こんにちは、ナレコム菅井です。
今回はMR and Azure312のアプリを作っていきます。
開発環境は以下のとおりです。
・Windows 10 Home
・Unity 2017.4.11f1
・Visual Studio Community 2017 version 15.9.7
・HoloLens
目標はHoloLensを介してボットと通信するアプリを実装していきます。それではさっそく始めていきましょう!
1.ボットアプリケーションの作成
ここではボットをASP.Net Core Webアプリとして作っていきます。
- Visual Studioを開き、[新しいプロジェクトの作成]をクリックします。

2.[ASP.NET Core Web アプリケーション]を選択し、名前をMyBotとして[OK]を押します。もし、[ASP.NET Core Web アプリケーション]がない場合は、Visual Studio Installerから該当する項目を追加します。

3.新たな画面にとんだら[Empty]を選択し、ターゲットが[ASP.NET Core 2.0]に、[認証なし]になっていることを確認して[OK]を押します。

4.ソリューションが開きますので、[ソリューション]を右クリックし[ソリューションのNuGetパッケージの管理]を選択します。

5.[参照]からMicrosoft.Bot.Builder.Integration.AspNet.Coreを検索し、[プロジェクト]にチェックをいれ(自動的にMyBotにもチェックが入り)、インストールします。バージョンは4.0.1-previewを選びます。他のバージョンだと後の工程でエラーが発生する可能性があります。

6.続いてMyBot(先ほど決めた名前)の上で右クリックし、[追加]->[クラス]を選択します。
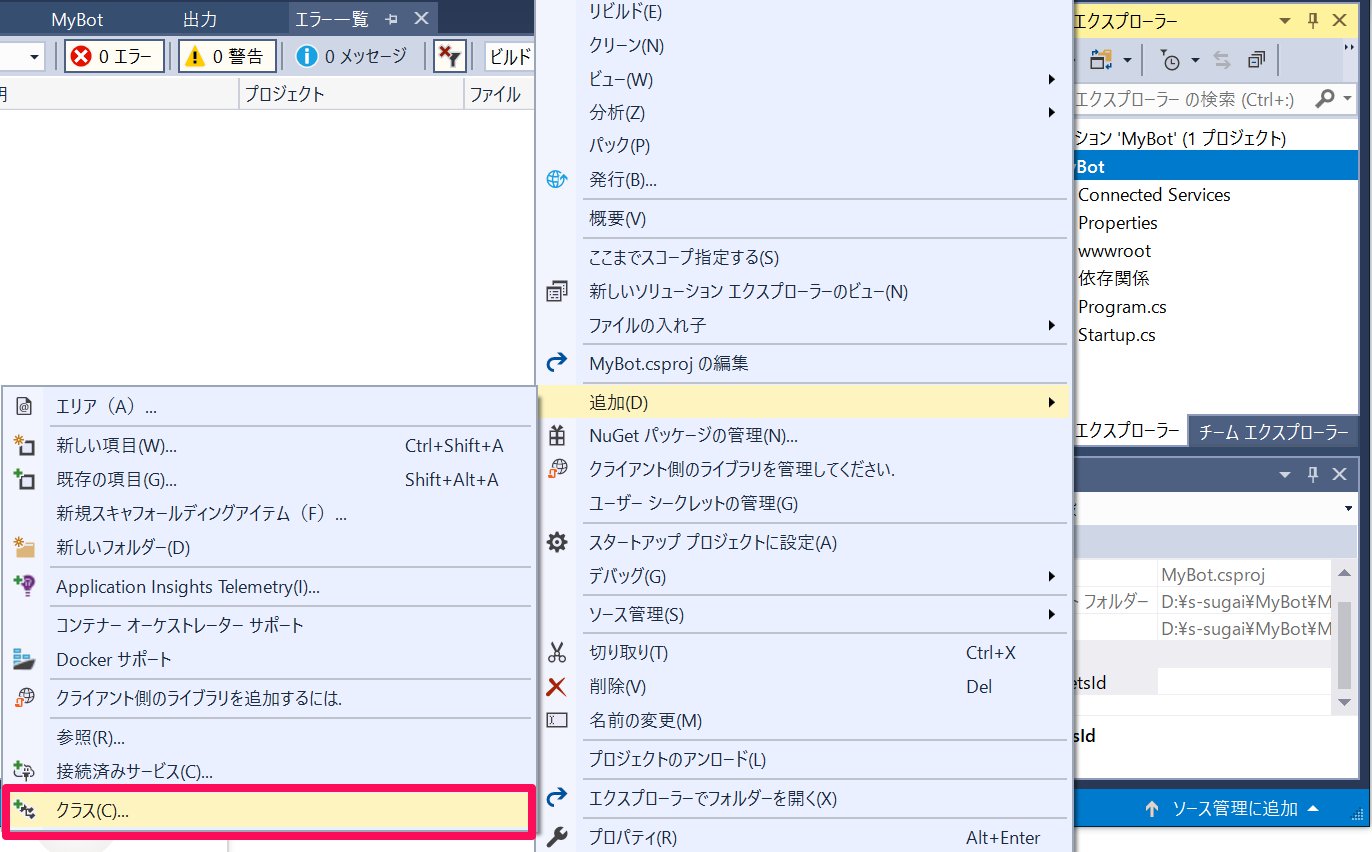
- [ASP.NET Core]->[コード]から[クラス]を選択し、名前をMyBot.csとして[追加]します。同様にしてConversationContext.csというクラスも作ります。

8.[MyBot]->[wwwroot]を右クリックして[追加]->[新しい項目]をクリックします。

9.[HTMLページ]を選択して名前をdefault.htmlとして[追加]します。

10.続いて、先程追加したC#のスクリプトを編集していきます。まず、ConversationContext.csに以下のように変更します。
namespace MyBot
{
public static class ConversationContext
{
internal static string userName;
internal static string userMsg;
}
}
11.次にMyBotクラスを編集してきます。コードは以下のとおりです。
using Microsoft.Bot;
using Microsoft.Bot.Builder;
using Microsoft.Bot.Schema;
using System.Threading.Tasks;
namespace MyBot
{
public class MyBot : IBot
{
public async Task OnTurn(ITurnContext context)
{
ConversationContext.userMsg = context.Activity.Text;
if (context.Activity.Type is ActivityTypes.Message)
{
if (string.IsNullOrEmpty(ConversationContext.userName))
{
ConversationContext.userName = ConversationContext.userMsg;
await context.SendActivity($"Hello {ConversationContext.userName}. Looks like today it is going to rain. \nLuckily I have umbrellas and waterproof jackets to sell!");
}
else
{
if (ConversationContext.userMsg.Contains("how much"))
{
if (ConversationContext.userMsg.Contains("umbrella")) await context.SendActivity($"Umbrellas are $13.");
else if (ConversationContext.userMsg.Contains("jacket")) await context.SendActivity($"Waterproof jackets are $30.");
else await context.SendActivity($"Umbrellas are $13. \nWaterproof jackets are $30.");
}
else if (ConversationContext.userMsg.Contains("color") || ConversationContext.userMsg.Contains("colour"))
{
await context.SendActivity($"Umbrellas are black. \nWaterproof jackets are yellow.");
}
else
{
await context.SendActivity($"Sorry {ConversationContext.userName}. I did not understand the question");
}
}
}
else
{
ConversationContext.userMsg = string.Empty;
ConversationContext.userName = string.Empty;
await context.SendActivity($"Welcome! \nI am the Weather Shop Bot \nWhat is your name?");
}
}
}
}
12.最後にStartup.csを変更します。このクラスはボットの初期化をします。
using Microsoft.AspNetCore.Builder;
using Microsoft.AspNetCore.Hosting;
using Microsoft.Bot.Builder.BotFramework;
using Microsoft.Bot.Builder.Integration.AspNet.Core;
using Microsoft.Extensions.Configuration;
using Microsoft.Extensions.DependencyInjection;
namespace MyBot
{
public class Startup
{
public IConfiguration Configuration { get; }
public Startup(IHostingEnvironment env)
{
var builder = new ConfigurationBuilder()
.SetBasePath(env.ContentRootPath)
.AddJsonFile("appsettings.json", optional: true, reloadOnChange: true)
.AddJsonFile($"appsettings.{env.EnvironmentName}.json", optional: true)
.AddEnvironmentVariables();
Configuration = builder.Build();
}
// This method gets called by the runtime. Use this method to add services to the container.
public void ConfigureServices(IServiceCollection services)
{
services.AddSingleton(_ => Configuration);
services.AddBot(options =>
{
options.CredentialProvider = new ConfigurationCredentialProvider(Configuration);
});
}
// This method gets called by the runtime. Use this method to configure the HTTP request pipeline.
public void Configure(IApplicationBuilder app, IHostingEnvironment env)
{
if (env.IsDevelopment())
{
app.UseDeveloperExceptionPage();
}
app.UseDefaultFiles();
app.UseStaticFiles();
app.UseBotFramework();
}
}
}
13.Program.csを開き以下のコードと同じであるかを確認します。
using Microsoft.AspNetCore;
using Microsoft.AspNetCore.Hosting;
namespace MyBot
{
public class Program
{
public static void Main(string[] args)
{
BuildWebHost(args).Run();
}
public static IWebHost BuildWebHost(string[] args) =>
WebHost.CreateDefaultBuilder(args)
.UseStartup()
.Build();
}
}
準備の第一段階は終了です。
2.Azure Botサービスを作成する
Azure でBotサービスのインスタンスを作っていきます。
1. Azure Portal
にログインします。
2.[リソースの作成]からWeb App Botで検索して、該当項目を選択し、[作成]します。

- Webアプリボットに関する情報を入力していきます。下と全て同じでなくても大丈夫です。入力し終えたら
[作成]します。これでサービスのデプロイが始まります。


- お知らせアイコンをクリックし、デプロイが終了して[リソースに移動]が表示されたら選択します。

- 作成したボットアプリが開きます。[チャンネル]を開き[おすすめチャンネルの追加]から下の図の左から二番目のアイコンを選択します。

- のちほど使うキーを保存します。XXXによって隠されているので、[表示]で表示し、コピーしておきます。

3.アプリの発行
- Visual Studioで一番最初に作成したMyBotに戻ります。
2.[MyBot]を右クリックし、[発行]をクリックします。

3.[発行先を選択]の画面から[App Service]を選び[既存のものを選択]にチェックを入れ、[発行]をクリックします。

4.[サブスクリプション]、[表示]ともにさきほどAzure Portalで作成したときのものにして、フォルダ構造から先ほどのアプリを選択し、[OK]をクリックします。これでアプリが公開されました。

4.Unityの設定
続いてUnityの設定を行っていきたいと思います。以下の手順で進めていきましょう。
1.Unityを開き、[New]から新しいプロジェクトをつくります。
名前をMR_360VideoStreamingとして、[Create project]をクリックします。

- [Build Settings..]からさまざまな項目を編集していきます。
[File]->[Build Settings..]を開きます。
a.プラットフォームの変更します
[PC, Mac & Linux Standalone]を[Universal Windows Platform]に変更し、[Switch Platform]をクリックします

b.[Player Settings..]を編集します。
[Player Settings..]をクリックします。

c.そのあと[Other Settings]、[Publishing Settings]->[Capabilities]、[XR Settings]を以下のように設定してきます。


[Build Settings..]の変更は以上です。続いて、[Unity C#]にチェックを入れます。

3.続いてシーンに名前をつけます。[Add Open Scene]をクリックし、新しいフォルダーをScenesとしてつくり、そこに名前をBotSceneとして[保存]します。フォルダーをシーンやスクリプトにわけて作ることでわかりやすくなります。

4.メインカメラの設定を行っていきます。[Hierarchy]->[Main Camera]を選択し、[Inspector]から[Transform]、[Camera]->[Clear Flags]、[Camera]->[Background]を変更します。

5.タグを追加します。メインカメラを選択したまま、[Inspector]->[Tag]から[Add Tag]を選択し、[BotTag]を追加します。このとき、メインカメラのタグにしないように注意してください。ただタグを追加するだけです。

2. Newtonsoftライブラリのインポートをします。まず
Newtonsoft ライブラリをダウンロードします[Assets]->[Import Package]->[Custom Package]を選び、ダウンロードしたNewtonsoftをフォルダの中から探し選択し、[Import]をクリックします。

7.Newtonsoftの中身を変更していきます。まず、さきほど追加した[Plugins]->[Newtonsoft.Json]を編集していきます。下の図のように変更し、[Apply]します。

- 続いて、[Plugins]->[WSA]->[Newtonsoft.Json]も編集します。同じように以下の図になるように編集して[Apply]します。

5.スクリプトの作成
ここでは5つのスクリプトを作成していきたいと思います。
・BotObjects
・GazeInput
・Bot
・Interactions
・SceneOrganiser
スクリプトの作り方はまず、すべてのスクリプトをまとめておくフォルダーを作成します。[Project]->[Create]をクリックし、[Folder]を選択して新しいフォルダーを作ります。名前をScriptsとします。続いて[Project]->[Create]->[C# Script]をクリックし、クラス名をつけていきます。

・BotObjects
このクラスはアプリで出てくるオブジェクトを一通り格納しています。コードは以下のとおりです。
using System;
using System.Collections;
using System.Collections.Generic;
using UnityEngine;
public class BotObjects : MonoBehaviour { }
/// <summary>
/// Object received when first opening a conversation
/// </summary>
[Serializable]
public class ConversationObject
{
public string ConversationId;
public string token;
public string expires_in;
public string streamUrl;
public string referenceGrammarId;
}
/// <summary>
/// Object including all Activities
/// </summary>
[Serializable]
public class ActivitiesRootObject
{
public List<Activity> activities { get; set; }
public string watermark { get; set; }
}
[Serializable]
public class Conversation
{
public string id { get; set; }
}
[Serializable]
public class From
{
public string id { get; set; }
public string name { get; set; }
}
[Serializable]
public class Activity
{
public string type { get; set; }
public string channelId { get; set; }
public Conversation conversation { get; set; }
public string id { get; set; }
public From from { get; set; }
public string text { get; set; }
public string textFormat { get; set; }
public DateTime timestamp { get; set; }
public string serviceUrl { get; set; }
}
・GazeInput
このクラスはユーザーの視線をカーソルとして作成し、視線があたったオブジェクトを検出します。コードは以下の通りです。
using System.Collections;
using System.Collections.Generic;
using UnityEngine;
/// <summary>
/// Class responsible for the User's gaze interactions
/// </summary>
[System.Serializable]
public class GazeInput : MonoBehaviour {
[Tooltip("Used to compare whether an object is to be interacted with.")]
internal string InteractibleTag = "BotTag";
/// <summary>
/// Length of the gaze
/// </summary>
internal float GazeMaxDistance = 300;
/// <summary>
/// Object currently gazed
/// </summary>
internal GameObject FocusedObject { get; private set; }
internal GameObject _oldFocusedObject { get; private set; }
internal RaycastHit HitInfo { get; private set; }
/// <summary>
/// Cursor object visible in the scene
/// </summary>
internal GameObject Cursor { get; private set; }
internal bool Hit { get; private set; }
internal Vector3 Position { get; private set; }
internal Vector3 Normal { get; private set; }
private Vector3 _gazeOrigin;
private Vector3 _gazeDirection;
/// <summary>
/// Start method used upon initialization.
/// </summary>
internal virtual void Start()
{
FocusedObject = null;
Cursor = CreateCursor();
}
/// <summary>
/// Method to create a cursor object.
/// </summary>
internal GameObject CreateCursor()
{
GameObject newCursor = GameObject.CreatePrimitive(PrimitiveType.Sphere);
newCursor.SetActive(false);
// Remove the collider, so it does not block Raycast.
Destroy(newCursor.GetComponent<SphereCollider>());
newCursor.transform.localScale = new Vector3(0.05f, 0.05f, 0.05f);
Material mat = new Material(Shader.Find("Diffuse"));
newCursor.GetComponent<MeshRenderer>().material = mat;
mat.color = Color.HSVToRGB(0.0223f, 0.7922f, 1.000f);
newCursor.SetActive(true);
return newCursor;
}
/// <summary>
/// Called every frame
/// </summary>
internal virtual void Update()
{
_gazeOrigin = Camera.main.transform.position;
_gazeDirection = Camera.main.transform.forward;
UpdateRaycast();
}
/// <summary>
/// Reset the old focused object, stop the gaze timer, and send data if it
/// is greater than one.
/// </summary>
private void ResetFocusedObject()
{
// Ensure the old focused object is not null.
if (_oldFocusedObject != null)
{
if (_oldFocusedObject.CompareTag(InteractibleTag))
{
// Provide the OnGazeExited event.
_oldFocusedObject.SendMessage("OnGazeExited",
SendMessageOptions.DontRequireReceiver);
}
}
}
private void UpdateRaycast()
{
// Set the old focused gameobject.
_oldFocusedObject = FocusedObject;
RaycastHit hitInfo;
// Initialize Raycasting.
Hit = Physics.Raycast(_gazeOrigin,
_gazeDirection,
out hitInfo,
GazeMaxDistance);
HitInfo = hitInfo;
// Check whether raycast has hit.
if (Hit == true)
{
Position = hitInfo.point;
Normal = hitInfo.normal;
// Check whether the hit has a collider.
if (hitInfo.collider != null)
{
// Set the focused object with what the user just looked at.
FocusedObject = hitInfo.collider.gameObject;
}
else
{
// Object looked on is not valid, set focused gameobject to null.
FocusedObject = null;
}
}
else
{
// No object looked upon, set focused gameobject to null.
FocusedObject = null;
// Provide default position for cursor.
Position = gazeOrigin + (gazeDirection * GazeMaxDistance);
// Provide a default normal.
Normal = _gazeDirection;
}
// Lerp the cursor to the given position, which helps to stabilize the gaze.
Cursor.transform.position = Vector3.Lerp(Cursor.transform.position, Position, 0.6f);
// Check whether the previous focused object is this same. If so, reset the focused object.
if (FocusedObject != _oldFocusedObject)
{
ResetFocusedObject();
if (FocusedObject != null)
{
if (FocusedObject.CompareTag(InteractibleTag))
{
// Provide the OnGazeEntered event.
FocusedObject.SendMessage("OnGazeEntered",
SendMessageOptions.DontRequireReceiver);
}
}
}
}
}
・Bot
このクラスはWeb App Botの認証情報を取得したり、Web App Botとの会話に必要な操作を行ったりと重要な役割を担っています。コードは以下のとおりです。–Insert your key–に先ほど保存したキーを挿入します。
using System.Collections;
using System.Collections.Generic;
using UnityEngine;
using Newtonsoft.Json;
using System.Text;
using UnityEngine.Networking;
using UnityEngine.Windows.Speech;
public class Bot : MonoBehaviour {
/// <summary>
/// Static instance of this class
/// </summary>
public static Bot Instance;
/// <summary>
/// Material of the sphere representing the Bot in the scene
/// </summary>
internal Material botMaterial;
/// <summary>
/// Speech recognizer class reference, which will convert speech to text.
/// </summary>
private DictationRecognizer dictationRecognizer;
/// <summary>
/// Use this variable to identify the Bot Id
/// Can be any value
/// </summary>
private string botId = "MRBotId";
/// <summary>
/// Use this variable to identify the Bot Name
/// Can be any value
/// </summary>
private string botName = "MRBotName";
/// <summary>
/// The Bot Secret key found on the Web App Bot Service on the Azure Portal
/// </summary>
private string botSecret = "--Insert your key--";
/// <summary>
/// Bot Endpoint, v4 Framework uses v3 endpoint at this point in time
/// </summary>
private string botEndpoint = "https://directline.botframework.com/v3/directline";
/// <summary>
/// The conversation object reference
/// </summary>
private ConversationObject conversation;
/// <summary>
/// Bot states to regulate the application flow
/// </summary>
internal enum BotState { ReadyToListen, Listening, Processing }
/// <summary>
/// Flag for the Bot state
/// </summary>
internal BotState botState;
/// <summary>
/// Flag for the conversation status
/// </summary>
internal bool conversationStarted = false;
/// <summary>
/// Called on Initialization
/// </summary>
void Awake()
{
Instance = this;
}
/// <summary>
/// Called immediately after Awake method
/// </summary>
void Start()
{
botState = BotState.ReadyToListen;
}
/// <summary>
/// Start microphone capture.
/// </summary>
public void StartCapturingAudio()
{
botState = BotState.Listening;
botMaterial.color = Color.red;
// Start dictation
dictationRecognizer = new DictationRecognizer();
dictationRecognizer.DictationResult += DictationRecognizer_DictationResult;
dictationRecognizer.Start();
}
/// <summary>
/// Stop microphone capture.
/// </summary>
public void StopCapturingAudio()
{
botState = BotState.Processing;
dictationRecognizer.Stop();
}
/// <summary>
/// This handler is called every time the Dictation detects a pause in the speech.
/// </summary>
private void DictationRecognizer_DictationResult(string text, ConfidenceLevel confidence)
{
// Update UI with dictation captured
Debug.Log($"User just said: {text}");
// Send dictation to Bot
StartCoroutine(SendMessageToBot(text, botId, botName, "message"));
StopCapturingAudio();
}
/// <summary>
/// Request a conversation with the Bot Service
/// </summary>
internal IEnumerator StartConversation()
{
string conversationEndpoint = string.Format("{0}/conversations", botEndpoint);
WWWForm webForm = new WWWForm();
using (UnityWebRequest unityWebRequest = UnityWebRequest.Post(conversationEndpoint, webForm))
{
unityWebRequest.SetRequestHeader("Authorization", "Bearer " + botSecret);
unityWebRequest.downloadHandler = new DownloadHandlerBuffer();
yield return unityWebRequest.SendWebRequest();
string jsonResponse = unityWebRequest.downloadHandler.text;
conversation = new ConversationObject();
conversation = JsonConvert.DeserializeObject<ConversationObject>(jsonResponse);
Debug.Log($"Start Conversation - Id: {conversation.ConversationId}");
conversationStarted = true;
}
// The following call is necessary to create and inject an activity of type //"conversationUpdate" to request a first "introduction" from the Bot Service.
StartCoroutine(SendMessageToBot("", botId, botName, "conversationUpdate"));
}
/// <summary>
/// Send the user message to the Bot Service in form of activity
/// and call for a response
/// </summary>
private IEnumerator SendMessageToBot(string message, string fromId, string fromName, string activityType)
{
Debug.Log($"SendMessageCoroutine: {conversation.ConversationId}, message: {message} from Id: {fromId} from name: {fromName}");
// Create a new activity here
Activity activity = new Activity();
activity.from = new From();
activity.conversation = new Conversation();
activity.from.id = fromId;
activity.from.name = fromName;
activity.text = message;
activity.type = activityType;
activity.channelId = "DirectLineChannelId";
activity.conversation.id = conversation.ConversationId;
// Serialize the activity
string json = JsonConvert.SerializeObject(activity);
string sendActivityEndpoint = string.Format("{0}/conversations/{1}/activities", botEndpoint, conversation.ConversationId);
// Send the activity to the Bot
using (UnityWebRequest www = new UnityWebRequest(sendActivityEndpoint, "POST"))
{
www.uploadHandler = new UploadHandlerRaw(Encoding.UTF8.GetBytes(json));
www.downloadHandler = new DownloadHandlerBuffer();
www.SetRequestHeader("Authorization", "Bearer " + botSecret);
www.SetRequestHeader("Content-Type", "application/json");
yield return www.SendWebRequest();
// extrapolate the response Id used to keep track of the conversation
string jsonResponse = www.downloadHandler.text;
string cleanedJsonResponse = jsonResponse.Replace("\r\n", string.Empty);
string responseConvId = cleanedJsonResponse.Substring(10, 30);
// Request a response from the Bot Service
StartCoroutine(GetResponseFromBot(activity));
}
}
/// <summary>
/// Request a response from the Bot by using a previously sent activity
/// </summary>
private IEnumerator GetResponseFromBot(Activity activity)
{
string getActivityEndpoint = string.Format("{0}/conversations/{1}/activities", botEndpoint, conversation.ConversationId);
using (UnityWebRequest unityWebRequest1 = UnityWebRequest.Get(getActivityEndpoint))
{
unityWebRequest1.downloadHandler = new DownloadHandlerBuffer();
unityWebRequest1.SetRequestHeader("Authorization", "Bearer " + botSecret);
yield return unityWebRequest1.SendWebRequest();
string jsonResponse = unityWebRequest1.downloadHandler.text;
ActivitiesRootObject root = new ActivitiesRootObject();
root = JsonConvert.DeserializeObject<ActivitiesRootObject>(jsonResponse);
foreach (var act in root.activities)
{
Debug.Log($"Bot Response: {act.text}");
SetBotResponseText(act.text);
}
botState = BotState.ReadyToListen;
botMaterial.color = Color.blue;
}
}
/// <summary>
/// Set the UI Response Text of the bot
/// </summary>
internal void SetBotResponseText(string responseString)
{
SceneOrganiser.Instance.botResponseText.text = responseString;
}
}
・Interactions
このクラスはユーザーのエアタップ動作を検出し、ボットの状態に合わせてUIテキストの表示の変更を行います。コードは以下のとおりです。
using System.Collections;
using System.Collections.Generic;
using UnityEngine;
using UnityEngine.XR.WSA.Input;
public class Interactions : GazeInput {
/// <summary>
/// Allows input recognition with the HoloLens
/// </summary>
private GestureRecognizer _gestureRecognizer;
/// <summary>
/// Called on initialization, after Awake
/// </summary>
internal override void Start()
{
base.Start();
//Register the application to recognize HoloLens user inputs
_gestureRecognizer = new GestureRecognizer();
_gestureRecognizer.SetRecognizableGestures(GestureSettings.Tap);
gestureRecognizer.Tapped += GestureRecognizerTapped;
_gestureRecognizer.StartCapturingGestures();
}
/// <summary>
/// Detects the User Tap Input
/// </summary>
private void GestureRecognizer_Tapped(TappedEventArgs obj)
{
// Ensure the bot is being gazed upon.
if (base.FocusedObject != null)
{
// If the user is tapping on Bot and the Bot is ready to listen
if (base.FocusedObject.name == "Bot" && Bot.Instance.botState == Bot.BotState.ReadyToListen)
{
// If a conversation has not started yet, request one
if (Bot.Instance.conversationStarted)
{
Bot.Instance.SetBotResponseText("Listening...");
Bot.Instance.StartCapturingAudio();
}
else
{
Bot.Instance.SetBotResponseText("Requesting Conversation...");
StartCoroutine(Bot.Instance.StartConversation());
}
}
}
}
}
・SceneOrganiser
このクラスはメインカメラにコンポーネントとスクリプトの追加をして、シーン内に適切にオブジェクトを配置していきます。コードは以下のとおりです。
using System.Collections;
using System.Collections.Generic;
using UnityEngine;
public class SceneOrganiser : MonoBehaviour {
/// <summary>
/// Static instance of this class
/// </summary>
public static SceneOrganiser Instance;
/// <summary>
/// The 3D text representing the Bot response
/// </summary>
internal TextMesh botResponseText;
/// <summary>
/// Called on Initialization
/// </summary>
private void Awake()
{
Instance = this;
}
/// <summary>
/// Called immediately after Awake method
/// </summary>
void Start()
{
// Add the GazeInput class to this object
gameObject.AddComponent<GazeInput>();
// Add the Interactions class to this object
gameObject.AddComponent<Interactions>();
// Create the Bot in the scene
CreateBotInScene();
}
/// <summary>
/// Create the Sign In button object in the scene
/// and sets its properties
/// </summary>
private void CreateBotInScene()
{
GameObject botObjInScene = GameObject.CreatePrimitive(PrimitiveType.Sphere);
botObjInScene.name = "Bot";
// Add the Bot class to the Bot GameObject
botObjInScene.AddComponent<Bot>();
// Create the Bot UI
botResponseText = CreateBotResponseText();
// Set properties of Bot GameObject
Bot.Instance.botMaterial = new Material(Shader.Find("Diffuse"));
botObjInScene.GetComponent<Renderer>().material = Bot.Instance.botMaterial;
Bot.Instance.botMaterial.color = Color.blue;
botObjInScene.transform.position = new Vector3(0f, 2f, 10f);
botObjInScene.tag = "BotTag";
}
/// <summary>
/// Spawns cursor for the Main Camera
/// </summary>
private TextMesh CreateBotResponseText()
{
// Create a sphere as new cursor
GameObject textObject = new GameObject();
textObject.transform.parent = Bot.Instance.transform;
textObject.transform.localPosition = new Vector3(0, 1, 0);
// Resize the new cursor
textObject.transform.localScale = new Vector3(0.1f, 0.1f, 0.1f);
// Creating the text of the Label
TextMesh textMesh = textObject.AddComponent<TextMesh>();
textMesh.anchor = TextAnchor.MiddleCenter;
textMesh.alignment = TextAlignment.Center;
textMesh.fontSize = 50;
textMesh.text = "Hi there, tap on me and I will start listening.";
return textMesh;
}
}
記述し終えたら、このスクリプトをMain CameraにD&Dします。

6.ビルド
[File]->[Build Settings..]->[Build]の順に選択します。新しいフォルダー(App)を作成し、このフォルダーを選択し、保存します。
この後の手順については こちら を参照してください。
HoloLensで実行した時の様子です。1章で記述したMyBot.csのWeather Botと接続できているのが確認できます。

さらにオブジェクトを見ながらエアタップすると聞き取りが始まることが確認できました。

以上となります。 お疲れ様でした。