こんにちは、ナレコム菅井です。
今回はMR and Azure307のアプリを作っていきます。
開発環境は以下の通りです。
・Windows
・Unity 2017.4.11f1
・visual studio2017
・HoloLens
目標はHoloLensでAzureのMachine Learning を使ったアプリを作ることです。AzureのMachine
Learning Studioにはたくさんの機械学習アルゴリズムがあり、その中から選択して自分のタスクにあったアゴリズムを簡単に実装できます。今回はあらかじめ用意されている購買データから、その日に最も選ばれる確率の高い3つのアイテムをHoloLens上で表示するようにします。それではさっそく始めていきましょう!
1.準備(1)
ステップ1. Storage Accountの作成
ステップ2. Machine Learning Studio Workspaceの作成
ステップ1
1. Azure Portalにログインします。
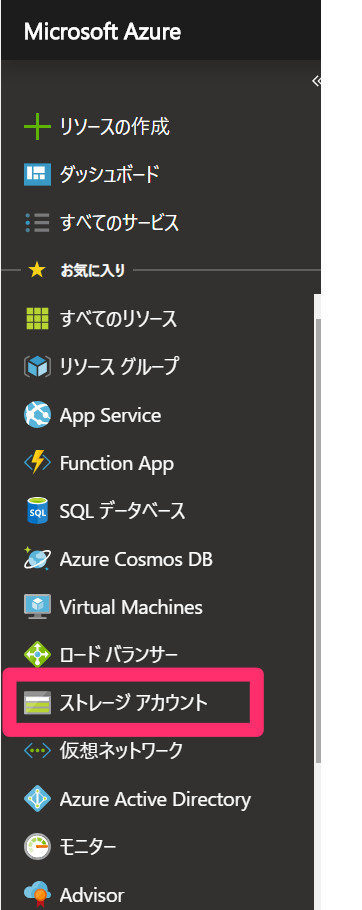
2. ストレージアカウントを作成します。左側のリストから[ストレージアカウント]を選択します。
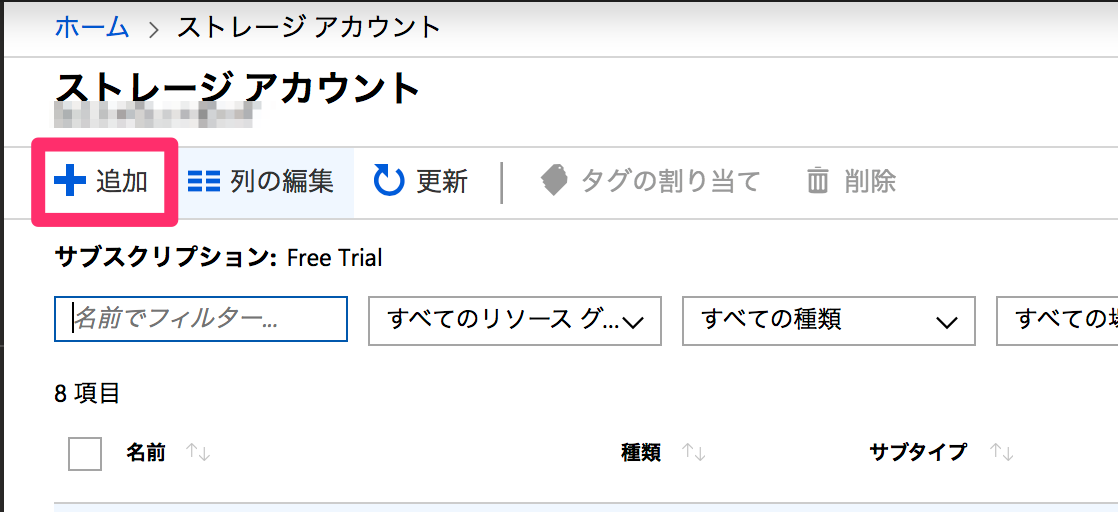
3. [追加]をクリックします。
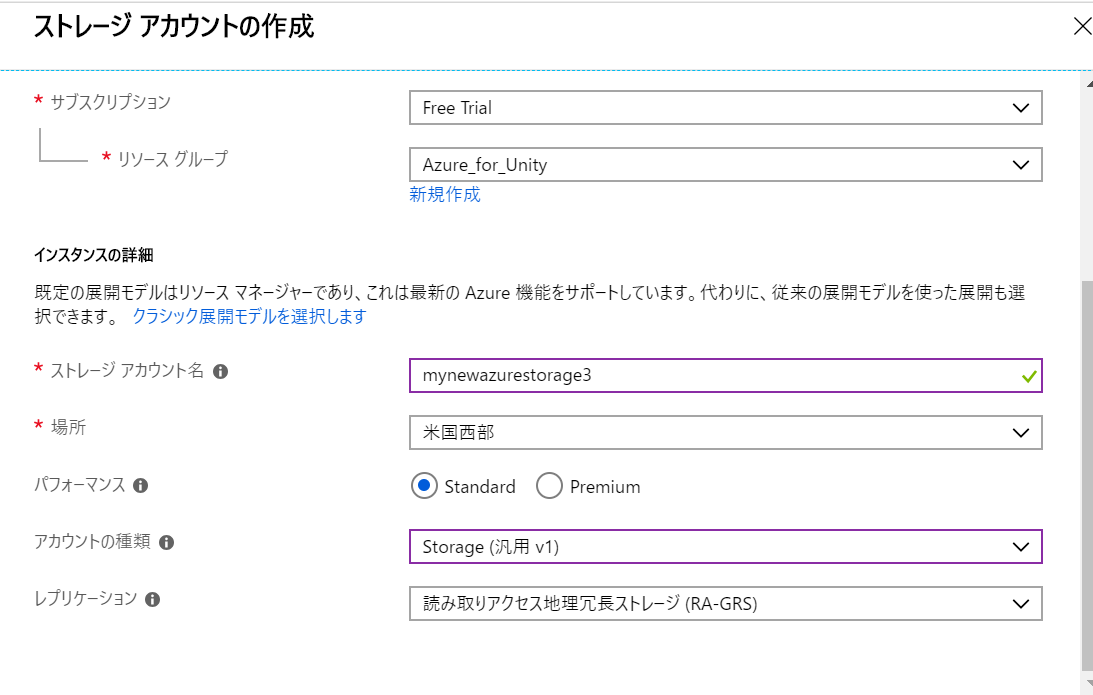
4. アカウント情報の入力画面になるので、必要な情報を入力していきます。[アカウントの種類]はStorage(汎用1 v)、[レプリケーション]は読み取りアクセス地理冗長ストレージ(RA-GRS)とし、[安全な転送が必須]を無効とします。入力し終わったあと[確認および作成]をクリックします。※写真は例です。
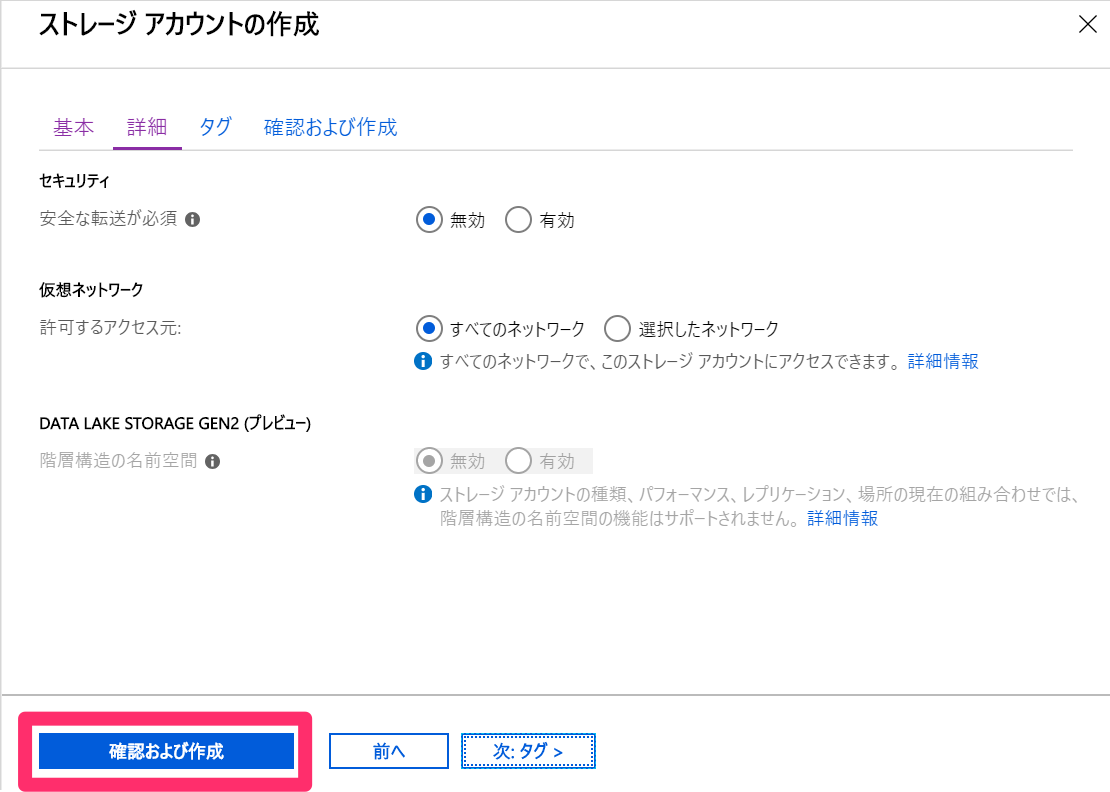
5. 入力情報の確認画面が出てくるので、確認して[作成]をクリックします。
![]()
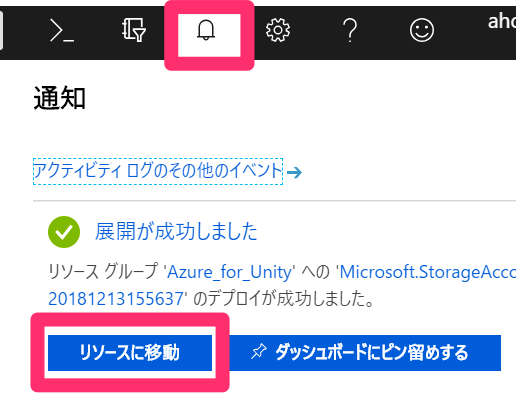
6. お知らせタブをクリックし、デプロイが完了したことを確認します。
ステップ2
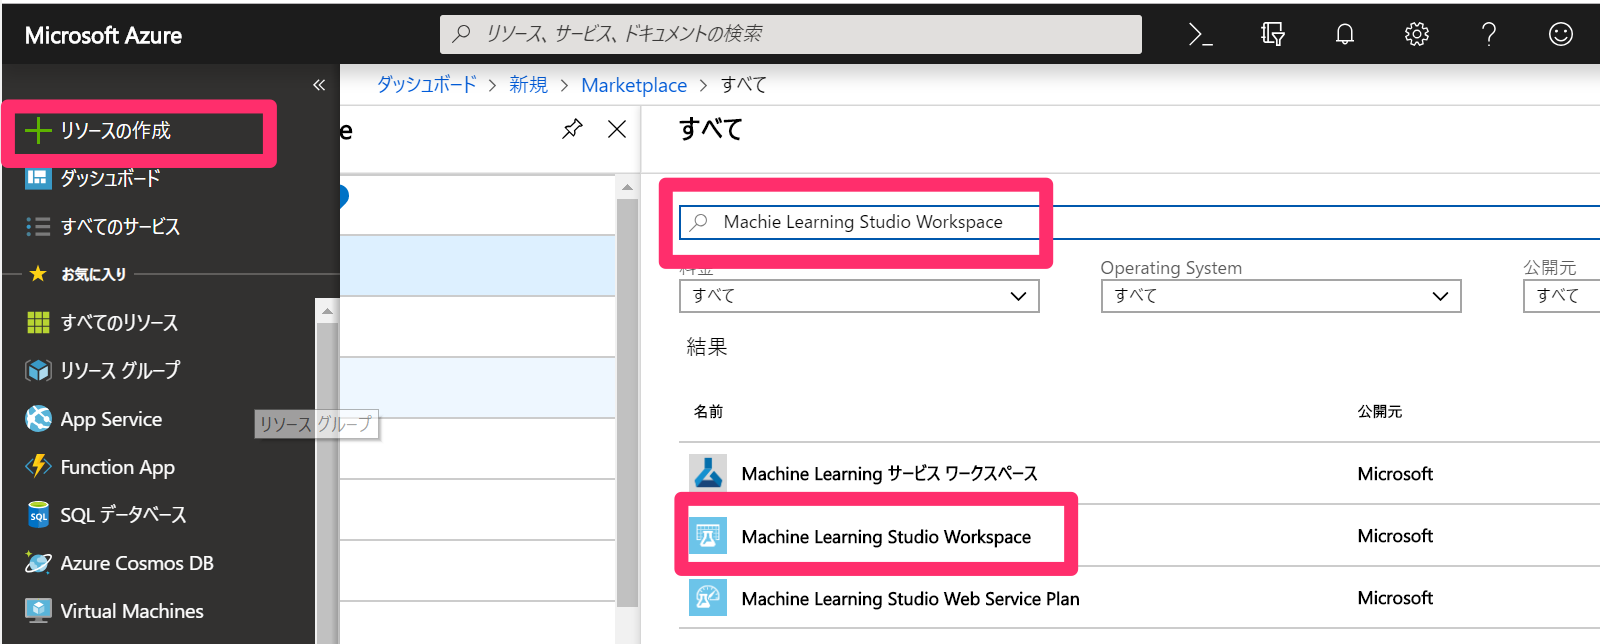
1. Azure Portalにログインしたまま、[リソースの作成]を開きMachine Learning Studio Workspaceと検索し、該当するアイコンを選択します。
2. Machine Learning Studio Workspaceの説明画面にスライドしますので、[作成]をクリックします。
![]()
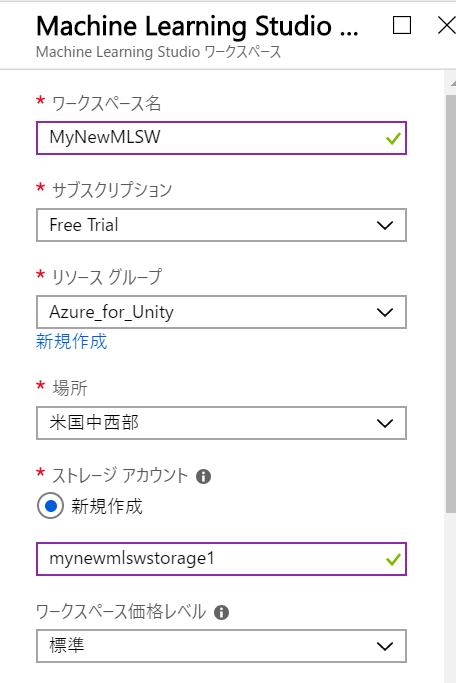
3. サービスの入力画面になるので、必要な情報を入力してきます。ストレージアカウントは先ほど作ったものを割り当てます。全て入力し終えたら、[作成]をクリックします。※下の画像は例です
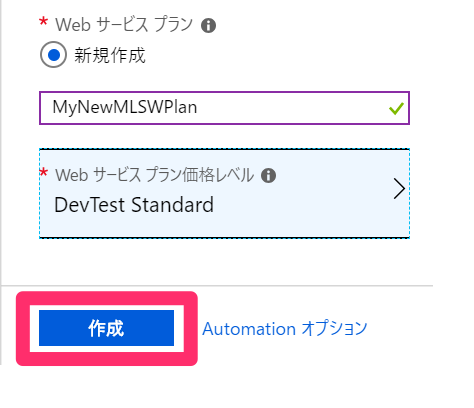
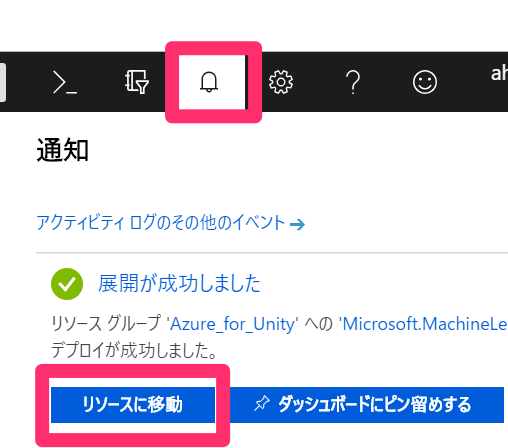
4. お知らせタブをクリックし、デプロイが完了したら、[リソースへ移動]します。
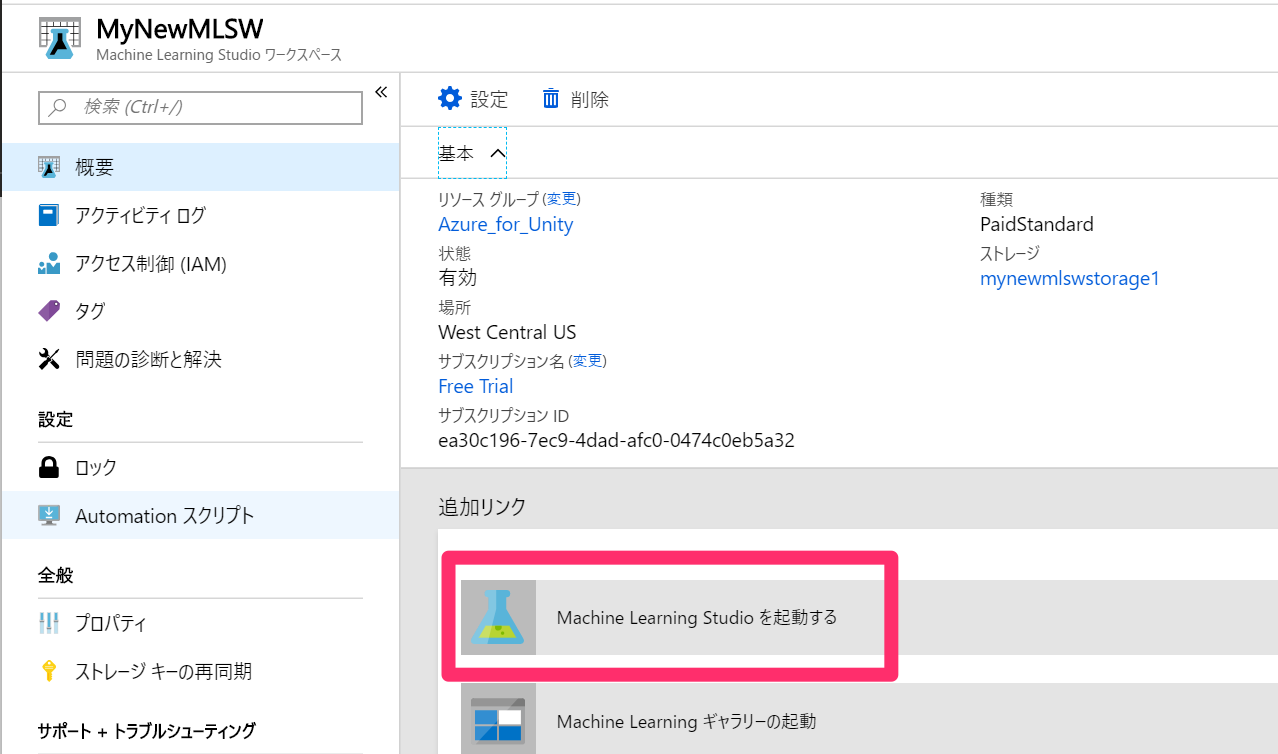
5. 今作成したMachine Learning Studio Workspaceに移動したら、[Machine Learning Studioを起動する]を選択します。
2.準備(2)
前の章の続きからです。この章ではMachine Learning Studioでアルゴリズムの選択などを行なっていき、モデルを作りたいと思います。
0. 今回使うデータ(ProductsTableCSV.csv)をダウンロードします。
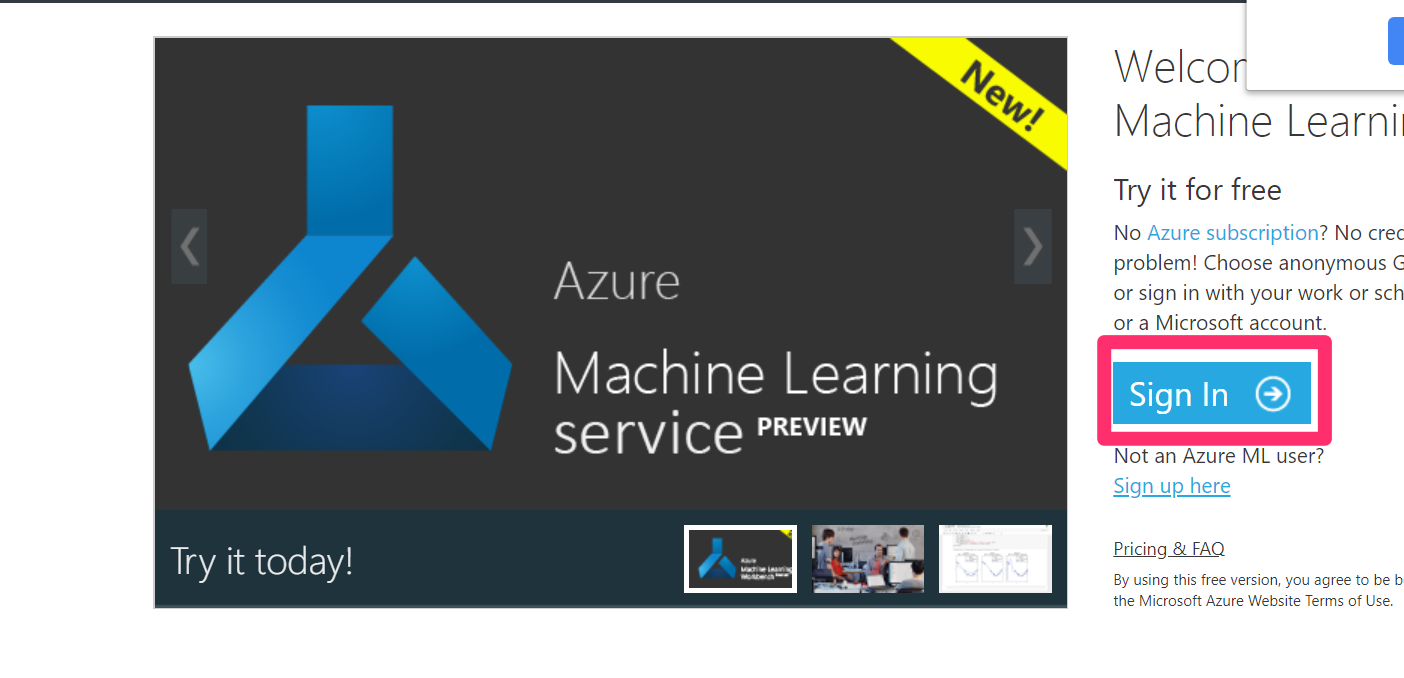
1. Azure Machine Learning Workbenchに[Sign In]します。
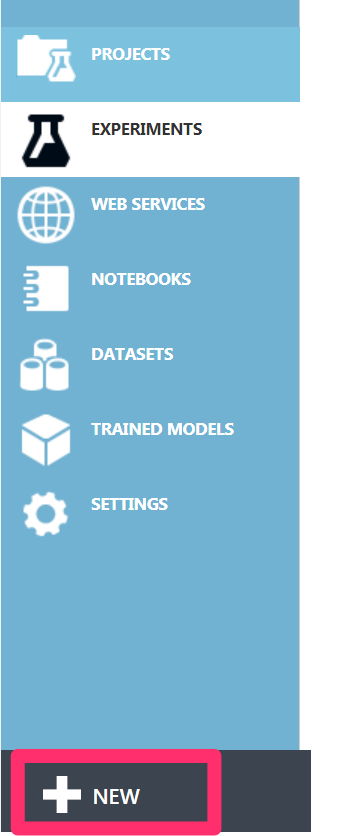
2. 画面左下の[+ NEW]をクリックします。
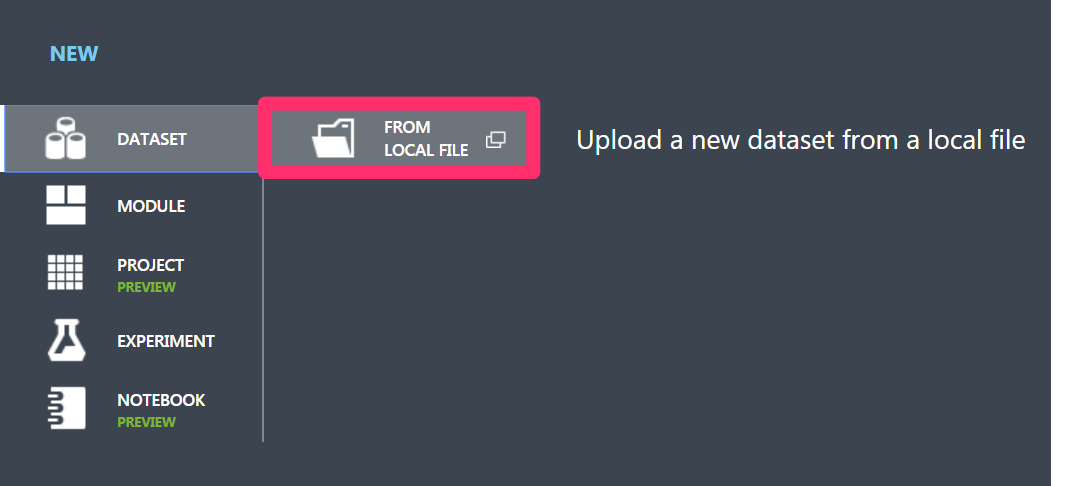
3. [DATASET]->[FROM LOCAL FILE]をクリックします。
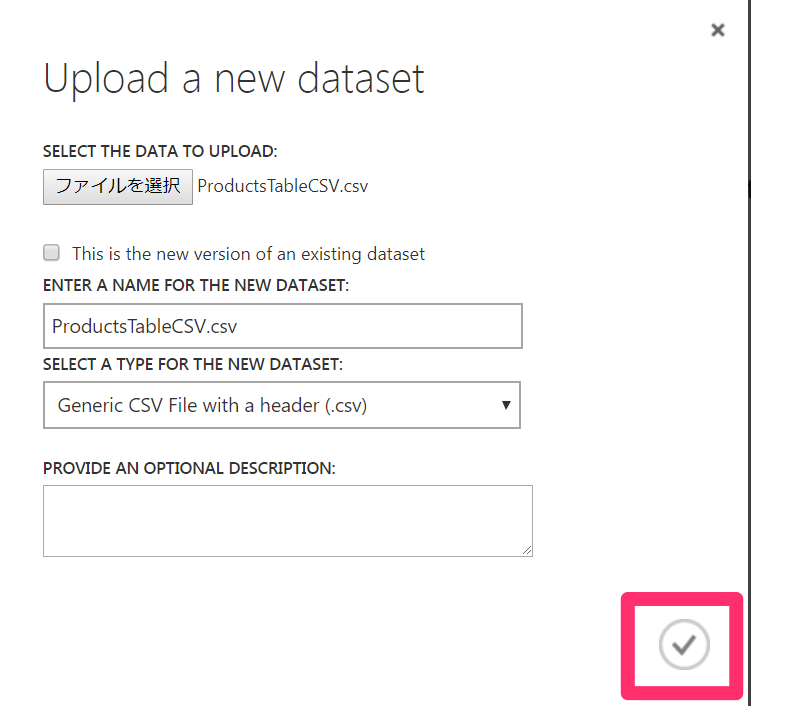
4. 先ほどダウンロードしたProductsTableCSVファイルを選択します。最後に右下のチェックボックスにチェックを入れます。
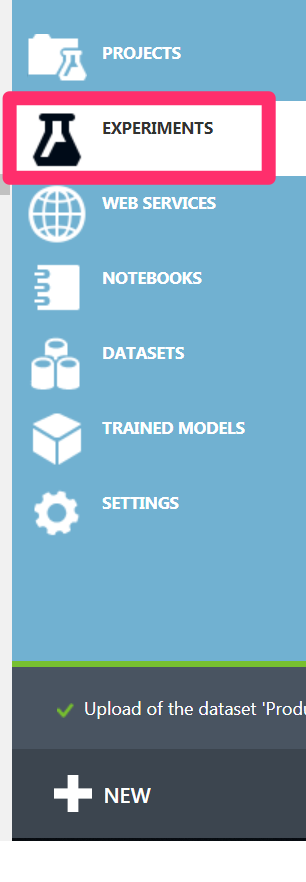
5. 続いて[EXPERIMENT]を選択します。
6. ここで学習の流れを組み立てていきます。以下の手順で進めていきます。
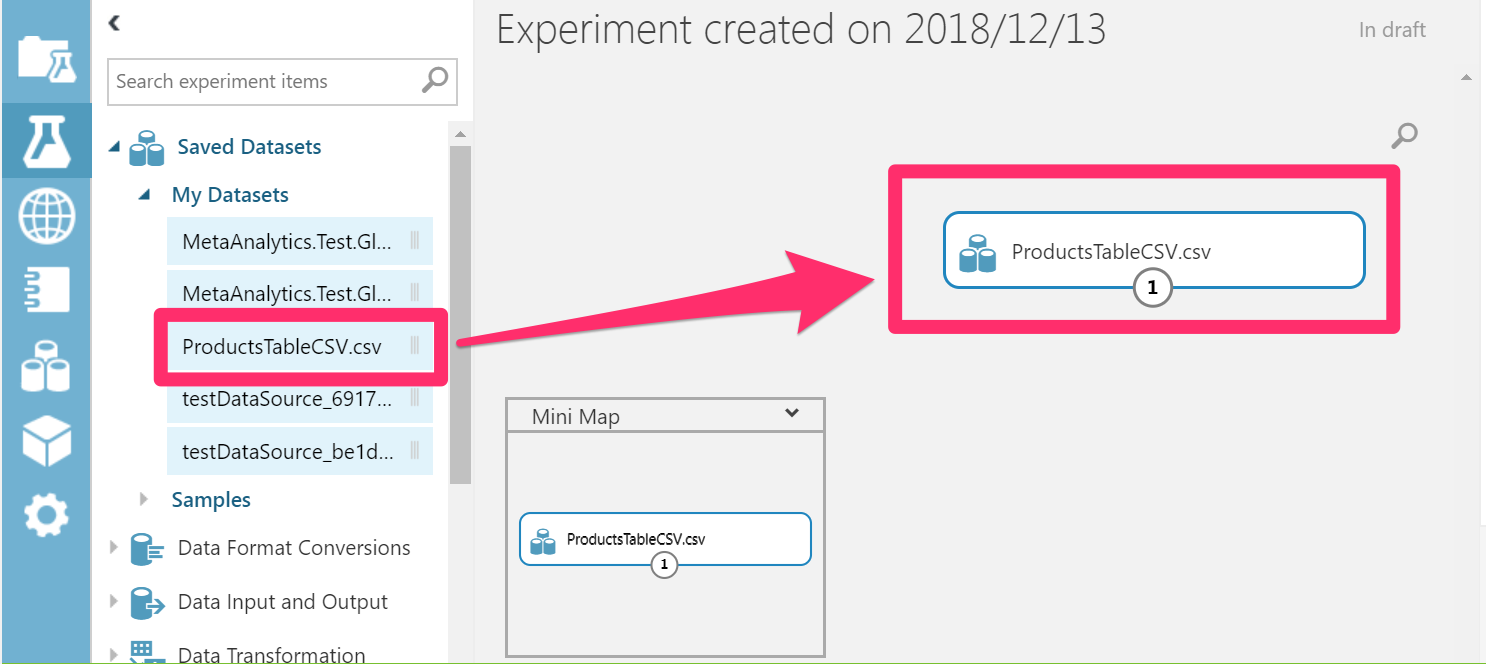
a. [Saved Datasets]->[My Datasets]から先ほどアップした[ProductsTableCSV]を[Experiment Panel]にD&Dします。
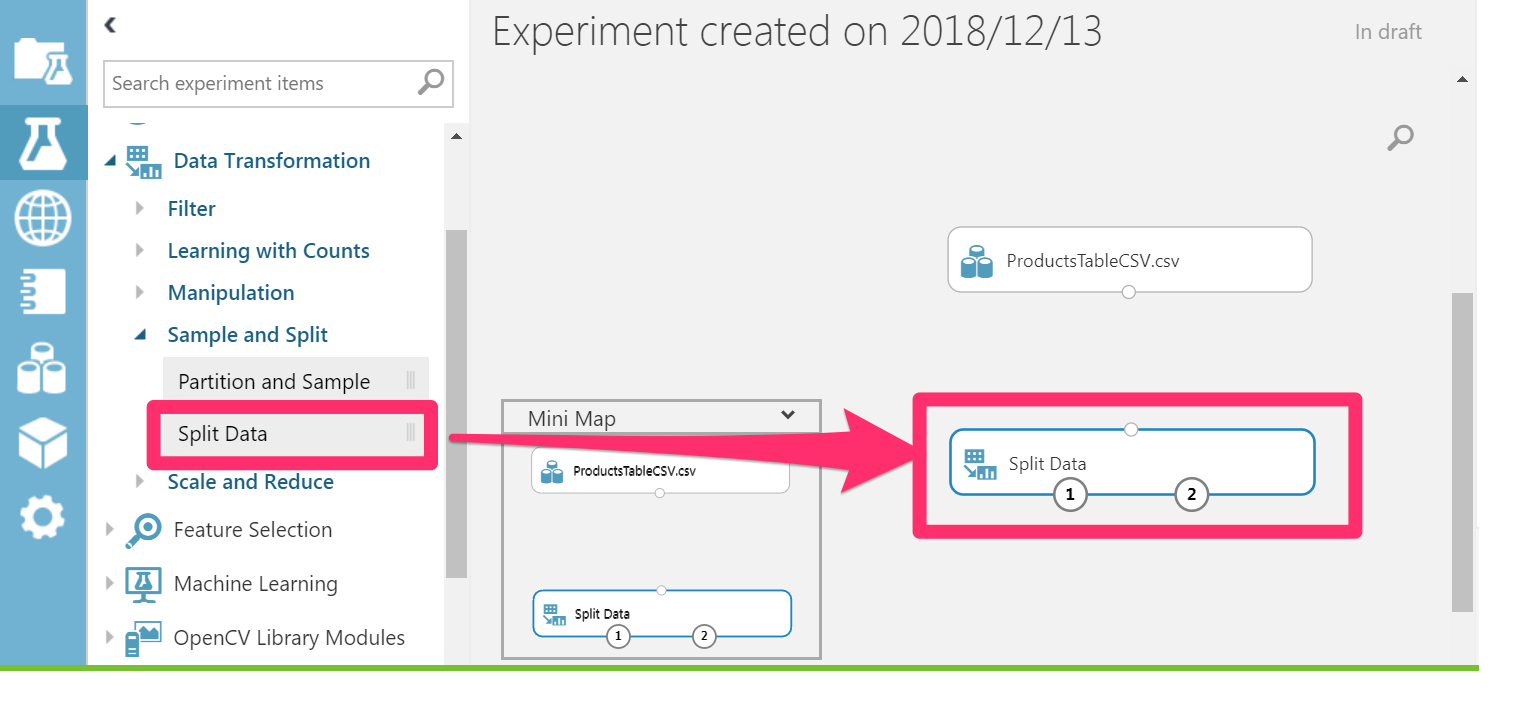
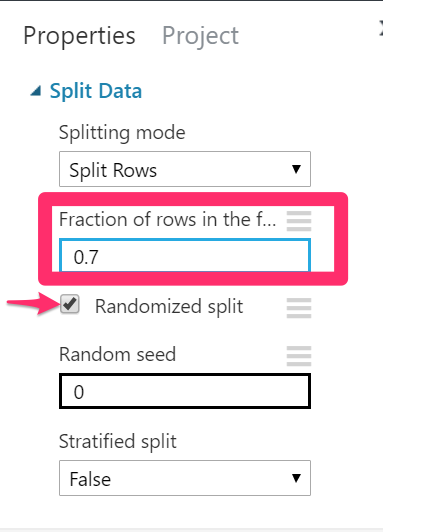
b. [Data Transformation]->[Sample and Split]から[Split Data]を選択して[Experiment Panel]にD&Dします。また、右側の[Properties] を編集してきます。[Fraction of rows in the first output dataset]を0.7に、[Randomized split]にチェックを入れます。これでデータがランダムに0.7:0.3に分割されました。
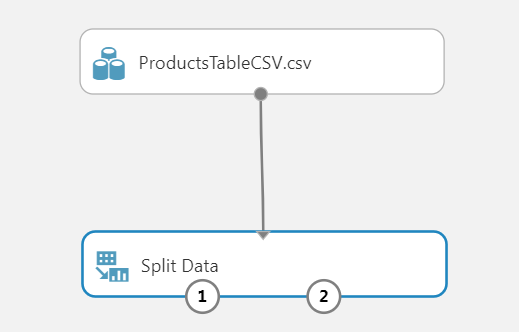
c. [Experiment Panel]内で[ProductsTableCSV]と[Split Data]を繋ぎます。
d. [Machine Learning]->[Train]から[Train Model]を選択して [Experiment Panel]にD&Dします。
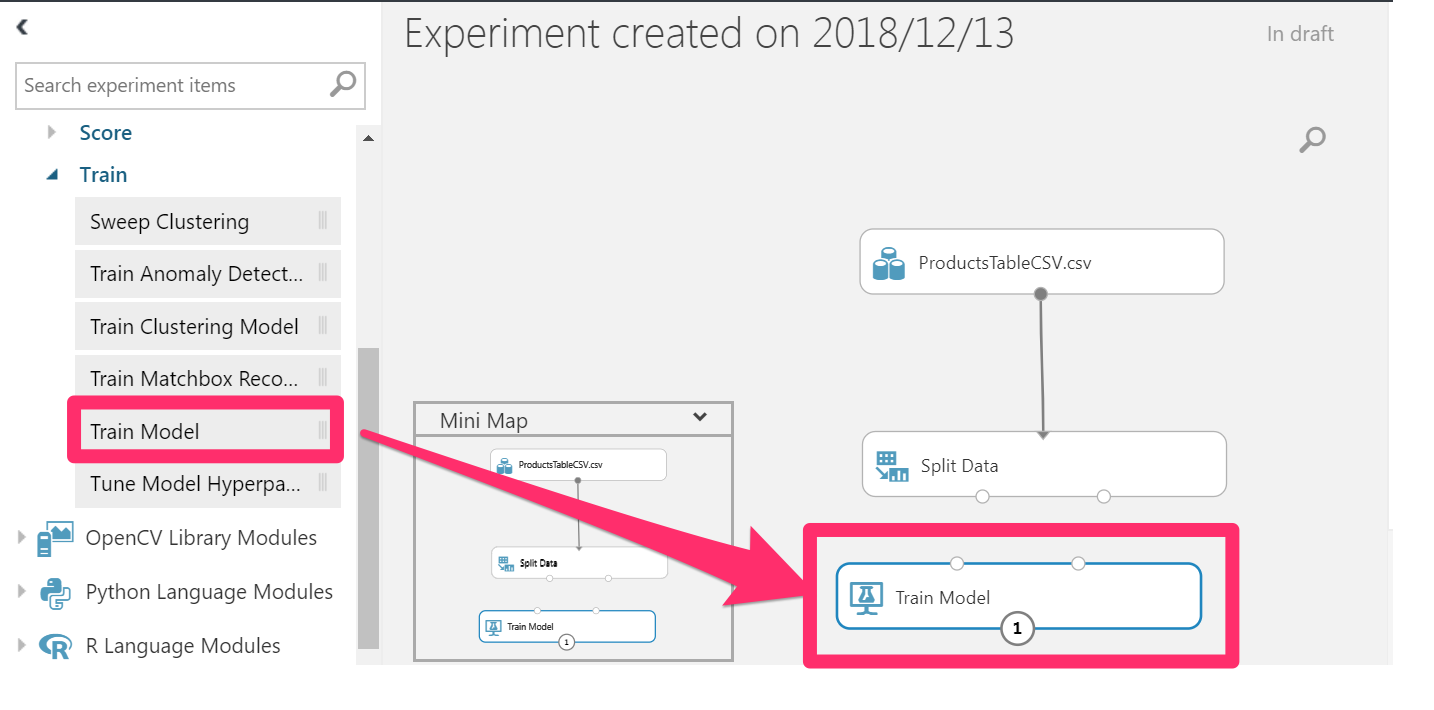
e. [Split Data]の左下の点と[Train Model]の右上の点をつなぎます。
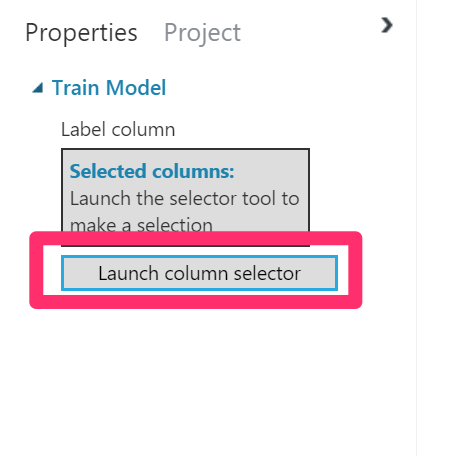
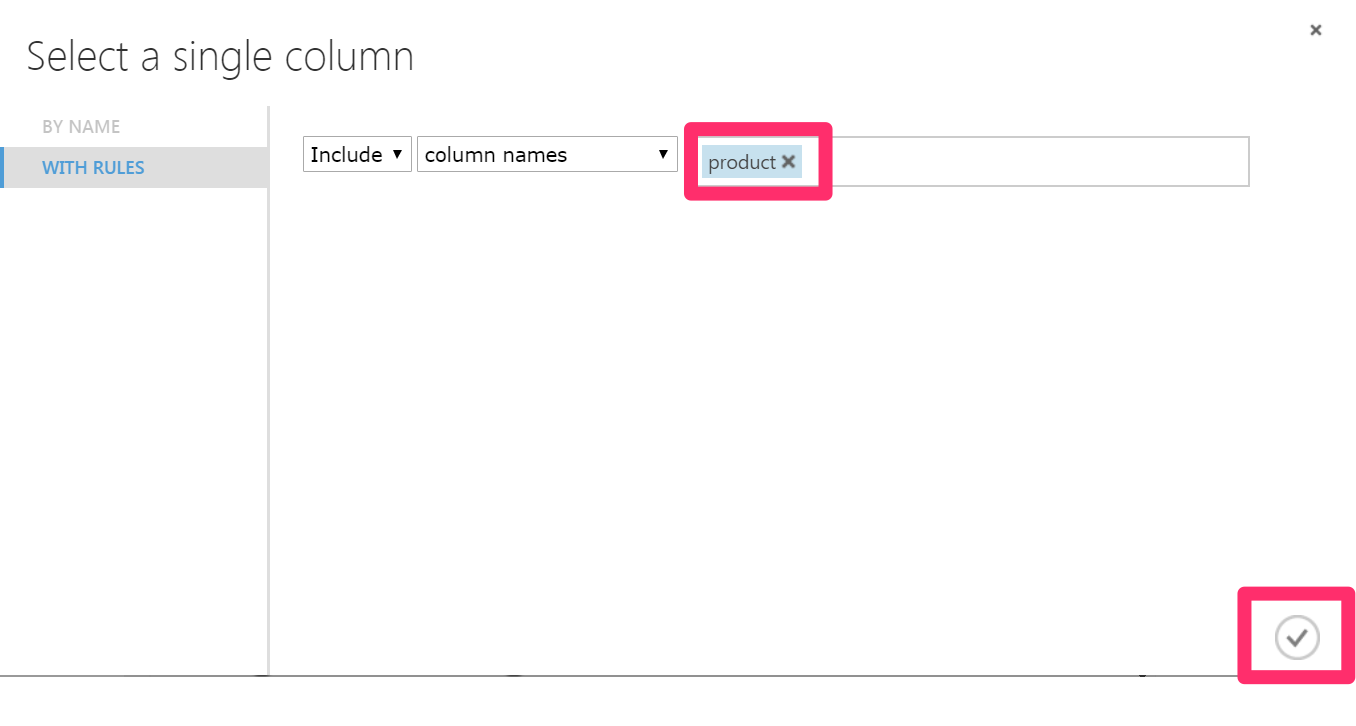
f. [Train Model]の[Properties]->[Launch column selector]をクリックし、ポップした画面の右側のボックスにproductを入力し, 右下のチェックマークにチェックを入れます。
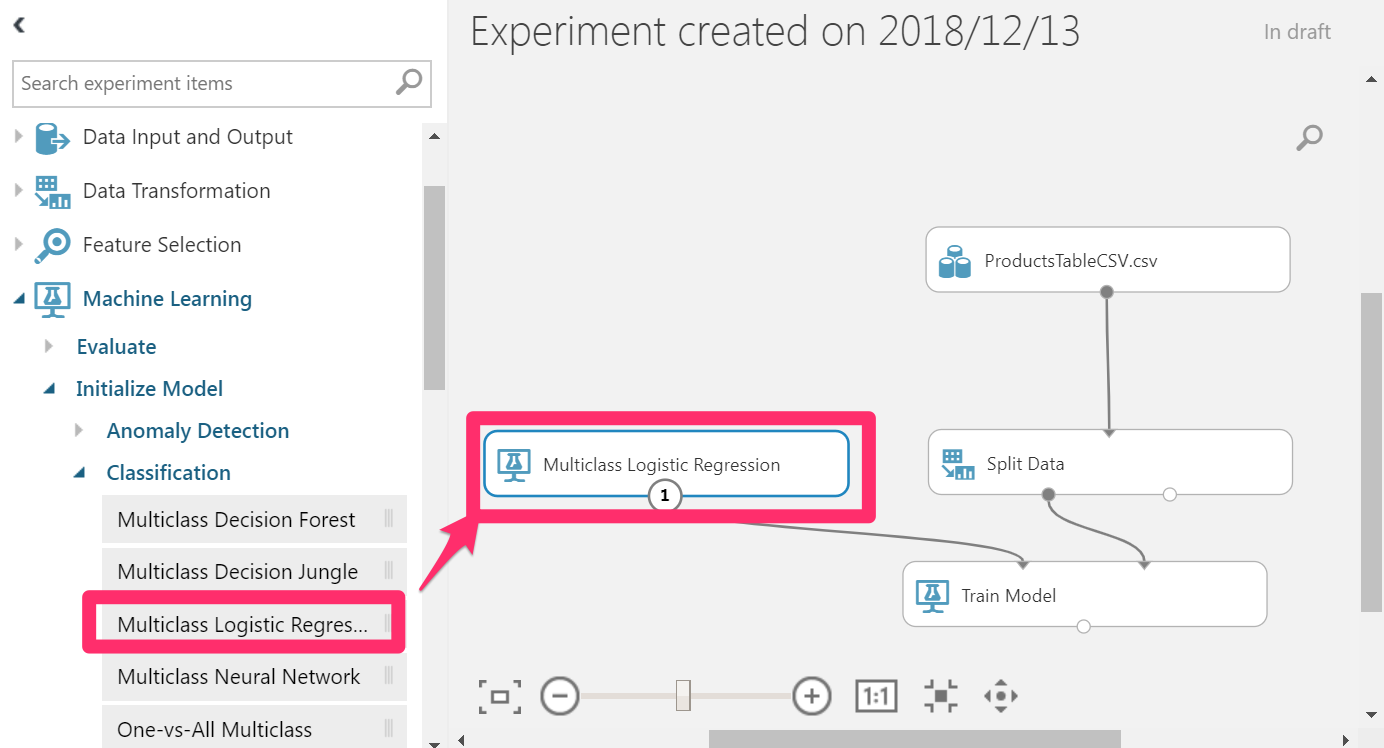
g. 続いて、[Machine Learning]->[initialize Model]->[Classification]から[Multiple Logistic Regression] を選択して [Experiment Panel]にD&Dします。
h. [Multiple Logistic Regression]から[Train Model]の右上に線を引きます。
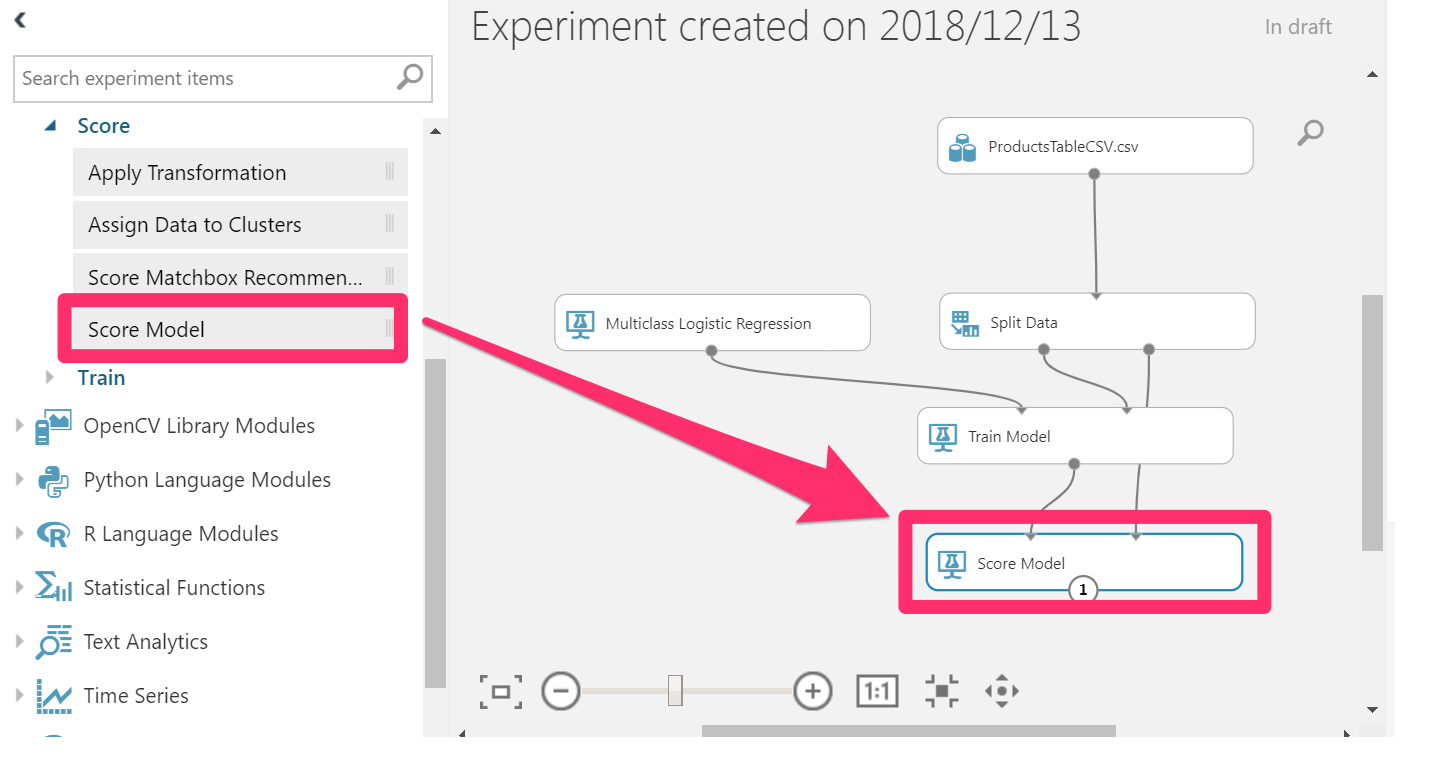
i. [Machine Learning]->[Score]から[Score Model] を選択して [Experiment Panel]にD&Dします。
j. [Train Model]の下の点と[Score Model]の左上の点、[Split Data]の右下の点と[Score Model]の右上の点を繋ぎます。
k. [Machine Learning]->[Evaluate]から[Evaluate Model] を選択して [Experiment Panel]にD&Dします。
l. [Score Model]の下の点と[Evaluate Model]の左上の点を繋ぎます。
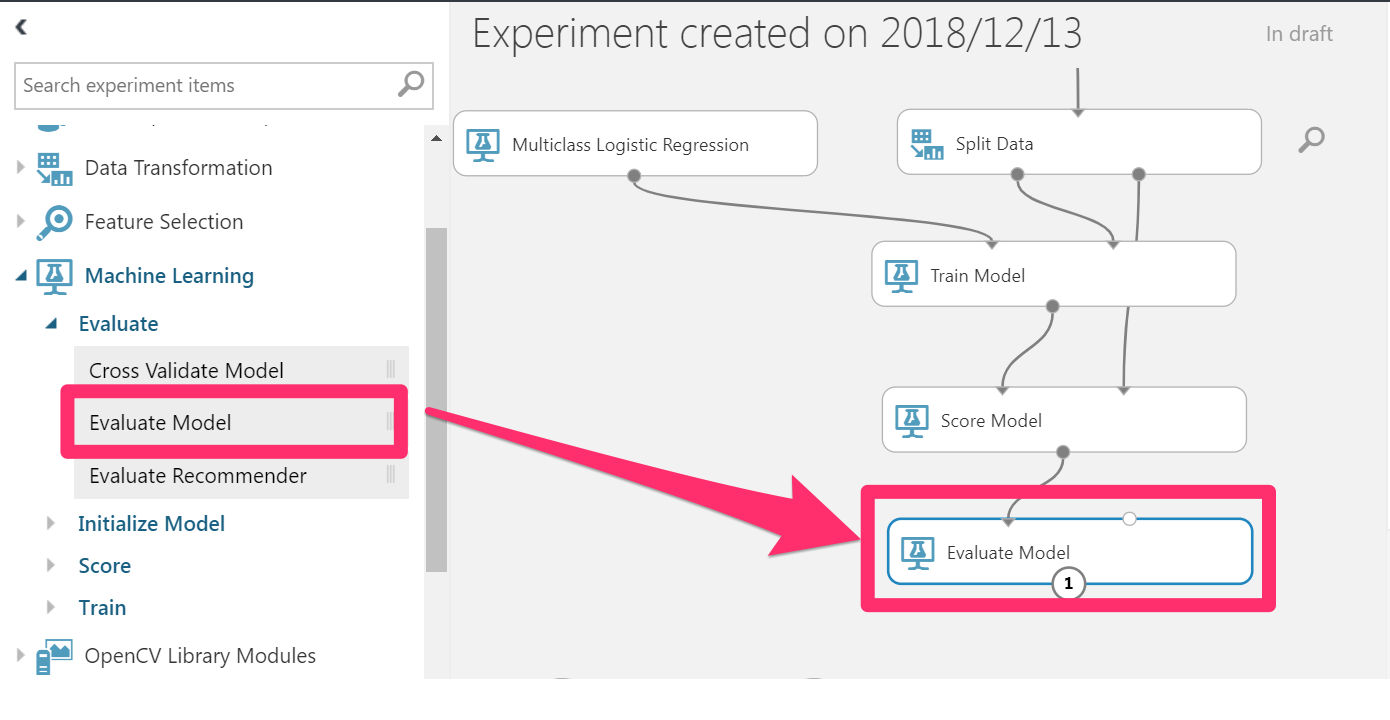
7. この学習させたモデルを使うためにWeb上に公開します。まず[SET UP WEB SERVICE]をクリックします。
![]()
8. [SAVE]して[RUN]で実行します
![]()
9. 実行が終わったら[DEPLOY WEB SERVICE]->[Deploy web service[classic]]でデプロイします。

10. デプロイが終わったらダッシュボードのページに戻ります。APIキーがあるのでコピーします。このAPIキーは後ほど使います。続いて、[REQUEST/RESPONSE]をクリックします。
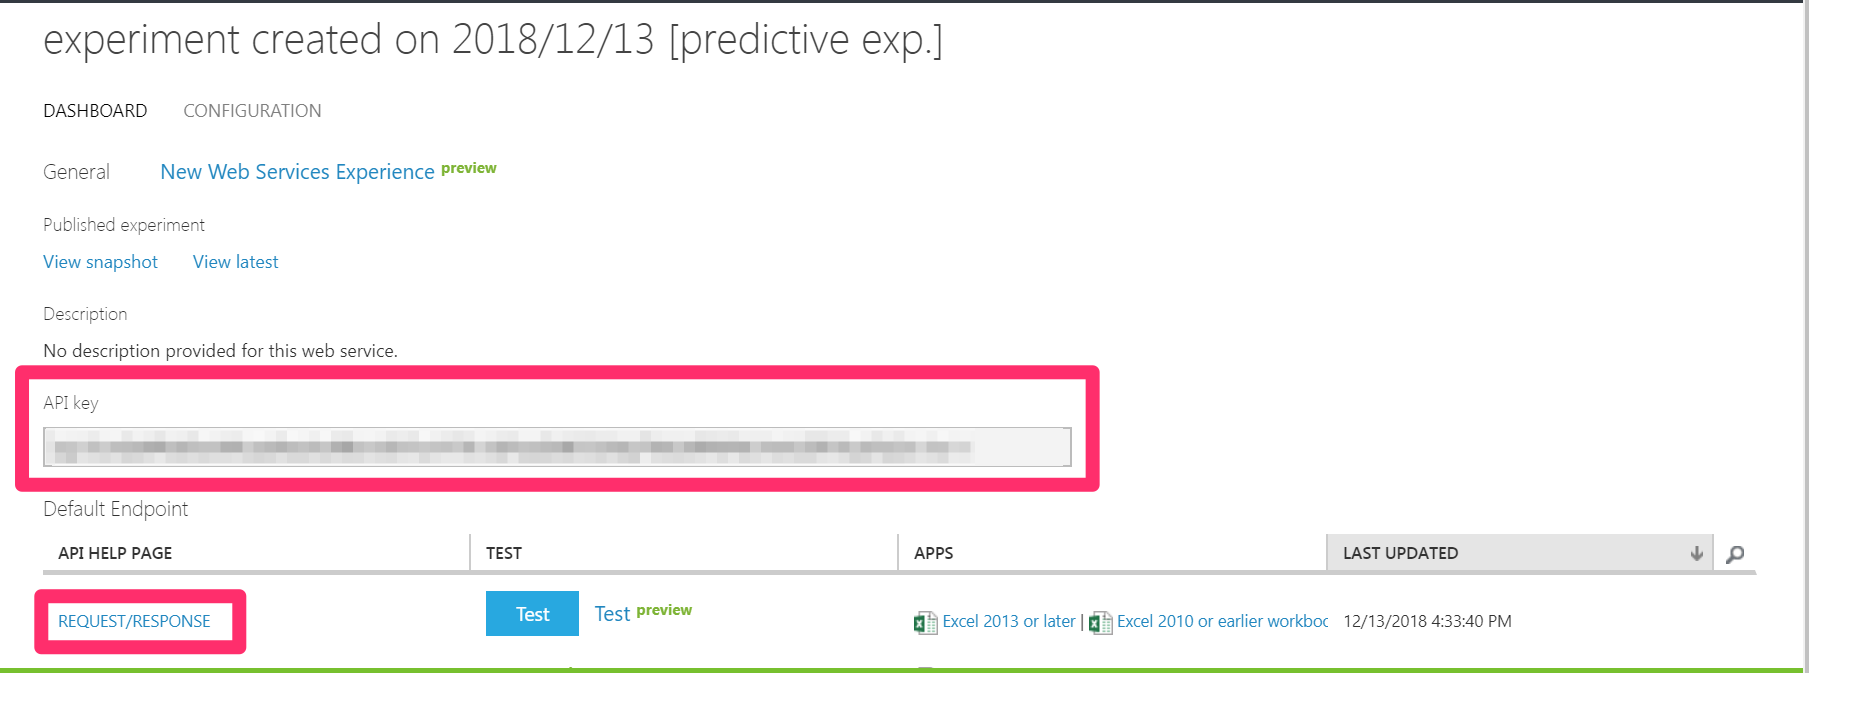
11. 先ほど公開したモデルのURLです。このURLも後ほど使いますので、コピーします。

3.Unityの設定
続いてUnityの設定を行っていきたいと思います。以下の手順で進めていきましょう。
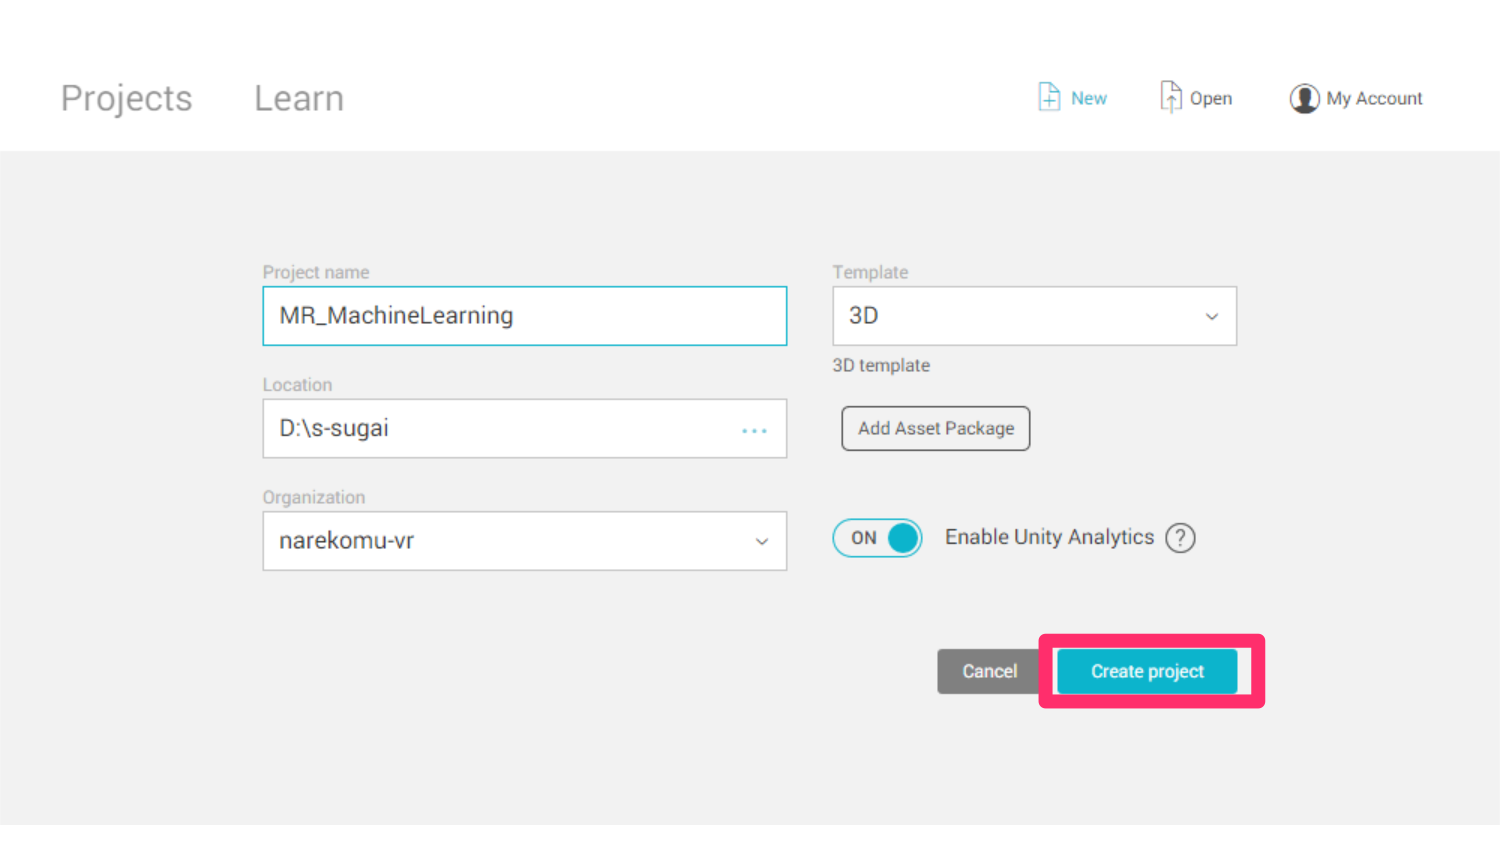
1.Unityを開き、[New]から新しいプロジェクトをつくる。
名前をMR_MachineLearningとして、[Create project]をクリックします。
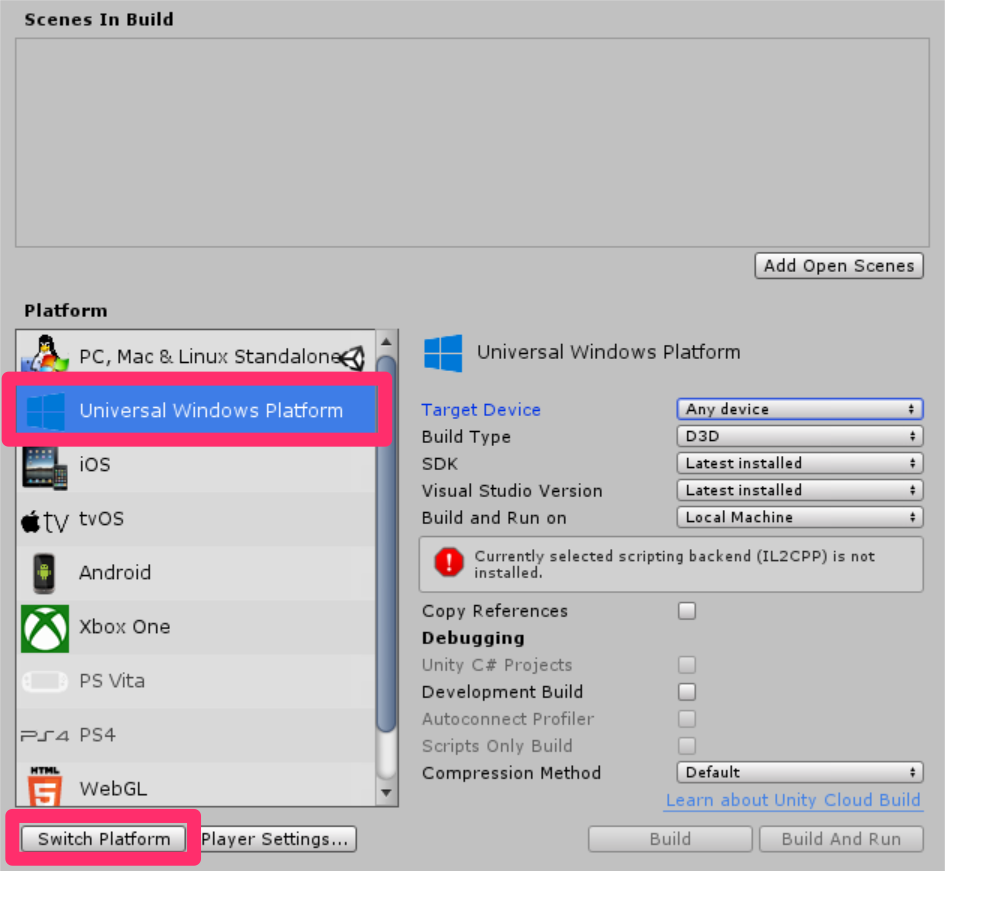
2. [Build Settings..]からさまざまな項目を編集していく。
[File]->[Build Settings..]を開きます。
a.プラットフォームの変更
[PC, Mac & Linux Standalone]を[Universal Windows Platform]に変更し、[Switch Platform]をクリックします
b.[Player Settings..]を編集する
[Player Settings..]をクリックします。
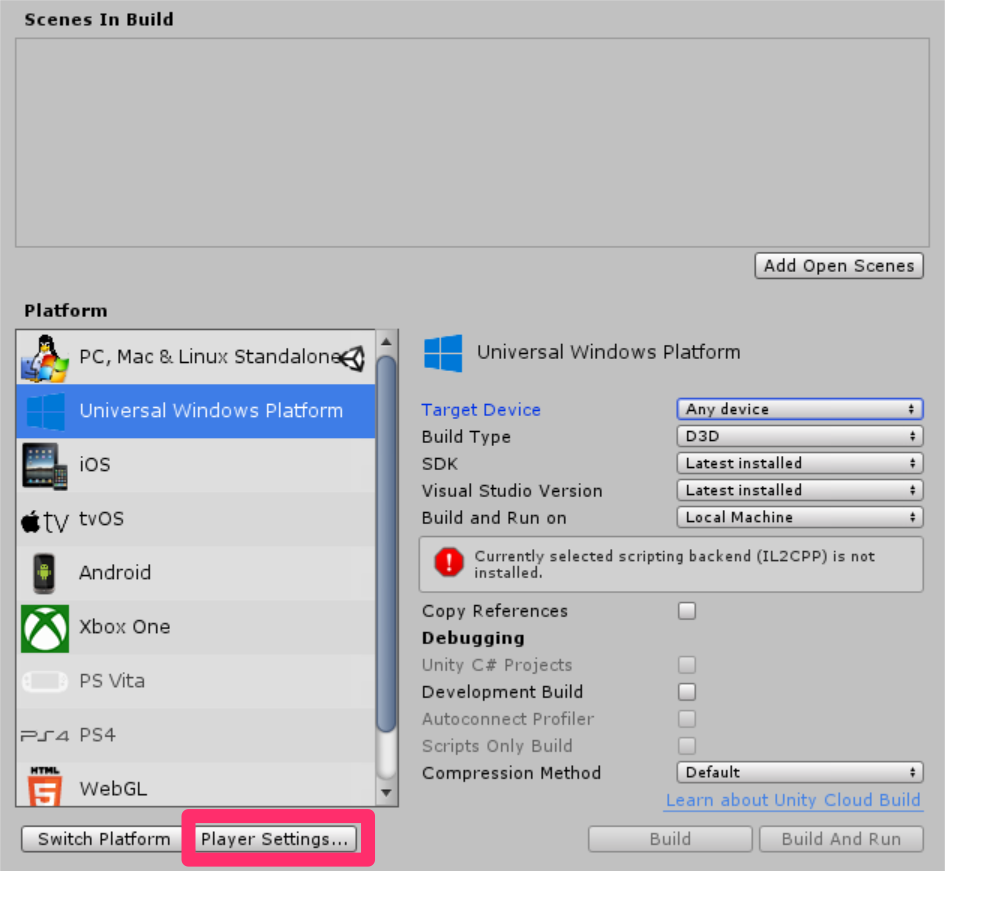
そのあと[Other Settings]、[Publishing Settings]->[Capabilities]、[XR Settings]を以下のように設定してきます。
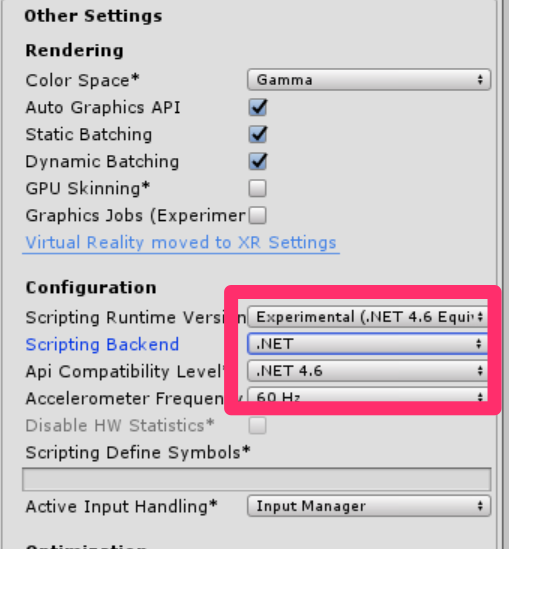
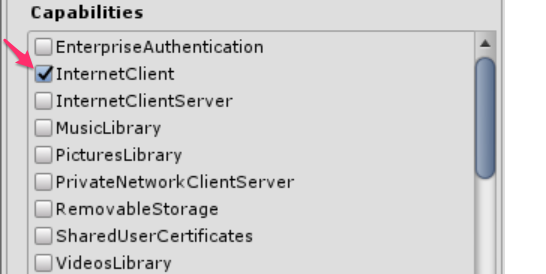
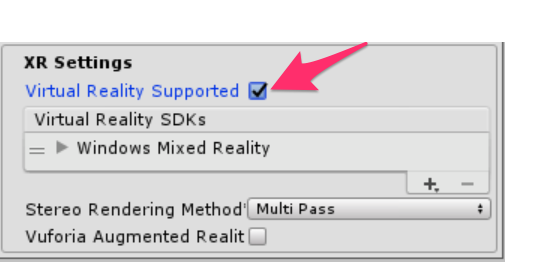
続いて、[Unity C#]にチェックを入れます。[Build Settings..]の変更は以上です。
![]()
3. パッケージのインポート
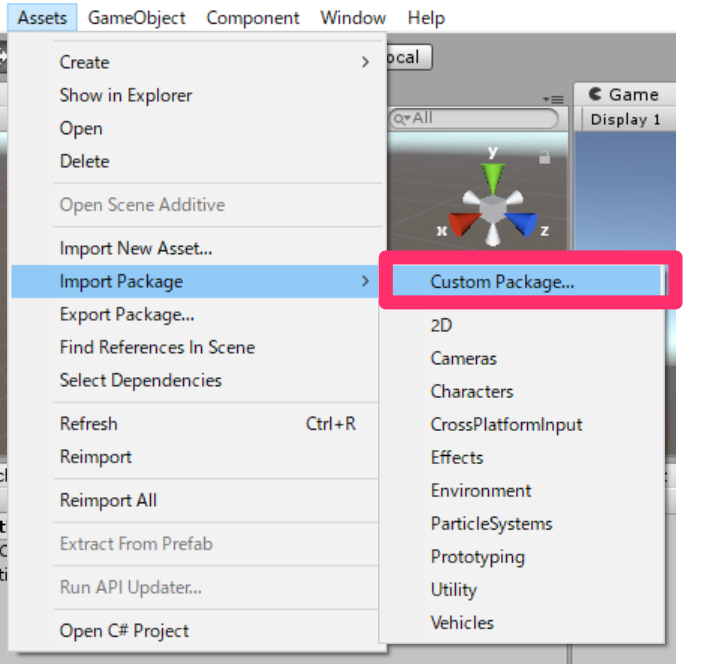
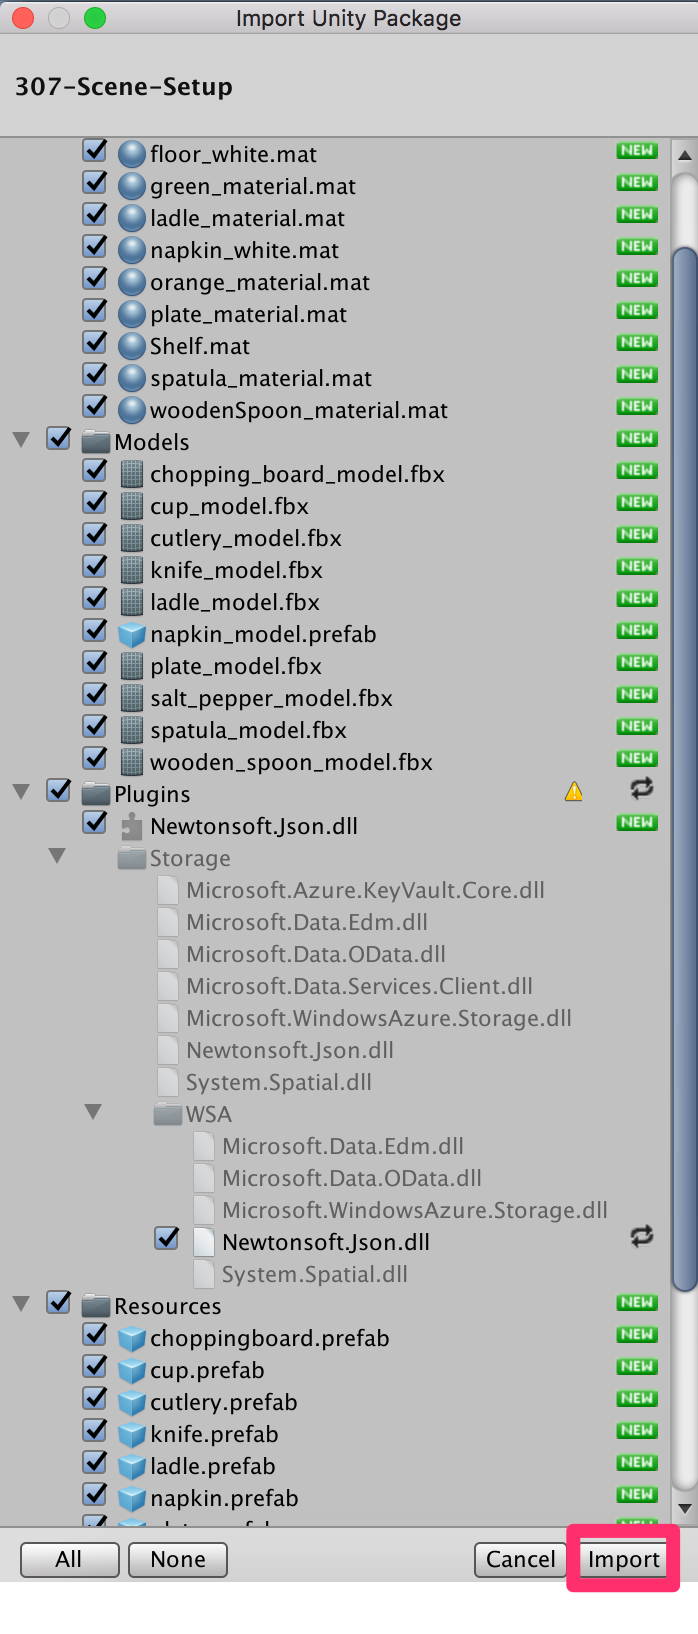
まず、Azure-MR-307.unitypackageをダウンロードします。[Assets]->[Import Package]->[Custom Package]をクリックします。ダウンロードしたAzure-MR-307.unitypackageをフォルダの中から探し選択し、[Import]をクリックします。
4. シーンの切り替え
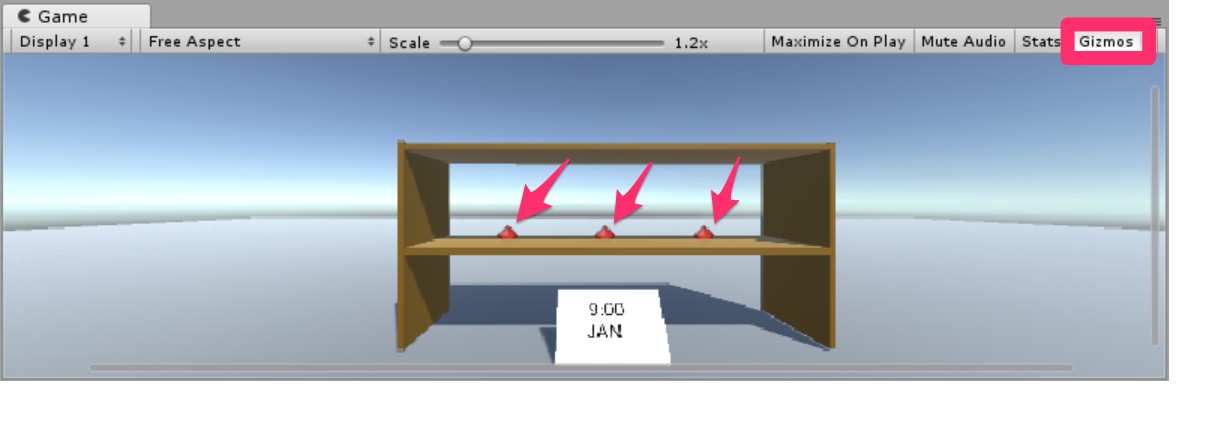
シーンをMR_MachineLearningSceneに切り替えます。[Project]->[Scenes]->[MR_MachineLearningScene]で探せます。先ほどインポートしたものの中に入っています。Game画面を確認します。ダイアモンドが三つ見えない場合は[Gizmos]をクリックします。
5. Newtonsoft DLLの確認
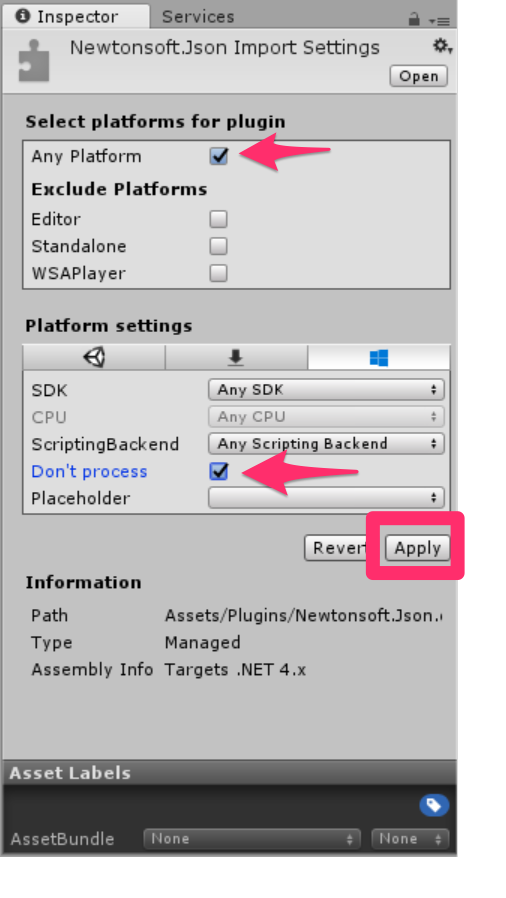
[Project]->[Plugins]から[Newtonsoft.Json.dll]を選択し、[Inspector]を確認します。以下のようになっていることを確認します。なっていない場合は変更して[Apply]をクリックします。
4.スクリプトの作成
ここでは以下の2つのスクリプトを編集していきたいと思います。
・ShelfKeeper
・ProductPrediction
・ShelfKeeper
このクラスはUIを調整したり、シーン内の物体を変えたりするクラスです。先ほどインポートしたパッケージにあらかじめスクリプが用意されているので、これを編集していきます。コードを以下のように書きかえます。
|
1 2 3 4 5 6 7 8 9 10 11 12 13 14 15 16 17 18 19 20 21 22 23 24 25 26 27 28 29 30 31 32 33 34 35 36 37 38 39 40 41 42 43 44 45 46 47 48 49 50 51 52 53 54 55 56 |
using UnityEngine; public class ShelfKeeper : MonoBehaviour { /// <summary> /// Provides this class Singleton-like behaviour /// </summary> public static ShelfKeeper instance; /// <summary> /// Unity Inspector accessible Reference to the Text Mesh object needed for data /// </summary> public TextMesh dateText; /// <summary> /// Unity Inspector accessible Reference to the Text Mesh object needed for time /// </summary> public TextMesh timeText; /// <summary> /// Provides references to the spawn locations for the products prefabs /// </summary> public Transform[] spawnPoint; private void Awake() { instance = this; } /// <summary> /// Set the text of the date in the scene /// </summary> public void SetDate(string day, string month) { dateText.text = day + " " + month; } /// <summary> /// Set the text of the time in the scene /// </summary> public void SetTime(string hour) { timeText.text = hour + ":00"; } /// <summary> /// Spawn a product on the shelf by providing the name and selling grade /// </summary> /// <param name="name"></param> /// <param name="sellingGrade">0 being the best seller</param> public void SpawnProduct(string name, int sellingGrade) { Instantiate(Resources.Load(name), spawnPoint[sellingGrade].transform.position, spawnPoint[sellingGrade].transform.rotation); } } |
全て書きかえたら保存してUnityに戻ります。[Hierarchy]内の[Main Camera]の[Inspector]を確認します。以下のようにShelf Keeperが追加されているはずです。
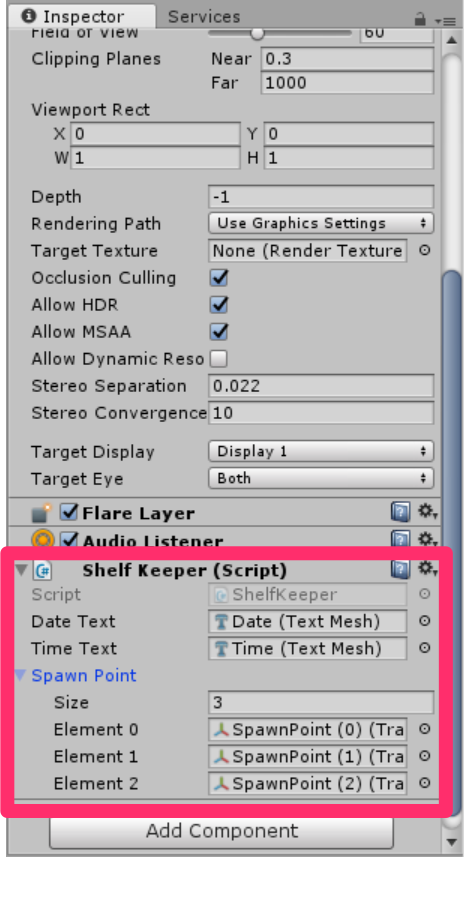
・ProductPrediction
このクラスは自分で作る必要があります。[Project]->[Create]->[C# Script]をクリックします。名前をProductPredictionとします。このクラスはMachine Learning Serviceとデータのやり取りをし、ShelfKeeperクラスに何を表示すべきか指令する役割を担います。コードは以下の通りです。このとき、2.準備(2)で取得したAPIキーとURLをコード内の–Insert your・・に適切に入れます。
|
1 2 3 4 5 6 7 8 9 10 11 12 13 14 15 16 17 18 19 20 21 22 23 24 25 26 27 28 29 30 31 32 33 34 35 36 37 38 39 40 41 42 43 44 45 46 47 48 49 50 51 52 53 54 55 56 57 58 59 60 61 62 63 64 65 66 67 68 69 70 71 72 73 74 75 76 77 78 79 80 81 82 83 84 85 86 87 88 89 90 91 92 93 94 95 96 97 98 99 100 101 102 103 104 105 106 107 108 109 110 111 112 113 114 115 116 117 118 119 120 121 122 123 124 125 126 127 128 129 130 131 132 133 134 135 136 137 138 139 140 141 142 143 144 145 146 147 148 149 150 151 152 153 154 155 156 157 158 159 160 161 162 163 164 165 166 167 168 169 170 171 172 173 174 175 176 177 178 179 180 181 182 183 184 185 186 187 188 189 190 191 192 193 194 195 196 197 198 199 200 201 202 203 204 205 206 207 208 209 210 211 212 213 214 215 216 217 218 219 220 221 222 223 224 225 226 227 228 229 230 231 232 233 234 235 236 237 238 |
using System.Collections; using System.Collections.Generic; using UnityEngine; using System; using System.Linq; using Newtonsoft.Json; using UnityEngine.Networking; using System.Runtime.Serialization; public class ProductPrediction : MonoBehaviour { /// <summary> /// This object represents the Prediction request /// It host the day of the year and hour of the day /// The product must be left blank when serialising /// </summary> public class RootObject { public Inputs Inputs { get; set; } } public class Inputs { public Input1 input1 { get; set; } } public class Input1 { public List<string> ColumnNames { get; set; } public List<List<string>> Values { get; set; } } /// <summary> /// This object containing the deserialised Prediction result /// It host the list of the products /// and the likelihood of them being sold at current date and time /// </summary> public class Prediction { public Results Results { get; set; } } public class Results { public Output1 output1; } public class Output1 { public string type; public Value value; } public class Value { public List<string> ColumnNames { get; set; } public List<List<string>> Values { get; set; } } /// <summary> /// The 'Primary Key' from your Machine Learning Portal /// </summary> private string authKey = "--Insert your APIキー--"; /// <summary> /// The 'Request-Response' Service Endpoint from your Machine Learning Portal /// </summary> private string serviceEndpoint = "--Insert your URL--"; /// <summary> /// The Hour as set in Windows /// </summary> private string thisHour; /// <summary> /// The Day, as set in Windows /// </summary> private string thisDay; /// <summary> /// The Month, as set in Windows /// </summary> private string thisMonth; /// <summary> /// The Numeric Day from current Date Conversion /// </summary> private string dayOfTheYear; /// <summary> /// Dictionary for holding the first (or default) provided prediction /// from the Machine Learning Experiment /// </summary> private Dictionary<string, string> predictionDictionary; /// <summary> /// List for holding product prediction with name and scores /// </summary> private List<KeyValuePair<string, double>> keyValueList; void Start() { // Call to get the current date and time as set in Windows GetTodayDateAndTime(); // Call to set the HOUR in the UI ShelfKeeper.instance.SetTime(thisHour); // Call to set the DATE in the UI ShelfKeeper.instance.SetDate(thisDay, thisMonth); // Run the method to Get Predication from Azure Machine Learning StartCoroutine(GetPrediction(thisHour, dayOfTheYear)); } /// <summary> /// Get current date and hour /// </summary> private void GetTodayDateAndTime() { // Get today date and time DateTime todayDate = DateTime.Now; // Extrapolate the HOUR thisHour = todayDate.Hour.ToString(); // Extrapolate the DATE thisDay = todayDate.Day.ToString(); thisMonth = todayDate.ToString("MMM"); // Extrapolate the day of the year dayOfTheYear = todayDate.DayOfYear.ToString(); } private IEnumerator GetPrediction(string timeOfDay, string dayOfYear) { // Populate the request object // Using current day of the year and hour of the day RootObject ro = new RootObject { Inputs = new Inputs { input1 = new Input1 { ColumnNames = new List<string> { "day", "hour", "product" }, Values = new List<List<string>>() } } }; List<string> l = new List<string> { dayOfYear, timeOfDay, "" }; ro.Inputs.input1.Values.Add(l); Debug.LogFormat("Score request built"); // Serialise the request string json = JsonConvert.SerializeObject(ro); using (UnityWebRequest www = UnityWebRequest.Post(serviceEndpoint, "POST")) { byte[] jsonToSend = new System.Text.UTF8Encoding().GetBytes(json); www.uploadHandler = new UploadHandlerRaw(jsonToSend); www.downloadHandler = new DownloadHandlerBuffer(); www.SetRequestHeader("Authorization", "Bearer " + authKey); www.SetRequestHeader("Content-Type", "application/json"); www.SetRequestHeader("Accept", "application/json"); yield return www.SendWebRequest(); string response = www.downloadHandler.text; // Deserialize the response DataContractSerializer serializer; serializer = new DataContractSerializer(typeof(string)); DeserialiseJsonResponse(response); } } /// <summary> /// Deserialize the response received from the Machine Learning portal /// </summary> public void DeserialiseJsonResponse(string jsonResponse) { // Deserialize JSON Prediction prediction = JsonConvert.DeserializeObject<Prediction>(jsonResponse); predictionDictionary = new Dictionary<string, string>(); for (int i = 0; i < prediction.Results.output1.value.ColumnNames.Count; i++) { if (prediction.Results.output1.value.Values[0][i] != null) { predictionDictionary.Add(prediction.Results.output1.value.ColumnNames[i], prediction.Results.output1.value.Values[0][i]); } } keyValueList = new List<KeyValuePair<string, double>>(); // Strip all non-results, by adding only items of interest to the scoreList for (int i = 0; i < predictionDictionary.Count; i++) { KeyValuePair<string, string> pair = predictionDictionary.ElementAt(i); if (pair.Key.StartsWith("Scored Probabilities")) { // Parse string as double then simplify the string key so to only have the item name double scorefloat = 0f; double.TryParse(pair.Value, out scorefloat); string simplifiedName = pair.Key.Replace("\"", "").Replace("Scored Probabilities for Class", "").Trim(); keyValueList.Add(new KeyValuePair<string, double>(simplifiedName, scorefloat)); } } // Sort Predictions (results will be lowest to highest) keyValueList.Sort((x, y) => y.Value.CompareTo(x.Value)); // Spawn the top three items, from the keyValueList, which we have sorted for (int i = 0; i < 3; i++) { ShelfKeeper.instance.SpawnProduct(keyValueList[i].Key, i); } // Clear lists in case of reuse keyValueList.Clear(); predictionDictionary.Clear(); } } |
記述し終えたら保存してUnityに戻り、このスクリプトを[Hierarchy]内の[Main Camera]にD&Dします。
![]()
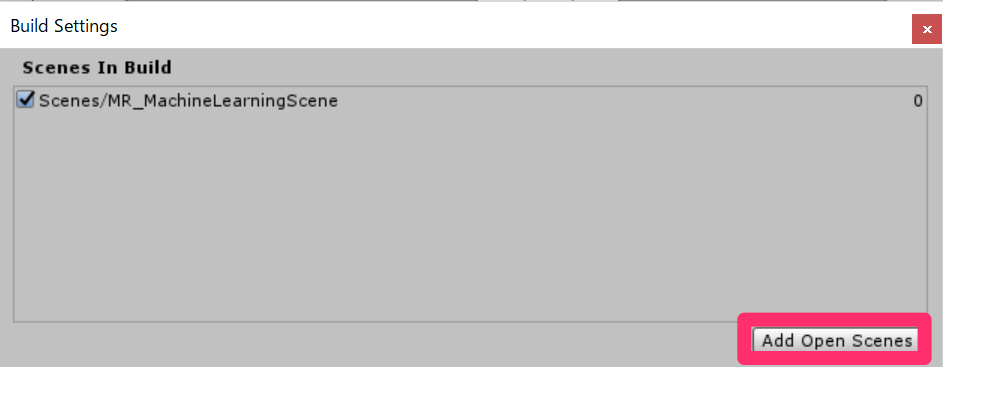
5.ビルド [File]->[Build Settings..]->[Add Open Scene]とし、シーンを追加します。
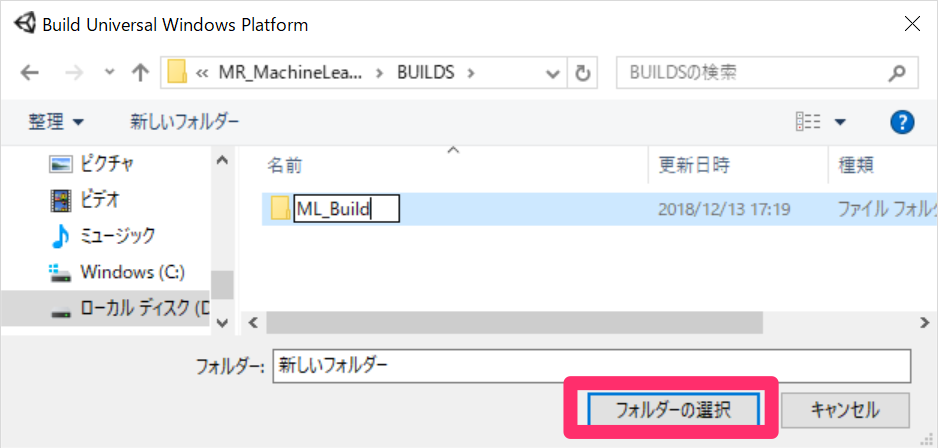
[File]->[Build Settings..]->[Build]の順に選択します。新しいフォルダー(BUILDS)を作成し、その中にさらにフォルダー(ML_Build)を作ります。このフォルダーを選択し、保存します。
この後の手順についてはこちらを参照してください。
実行時にエラーがでなければHoloLens上で台の真ん中に3つのアイテムが表示されるはずですが、筆者が実行したときは例外が発生し、台の真ん中に何も表示されませんでした。例外の内容は以下のとおりでした。
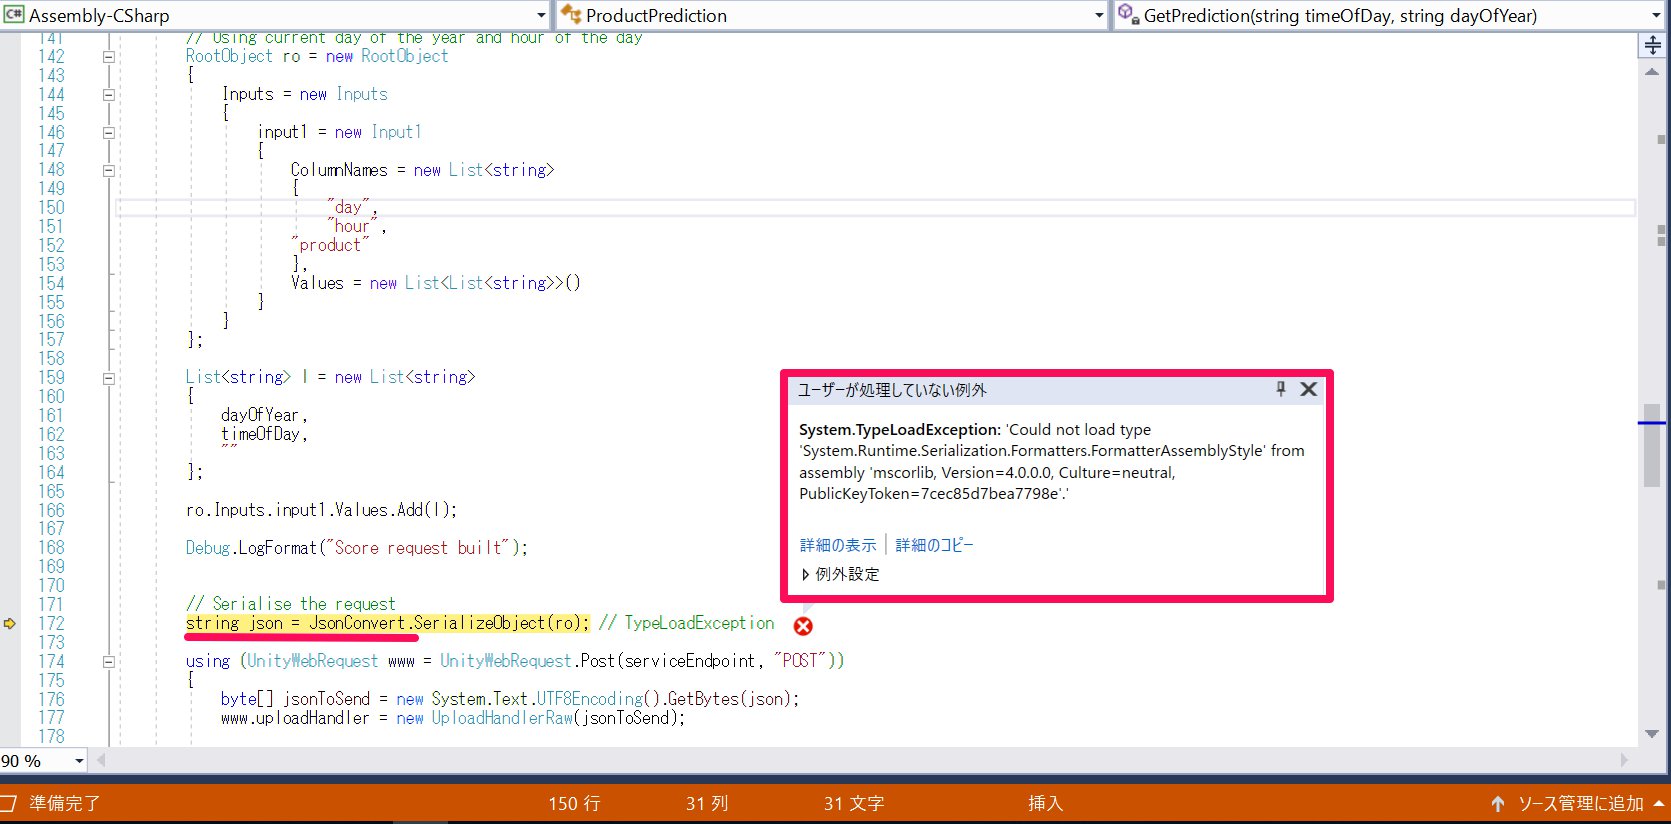
Jsonに変換するために必要なツールがインストールされていないのが原因と思い、Newtonsoft.Jsonの最新版をインストールしようとしました。ソリューションを右クリックし、「ソリューションのNuGetパッケージの管理(N)」を選択します。
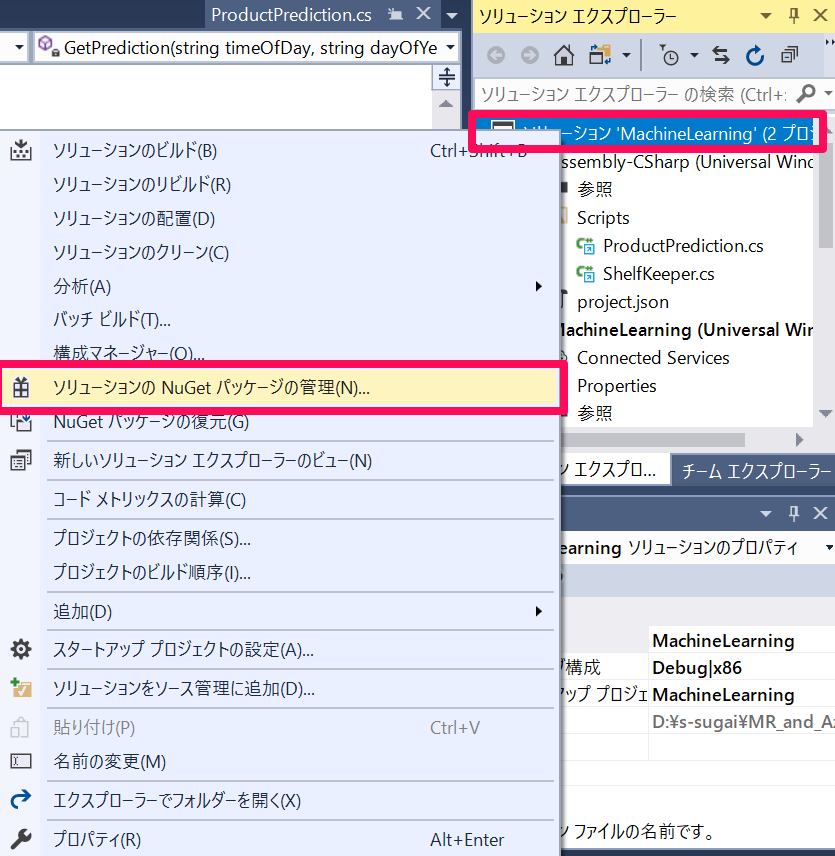
つづいて、[参照]->[Newtonsoft.Json]を選択し、[プロジェクト]にチェックをいれ(自動的に下の2つにもチェックが入り)、インストールをクリックします。
.jpg)
が、ここでエラーが発生しました。もう2,3バージョン古いものも試しましたが、だめでした。
.jpg)
しかし、先輩エンジニアからNewtonsoft.Jsonのバージョン違いがあり得るとのアドバイスをいただいたので、翌日もっと古いバージョンもインストールしてみました。結果、9.0.1がインストールできました。
.jpg)
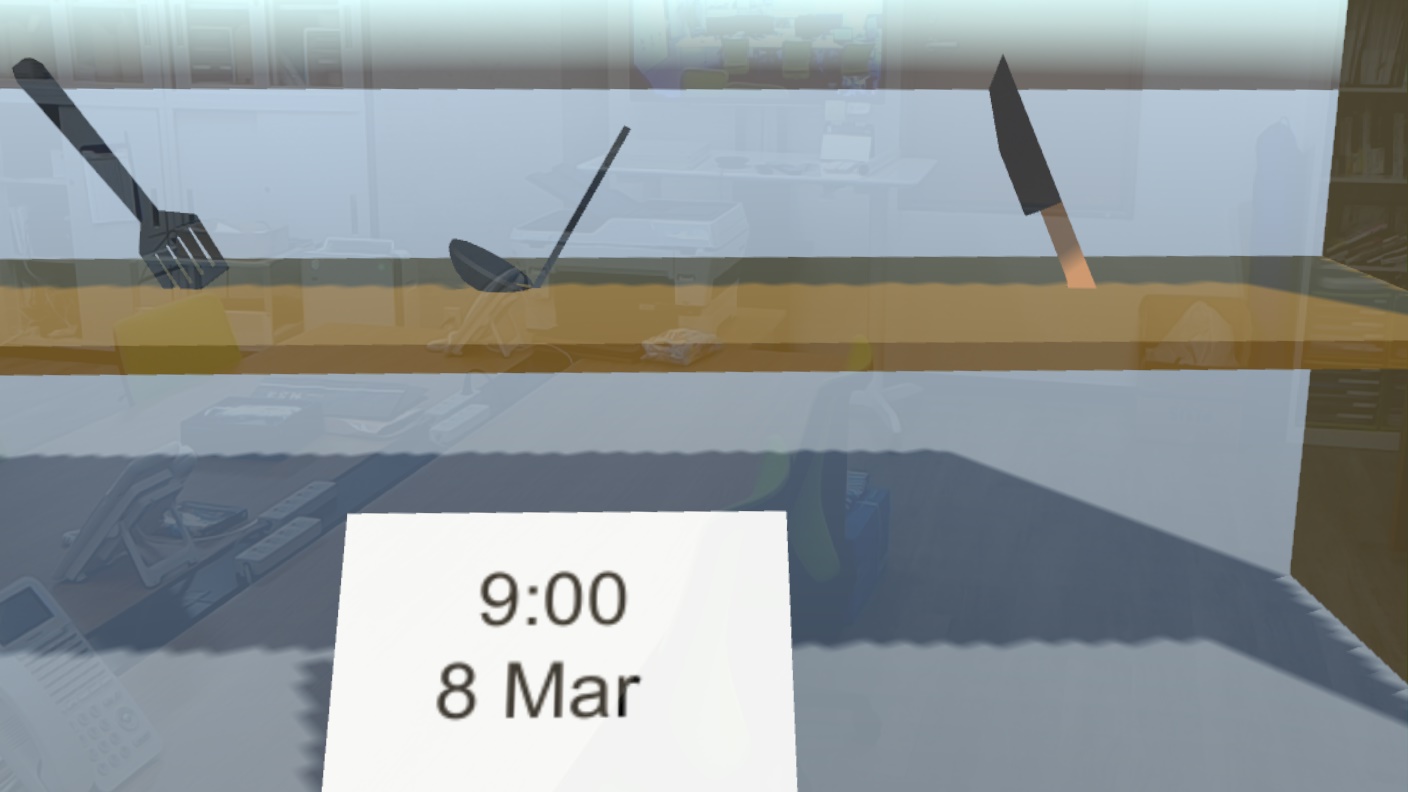
無事例外も発生することなく、台に3つのアイテムが表示されました。
HoloLensで実行した時の様子です。
以上となります。 お疲れ様でした。
