こんにちは、ナレコム菅井です
今回はMR and Azure302bのアプリを作っていきたいと思います。
今回使用したツールは以下の通りです。
・Windows
・Unity 2017.4.11f1
・visual studio2017
・HoloLens
目標はMicrosoft Cognitive Serviceをつかって、画像認識アプリを実装することです。自分で用意した画像を使って学習させていきます。それではさっそく始めていきましょう。
0.準備
マウスとキーボードを識別したいので、あらかじめマウスとキーボードの写真を五枚ずつ以上用意しておきましょう。
今回はAzureのCustom Vision Serviceを利用します。まずCustom Vision serviceのメインページに移動します。続いて以下の順序で進んでいきます。
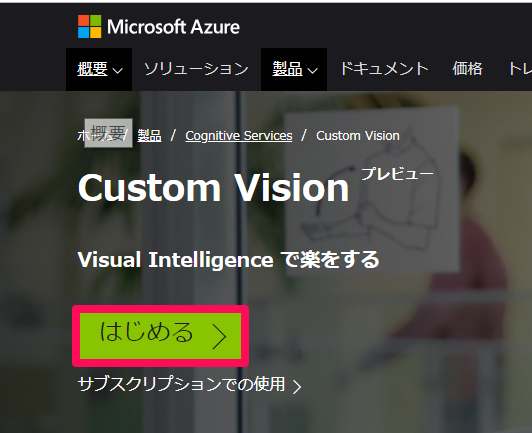
1.[はじめる]をクリック
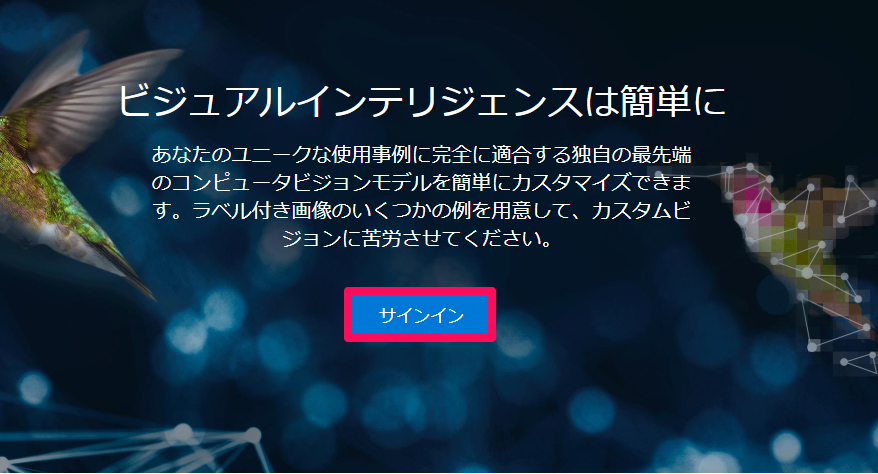
2.[サインイン]をクリック
3.チェックボックスにチェックを入れ、[I agree]をクリック(初めてのログインのときのみ)

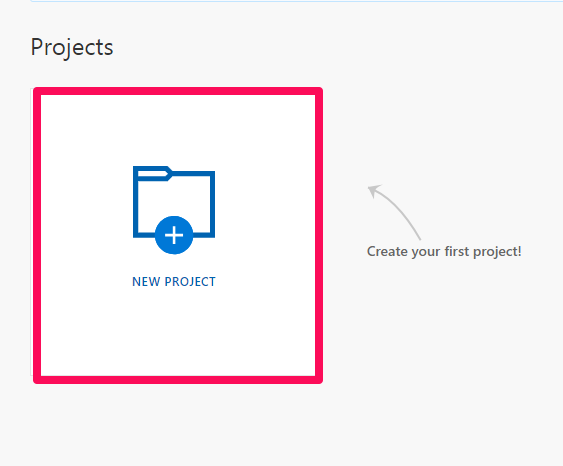
4.[NEW PROJECT]をクリック
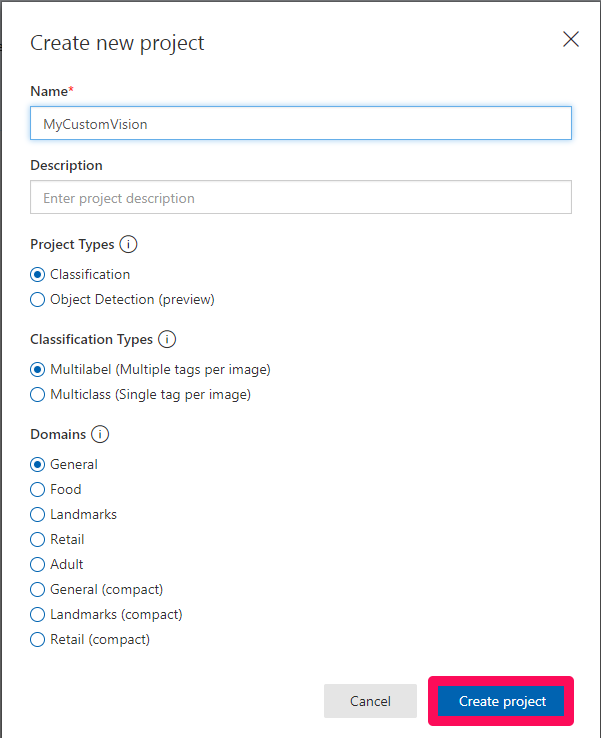
5.名前をMyCustomVisionとし、[Project Types]、[Domains]を以下のように選択し、[Create project]をクリック
※[Description]は入力してもしなくてもよいです
続いて画像を学習させていきたいと思います。
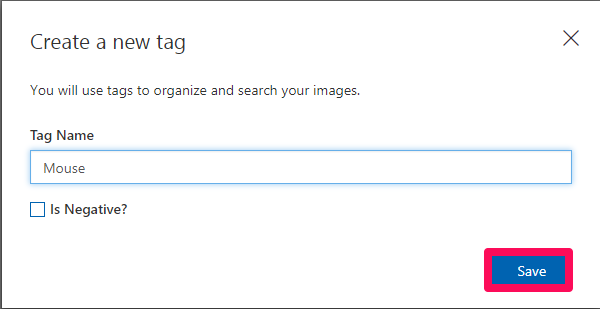
6.[Tags]の横にある[+]をクリックし、Mouseと名前をつけ、[保存]をクリックする(同様にKeyboardというタグもつくります)
![]()
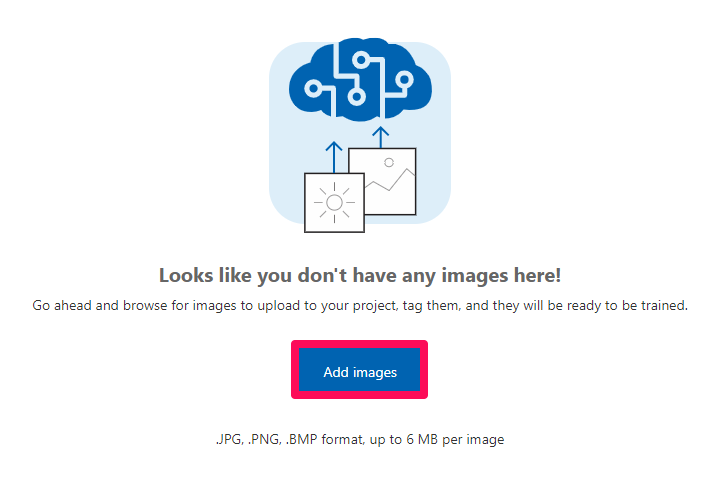
7.[Add images]をクリックし、画像を追加していく
※一度に複数の画像を追加できます
※My Tagsを選択するのをわすれないでください。
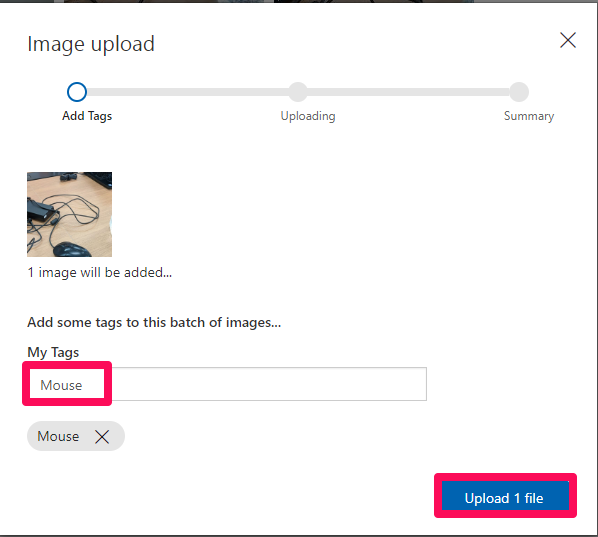
例えばMouseのタグがついた画像が以下のようにアップされていればokです。キーボードの画像も同様にしてKeyboardタグのファイルに追加していきましょう。
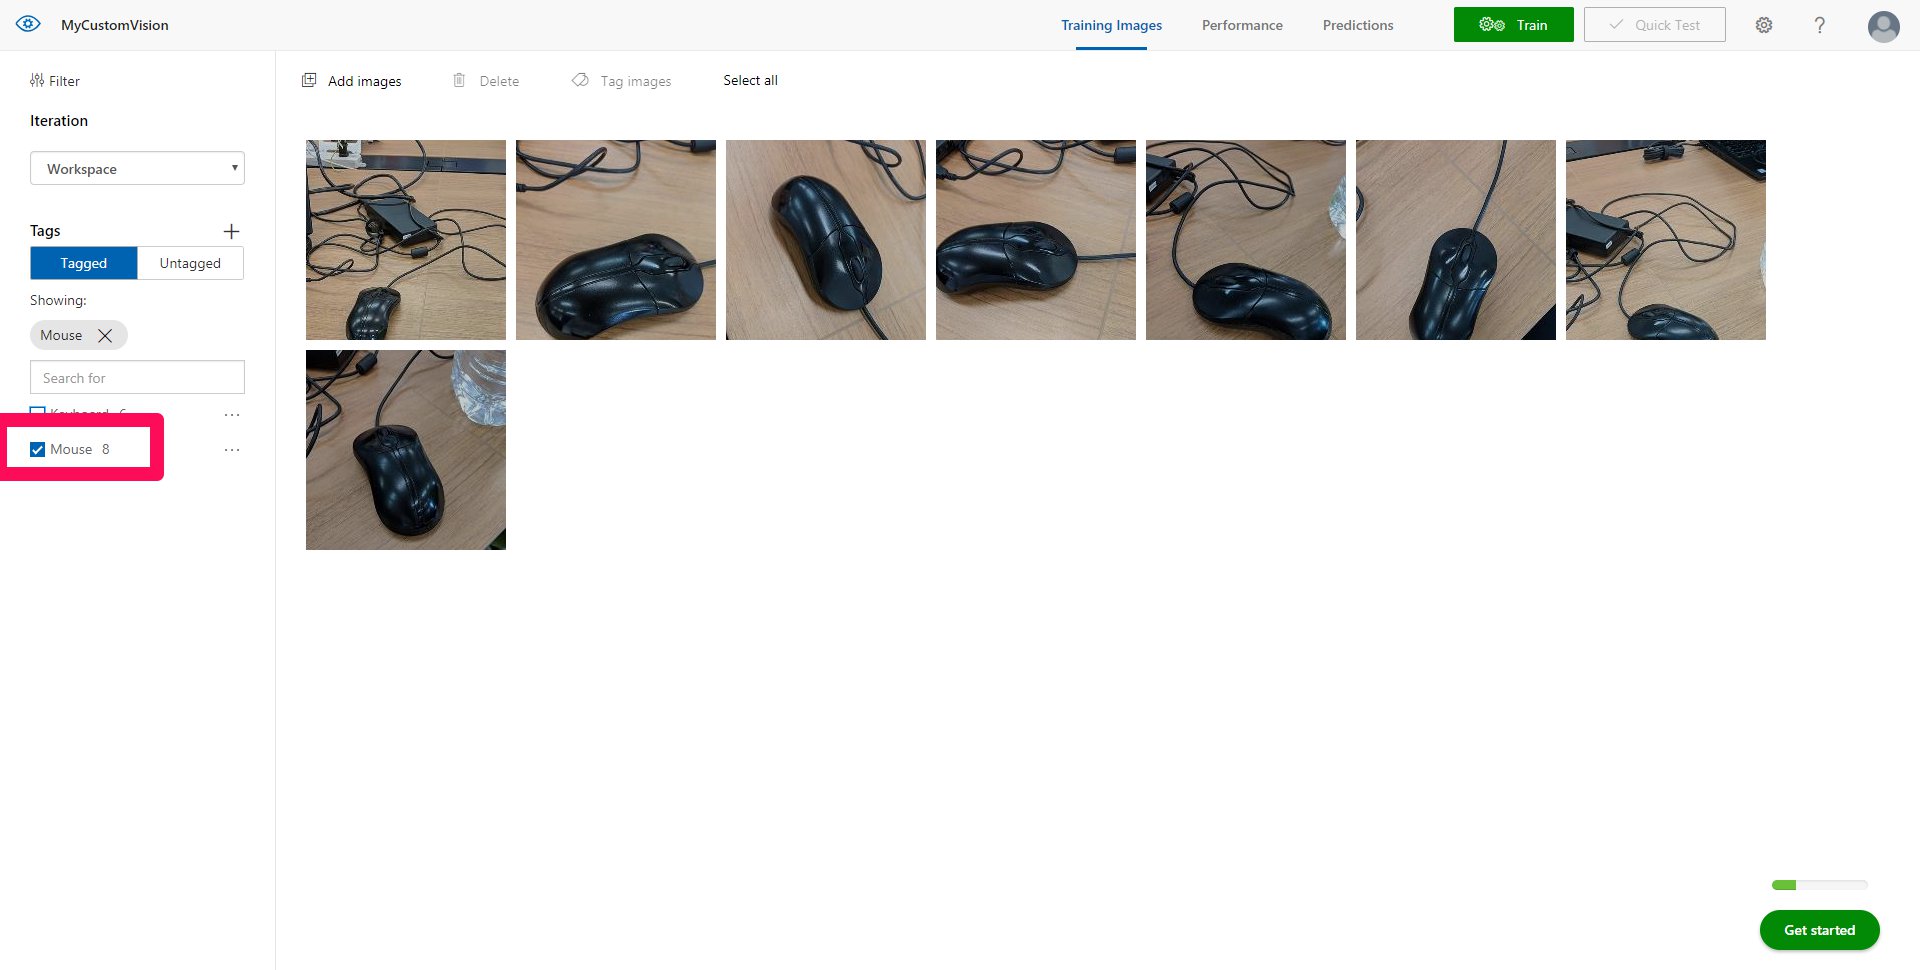
8.両方のタグのチェックを外し、[Train]をクリックする
![]()
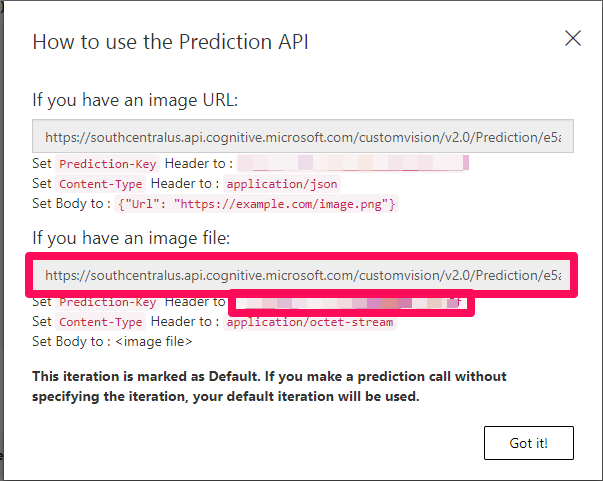
9.学習の終了後、[Make default]をクリックし、続いて[Prediction URL]をクリックする
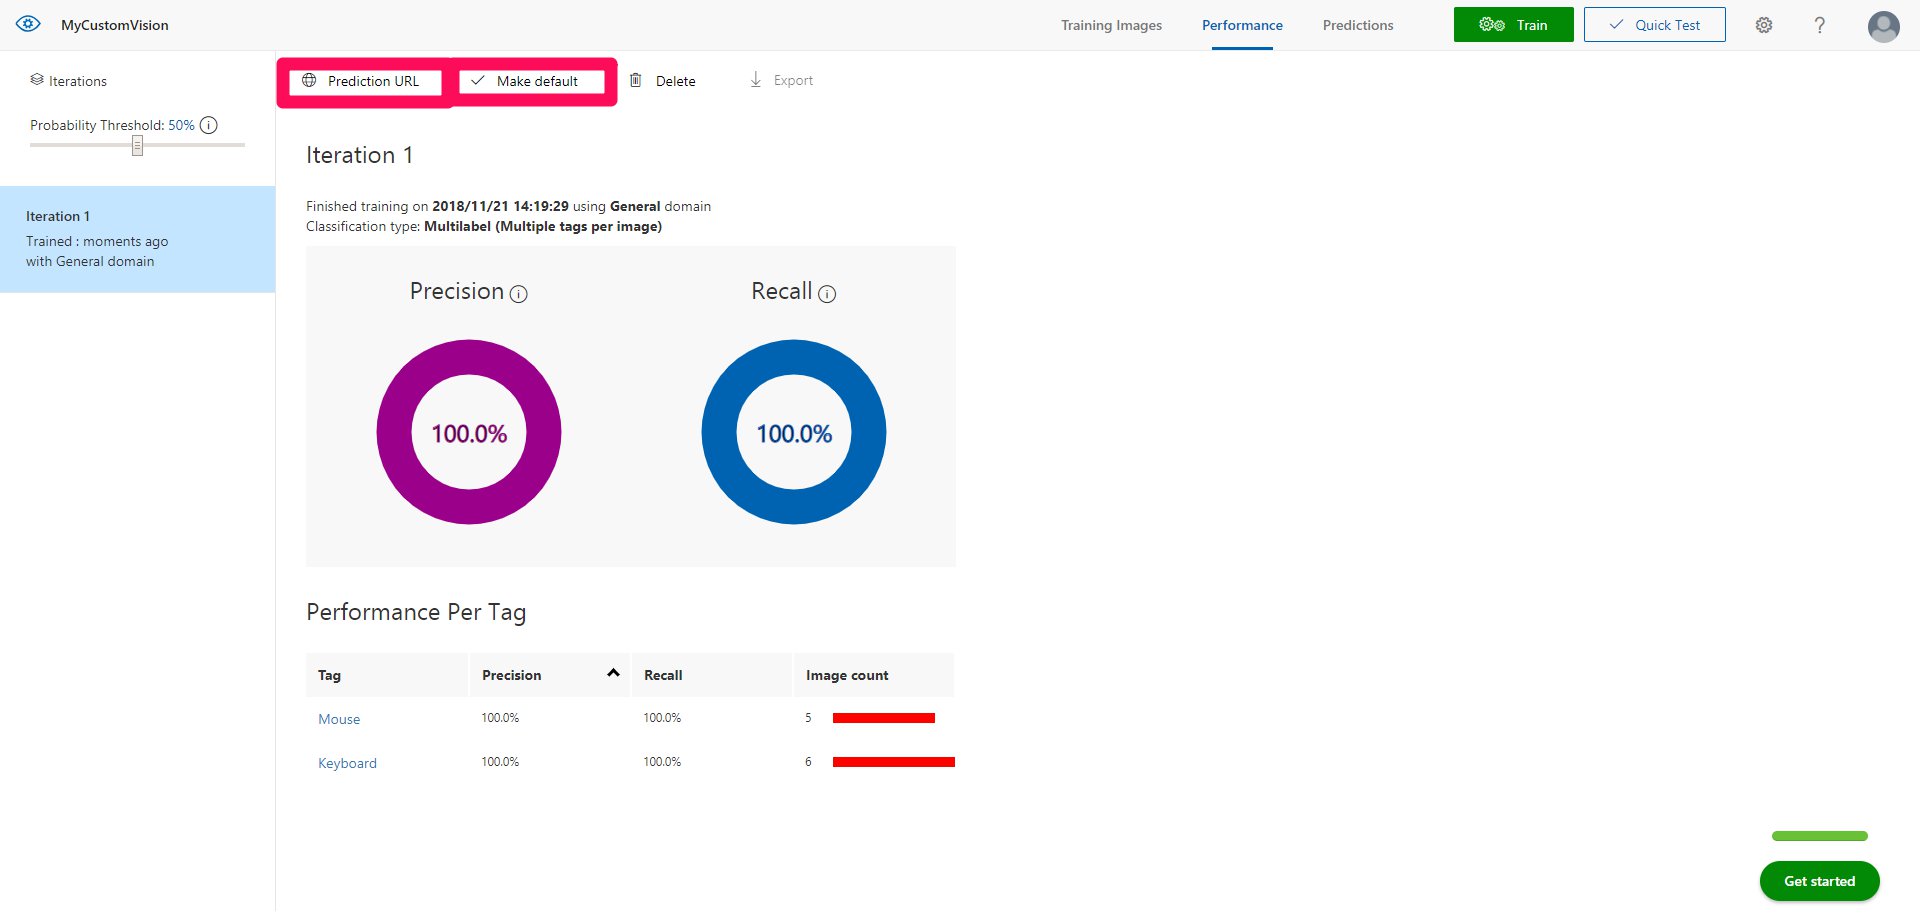
表示されたこれは後ほど使うので場所を覚えておきましょう。赤い枠で囲んだ上の部分はprediction endpointとして、下の部分はPrediction Keyとして使います。
10.歯車マークをクリックし、[Project Id]と[Training Key]を確認する
![]()
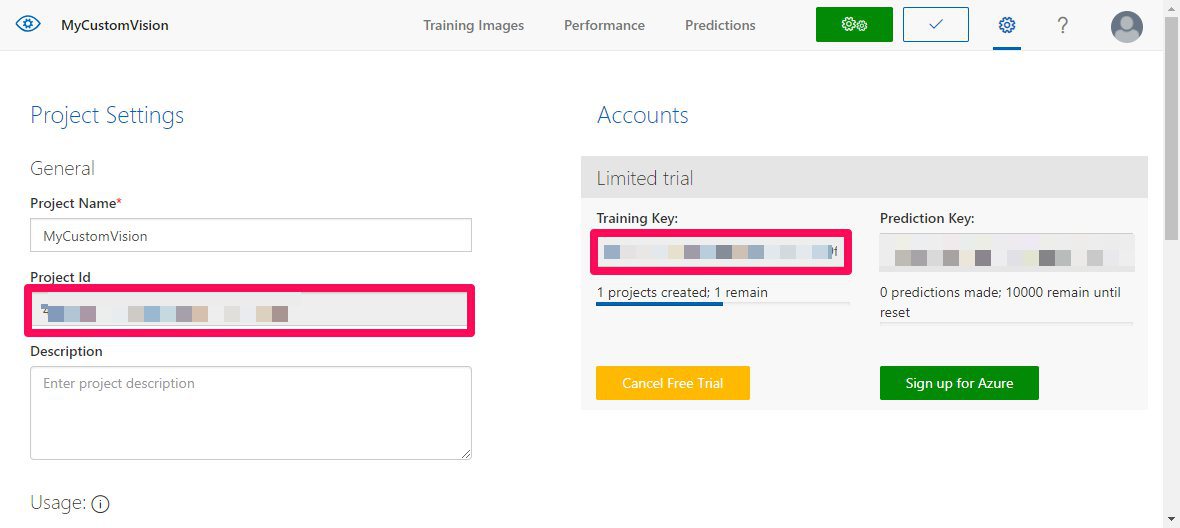
これらものちほど使うので場所を覚えておきましょう。
1.Unityの設定
続いてUnityの設定を行っていきたいと思います。以下の手順で進めていきましょう。
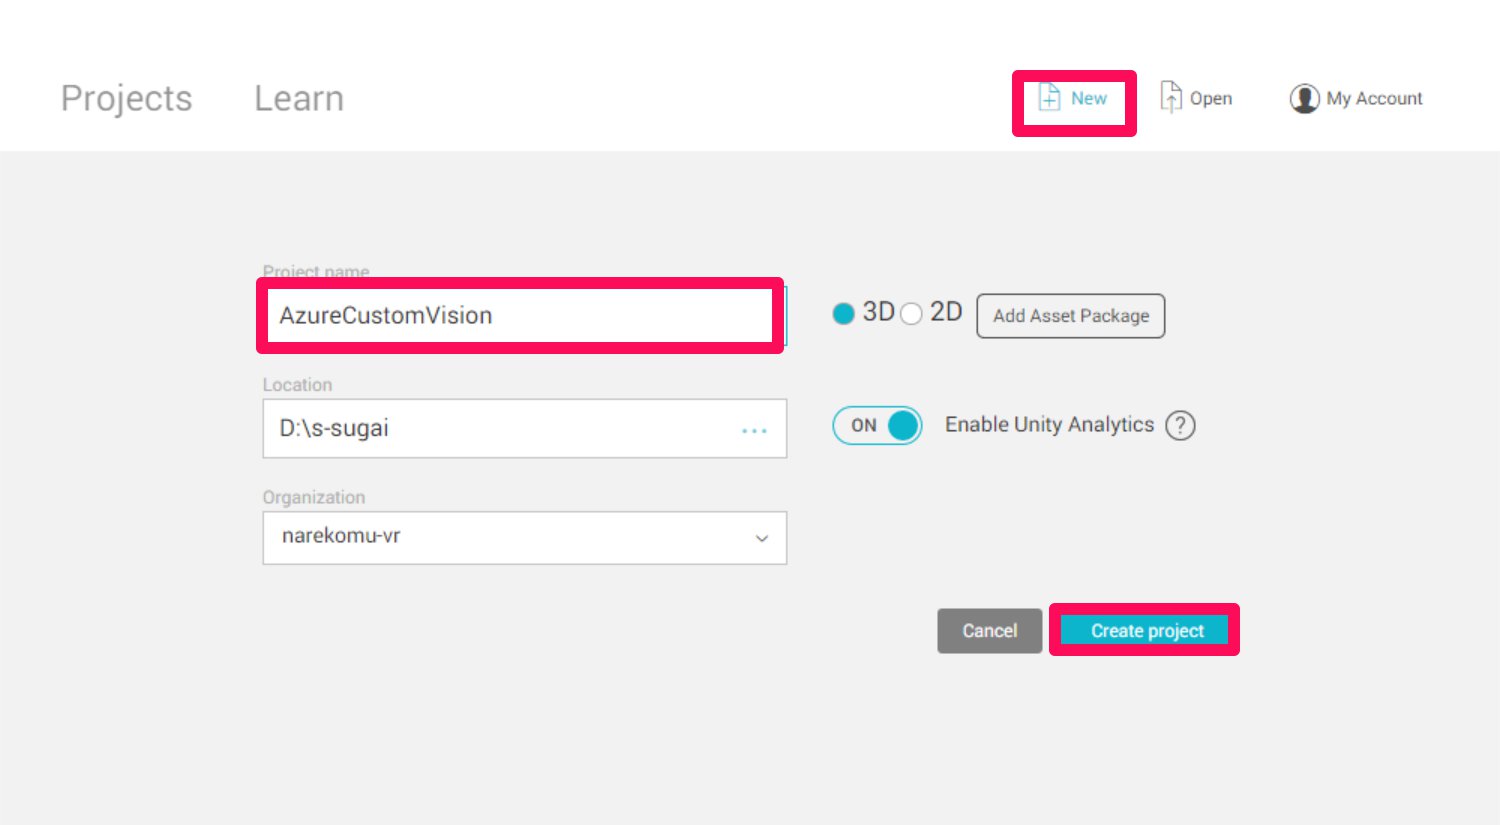
1.Unityを開き、[New]から新しいプロジェクトをつくる
名前をAzureCustomVisionとして、[Create project]をクリックします。
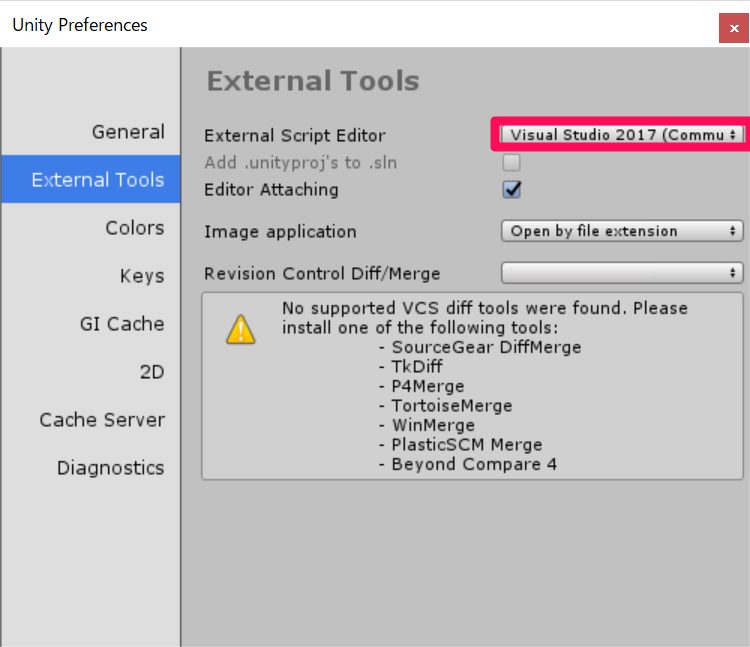
2.スクリプトエディタがvisual studioになっているかどうか確認する
[Edit]->[Preferences..]->[External Tools]の[External Script Editor]がVisual Studio 2017(Community)になっているか確認します。
3.[Build Settings..]からさまざまな項目を編集していく
[File]->[Build Settings..]を開きます。
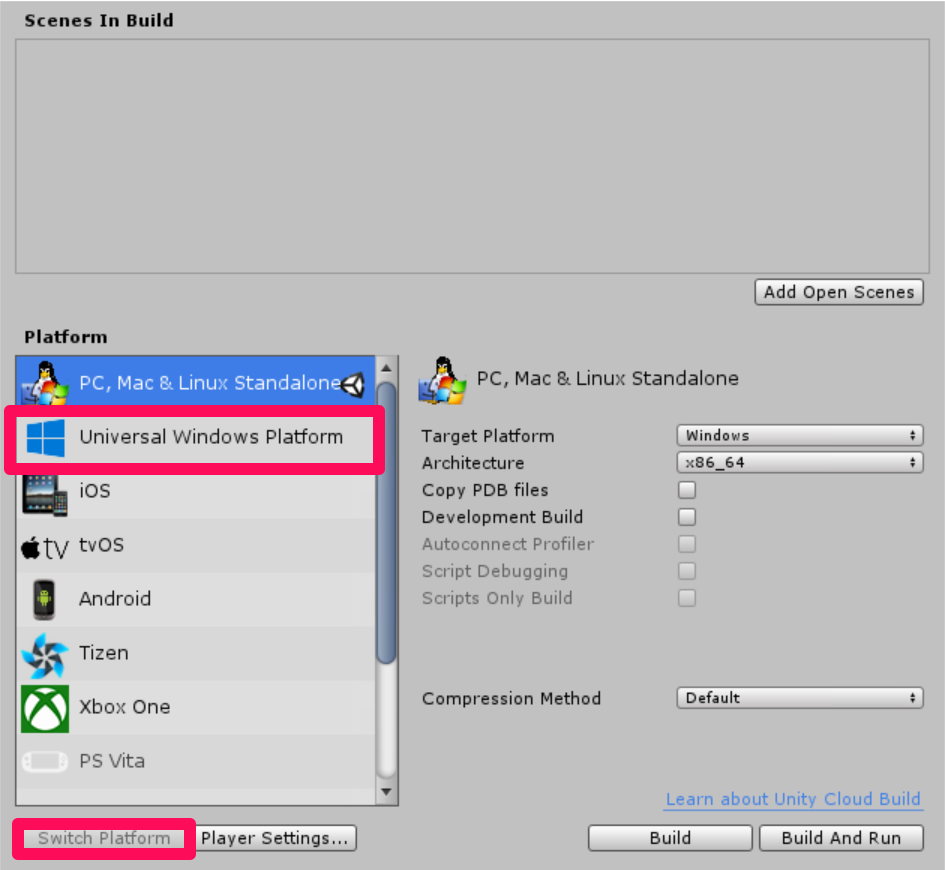
a.プラットフォームの変更
[PC, Mac & Linux Standalone]を[Universal Windows Platform]に変更し、[Switch Platform]をクリックします
b.シーンを追加する
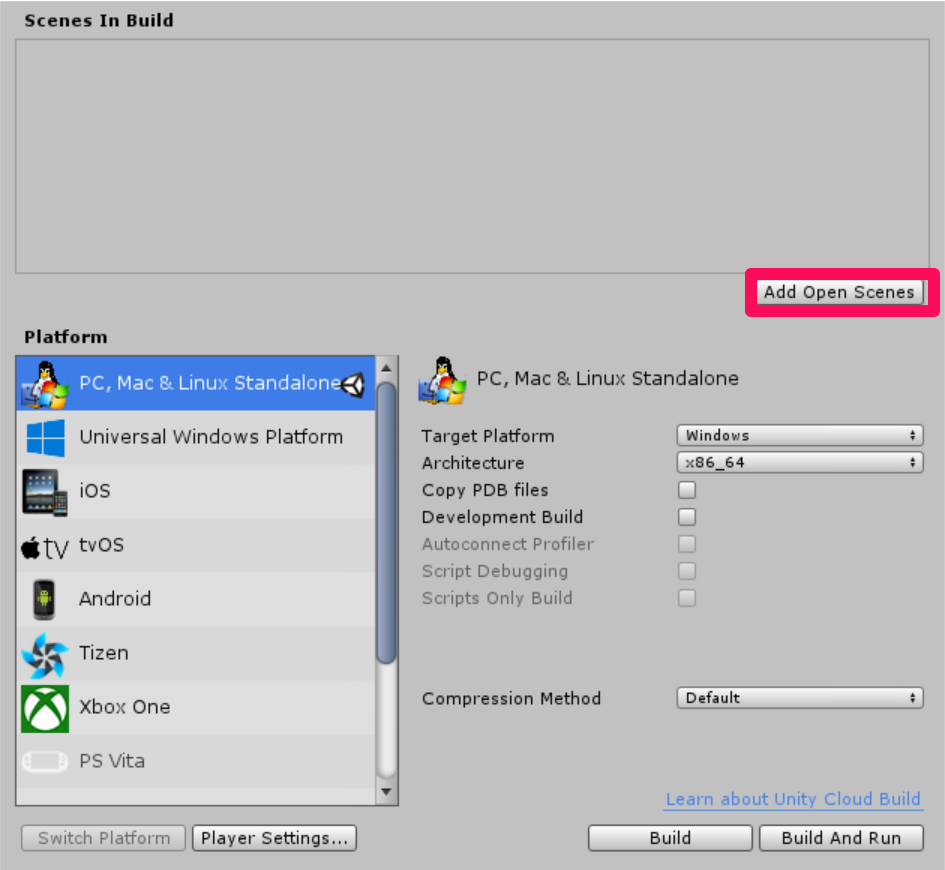
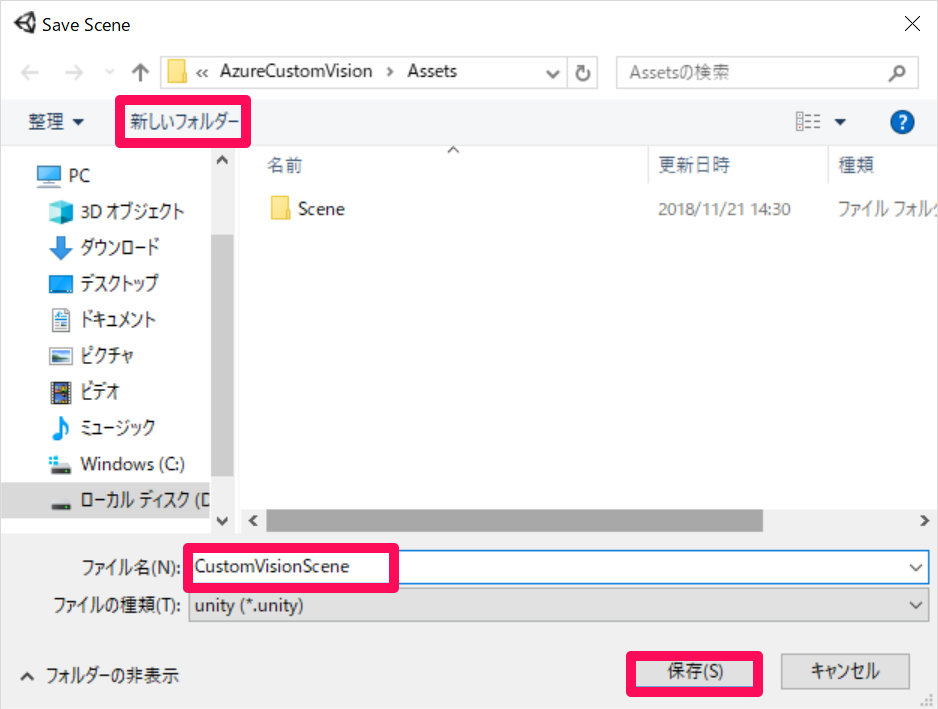
[Add Open Scenes]をクリックし、[新しいフォルダー]を作成し名前をSceneとします。Sceneフォルダーの中にCustomVisionSceneと名前をつけて保存します。
c.[Player Settings..]を編集する
[Player Settings..]をクリックします。
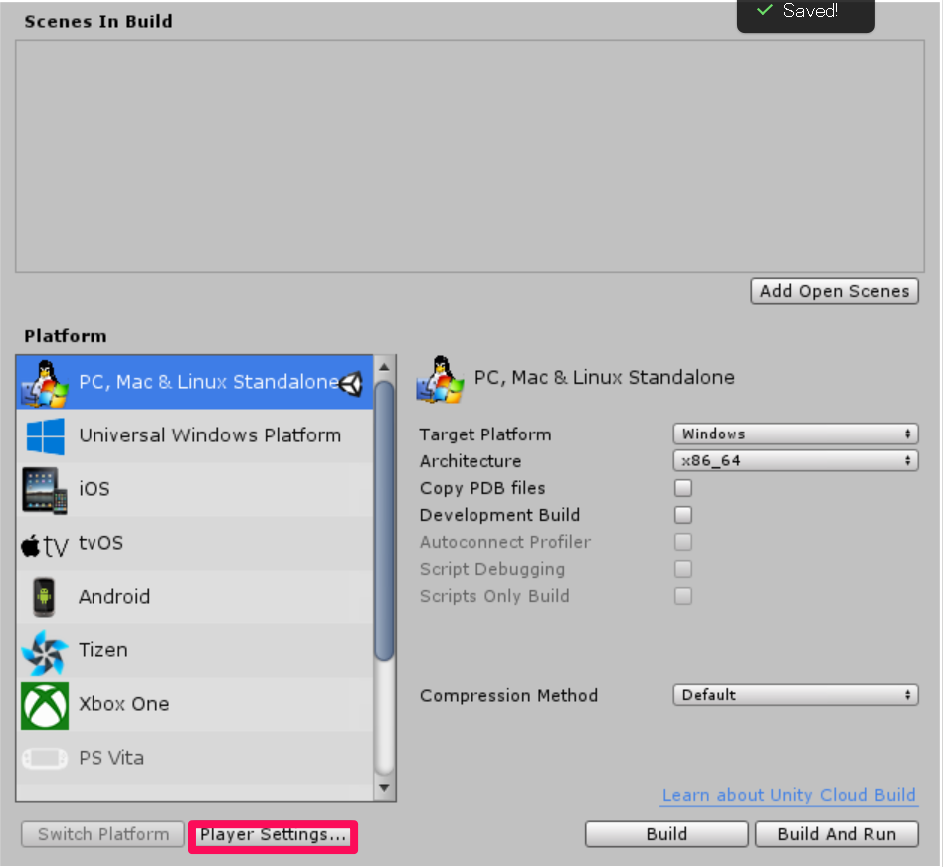
そのあと[Other Settings]、[Publishing Settings]->[Capabilities]、[XR Settings]を以下のように設定してきます。
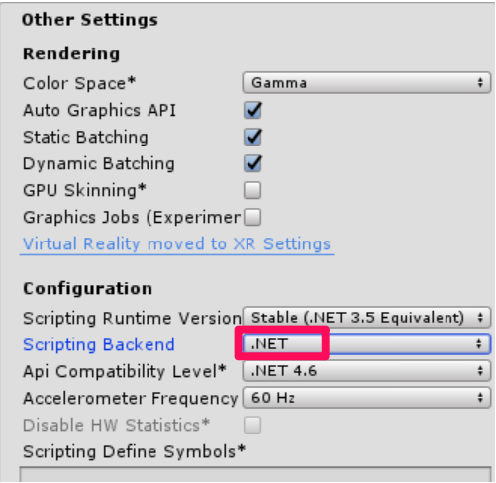
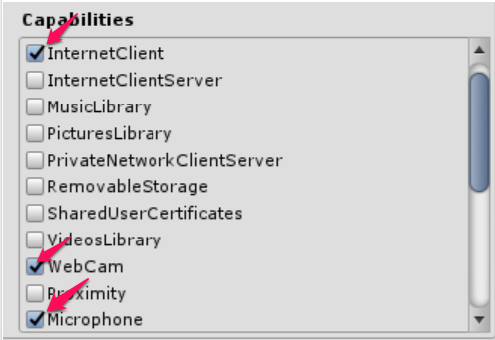

続いて、Unity C#にチェックを入れます。[Player Settings]は以上です。
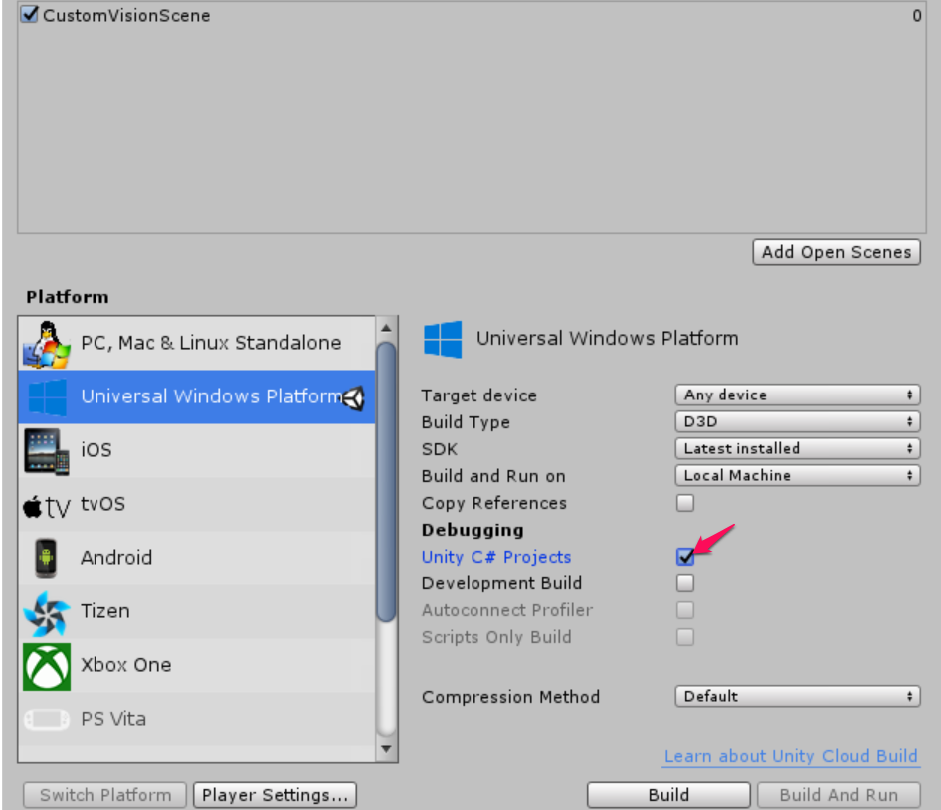
4.Newtonsoftライブラリのインポート
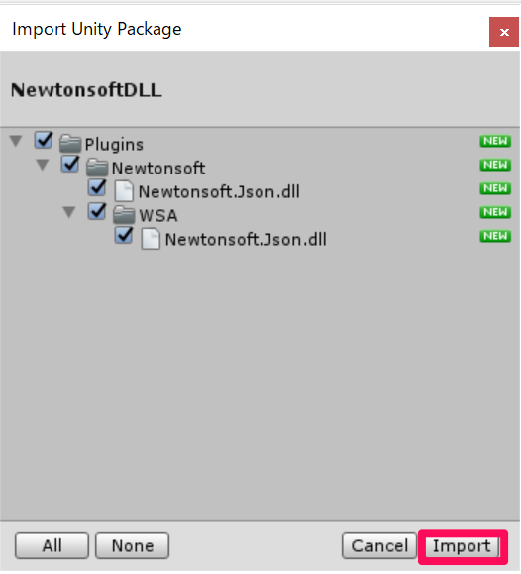
まず、Newtonsoftライブラリをダウンロードします。[Assets]->[Import Package]->[Custom Package]をクリックします。ダウンロードしたnewtosoftDLLをフォルダの名から探し選択します。
以下のようになっていることを確認して[Import]をクリックします。
2.カメラの作成、設定
[Hierarchy]->[MainCamera]を選択し[Inspector]を以下のように変更します。
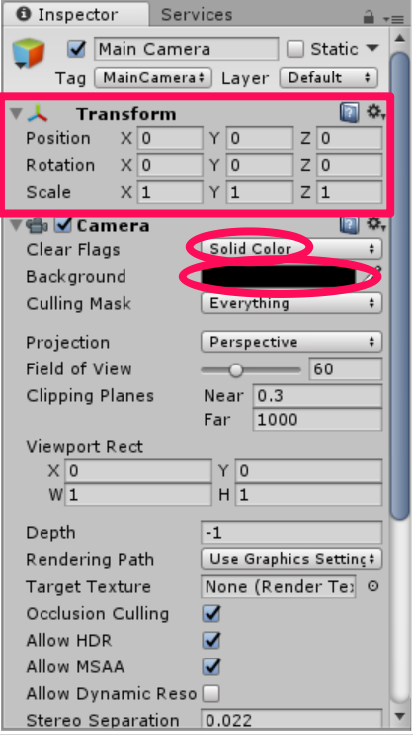
これで以上です。
3.スクリプトの作成
今回は以下の6つのスクリプトを作っていきます。
・CustomVisionAnalyser
・CustomVisionObjects
・VoiceRecognizer
・CustomVIsionTrainer
・SceneOrgaaiser
・ImageCapture
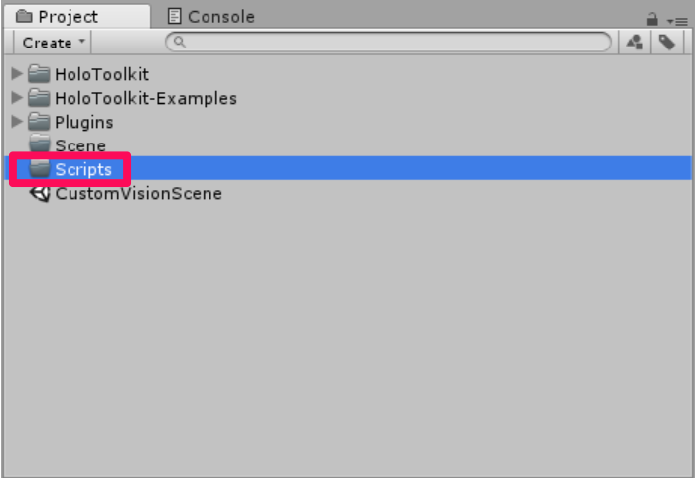
1.すべてのスクリプトをまとめておくフォルダーを作成します。[Project]->[Create]をクリックし、[Folder]を選択して新しいフォルダーを作ります。名前をScriptsとします。
2.CustomVisionAnalyserクラスをつくる
[Project]->[Create]->[C# Script]をクリックし、名前をCustomVisionAnalyserとします。以下のコードをうつしてきますが、ここで0.準備の8で取得したPrediction Keyとprediction endpointを使います。コードの日本語で書かれた文を削除し、かわりにそれらを挿入していきます。
このクラスは次の役割を担います。
・画像を配列としてロードする
・ロードした画像データをAzure Custom Vision Serviceに送信する。
・Azure Custom Vision Serviceから結果を受け取る
・結果をSceneOrganiserクラスに渡す
|
1 2 3 4 5 6 7 8 9 10 11 12 13 14 15 16 17 18 19 20 21 22 23 24 25 26 27 28 29 30 31 32 33 34 35 36 37 38 39 40 41 42 43 44 45 46 47 48 49 50 51 52 53 54 55 56 57 58 59 60 61 62 63 64 65 66 67 68 69 70 71 72 73 74 75 76 77 78 79 80 81 82 83 84 85 86 87 88 |
using System.Collections.Generic; using System.Collections; using System.IO; using UnityEngine; using UnityEngine.Networking; using Newtonsoft.Json; public class CustomVisionAnalyser : MonoBehaviour { /// <summary> /// Unique instance of this class /// </summary> public static CustomVisionAnalyser Instance; /// <summary> /// Insert your Prediction Key here /// </summary> private string predictionKey = "先ほど取得したプレディクションキー"; /// <summary> /// Insert your prediction endpoint here /// </summary> private string predictionEndpoint = "先ほど取得したプレディクションエンドポイント"; /// <summary> /// Byte array of the image to submit for analysis /// </summary> [HideInInspector] public byte[] imageBytes; /// <summary> /// Initialises this class /// </summary> private void Awake() { // Allows this instance to behave like a singleton Instance = this; } /// <summary> /// Call the Computer Vision Service to submit the image. /// </summary> public IEnumerator AnalyseLastImageCaptured(string imagePath) { WWWForm webForm = new WWWForm(); using (UnityWebRequest unityWebRequest = UnityWebRequest.Post(predictionEndpoint, webForm)) { // Gets a byte array out of the saved image imageBytes = GetImageAsByteArray(imagePath); unityWebRequest.SetRequestHeader("Content-Type", "application/octet-stream"); unityWebRequest.SetRequestHeader("Prediction-Key", predictionKey); // The upload handler will help uploading the byte array with the request unityWebRequest.uploadHandler = new UploadHandlerRaw(imageBytes); unityWebRequest.uploadHandler.contentType = "application/octet-stream"; // The download handler will help receiving the analysis from Azure unityWebRequest.downloadHandler = new DownloadHandlerBuffer(); // Send the request yield return unityWebRequest.SendWebRequest(); string jsonResponse = unityWebRequest.downloadHandler.text; // The response will be in JSON format, therefore it needs to be deserialized // The following lines refers to a class that you will build in later Chapters // Wait until then to uncomment these lines AnalysisObject analysisObject = new AnalysisObject(); analysisObject = JsonConvert.DeserializeObject<AnalysisObject>(jsonResponse); SceneOrganiser.Instance.SetTagsToLastLabel(analysisObject); } } /// <summary> /// Returns the contents of the specified image file as a byte array. /// </summary> static byte[] GetImageAsByteArray(string imageFilePath) { FileStream fileStream = new FileStream(imageFilePath, FileMode.Open, FileAccess.Read); BinaryReader binaryReader = new BinaryReader(fileStream); return binaryReader.ReadBytes((int)fileStream.Length); } } |
3.CustomVisionObjectsをつくる
先ほど同様、新しいスクリプトを作り、名前をCustomVisionObjectsとします。そして、以下のコードを写していきます。このスクリプトで変更する点はありませんが、写経する場合は間違えてCustomVisionObjectsのクラスの中に他のクラスを書かないように注意しましょう。私は最初、中に入れてしまいました。この部分にエラーが出るのではなく他のスクリプト(SceneOrganizerなど)にエラーが出るので、そこに問題があるのだと勘違いしなかなか進みませんでした。
このクラスの役割は他のクラスがシリアライズ、デシリアライズするために使われる
|
1 2 3 4 5 6 7 8 9 10 11 12 13 14 15 16 17 18 19 20 21 22 23 24 25 26 27 28 29 30 31 32 33 34 35 36 37 38 39 40 41 42 43 44 45 46 47 48 49 50 51 52 53 54 55 56 57 58 59 60 61 62 63 64 65 66 67 68 69 70 71 72 73 74 75 76 77 78 79 80 81 82 83 84 85 86 87 88 89 90 91 92 93 94 95 96 97 98 99 100 101 102 103 104 105 106 107 108 109 110 111 112 113 114 115 116 117 118 119 120 121 122 123 |
using System.Collections; using System.Collections.Generic; using UnityEngine; using System; using UnityEngine.Networking; public class CustomVisionObjects : MonoBehaviour { } // The objects contained in this script represent the deserialized version // of the objects used by this application /// Web request object for image /// <summary> data /// </summary> class MultipartObject : IMultipartFormSection { public string sectionName { get; set; } public byte[] sectionData { get; set; } public string fileName { get; set; } public string contentType { get; set; } } /// <summary> /// JSON of all Tags existing within the project /// contains the list of Tags /// </summary> public class Tags_RootObject { public List<TagOfProject> Tags { get; set; } public int TotalTaggedImages { get; set; } public int TotalUntaggedImages { get; set; } } public class TagOfProject { public string Id { get; set; } public string Name { get; set; } public string Description { get; set; } public int ImageCount { get; set; } } /// <summary> /// JSON of Tag to associate to an image /// Contains a list of hosting the tags, /// since multiple tags can be associated with one image /// </summary> public class Tag_RootObject { public List<Tag> Tags { get; set; } } public class Tag { public string ImageId { get; set; } public string TagId { get; set; } } /// <summary> /// JSON of Images submitted /// Contains objects that host detailed information about one or more images /// </summary> public class ImageRootObject { public bool IsBatchSuccessful { get; set; } public List<SubmittedImage> Images { get; set; } } public class SubmittedImage { public string SourceUrl { get; set; } public string Status { get; set; } public ImageObject Image { get; set; } } public class ImageObject { public string Id { get; set; } public DateTime Created { get; set; } public int Width { get; set; } public int Height { get; set; } public string ImageUri { get; set; } public string ThumbnailUri { get; set; } } /// <summary> /// JSON of Service Iteration /// </summary> public class Iteration { public string Id { get; set; } public string Name { get; set; } public bool IsDefault { get; set; } public string Status { get; set; } public string Created { get; set; } public string LastModified { get; set; } public string TrainedAt { get; set; } public string ProjectId { get; set; } public bool Exportable { get; set; } public string DomainId { get; set; } } /// <summary> /// Predictions received by the Service after submitting an image for analysis /// </summary> [Serializable] public class AnalysisObject { public List<Prediction> Predictions { get; set; } } [Serializable] public class Prediction { public string TagName { get; set; } public double Probability { get; set; } } |
4.VoiceRecognizerクラスをつくる
先ほど同様に新しいスクリプトをつくり、名前をVoiceRecoginzerとします。このスクリプトも特に注意点はありませんので以下のコードを写していきます。
このクラスの役割はユーザーからの音声入力を認識することです。
|
1 2 3 4 5 6 7 8 9 10 11 12 13 14 15 16 17 18 19 20 21 22 23 24 25 26 27 28 29 30 31 32 33 34 35 36 37 38 39 40 41 42 43 44 45 46 47 48 49 50 51 52 53 54 55 56 57 58 59 60 61 62 63 64 65 66 67 68 69 70 71 72 73 74 75 76 77 78 |
using System; using System.Collections.Generic; using System.Linq; using UnityEngine; using UnityEngine.Windows.Speech; using System.Collections; public class VoiceRecognizer : MonoBehaviour { /// <summary> /// Allows this class to behave like a singleton /// </summary> public static VoiceRecognizer Instance; /// <summary> /// Recognizer class for voice recognition /// </summary> internal KeywordRecognizer keywordRecognizer; /// <summary> /// List of Keywords registered /// </summary> private Dictionary<string, Action> _keywords = new Dictionary<string, Action>(); /// <summary> /// Called on initialization /// </summary> private void Awake() { Instance = this; } /// <summary> /// Runs at initialization right after Awake method /// </summary> void Start() { Array tagsArray = Enum.GetValues(typeof(CustomVisionTrainer.Tags)); foreach (object tagWord in tagsArray) { _keywords.Add(tagWord.ToString(), () => { // When a word is recognized, the following line will be called CustomVisionTrainer.Instance.VerifyTag(tagWord.ToString()); }); } _keywords.Add("Discard", () => { // When a word is recognized, the following line will be called // The user does not want to submit the image // therefore ignore and discard the process ImageCapture.Instance.ResetImageCapture(); keywordRecognizer.Stop(); }); //Create the keyword recognizer keywordRecognizer = new KeywordRecognizer(_keywords.Keys.ToArray()); // Register for the OnPhraseRecognized event keywordRecognizer.OnPhraseRecognized += KeywordRecognizer_OnPhraseRecognized; } /// <summary> /// Handler called when a word is recognized /// </summary> private void KeywordRecognizer_OnPhraseRecognized(PhraseRecognizedEventArgs args) { Action keywordAction; // if the keyword recognized is in our dictionary, call that Action. if (_keywords.TryGetValue(args.text, out keywordAction)) { keywordAction.Invoke(); } } } |
5.CustomVisionTrainerを作成する。
同様にスクリプトをつくり、名前をCustomVisionTrainerとします。以下のコードを写していくのですが、ここで0.準備の10で取得したTraining KeyとProject Idを使います。日本語の部分を削除して順序を間違えないようにTraining KeyとProject Idを挿入していきます。
このクラスはホロレンズで撮った画像を学習させる際に使われます。
|
1 2 3 4 5 6 7 8 9 10 11 12 13 14 15 16 17 18 19 20 21 22 23 24 25 26 27 28 29 30 31 32 33 34 35 36 37 38 39 40 41 42 43 44 45 46 47 48 49 50 51 52 53 54 55 56 57 58 59 60 61 62 63 64 65 66 67 68 69 70 71 72 73 74 75 76 77 78 79 80 81 82 83 84 85 86 87 88 89 90 91 92 93 94 95 96 97 98 99 100 101 102 103 104 105 106 107 108 109 110 111 112 113 114 115 116 117 118 119 120 121 122 123 124 125 126 127 128 129 130 131 132 133 134 135 136 137 138 139 140 141 142 143 144 145 146 147 148 149 150 151 152 153 154 155 156 157 158 159 160 161 162 163 164 165 166 167 168 169 170 171 172 173 174 175 176 177 178 179 180 181 182 183 184 185 186 187 188 189 190 191 192 193 194 195 196 197 198 199 200 201 202 203 204 205 206 207 208 209 210 211 212 213 214 215 216 217 218 219 220 221 222 223 224 225 226 227 228 229 230 231 232 233 234 235 236 237 238 239 240 241 242 243 244 245 246 247 248 249 250 251 252 253 254 255 256 257 258 259 260 261 262 263 264 265 266 267 268 269 270 271 272 273 274 275 276 277 278 279 280 281 282 283 284 285 286 287 288 289 290 |
<pre class="lang:c# decode:true " title="CustomVisionTrainer" >using Newtonsoft.Json; using System.Collections; using System.Collections.Generic; using System.IO; using System.Text; using UnityEngine; using UnityEngine.Networking; public class CustomVisionTrainer : MonoBehaviour { /// <summary> /// Allows this class to behave like a singleton /// </summary> public static CustomVisionTrainer Instance; /// <summary> /// Custom Vision Service URL root /// </summary> private string url = "https://southcentralus.api.cognitive.microsoft.com/customvision/v1.2/Training/projects/"; /// <summary> /// Insert your prediction key here /// </summary> private string trainingKey = "先ほど入手したトレーニングキー"; /// <summary> /// Insert your Project Id here /// </summary> private string projectId = "先ほど入手したプロジェクトID"; /// <summary> /// Byte array of the image to submit for analysis /// </summary> internal byte[] imageBytes; /// <summary> /// The Tags accepted /// </summary> internal enum Tags { Mouse, Keyboard } /// <summary> /// The UI displaying the training Chapters /// </summary> private TextMesh trainingUI_TextMesh; /// <summary> /// Called on initialization /// </summary> private void Awake() { Instance = this; } /// <summary> /// Runs at initialization right after Awake method /// </summary> private void Start() { trainingUI_TextMesh = SceneOrganiser.Instance.CreateTrainingUI("TrainingUI", 0.04f, 0, 4, false); } internal void RequestTagSelection() { trainingUI_TextMesh.gameObject.SetActive(true); trainingUI_TextMesh.text = $" \nUse voice command \nto choose between the following tags: \nMouse\nKeyboard \nor say Discard"; VoiceRecognizer.Instance.keywordRecognizer.Start(); } /// <summary> /// Verify voice input against stored tags. /// If positive, it will begin the Service training process. /// </summary> internal void VerifyTag(string spokenTag) { if (spokenTag == Tags.Mouse.ToString() || spokenTag == Tags.Keyboard.ToString()) { trainingUI_TextMesh.text = $"Tag chosen: {spokenTag}"; VoiceRecognizer.Instance.keywordRecognizer.Stop(); StartCoroutine(SubmitImageForTraining(ImageCapture.Instance.filePath, spokenTag)); } } /// <summary> /// Call the Custom Vision Service to submit the image. /// </summary> public IEnumerator SubmitImageForTraining(string imagePath, string tag) { yield return new WaitForSeconds(2); trainingUI_TextMesh.text = $"Submitting Image \nwith tag: {tag} \nto Custom Vision Service"; string imageId = string.Empty; string tagId = string.Empty; // Retrieving the Tag Id relative to the voice input string getTagIdEndpoint = string.Format("{0}{1}/tags", url, projectId); using (UnityWebRequest www = UnityWebRequest.Get(getTagIdEndpoint)) { www.SetRequestHeader("Training-Key", trainingKey); www.downloadHandler = new DownloadHandlerBuffer(); yield return www.SendWebRequest(); string jsonResponse = www.downloadHandler.text; Tags_RootObject tagRootObject = JsonConvert.DeserializeObject<Tags_RootObject>(jsonResponse); foreach (TagOfProject tOP in tagRootObject.Tags) { if (tOP.Name == tag) { tagId = tOP.Id; } } } // Creating the image object to send for training List<IMultipartFormSection> multipartList = new List<IMultipartFormSection>(); MultipartObject multipartObject = new MultipartObject(); multipartObject.contentType = "application/octet-stream"; multipartObject.fileName = ""; multipartObject.sectionData = GetImageAsByteArray(imagePath); multipartList.Add(multipartObject); string createImageFromDataEndpoint = string.Format("{0}{1}/images?tagIds={2}", url, projectId, tagId); using (UnityWebRequest www = UnityWebRequest.Post(createImageFromDataEndpoint, multipartList)) { // Gets a byte array out of the saved image imageBytes = GetImageAsByteArray(imagePath); //unityWebRequest.SetRequestHeader("Content-Type", "application/octet-stream"); www.SetRequestHeader("Training-Key", trainingKey); // The upload handler will help uploading the byte array with the request www.uploadHandler = new UploadHandlerRaw(imageBytes); // The download handler will help receiving the analysis from Azure www.downloadHandler = new DownloadHandlerBuffer(); // Send the request yield return www.SendWebRequest(); string jsonResponse = www.downloadHandler.text; ImageRootObject m = JsonConvert.DeserializeObject<ImageRootObject>(jsonResponse); imageId = m.Images[0].Image.Id; } trainingUI_TextMesh.text = "Image uploaded"; StartCoroutine(TrainCustomVisionProject()); } /// <summary> /// Call the Custom Vision Service to train the Service. /// It will generate a new Iteration in the Service /// </summary> public IEnumerator TrainCustomVisionProject() { yield return new WaitForSeconds(2); trainingUI_TextMesh.text = "Training Custom Vision Service"; WWWForm webForm = new WWWForm(); string trainProjectEndpoint = string.Format("{0}{1}/train", url, projectId); using (UnityWebRequest www = UnityWebRequest.Post(trainProjectEndpoint, webForm)) { www.SetRequestHeader("Training-Key", trainingKey); www.downloadHandler = new DownloadHandlerBuffer(); yield return www.SendWebRequest(); string jsonResponse = www.downloadHandler.text; Debug.Log($"Training - JSON Response: {jsonResponse}"); // A new iteration that has just been created and trained Iteration iteration = new Iteration(); iteration = JsonConvert.DeserializeObject<Iteration>(jsonResponse); if (www.isDone) { trainingUI_TextMesh.text = "Custom Vision Trained"; // Since the Service has a limited number of iterations available, // we need to set the last trained iteration as default // and delete all the iterations you dont need anymore StartCoroutine(SetDefaultIteration(iteration)); } } } /// <summary> /// Set the newly created iteration as Default /// </summary> private IEnumerator SetDefaultIteration(Iteration iteration) { yield return new WaitForSeconds(5); trainingUI_TextMesh.text = "Setting default iteration"; // Set the last trained iteration to default iteration.IsDefault = true; // Convert the iteration object as JSON string iterationAsJson = JsonConvert.SerializeObject(iteration); byte[] bytes = Encoding.UTF8.GetBytes(iterationAsJson); string setDefaultIterationEndpoint = string.Format("{0}{1}/iterations/{2}", url, projectId, iteration.Id); using (UnityWebRequest www = UnityWebRequest.Put(setDefaultIterationEndpoint, bytes)) { www.method = "PATCH"; www.SetRequestHeader("Training-Key", trainingKey); www.SetRequestHeader("Content-Type", "application/json"); www.downloadHandler = new DownloadHandlerBuffer(); yield return www.SendWebRequest(); string jsonResponse = www.downloadHandler.text; if (www.isDone) { trainingUI_TextMesh.text = "Default iteration is set \nDeleting Unused Iteration"; StartCoroutine(DeletePreviousIteration(iteration)); } } } /// <summary> /// Delete the previous non-default iteration. /// </summary> public IEnumerator DeletePreviousIteration(Iteration iteration) { yield return new WaitForSeconds(5); trainingUI_TextMesh.text = "Deleting Unused \nIteration"; string iterationToDeleteId = string.Empty; string findAllIterationsEndpoint = string.Format("{0}{1}/iterations", url, projectId); using (UnityWebRequest www = UnityWebRequest.Get(findAllIterationsEndpoint)) { www.SetRequestHeader("Training-Key", trainingKey); www.downloadHandler = new DownloadHandlerBuffer(); yield return www.SendWebRequest(); string jsonResponse = www.downloadHandler.text; // The iteration that has just been trained List<Iteration> iterationsList = new List<Iteration>(); iterationsList = JsonConvert.DeserializeObject<List<Iteration>>(jsonResponse); foreach (Iteration i in iterationsList) { if (i.IsDefault != true) { Debug.Log($"Cleaning - Deleting iteration: {i.Name}, {i.Id}"); iterationToDeleteId = i.Id; break; } } } string deleteEndpoint = string.Format("{0}{1}/iterations/{2}", url, projectId, iterationToDeleteId); using (UnityWebRequest www2 = UnityWebRequest.Delete(deleteEndpoint)) { www2.SetRequestHeader("Training-Key", trainingKey); www2.downloadHandler = new DownloadHandlerBuffer(); yield return www2.SendWebRequest(); string jsonResponse = www2.downloadHandler.text; trainingUI_TextMesh.text = "Iteration Deleted"; yield return new WaitForSeconds(2); trainingUI_TextMesh.text = "Ready for next \ncapture"; yield return new WaitForSeconds(2); trainingUI_TextMesh.text = ""; ImageCapture.Instance.ResetImageCapture(); } } /// <summary> /// Returns the contents of the specified image file as a byte array. /// </summary> static byte[] GetImageAsByteArray(string imageFilePath) { FileStream fileStream = new FileStream(imageFilePath, FileMode.Open, FileAccess.Read); BinaryReader binaryReader = new BinaryReader(fileStream); return binaryReader.ReadBytes((int)fileStream.Length); } }</code> |
6.SceneOrganiserを作成する。
これも同様にして新しいスクリプトをつくり、名前をSceneOrganiserとして編集していきます。Organiserのスペルがzerでなくserであることに注意します。このクラスを他のクラスで使う時、SceneOrganiserとしているので、zerとしてしまうと他のクラスでエラーが出ます。コード自体は以下のコードを変更せずにそのまま写して大丈夫です。
このクラスの主な役割は次の通りです。
・メインカメラのカーソルをつくる。
・CustomVisionAnalyzerから受け取った結果を表示する。
・学習モードの際の表示をする
|
1 2 3 4 5 6 7 8 9 10 11 12 13 14 15 16 17 18 19 20 21 22 23 24 25 26 27 28 29 30 31 32 33 34 35 36 37 38 39 40 41 42 43 44 45 46 47 48 49 50 51 52 53 54 55 56 57 58 59 60 61 62 63 64 65 66 67 68 69 70 71 72 73 74 75 76 77 78 79 80 81 82 83 84 85 86 87 88 89 90 91 92 93 94 95 96 97 98 99 100 101 102 103 104 105 106 107 108 109 110 111 112 113 114 115 116 117 118 119 120 121 122 123 124 125 126 127 128 129 130 131 132 133 134 135 136 137 138 139 140 141 142 143 144 145 146 147 148 149 150 151 152 153 154 155 156 157 158 159 160 161 162 163 164 165 166 167 168 169 170 171 172 173 174 175 176 177 178 179 180 181 182 183 184 185 186 187 188 189 190 191 192 193 194 195 196 197 198 199 200 201 202 203 204 205 206 207 208 209 210 211 212 213 214 |
using System; using UnityEngine; using System.Collections; using System.Collections.Generic; public class SceneOrganiser : MonoBehaviour { /// <summary> /// Allows this class to behave like a singleton /// </summary> public static SceneOrganiser Instance; /// <summary> /// The cursor object attached to the camera /// </summary> internal GameObject cursor; /// <summary> /// The label used to display the analysis on the objects in the real world /// </summary> internal GameObject label; /// <summary> /// Object providing the current status of the camera. /// </summary> internal TextMesh cameraStatusIndicator; /// <summary> /// Reference to the last label positioned /// </summary> internal Transform lastLabelPlaced; /// <summary> /// Reference to the last label positioned /// </summary> internal TextMesh lastLabelPlacedText; /// <summary> /// Current threshold accepted for displaying the label /// Reduce this value to display the recognition more often /// </summary> internal float probabilityThreshold = 0.5f; /// <summary> /// Called on initialization /// </summary> private void Awake() { // Use this class instance as singleton Instance = this; // Add the ImageCapture class to this GameObject gameObject.AddComponent<ImageCapture>(); // Add the CustomVisionAnalyser class to this GameObject gameObject.AddComponent<CustomVisionAnalyser>(); // Add the CustomVisionTrainer class to this GameObject gameObject.AddComponent<CustomVisionTrainer>(); // Add the VoiceRecogniser class to this GameObject gameObject.AddComponent<VoiceRecognizer>(); // Add the CustomVisionObjects class to this GameObject gameObject.AddComponent<CustomVisionObjects>(); // Create the camera Cursor cursor = CreateCameraCursor(); // Load the label prefab as reference label = CreateLabel(); // Create the camera status indicator label, and place it above where predictions // and training UI will appear. cameraStatusIndicator = CreateTrainingUI("Status Indicator", 0.02f, 0.2f, 3, true); // Set camera status indicator to loading. SetCameraStatus("Loading"); } /// <summary> /// Spawns cursor for the Main Camera /// </summary> private GameObject CreateCameraCursor() { // Create a sphere as new cursor GameObject newCursor = GameObject.CreatePrimitive(PrimitiveType.Sphere); // Attach it to the camera newCursor.transform.parent = gameObject.transform; // Resize the new cursor newCursor.transform.localScale = new Vector3(0.02f, 0.02f, 0.02f); // Move it to the correct position newCursor.transform.localPosition = new Vector3(0, 0, 4); // Set the cursor color to red newCursor.GetComponent<Renderer>().material = new Material(Shader.Find("Diffuse")); newCursor.GetComponent<Renderer>().material.color = Color.green; return newCursor; } /// <summary> /// Create the analysis label object /// </summary> private GameObject CreateLabel() { // Create a sphere as new cursor GameObject newLabel = new GameObject(); // Resize the new cursor newLabel.transform.localScale = new Vector3(0.01f, 0.01f, 0.01f); // Creating the text of the label TextMesh t = newLabel.AddComponent<TextMesh>(); t.anchor = TextAnchor.MiddleCenter; t.alignment = TextAlignment.Center; t.fontSize = 50; t.text = ""; return newLabel; } /// <summary> /// Set the camera status to a provided string. Will be coloured if it matches a keyword. /// </summary> /// <param name="statusText">Input string</param> public void SetCameraStatus(string statusText) { if (string.IsNullOrEmpty(statusText) == false) { string message = "white"; switch (statusText.ToLower()) { case "loading": message = "yellow"; break; case "ready": message = "green"; break; case "uploading image": message = "red"; break; case "looping capture": message = "yellow"; break; case "analysis": message = "red"; break; } cameraStatusIndicator.GetComponent<TextMesh>().text = $"Camera Status:\n<color={message}>{statusText}..</color>"; } } /// <summary> /// Instantiate a label in the appropriate location relative to the Main Camera. /// </summary> public void PlaceAnalysisLabel() { lastLabelPlaced = Instantiate(label.transform, cursor.transform.position, transform.rotation); lastLabelPlacedText = lastLabelPlaced.GetComponent<TextMesh>(); } /// <summary> /// Set the Tags as Text of the last label created. /// </summary> public void SetTagsToLastLabel(AnalysisObject analysisObject) { lastLabelPlacedText = lastLabelPlaced.GetComponent<TextMesh>(); if (analysisObject.Predictions != null) { foreach (Prediction p in analysisObject.Predictions) { if (p.Probability > 0.02) { lastLabelPlacedText.text += $"Detected: {p.TagName} {p.Probability.ToString("0.00 \n")}"; Debug.Log($"Detected: {p.TagName} {p.Probability.ToString("0.00 \n")}"); } } } } /// <summary> /// Create a 3D Text Mesh in scene, with various parameters. /// </summary> /// <param name="name">name of object</param> /// <param name="scale">scale of object (i.e. 0.04f)</param> /// <param name="yPos">height above the cursor (i.e. 0.3f</param> /// <param name="zPos">distance from the camera</param> /// <param name="setActive">whether the text mesh should be visible when it has been created</param> /// <returns>Returns a 3D text mesh within the scene</returns> internal TextMesh CreateTrainingUI(string name, float scale, float yPos, float zPos, bool setActive) { GameObject display = new GameObject(name, typeof(TextMesh)); display.transform.parent = Camera.main.transform; display.transform.localPosition = new Vector3(0, yPos, zPos); display.SetActive(setActive); display.transform.localScale = new Vector3(scale, scale, scale); display.transform.rotation = new Quaternion(); TextMesh textMesh = display.GetComponent<TextMesh>(); textMesh.anchor = TextAnchor.MiddleCenter; textMesh.alignment = TextAlignment.Center; return textMesh; } } |
7.ImageCaptureクラスを作成する。
最後のクラスです。今まで同様新しいスクリプトをつくり、名前をImageCaptureとします。このクラスは学習モードと認識・識別モードをスイッチする役割を持っています。白文字をAnalysisのままにすると認識・識別モードとなり、Trainingとすると学習モードになります。
このクラスの役割は次の通りです。
・画像をAppフォルダーに保存する。
・ユーザーのジェスチャーの処理
・学習モードと認識・識別モードの切り替え
|
1 2 3 4 5 6 7 8 9 10 11 12 13 14 15 16 17 18 19 20 21 22 23 24 25 26 27 28 29 30 31 32 33 34 35 36 37 38 39 40 41 42 43 44 45 46 47 48 49 50 51 52 53 54 55 56 57 58 59 60 61 62 63 64 65 66 67 68 69 70 71 72 73 74 75 76 77 78 79 80 81 82 83 84 85 86 87 88 89 90 91 92 93 94 95 96 97 98 99 100 101 102 103 104 105 106 107 108 109 110 111 112 113 114 115 116 117 118 119 120 121 122 123 124 125 126 127 128 129 130 131 132 133 134 135 136 137 138 139 140 141 142 143 144 145 146 147 148 149 150 151 152 153 154 155 156 157 158 159 160 161 162 163 164 165 166 167 168 169 170 171 172 173 174 175 176 177 178 179 180 181 182 183 184 185 186 187 188 189 190 191 192 193 194 195 196 197 198 199 200 201 202 203 204 205 206 207 208 209 210 211 212 213 214 215 216 217 218 219 220 221 222 223 224 225 226 227 228 229 230 231 232 233 234 235 |
using UnityEngine; using UnityEngine.XR.WSA.Input; using UnityEngine.XR.WSA.WebCam; using System.Collections; using System.Collections.Generic; public class ImageCapture : MonoBehaviour { /// <summary> /// Allows this class to behave like a singleton /// </summary> public static ImageCapture Instance; /// <summary> /// Keep counts of the taps for image renaming /// </summary> private int captureCount = 0; /// <summary> /// Photo Capture object /// </summary> private PhotoCapture photoCaptureObject = null; /// <summary> /// Allows gestures recognition in HoloLens /// </summary> private GestureRecognizer recognizer; /// <summary> /// Loop timer /// </summary> private float secondsBetweenCaptures = 10f; /// <summary> /// Application main functionalities switch /// </summary> internal enum AppModes { Analysis, Training } /// <summary> /// Local variable for current AppMode /// </summary> internal AppModes AppMode { get; private set; } /// <summary> /// Flagging if the capture loop is running /// </summary> internal bool captureIsActive; /// <summary> /// File path of current analysed photo /// </summary> internal string filePath = string.Empty; /// <summary> /// Called on initialization /// </summary> private void Awake() { Instance = this; // Change this flag to switch between Analysis Mode and Training Mode AppMode = AppModes.Analysis; } /// <summary> /// Runs at initialization right after Awake method /// </summary> void Start() { // Clean up the LocalState folder of this application from all photos stored DirectoryInfo info = new DirectoryInfo(Application.persistentDataPath); var fileInfo = info.GetFiles(); foreach (var file in fileInfo) { try { file.Delete(); } catch (Exception) { Debug.LogFormat("Cannot delete file: ", file.Name); } } // Subscribing to the Hololens API gesture recognizer to track user gestures recognizer = new GestureRecognizer(); recognizer.SetRecognizableGestures(GestureSettings.Tap); recognizer.Tapped += TapHandler; recognizer.StartCapturingGestures(); SceneOrganiser.Instance.SetCameraStatus("Ready"); } /// <summary> /// Respond to Tap Input. /// </summary> private void TapHandler(TappedEventArgs obj) { switch (AppMode) { case AppModes.Analysis: if (!captureIsActive) { captureIsActive = true; // Set the cursor color to red SceneOrganiser.Instance.cursor.GetComponent<Renderer>().material.color = Color.red; // Update camera status to looping capture. SceneOrganiser.Instance.SetCameraStatus("Looping Capture"); // Begin the capture loop InvokeRepeating("ExecuteImageCaptureAndAnalysis", 0, secondsBetweenCaptures); } else { // The user tapped while the app was analyzing // therefore stop the analysis process ResetImageCapture(); } break; case AppModes.Training: if (!captureIsActive) { captureIsActive = true; // Call the image capture ExecuteImageCaptureAndAnalysis(); // Set the cursor color to red SceneOrganiser.Instance.cursor.GetComponent<Renderer>().material.color = Color.red; // Update camera status to uploading image. SceneOrganiser.Instance.SetCameraStatus("Uploading Image"); } break; } } /// <summary> /// Begin process of Image Capturing and send To Azure Custom Vision Service. /// </summary> private void ExecuteImageCaptureAndAnalysis() { // Update camera status to analysis. SceneOrganiser.Instance.SetCameraStatus("Analysis"); // Create a label in world space using the SceneOrganiser class // Invisible at this point but correctly positioned where the image was taken SceneOrganiser.Instance.PlaceAnalysisLabel(); // Set the camera resolution to be the highest possible Resolution cameraResolution = PhotoCapture.SupportedResolutions.OrderByDescending((res) => res.width * res.height).First(); Texture2D targetTexture = new Texture2D(cameraResolution.width, cameraResolution.height); // Begin capture process, set the image format PhotoCapture.CreateAsync(false, delegate (PhotoCapture captureObject) { photoCaptureObject = captureObject; CameraParameters camParameters = new CameraParameters { hologramOpacity = 0.0f, cameraResolutionWidth = targetTexture.width, cameraResolutionHeight = targetTexture.height, pixelFormat = CapturePixelFormat.BGRA32 }; // Capture the image from the camera and save it in the App internal folder captureObject.StartPhotoModeAsync(camParameters, delegate (PhotoCapture.PhotoCaptureResult result) { string filename = string.Format(@"CapturedImage{0}.jpg", captureCount); filePath = Path.Combine(Application.persistentDataPath, filename); captureCount++; photoCaptureObject.TakePhotoAsync(filePath, PhotoCaptureFileOutputFormat.JPG, OnCapturedPhotoToDisk); }); }); } /// <summary> /// Register the full execution of the Photo Capture. /// </summary> void OnCapturedPhotoToDisk(PhotoCapture.PhotoCaptureResult result) { // Call StopPhotoMode once the image has successfully captured photoCaptureObject.StopPhotoModeAsync(OnStoppedPhotoMode); } /// <summary> /// The camera photo mode has stopped after the capture. /// Begin the Image Analysis process. /// </summary> void OnStoppedPhotoMode(PhotoCapture.PhotoCaptureResult result) { Debug.LogFormat("Stopped Photo Mode"); // Dispose from the object in memory and request the image analysis photoCaptureObject.Dispose(); photoCaptureObject = null; switch (AppMode) { case AppModes.Analysis: // Call the image analysis StartCoroutine(CustomVisionAnalyser.Instance.AnalyseLastImageCaptured(filePath)); break; case AppModes.Training: // Call training using captured image CustomVisionTrainer.Instance.RequestTagSelection(); break; } } /// <summary> /// Stops all capture pending actions /// </summary> internal void ResetImageCapture() { captureIsActive = false; // Set the cursor color to green SceneOrganiser.Instance.cursor.GetComponent<Renderer>().material.color = Color.green; // Update camera status to ready. SceneOrganiser.Instance.SetCameraStatus("Ready"); // Stop the capture loop if active CancelInvoke(); } } |
スクリプトは以上です。
8.最後にSceneOrganiserを[MainCamera]にD&Dします。
4.使ってみよう
最後のステップです。今までに実装したものをホロレンズ上で実行してみたいと思います。ビルドする方法はこちらを参照してください。最初に行った設定を変えずに[Build]をすることに注意します。
Buildが無事完了したら、ホロレンズを装着してアプリを試してみます。Analysisモードで試してみるとこのようになります。
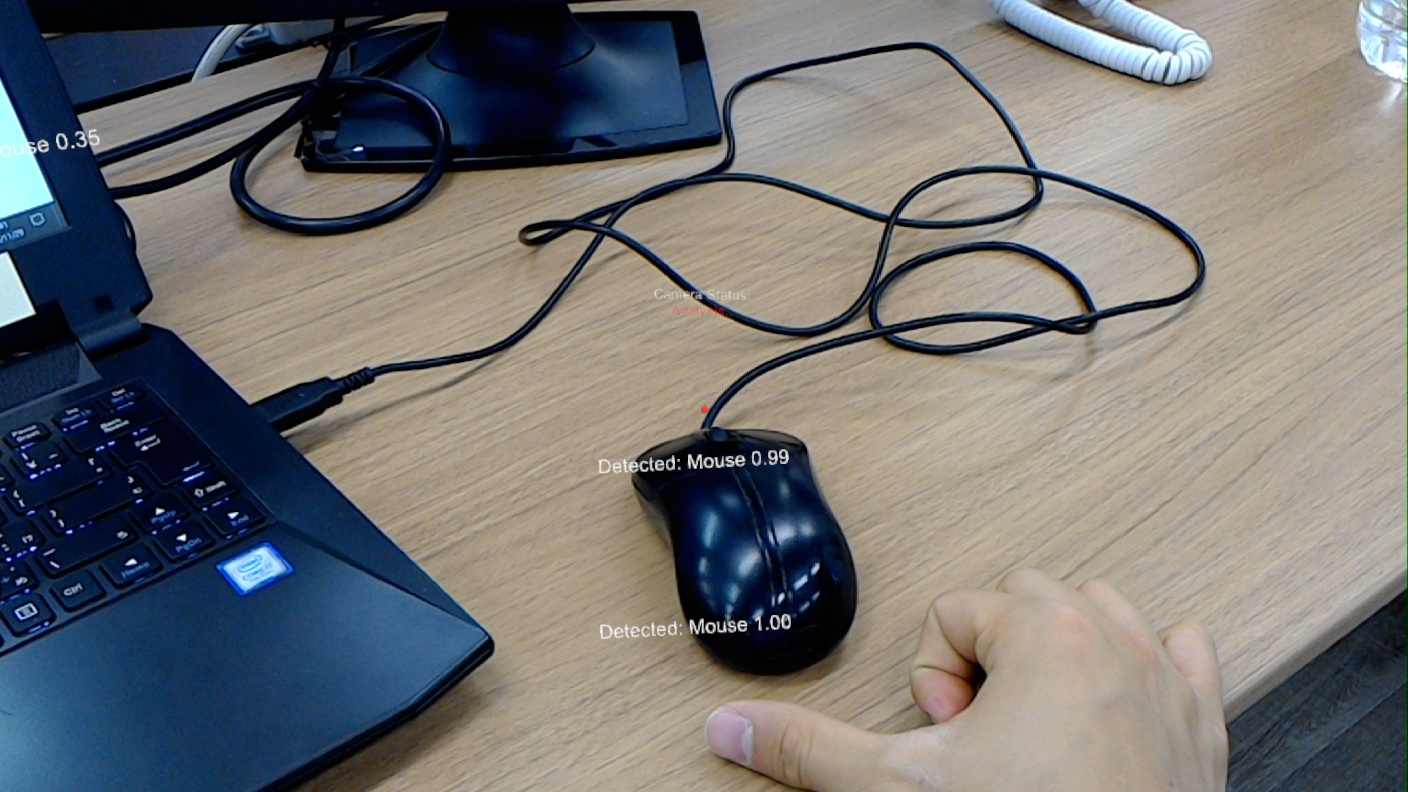
今回はタグ名としてMouseとKeyboardとしましたが、他のタグ名をつけた場合はスクリプトを少し修正しなければなりませんので注意しましょう。
以上となります。 お疲れ様でした
