こんにちは、ナレコム菅井です
今回はMR and Azure302の画像認識アプリを作っていきたいと思います。
使用したツールは以下の通りです。
・Windows10
・Unity 2017.4.11f1
・visual studio2017
・HoloLens
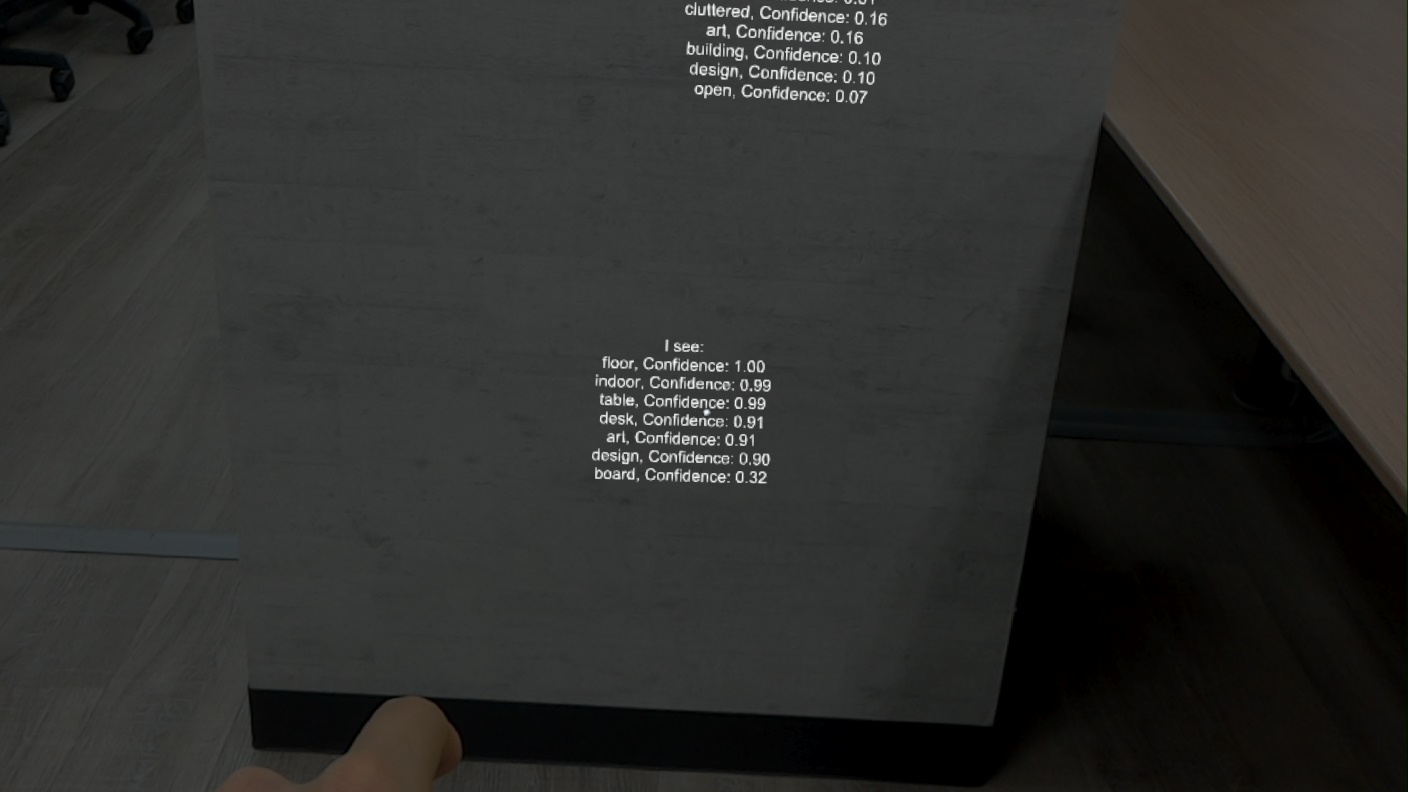
目標はある物体に焦点を合わせエアタップしたとき、その物体が何であるか確率とともに表示することです。それではさっそく始めていきましょう!
0.準備
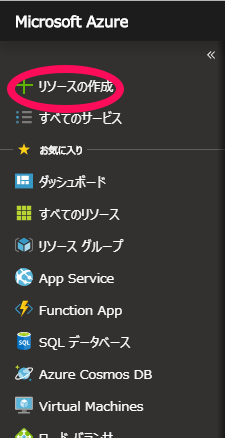
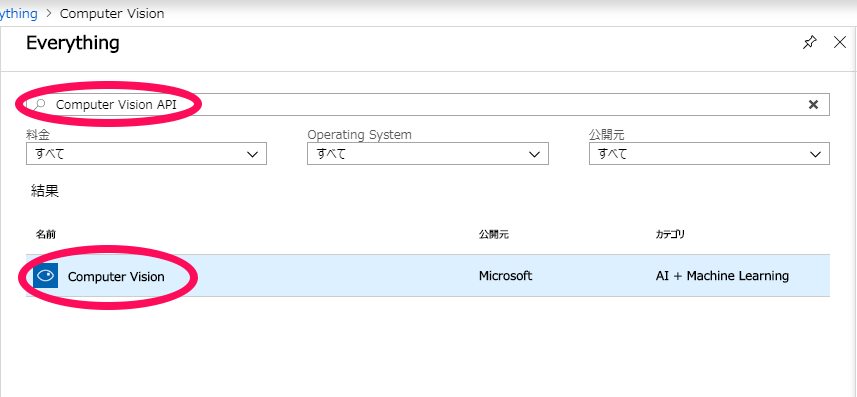
Azure Computer Visionを使って画像認識していくので、まずはAzure Potalにログインします。アカウントがない方はアカウントを作ってください。ログインして[リソースの作成]を開いた後、Computer Vision APIと検索します。そして[Computer Vision]を選択します。
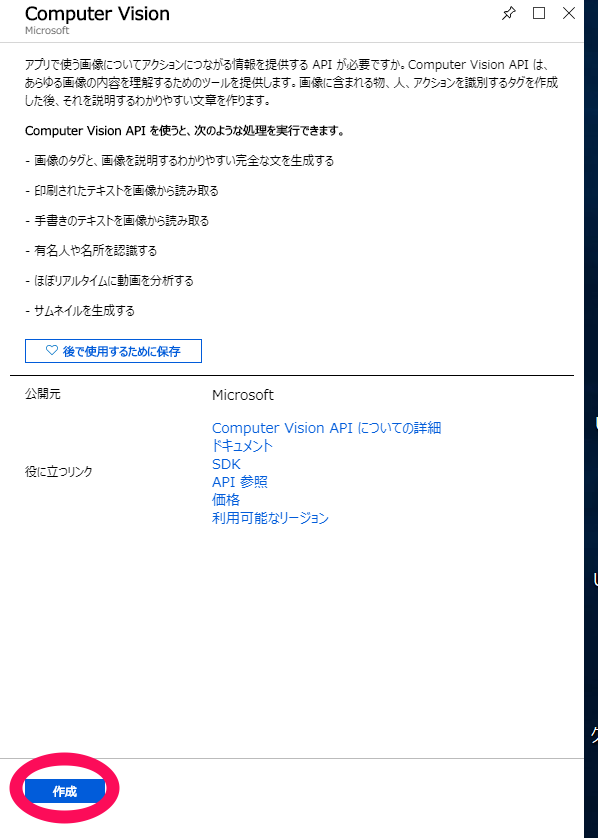
Computer Vision APIの説明文がでてきます。ここで[作成]をクリックします。
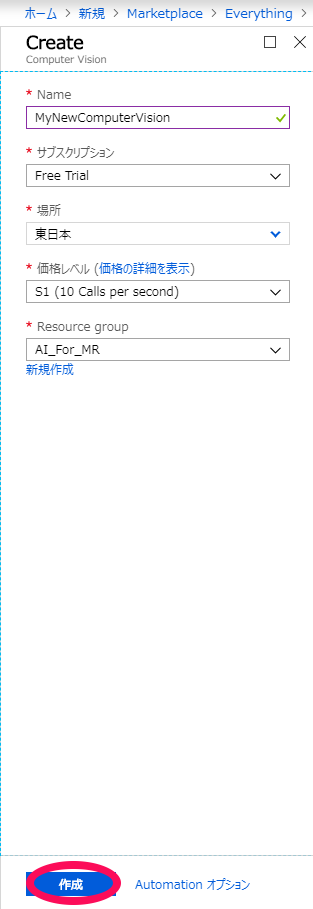
このあとさまざまな個人情報を入力させられますが、登録自体は無料でできるので同意したうえで記入していきます。登録が終わると以下の画面になりますので入力をすませて、[作成]をクリックします。
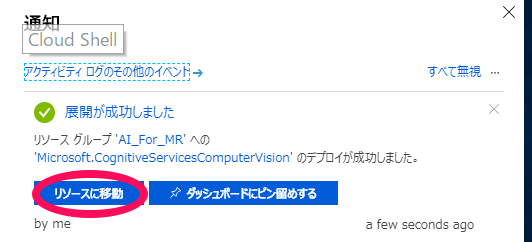
お知らせのタブを開き、[リソースへ移動]をクリックします。
![]()
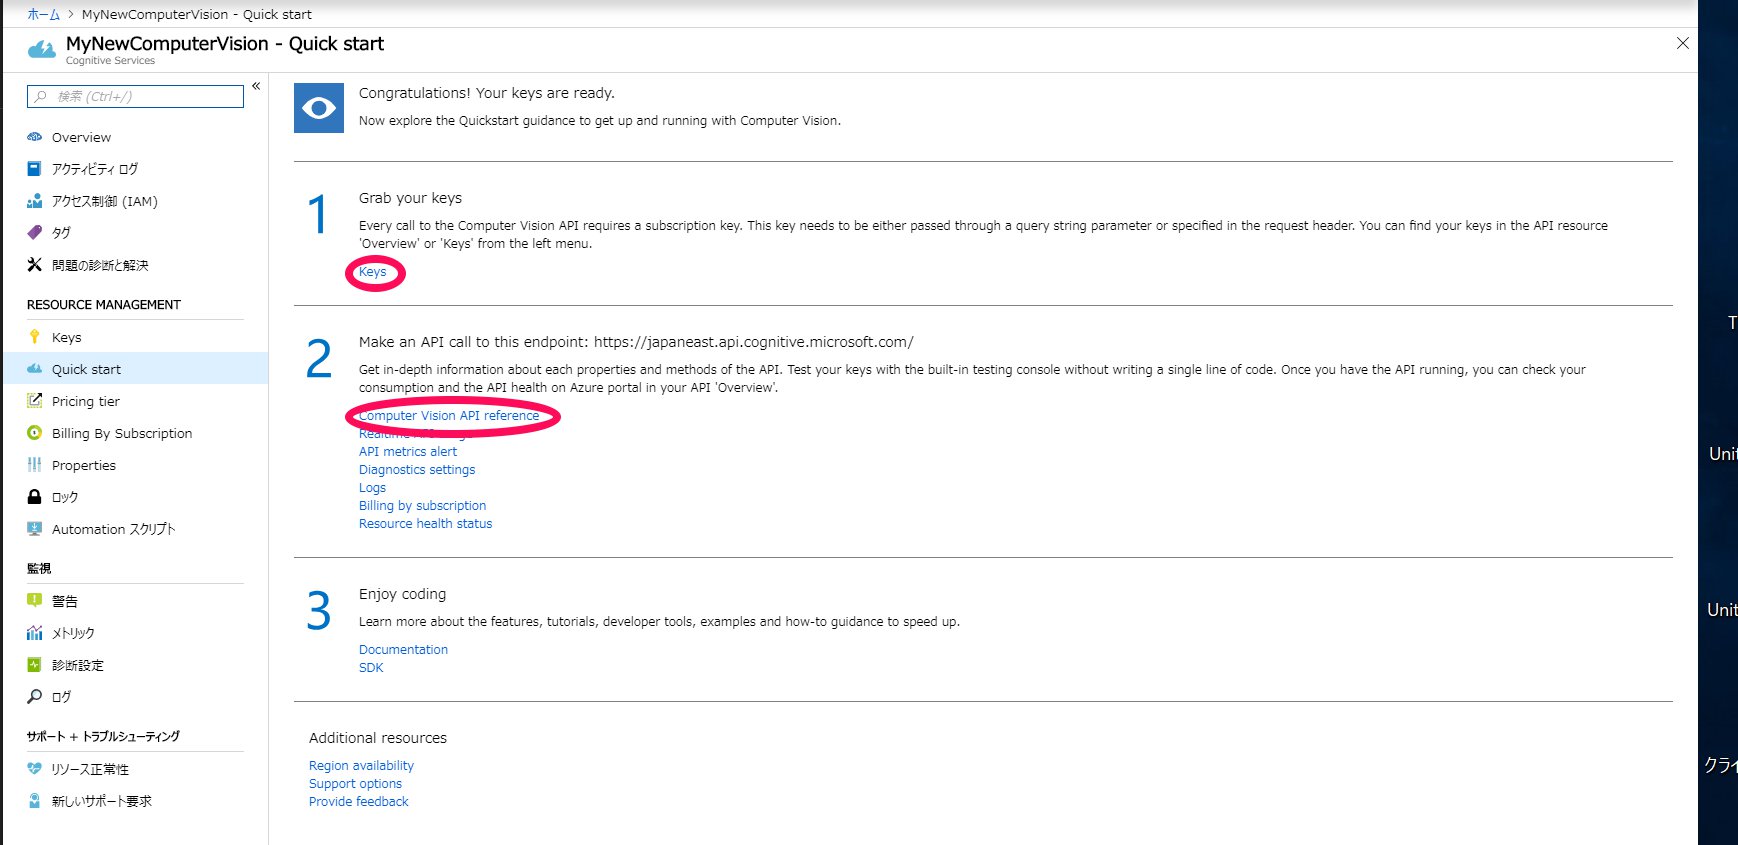
[Quick start]の1の[Keys]をクリックするとkey1とkey2が表示されます。これは後ほど使うのでこの場所を覚えておきましょう。また、2の[Computer Vision API reference]から、先ほど選択した[場所]に合わせたURLを保存しておきます。
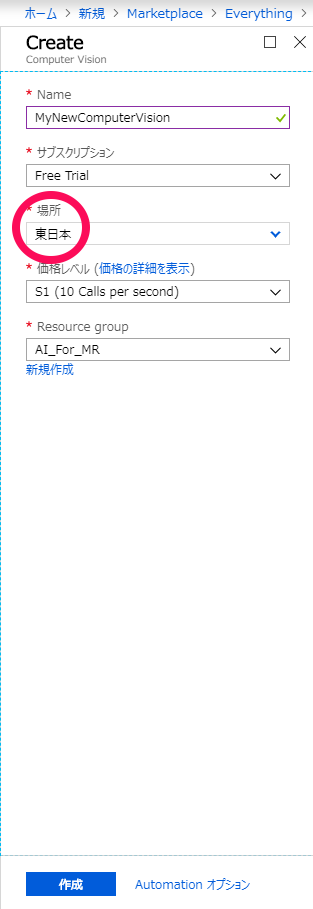
以上が準備となります。
1.Unityの設定
次はUnityの設定を行います。まずは、Unityを開き、[New]を選択して名前をつけます。今回はチュートリアル通りMR_ComputerVisionとします。3Dを選択していることを確認したあと[Create Projects]をクリックします。
![]()
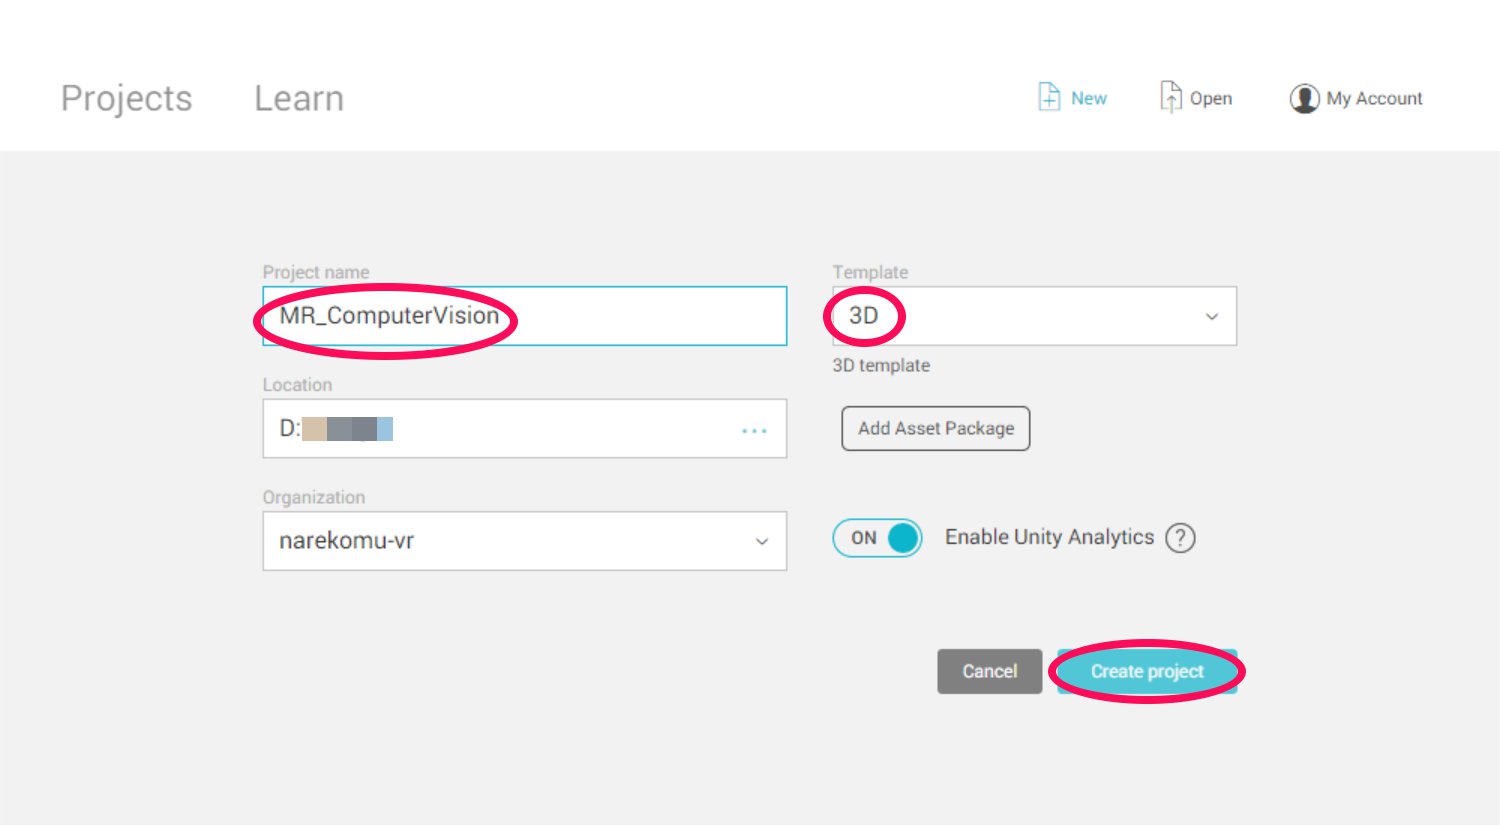
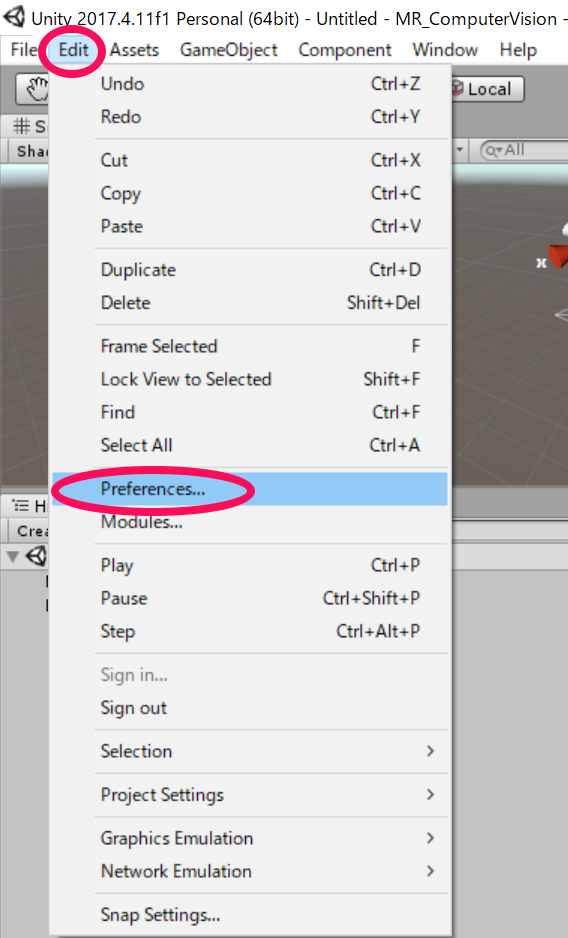
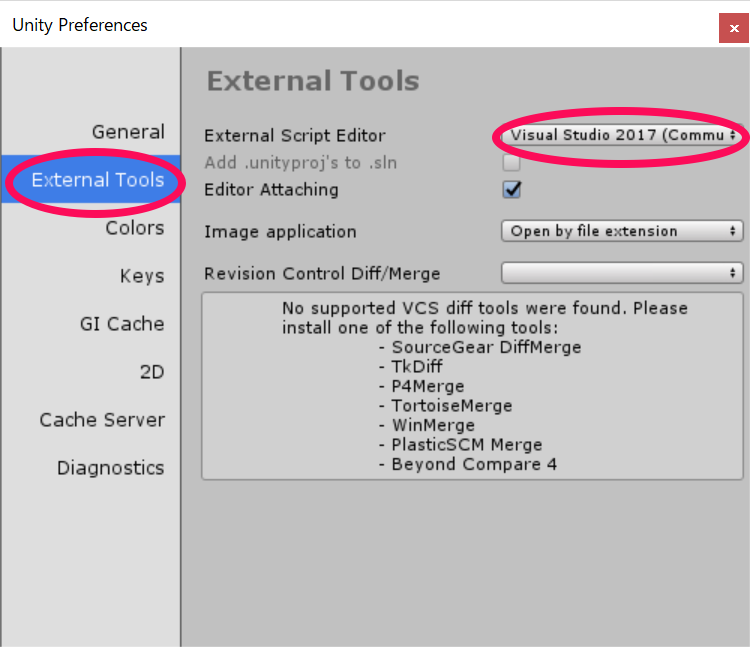
Unityの編集画面になったら設定を行っていきます。まず、デフォルトのスクリプトエディタがvisual studio になっていることを確認します。[Edit]→[Preferences]を開きます。[External Tools]→[External Script Editor]の項目をVisual Studio 2017(Community)とします。
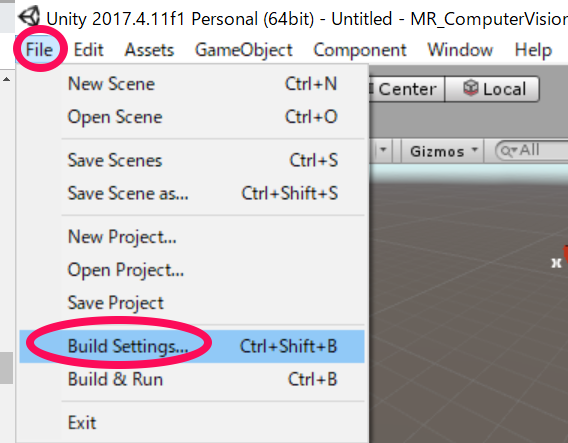
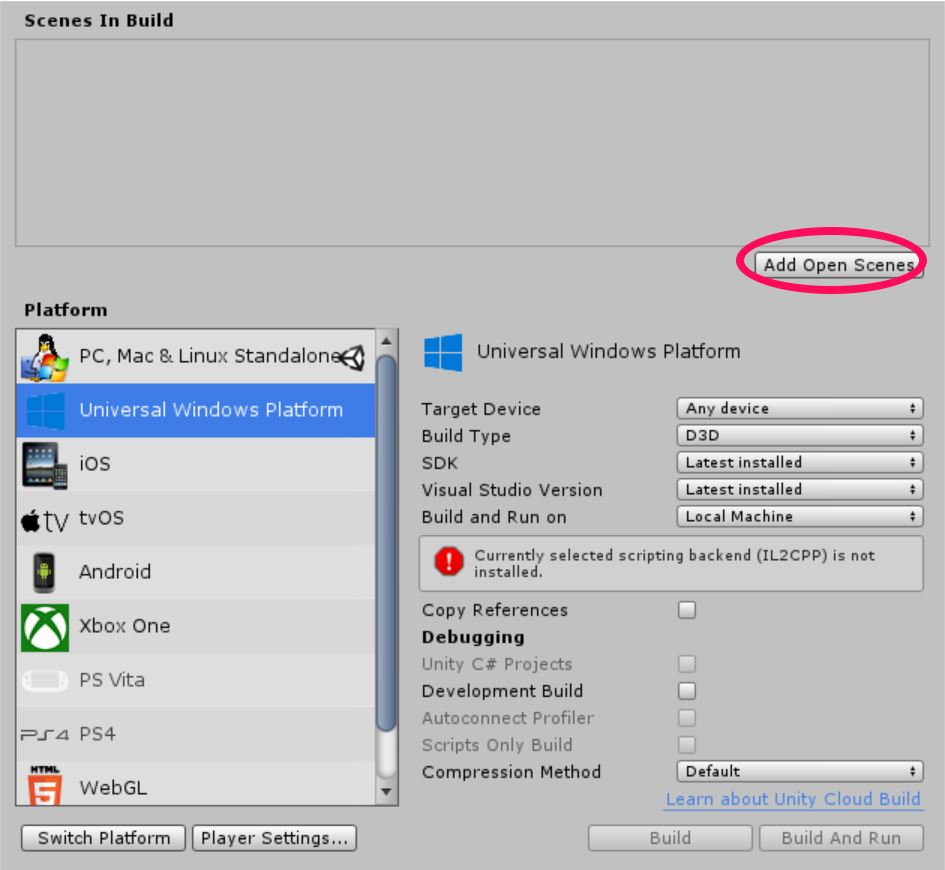
次に[File]→[Build Settings…]を開き、[Platform]を[Universal Windows Platform]に変更し、[Switch Platform]を選びます。
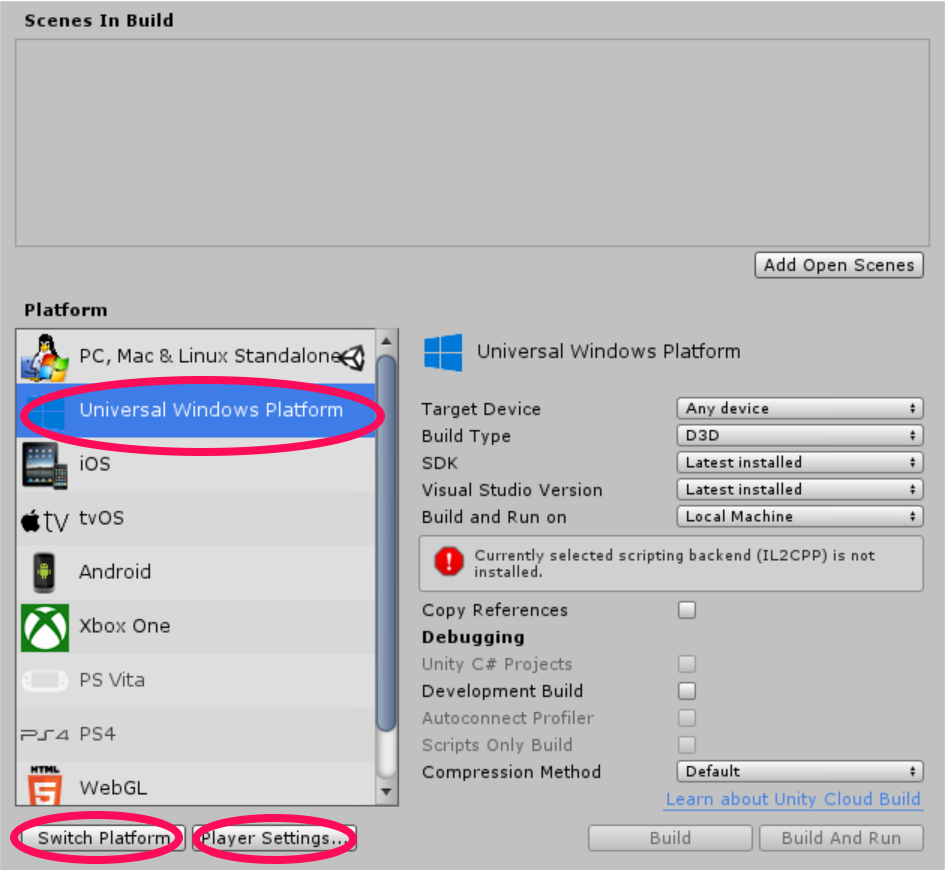
そのあと[Player Settings…]から[Other Settings]、[Publishing Settings]→[Capabilities]、[XR Settings]を以下のように変更していきます。[Unity C# Projects] を編集できるようになるのでチェックを入れます。
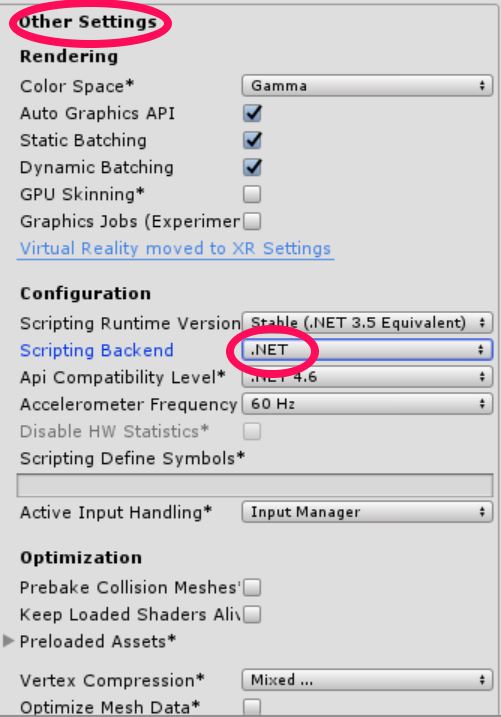
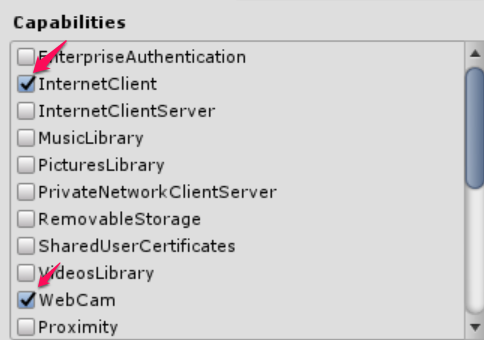
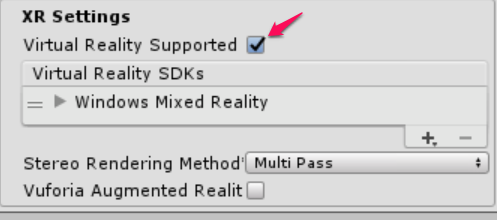
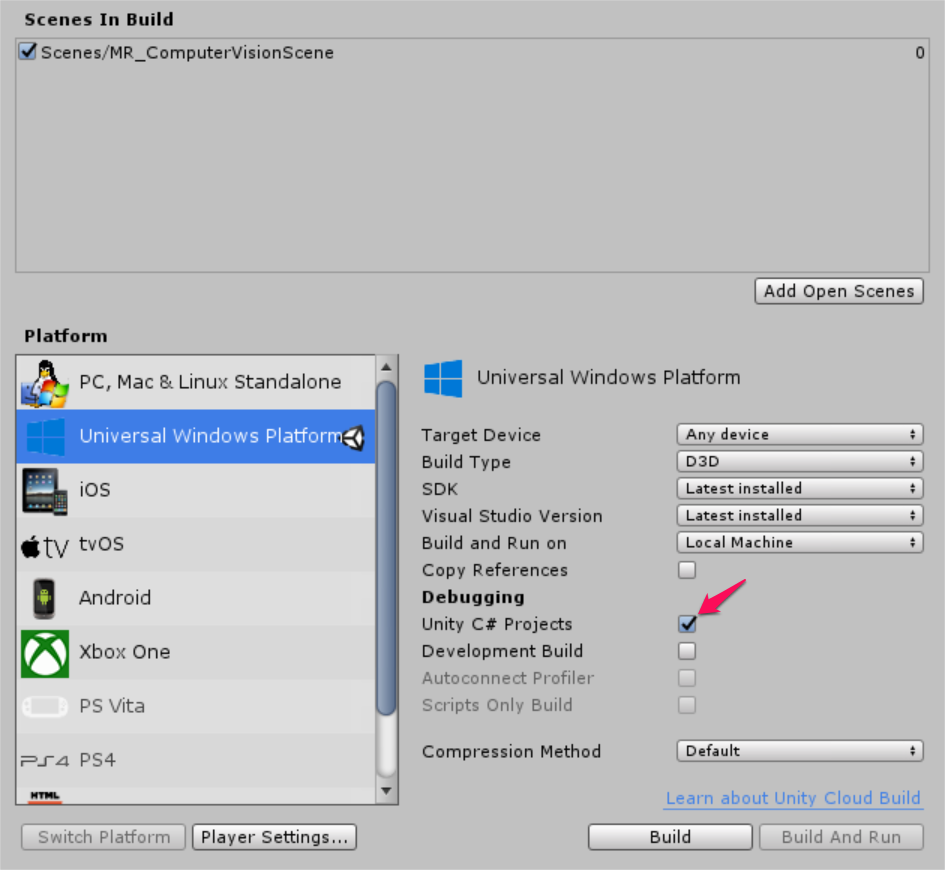
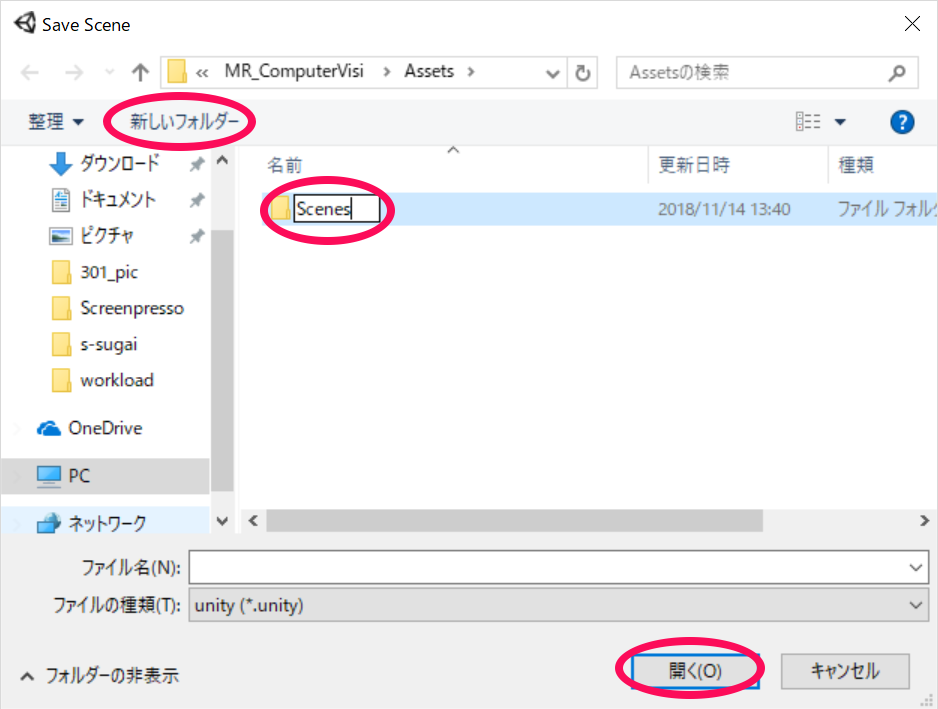
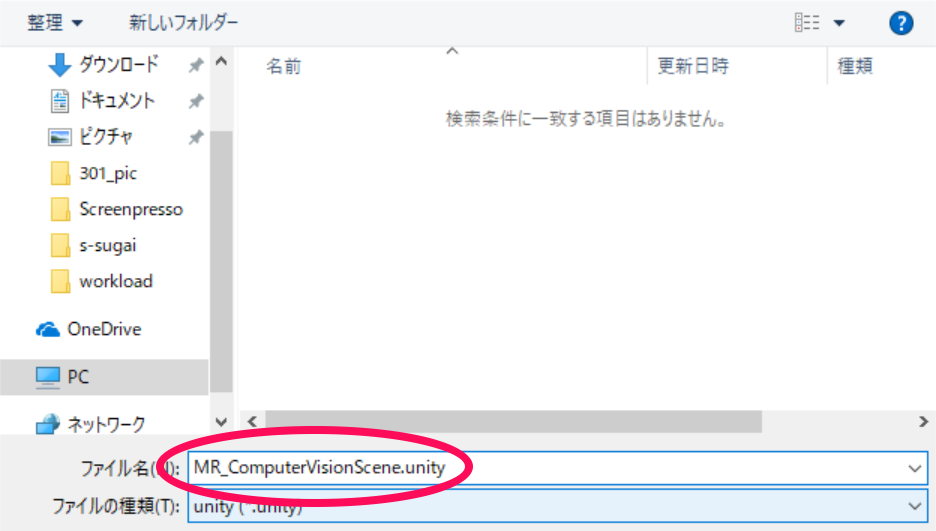
最後に[Add Open Scenes]をクリックし[新しいフォルダー]をクリックし名前をScenesとします。そのファイルを開き名前をMR_ComputerVisionScene.unityとして保存します。
以上で設定は終わりとなります。次のステップから配置していきたいと思います。
2.ホロレンズで表示される画面を実装する
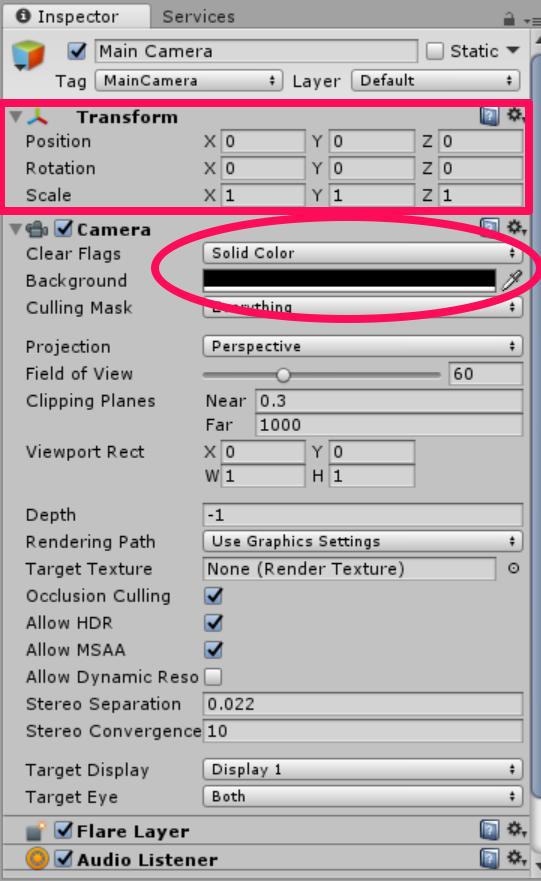
まずはじめに、[Main Camera]を編集していきたいと思います。[Hierarchy]→[Main Camera]を選択します。[Inspector]→[Transform]を以下のように変更します。次に、[Camera]→[Clear Flags]をSolid Colorにし、[Background]を#0000000とし黒にします。
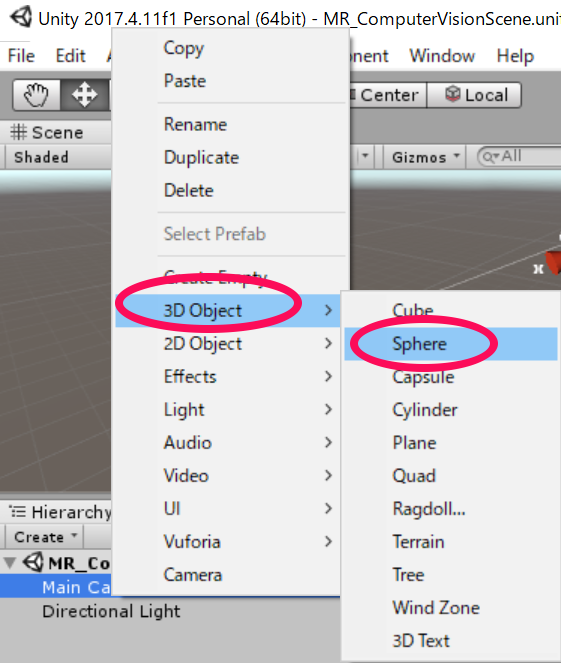
さらに、[Main Camera]を右クリックし[3D Objects]→[Sphere]とし、名前をCursorとします。今作成したCursorの[Inspector]を以下のように編集していきます。これは、画像解析の出力位置となります。
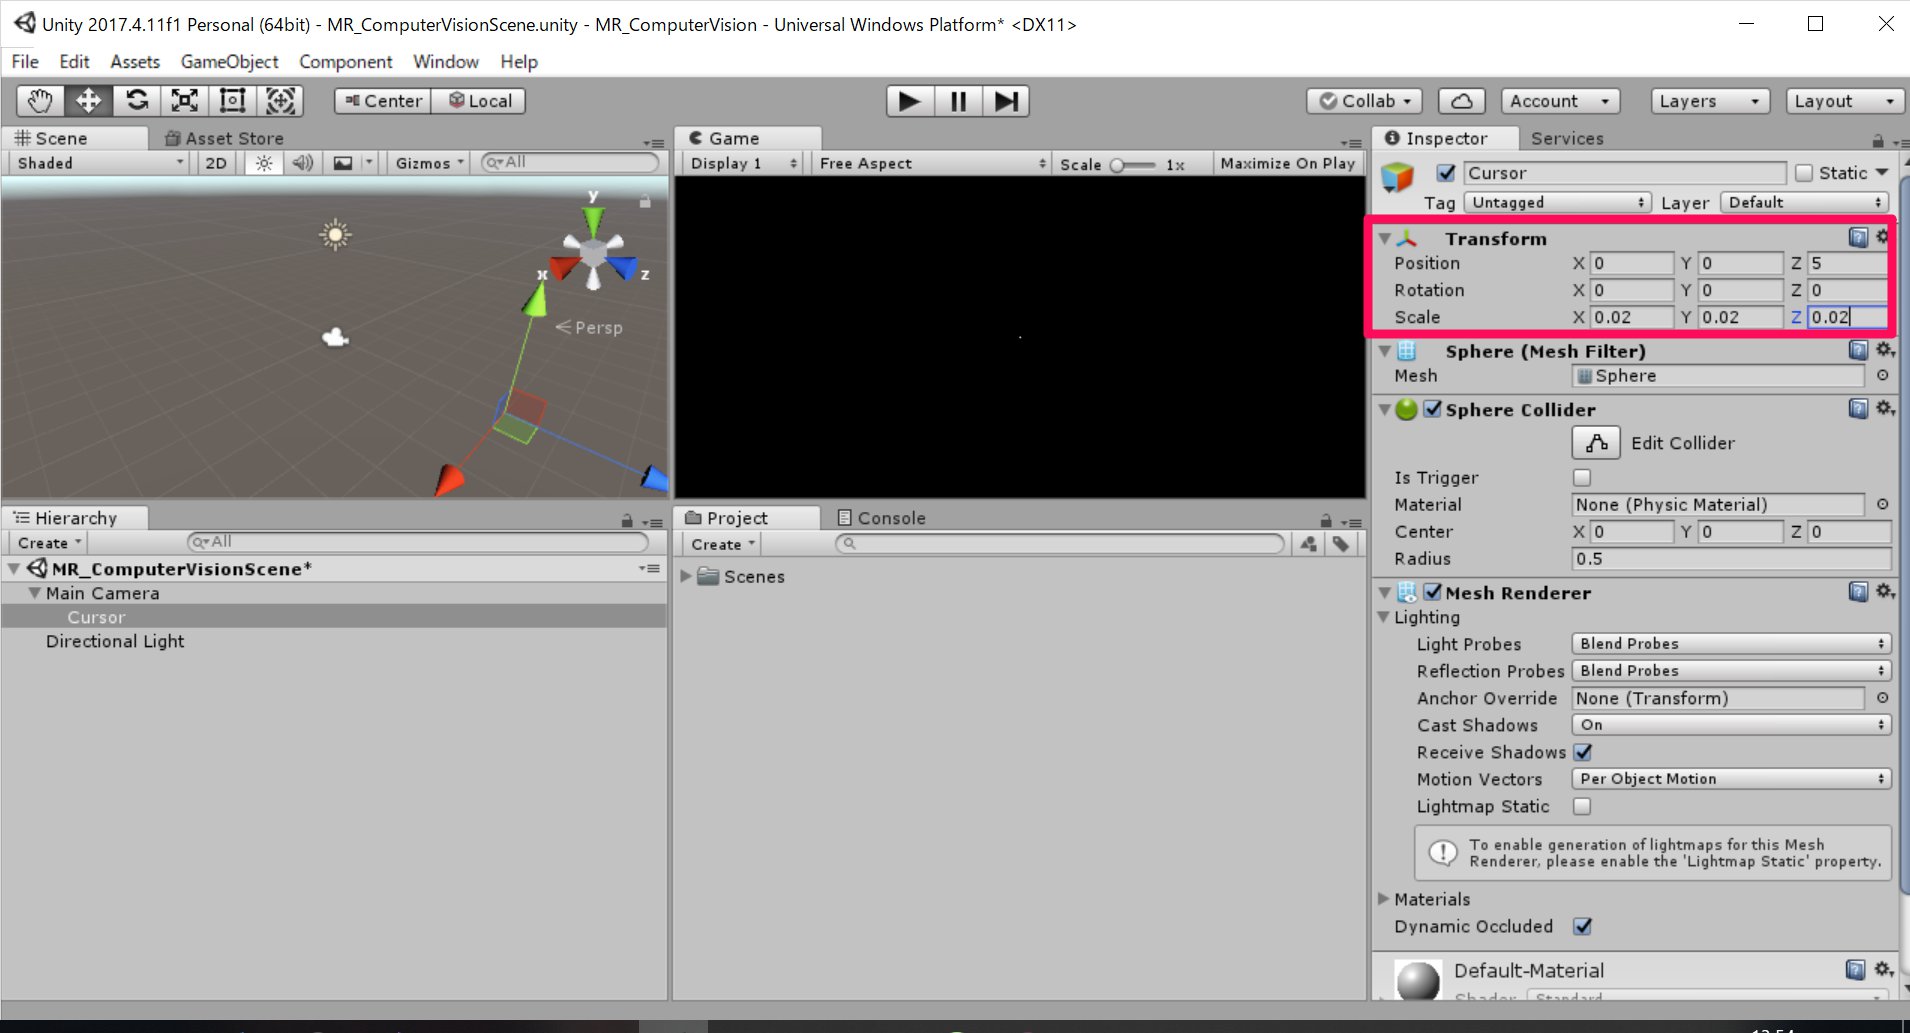
続いて、分析結果を表示するタグを作っていきたいと思います。ホロレンズを通して取得した画像は、Azure Computer Vision API Serviceに送信され分析されます。その分析結果がタグとよばれるリストとして返されます。今から画像を認識したい物体に、タグを表示するためのものをつくっていきます。
まずはじめに、[Herarchy]→[Create]→[3D Object]→[3D Text]としてテキストをつくり、名前をLabelTextとします。
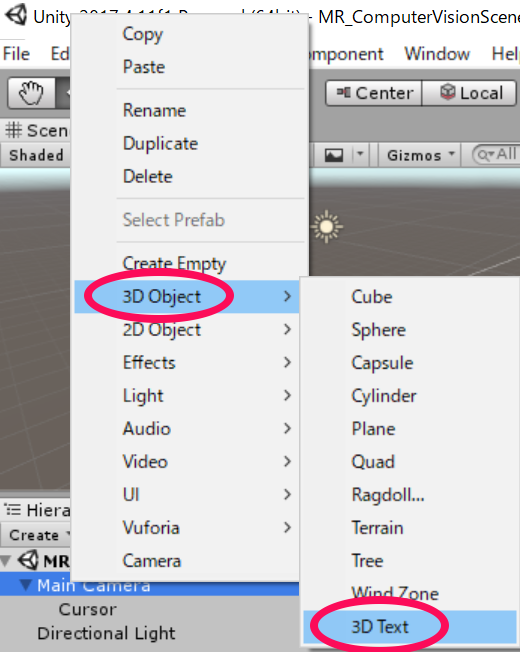
続いて[LabelText]の[Inspector]を編集していきます。

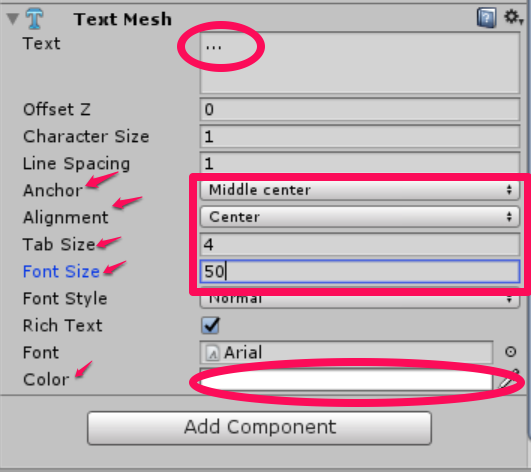
今作った[LabelText]をプレハブにしていきたいと思います。[LabelText]を[Hierarchy]から[Project]へD&Dします。
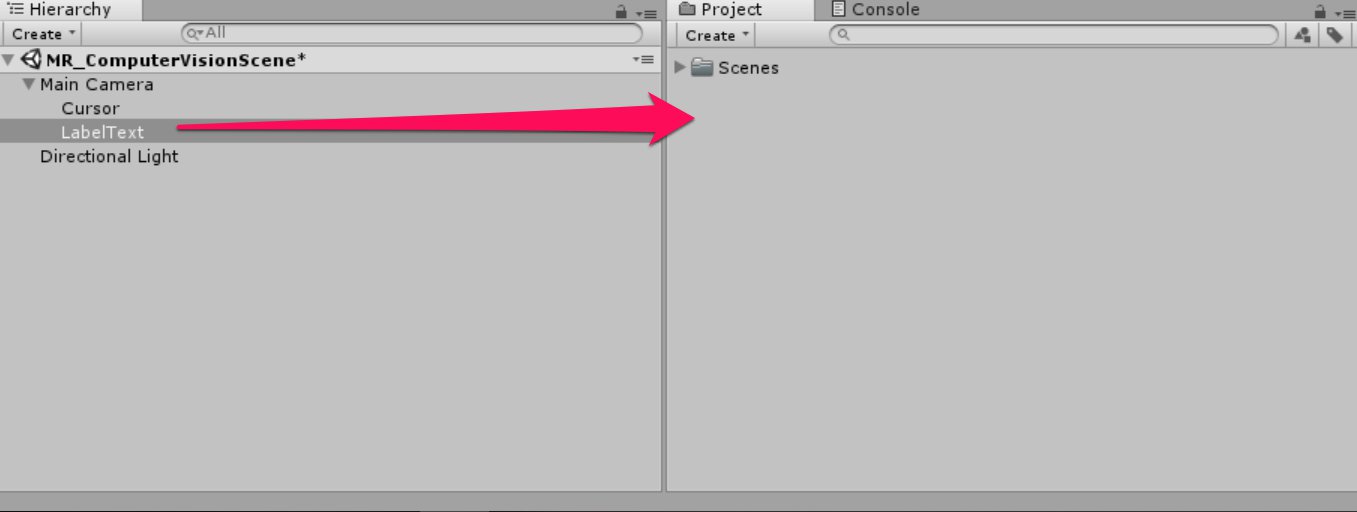
これによりコードでインスタンス化できるようになりました。また、[Hierarchy]の[LabelText]を削除します。これで最初からシーンに表示されないようになります。以上で表示される画面は実装できました。次のステップからはそれらに動きをつけていきたいと思います。
3.スクリプトの作成
このステップでは、認識した画像を画像処理した結果を表示するまでの動きを作っていきます。まず最初に行うのがResultsLabelクラスのスクリプト作成です。これは、画像解析した結果(タグ)を表示するためのものです。
はじめに今後記述していくスクリプトをまとめておくためのフォルダーをつくっていきます。これは直接動作には関係ありませんが、あとで整理しやすくなるのでつくります。まず、[Project]→[Create]→[Folder]として名前をScriptsとしておきます。以後つくるスクリプトはすべてこの中にしまっていきましょう。
①続いて、今つくった[Scripts]フォルダーを選択し、右クリックして[Create]→[C# Script]をクリックして中にスクリプトを作っていきます。名前はResultsLabelとしておきましょう。
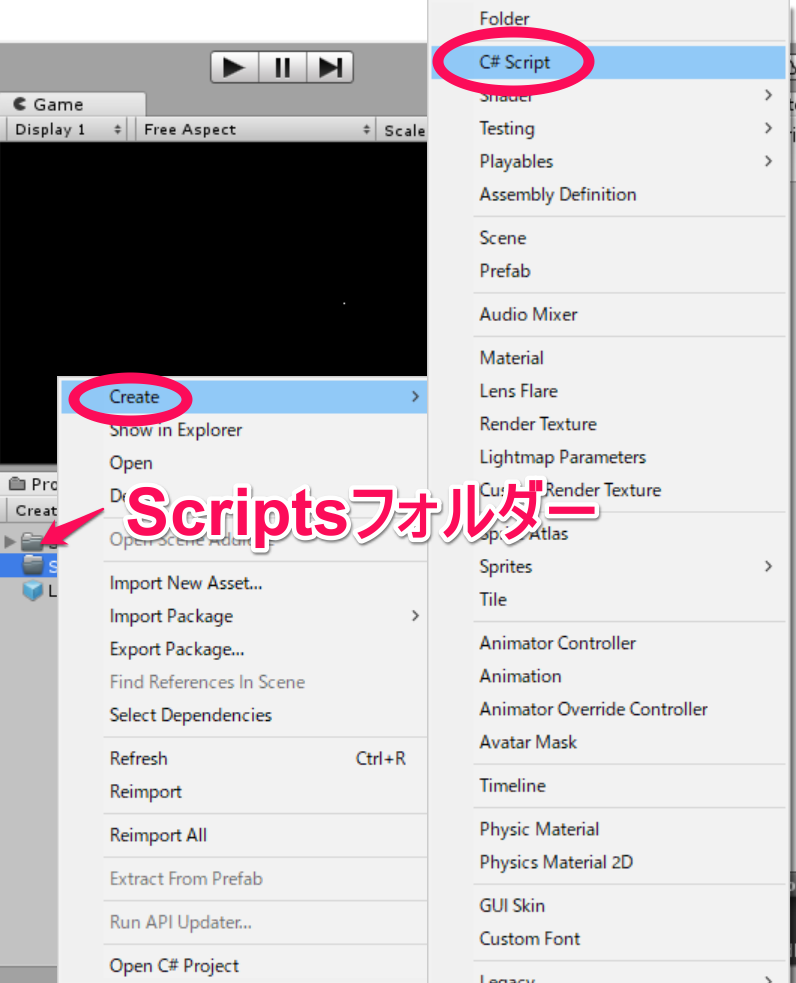
[ResultsLabel]をダブルクリックすると、visual studioが開きます。では、スクリプトを記述していきたいと思います。コードは以下の通りです。
|
1 2 3 4 5 6 7 8 9 10 11 12 13 14 15 16 17 18 19 20 21 22 23 24 25 26 27 28 29 30 31 32 33 34 35 36 37 38 39 40 41 42 43 44 45 46 47 48 49 50 51 52 53 |
using System.Collections; using System.Collections.Generic; using UnityEngine; public class ResultsLabel : MonoBehaviour { public static ResultsLabel instance; public GameObject cursor; public Transform labelPrefab; [HideInInspector] public Transform lastLabelPlaced; [HideInInspector] public TextMesh lastLabelPlacedText; private void Awake() { // allows this instance to behave like a singleton instance = this; } /// <summary> /// Instantiate a Label in the appropriate location relative to the Main Camera. /// </summary> public void CreateLabel() { lastLabelPlaced = Instantiate(labelPrefab, cursor.transform.position, transform.rotation); lastLabelPlacedText = lastLabelPlaced.GetComponent<TextMesh>(); // Change the text of the label to show that has been placed // The final text will be set at a later stage lastLabelPlacedText.text = "Analysing..."; } /// <summary> /// Set the Tags as Text of the last Label created. /// </summary> public void SetTagsToLastLabel(Dictionary<string, float> tagsDictionary) { lastLabelPlacedText = lastLabelPlaced.GetComponent<TextMesh>(); // At this point we go through all the tags received and set them as text of the label lastLabelPlacedText.text = "I see: \n"; foreach (KeyValuePair<string, float> tag in tagsDictionary) { lastLabelPlacedText.text += tag.Key + ", Confidence: " + tag.Value.ToString("0.00 \n"); } } } |
保存しUnityに戻ります。このスクリプトを[Hierarchy]の[Main Camera]にD&Dします。すると、[Main Camera]内の[Inspector]に[Results Label]という項目が増えています。[Cursor]という項目に[Hierarchy]の[Cursor]を、[Label Prefab]という項目に[Project]の[Label Text]をアタッチします。

②次に、ImageCaptureクラスを作っていきたいと思います。このクラスの役割は二点です。
・ホロレンズで画像をとり、それをAppフォルダーに保存する。
・画像をとるときのタップジェスチャーを認識する。
スクリプトのつくりかたは先ほどと同じなのでここでは省略させてもらいます。名前をImageCaptureとして保存します。ダブルクリックをしてvisual studioの編集画面になったら以下のコードを記述していきます。
|
1 2 3 4 5 6 7 8 9 10 11 12 13 14 15 16 17 18 19 20 21 22 23 24 25 26 27 28 29 30 31 32 33 34 35 36 37 38 39 40 41 42 43 44 45 46 47 48 49 50 51 52 53 54 55 56 57 58 59 60 61 62 63 64 65 66 67 68 69 70 71 72 73 74 75 76 77 78 79 80 81 82 83 84 85 86 87 88 89 90 91 92 93 94 95 96 97 98 99 100 101 102 103 104 105 106 107 108 |
using System.Collections; using System.Collections.Generic; using System.IO; using System.Linq; using UnityEngine; using UnityEngine.XR.WSA.Input; using UnityEngine.XR.WSA.WebCam; public class ImageCapture : MonoBehaviour { public static ImageCapture instance; public int tapsCount; private PhotoCapture photoCaptureObject = null; private GestureRecognizer recognizer; private bool currentlyCapturing = false; private void Awake() { // Allows this instance to behave like a singleton instance = this; } void Start() { // subscribing to the Hololens API gesture recognizer to track user gestures recognizer = new GestureRecognizer(); recognizer.SetRecognizableGestures(GestureSettings.Tap); recognizer.Tapped += TapHandler; recognizer.StartCapturingGestures(); } /// <summary> /// Respond to Tap Input. /// </summary> private void TapHandler(TappedEventArgs obj) { // Only allow capturing, if not currently processing a request. if (currentlyCapturing == false) { currentlyCapturing = true; // increment taps count, used to name images when saving tapsCount++; // Create a label in world space using the ResultsLabel class ResultsLabel.instance.CreateLabel(); // Begins the image capture and analysis procedure ExecuteImageCaptureAndAnalysis(); } } /// <summary> /// Register the full execution of the Photo Capture. If successful, it will begin /// the Image Analysis process. /// </summary> void OnCapturedPhotoToDisk(PhotoCapture.PhotoCaptureResult result) { // Call StopPhotoMode once the image has successfully captured photoCaptureObject.StopPhotoModeAsync(OnStoppedPhotoMode); } void OnStoppedPhotoMode(PhotoCapture.PhotoCaptureResult result) { // Dispose from the object in memory and request the image analysis // to the VisionManager class photoCaptureObject.Dispose(); photoCaptureObject = null; StartCoroutine(VisionManager.instance.AnalyseLastImageCaptured()); } /// <summary> /// Begin process of Image Capturing and send To Azure /// Computer Vision service. /// </summary> private void ExecuteImageCaptureAndAnalysis() { // Set the camera resolution to be the highest possible Resolution cameraResolution = PhotoCapture.SupportedResolutions.OrderByDescending((res) => res.width * res.height).First(); Texture2D targetTexture = new Texture2D(cameraResolution.width, cameraResolution.height); // Begin capture process, set the image format PhotoCapture.CreateAsync(false, delegate (PhotoCapture captureObject) { photoCaptureObject = captureObject; CameraParameters camParameters = new CameraParameters(); camParameters.hologramOpacity = 0.0f; camParameters.cameraResolutionWidth = targetTexture.width; camParameters.cameraResolutionHeight = targetTexture.height; camParameters.pixelFormat = CapturePixelFormat.BGRA32; // Capture the image from the camera and save it in the App internal folder captureObject.StartPhotoModeAsync(camParameters, delegate (PhotoCapture.PhotoCaptureResult result) { string filename = string.Format(@"CapturedImage{0}.jpg", tapsCount); string filePath = Path.Combine(Application.persistentDataPath, filename); VisionManager.instance.imagePath = filePath; photoCaptureObject.TakePhotoAsync(filePath, PhotoCaptureFileOutputFormat.JPG, OnCapturedPhotoToDisk); currentlyCapturing = false; }); }); } } |
保存した後、Unity画面に戻ります。ここでコードのエラーが表示されるかもしれませんが、次につくるクラスをつくれば、解消されるので気にしなくて大丈夫です。
③最後にVisionManagerクラスを作っていきたいと思います。このクラスの役割は以下の3点です
・撮った画像をバイト配列としてロードする。(画像はRGBAの配列であらわされるのですがわからなくても問題ないです)
・ロードした配列をAzure Computer Vision API Serviceに送信する。
・その結果を受け取り人間が分かるように変換した後、その結果をResultsLabelクラスへ渡す。
スクリプトの作り方は今回も省略させてもらいます。名前をVisionManagerとし、visual studioで開きます。
以下のコードを記述していきましょう。ここで重要な注意点が二点あります。
・authorizationKeyに0章で取得したkey1,key2のいずれかをいれる。
・visionAnalysisEndpointに0章で取得した、地域を表すURLをいれる。
|
1 2 3 4 5 6 7 8 9 10 11 12 13 14 15 16 17 18 19 20 21 22 23 24 25 26 27 28 29 30 31 32 33 34 35 36 37 38 39 40 41 42 43 44 45 46 47 48 49 50 51 52 53 54 55 56 57 58 59 60 61 62 63 64 65 66 67 68 69 70 71 72 73 74 75 76 77 78 79 80 81 82 83 84 85 86 87 88 89 90 91 92 93 94 95 96 97 98 99 100 101 102 103 104 105 106 107 108 109 110 111 112 113 114 115 116 117 118 119 120 121 |
using System; using System.Collections; using System.Collections.Generic; using System.IO; using UnityEngine; using UnityEngine.Networking; public class VisionManager : MonoBehaviour { [System.Serializable] public class TagData { public string name; public float confidence; } [System.Serializable] public class AnalysedObject { public TagData[] tags; public string requestId; public object metadata; } public static VisionManager instance; // you must insert your service key here! private string authorizationKey = "先ほど取得したkey1,key2のいずれか"; private const string ocpApimSubscriptionKeyHeader = "Ocp-Apim-Subscription-Key"; private string visionAnalysisEndpoint = "先ほど取得したURL/vision/v1.0/analyze?visualFeatures=Tags"; // This is where you need to update your endpoint, if you set your location to something other than west-us. internal byte[] imageBytes; internal string imagePath; private void Awake() { // allows this instance to behave like a singleton instance = this; } /// <summary> /// Call the Computer Vision Service to submit the image. /// </summary> public IEnumerator AnalyseLastImageCaptured() { WWWForm webForm = new WWWForm(); using (UnityWebRequest unityWebRequest = UnityWebRequest.Post(visionAnalysisEndpoint, webForm)) { // gets a byte array out of the saved image imageBytes = GetImageAsByteArray(imagePath); unityWebRequest.SetRequestHeader("Content-Type", "application/octet-stream"); unityWebRequest.SetRequestHeader(ocpApimSubscriptionKeyHeader, authorizationKey); // the download handler will help receiving the analysis from Azure unityWebRequest.downloadHandler = new DownloadHandlerBuffer(); // the upload handler will help uploading the byte array with the request unityWebRequest.uploadHandler = new UploadHandlerRaw(imageBytes); unityWebRequest.uploadHandler.contentType = "application/octet-stream"; yield return unityWebRequest.SendWebRequest(); long responseCode = unityWebRequest.responseCode; try { string jsonResponse = null; jsonResponse = unityWebRequest.downloadHandler.text; // The response will be in Json format // therefore it needs to be deserialized into the classes AnalysedObject and TagData AnalysedObject analysedObject = new AnalysedObject(); analysedObject = JsonUtility.FromJson<AnalysedObject>(jsonResponse); if (analysedObject.tags == null) { Debug.Log("analysedObject.tagData is null"); } else { Dictionary<string, float> tagsDictionary = new Dictionary<string, float>(); foreach (TagData td in analysedObject.tags) { TagData tag = td as TagData; tagsDictionary.Add(tag.name, tag.confidence); } ResultsLabel.instance.SetTagsToLastLabel(tagsDictionary); } } catch (Exception exception) { Debug.Log("Json exception.Message: " + exception.Message); } yield return null; } } /// <summary> /// Returns the contents of the specified file as a byte array. /// </summary> private static byte[] GetImageAsByteArray(string imageFilePath) { FileStream fileStream = new FileStream(imageFilePath, FileMode.Open, FileAccess.Read); BinaryReader binaryReader = new BinaryReader(fileStream); return binaryReader.ReadBytes((int)fileStream.Length); } // Use this for initialization void Start () { } // Update is called once per frame void Update () { } } |
これを保存し、Unity画面に戻ります。先ほどつくった[ImageCapture]スクリプトおよび[VisionManager]スクリプトを[Hierarchy]の[Main Camera]にD&Dします。[Main Camera]内の[Inspector]に以下の項目が増えていることを確認しましょう。
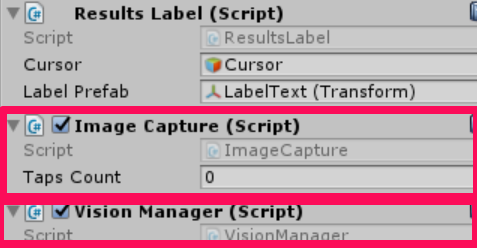
以上で必要なスクリプトをすべて記述し終わりました。
4.ホロレンズで使ってみよう
最後のステップです。今までに実装したものをホロレンズ上で実行してみたいと思います。ビルドする方法はこちらを参照してください。最初に行った設定を変えずに[Build]をすることに注意します。
認識したい物体に視点をあわせて
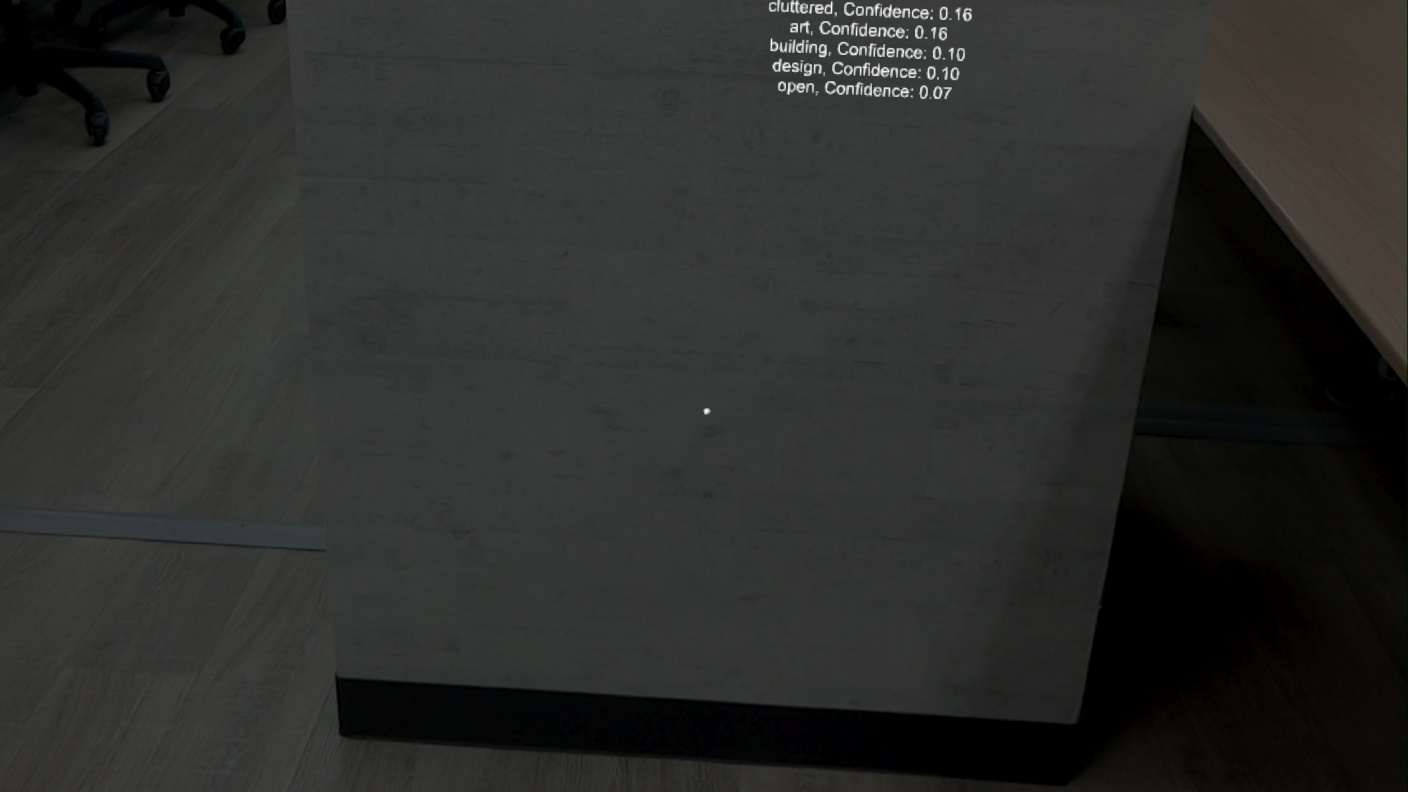
エアタップするとanalysing..と表示された後に結果が表示されます。
以上となります。お疲れさまでした。
