こんにちは、ナレコム菅井です
今回はMR and Azure301の翻訳アプリを作っていきたいと思います。
使用したツールは以下の通りです。
・Windows10
・Unity 2017.4.11f1
・visual studio2017
・HoloLens
目標はHoloLensをかけた状態で英語をしゃべったとき、日本語の翻訳を表示することです。
それではさっそく始めていきましょう!
0.準備
Azure Translatorを使って翻訳をしていくので、まずはAzure Potalにログインします。アカウントを作っていない方はアカウントを作ってください。ログインして[リソースの作成]を開いたあと、Potal Text APIと検索します。以下の通り選択すると、Azure Text API Serviceの説明文がでてきます。
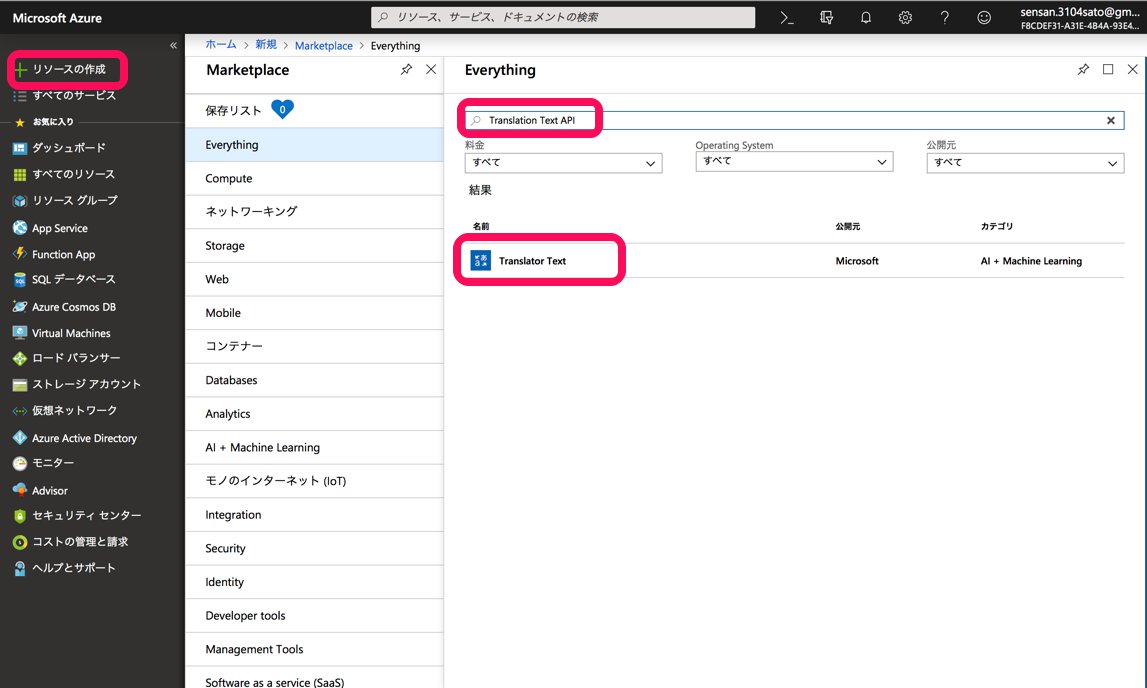
作成をクリックします。このあと様々な個人情報を入力させられますが、登録自体は無料でできるので同意した上で入力していきます。登録が終わると以下の画面になります。
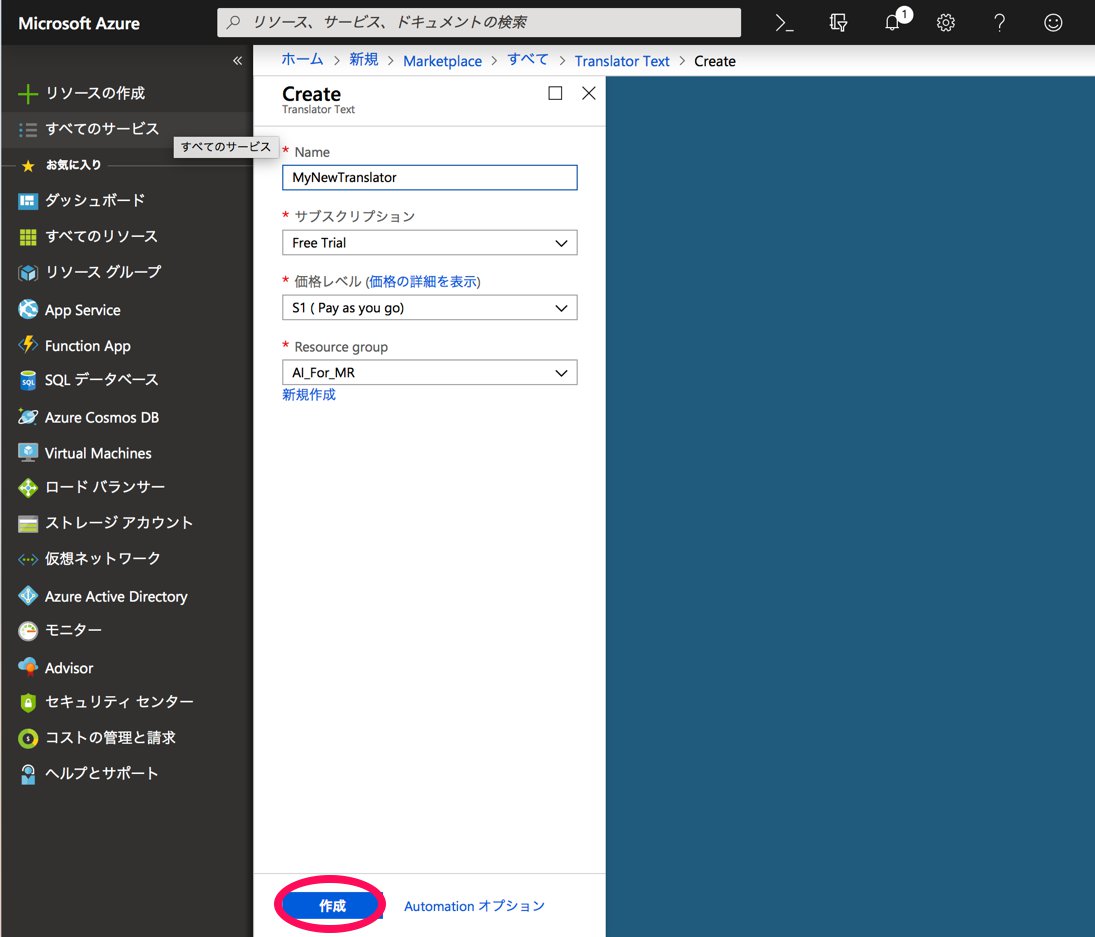
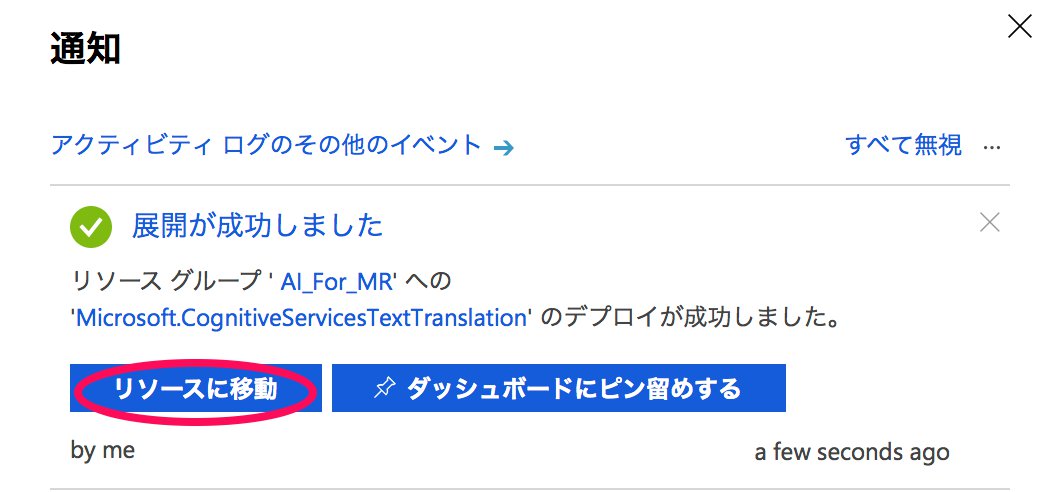
上のように入力し、[作成]を選択します。お知らせのタブを開き、

[リソースへ移動]をクリックします。
[Quick start]の[1]の[keys]を選択するとkey1とkey2が表示されます。このあとこれを使うのでkeyのある場所を覚えておきましょう。
1.Unityの設定
これからUnityの設定を行っていきます。
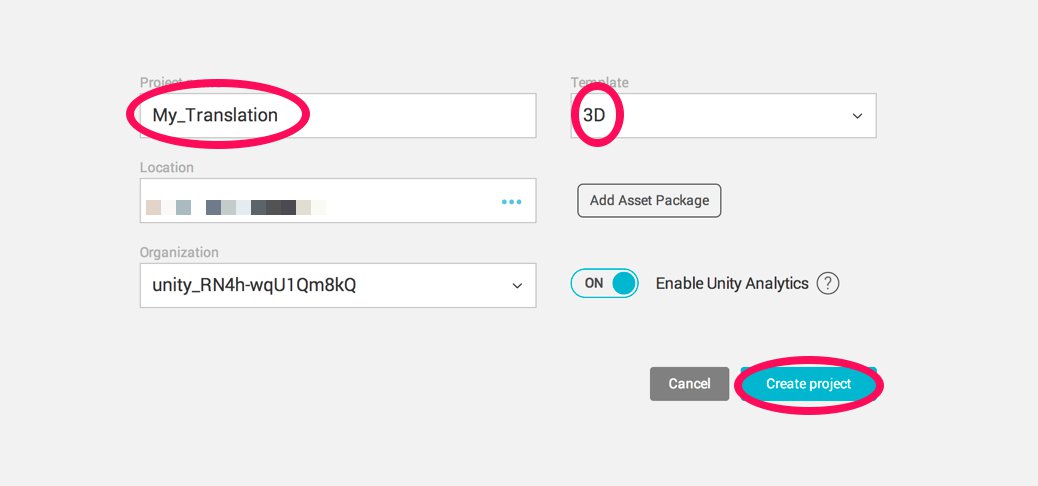
まずUnityを開き、[New]を選択して名前をつけます。

今回はチュートリアル通りMR_Translationとします。3Dを選択していることを確認したあと[Create Project]を選択します。
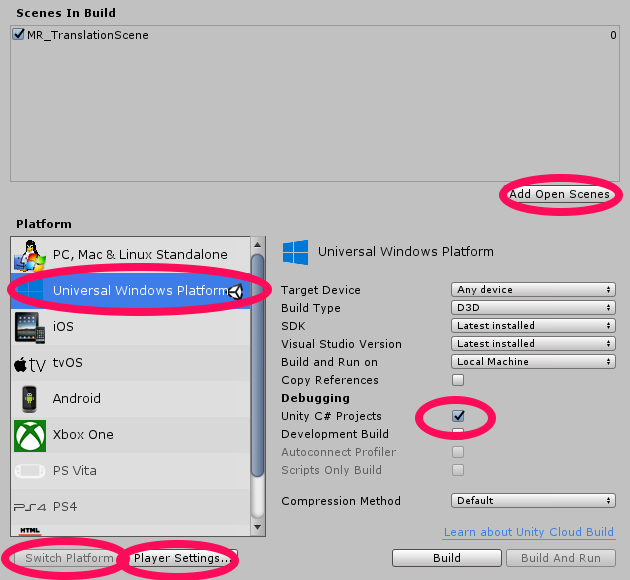
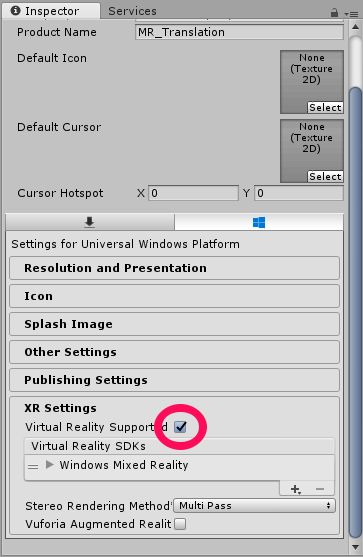
Unityの編集画面になったら設定を行っていきます。まず[File]->[Build Settings…]を開き[Platform]を[Universal Windows Platform]に変更し、 [Switch Platform]を選びます。次に[Add Open Scenes]をクリックし名前をMR_Translationとて保存します。続いて[Player Settings]をクリックします。
[Other Settings]と[Publishing Settings]の[Capabilities]と[XR Settings]を以下のように設定していき、最後に[Unity C# Projects]にチェックをいれます。
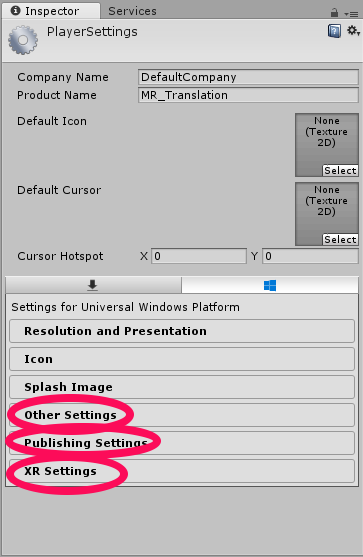
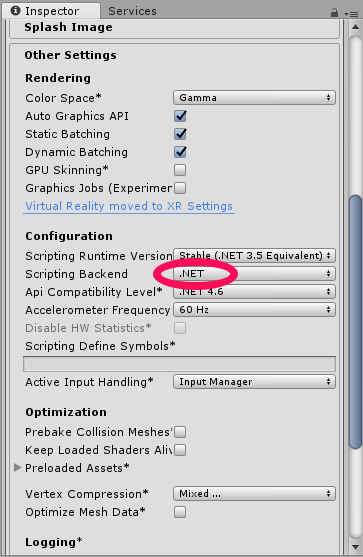
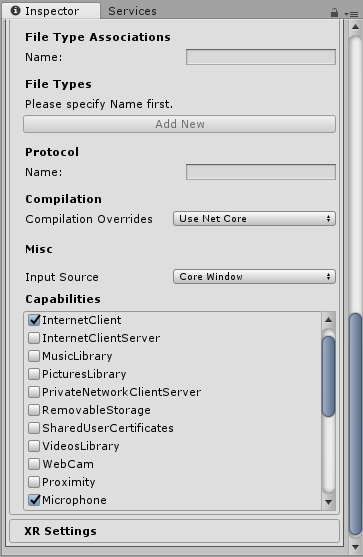
2.ホロレンズで表示される画面を実装する
ここでは[Main Camera]を編集したり、[Canvas]を追加したりしてホロレンズを装着してアプリを利用する際にどのように表示されるかを実装していきます。
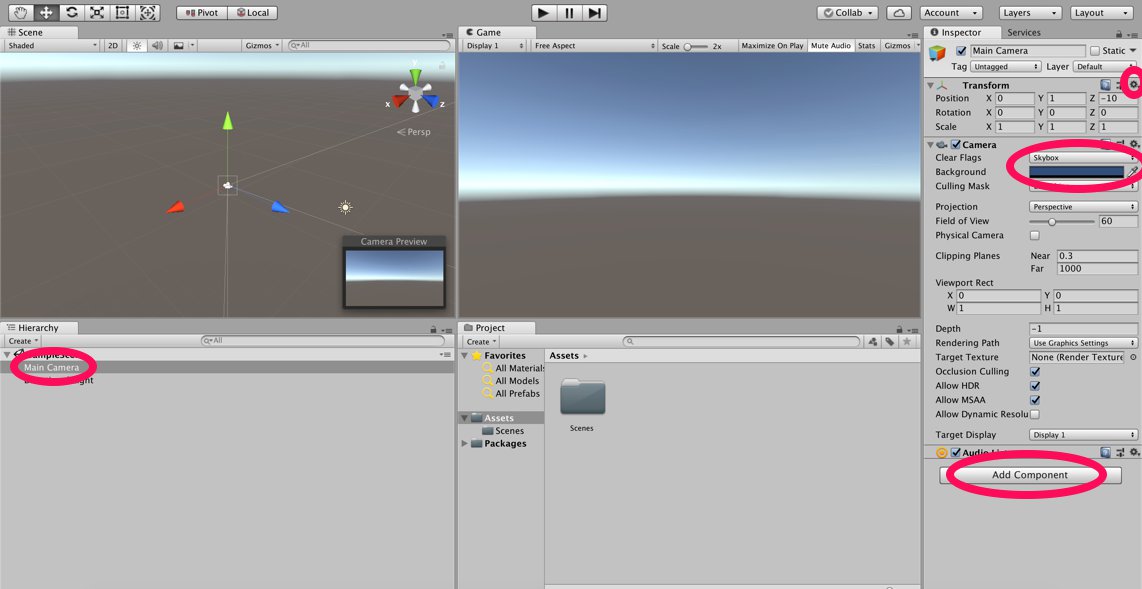
まずはじめに[Main Camera]を編集していきます。[Hierarchy]から[Main Camera]を選択し、[Inspector]の[Transform]の歯車マーク->[Reset]をクリックします。次に、[Camera]の[Clear Flags]をSolid Colorにし、[Background]を#0000000とし黒にします。最後に[Inspector]の下の方にある[Add Componet]からAudio Sourseを追加します。
※Audio Sourceについてはこちらを参照してください。
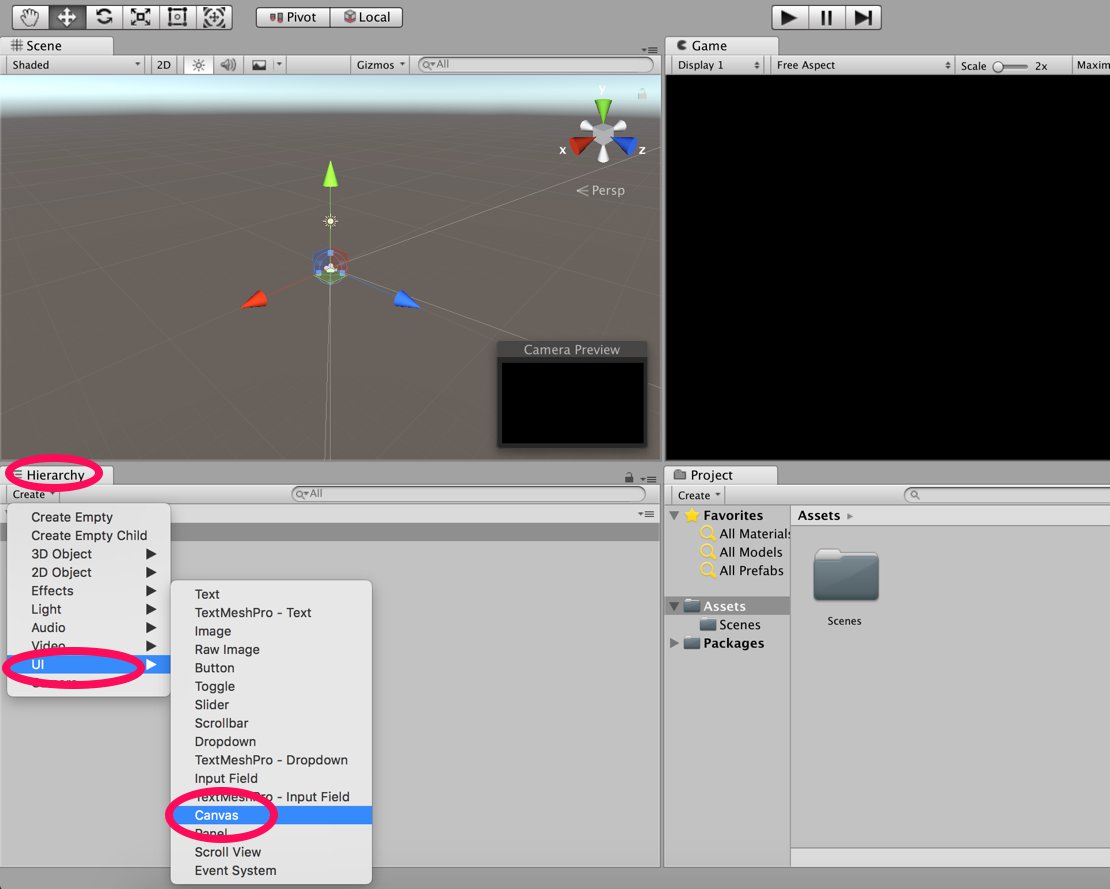
続いてCanvasを追加していきます。今回はCanvas はメニューの表示に使います。[Hierarchy]->[Create]->[UI]->[Canvas]を選択します。
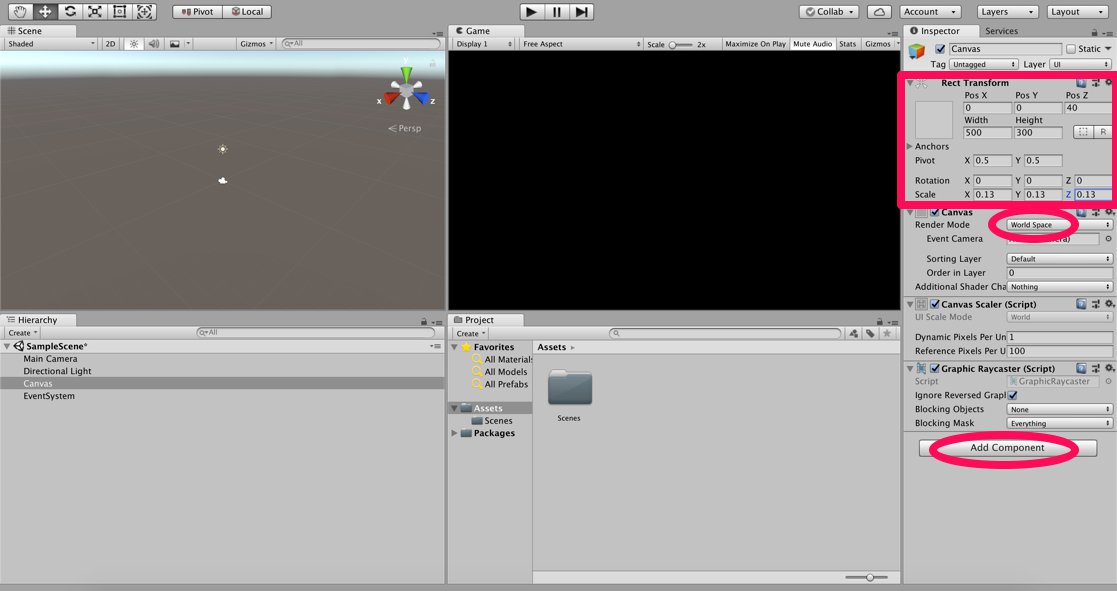
最初に[Inspector]の[Canvas]の[Render Modo]をWorld Spaceとします。これによって[Inspector]の[Rect Transform]が編集できるようになります。[Rect Transform]の値を以下のように変更します。
/>次に、[Hierarchy]の[Canvas]を右クリックして[UI]->[Panel]を選択します。さらに[Panel]を右クリックし[UI]->[Text]を選択します。これを四つ複製(ctrl+D)します。それぞれのTextを以下のように変更しましょう。
————————————————————————————
名前 | Transform | Width | Height
————————————————————————————
MicrophoneStatusLabel | X -80 | Y 90 | Z 0 | 300 | 30
————————————————————————————
AzureResponseLabel | X -80 | Y 30 | Z 0 | 300 | 30
————————————————————————————
DictationLabel | X -80 | Y -30 | Z 0 | 300 | 30
————————————————————————————
TranslationResultLabel | X -80 | Y -90 | Z 0 | 300 | 30
————————————————————————————
———————————————————————–
名前 |Text
———————————————————————–
MicrophoneStatusLabel | Microphone Status:
———————————————————————–
AzureResponseLabel | Azure Web Response:
———————————————————————–
DictationLabel | You just said:
———————————————————————–
TranslationResultLabel | Translation:
———————————————————————–
また、すべてのテキストの[Font Style]と[Font Size]を以下のように変更しましょう。
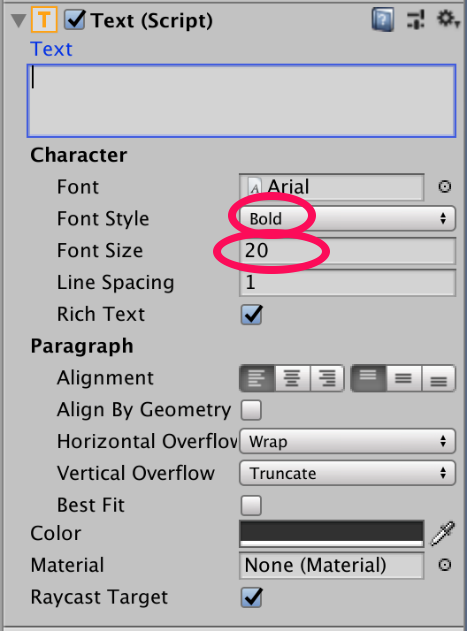
続いて、つくったすべてのテキストについて、それぞれの中にさらにTextを作っていきます。やり方は先ほど同様です。しかし、すべてのTextの[Inspector]が同じなので以下のように一つを作ってからコピーする方が良さそうです。[Paragraph]の[Alignment]と[Color]は先ほどと違うので注意しましょう。[Color]は#0032EAFFとします。
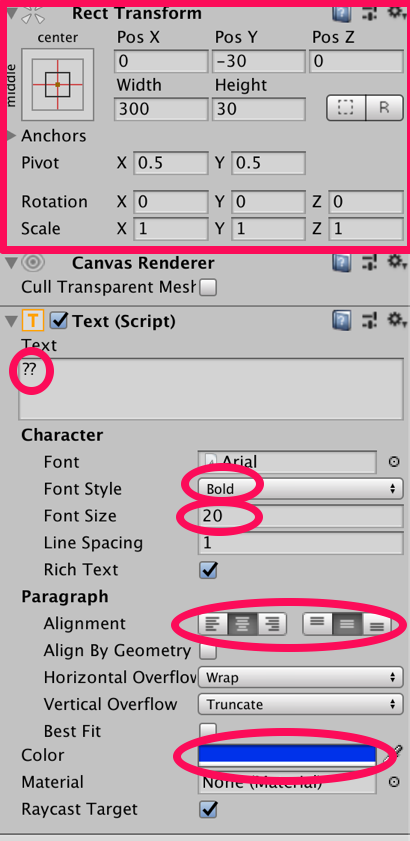
今作った部分は実装したときに音声に合わせて変わる部分となります。しかし、まだその動きを記述していないので動かないです。
最終的に以下のようになれば良いです。
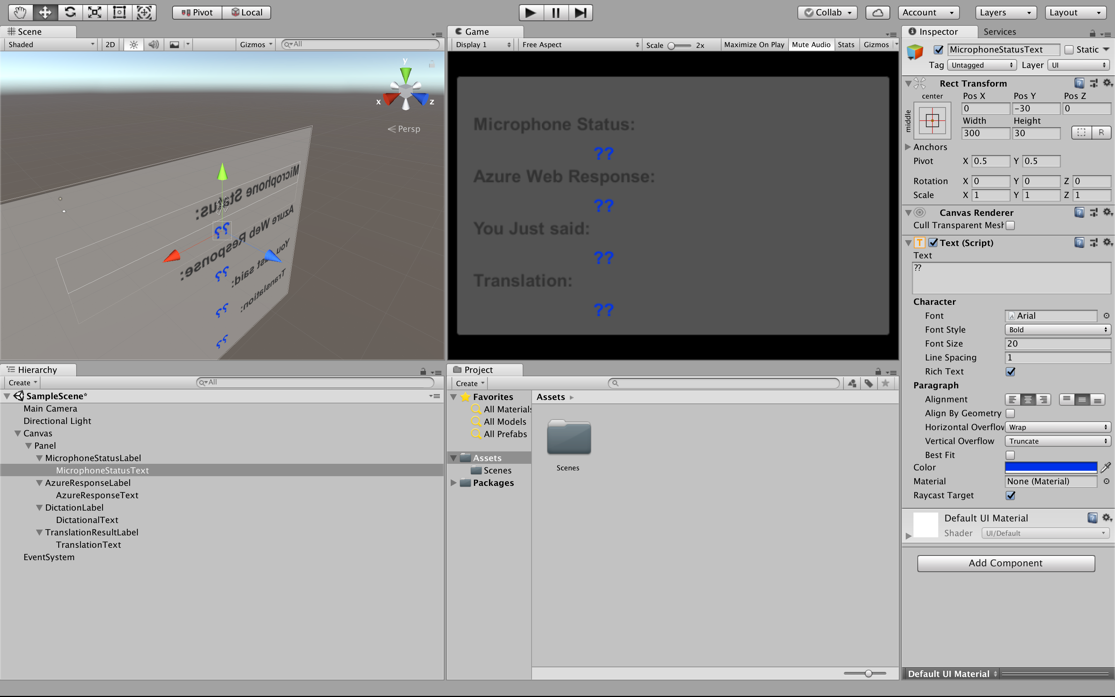
この時点では何も動きませんので次以降のステップで動きをつけていきたいと思います。
3.スクリプトの作成
それでは先ほど作ったTextに動きをつけていきましょう。はじめに作るのは翻訳の結果を表示する部分です。まず[Project]->[Create]->[Folder]でフォルダーを作成し、名前をScriptsとしましょう。次に[Project]->[Create]->[C# Script]とし、名前をResultsとしたあと[Scripts]の中に入れます。
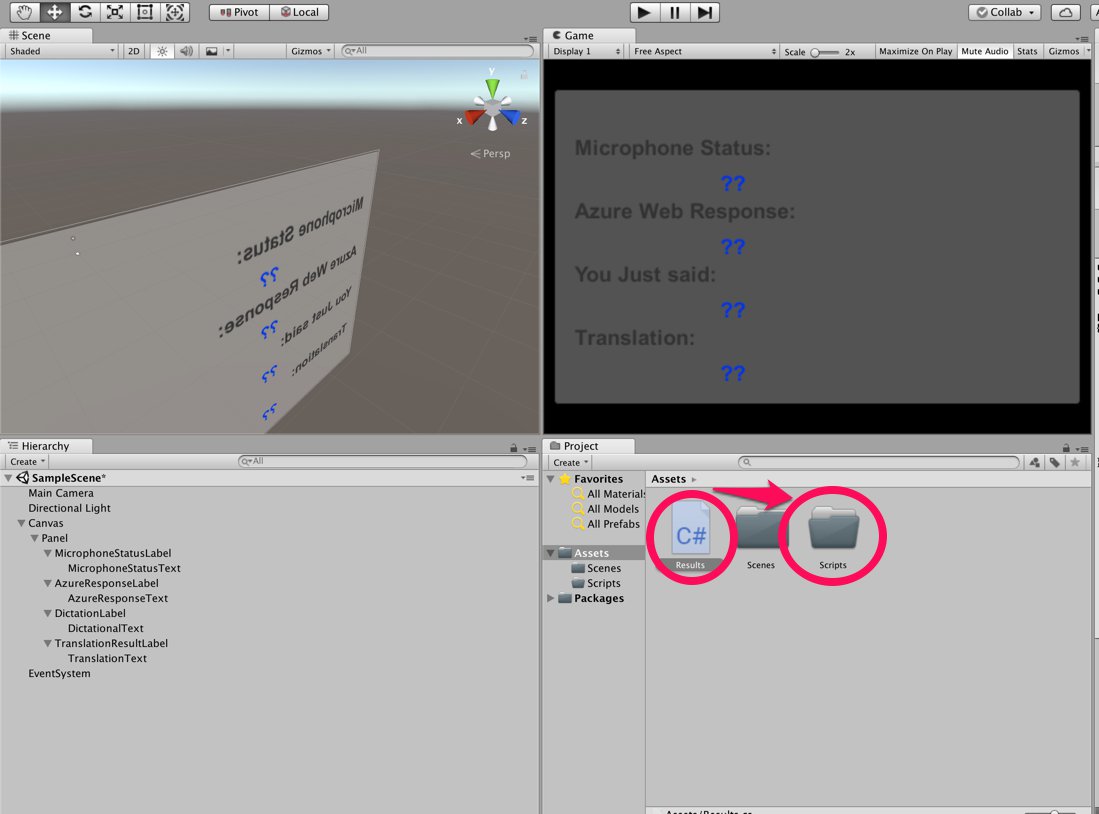
名前をResultsとしたあと、ダブルクリックします。Visual studioが開き編集画面になるので以下のコードを記述しましょう。
|
1 2 3 4 5 6 7 8 9 10 11 12 13 14 15 16 17 18 19 20 21 22 23 24 25 26 27 28 29 30 31 32 33 34 35 36 37 38 39 40 41 42 43 44 45 46 47 48 49 50 51 52 53 54 55 56 57 58 59 60 61 62 63 64 65 66 67 68 69 70 71 72 73 74 75 76 77 78 79 80 81 |
using System.Collections; using System.Collections.Generic; using UnityEngine; using UnityEngine.UI public class Results : MonoBehaviour { public static Results instance; [HideInInspector] public string azureResponseCode; [HideInInspector] public string translationResult; [HideInInspector] public string dictationResult; [HideInInspector] public string micStatus; public Text microphoneStatusText; public Text azureResponseText; public Text dictationText; public Text translationResultText; private void Awake() { // Set this class to behave similar to singleton instance = this; } /// <summary> /// Stores the Azure response value in the static instance of Result class. /// </summary> public void SetAzureResponse(string result) { azureResponseCode = result; azureResponseText.text = azureResponseCode; } /// <summary> /// Stores the translated result from dictation in the static instance of Result class. /// </summary> public void SetDictationResult(string result) { dictationResult = result; dictationText.text = dictationResult; } /// <summary> /// Stores the translated result from Azure Service in the static instance of Result class. /// </summary> public void SetTranslatedResult(string result) { translationResult = result; translationResultText.text = translationResult; } /// <summary> /// Stores the status of the Microphone in the static instance of Result class. /// </summary> public void SetMicrophoneStatus(string result) { micStatus = result; microphoneStatusText.text = micStatus; } // Use this for initialization void Start () { } // Update is called once per frame void Update () { } } |
変更を保存したあとUnityに戻ります。
次に、ホロレンズのマイクで聞き取った音声を可視化したりAzure Translationに送ったりするための処理を行うスクリプトを記述していきます。先ほど同様C# Scriptを作り今度はMicrophoneManagerとします。これも同様に[Scripts]の中に入れます。
ダブルクリックしvisual studioに移動した後、以下のコードを記述します。
|
1 2 3 4 5 6 7 8 9 10 11 12 13 14 15 16 17 18 19 20 21 22 23 24 25 26 27 28 29 30 31 32 33 34 35 36 37 38 39 40 41 42 43 44 45 46 47 48 49 50 51 52 53 54 55 56 57 58 59 60 61 62 63 64 65 66 67 68 69 70 71 72 73 74 75 76 77 78 79 80 81 82 83 84 |
using System.Collections; using System.Collections.Generic; using UnityEngine; using UnityEngine.Windows.Speech; public class MicrophoneManager : MonoBehaviour { // Help to access instance of this object public static MicrophoneManager instance; // AudioSource component, provides access to mic private AudioSource audioSource; // Flag indicating mic detection private bool microphoneDetected; // Component converting speech to text private DictationRecognizer dictationRecognizer; private void Awake() { // Set this class to behave similar to singleton instance = this; } // Use this for initialization void Start() { //Use Unity Microphone class to detect devices and setup AudioSource if (Microphone.devices.Length > 0) { Results.instance.SetMicrophoneStatus("Initialising..."); audioSource = GetComponent<AudioSource>(); microphoneDetected = true; } else { Results.instance.SetMicrophoneStatus("No Microphone detected"); } } /// <summary> /// Start microphone capture. Debugging message is delivered to the Results class. /// </summary> public void StartCapturingAudio() { if (microphoneDetected) { // Start dictation dictationRecognizer = new DictationRecognizer(); dictationRecognizer.DictationResult += DictationRecognizer_DictationResult; dictationRecognizer.Start(); // Update UI with mic status Results.instance.SetMicrophoneStatus("Capturing..."); } } /// <summary> /// Stop microphone capture. Debugging message is delivered to the Results class. /// </summary> public void StopCapturingAudio() { Results.instance.SetMicrophoneStatus("Mic sleeping"); Microphone.End(null); dictationRecognizer.DictationResult -= DictationRecognizer_DictationResult; dictationRecognizer.Dispose(); } /// <summary> /// This handler is called every time the Dictation detects a pause in the speech. /// Debugging message is delivered to the Results class. /// </summary> private void DictationRecognizer_DictationResult(string text, ConfidenceLevel confidence) { // Update UI with dictation captured Results.instance.SetDictationResult(text); // Start the coroutine that process the dictation through Azure StartCoroutine(Translator.instance.TranslateWithUnityNetworking(text)); } } |
続いてAzure Translationの翻訳機能を利用するためのスクリプトを書いていきましょう。先ほど同様にC# Scriptを作り名前をTranslatorとします。
ダブルクリックでVisual studioを開き以下のコードを記述しましょう。先ほど準備で入手したTranslator Text APIのkey1、key2いずれかを–Insert your authorizationKey–にいれます。
|
1 2 3 4 5 6 7 8 9 10 11 12 13 14 15 16 17 18 19 20 21 22 23 24 25 26 27 28 29 30 31 32 33 34 35 36 37 38 39 40 41 42 43 44 45 46 47 48 49 50 51 52 53 54 55 56 57 58 59 60 61 62 63 64 65 66 67 68 69 70 71 72 73 74 75 76 77 78 79 80 81 82 83 84 85 86 87 88 89 90 91 92 93 94 95 96 97 98 99 100 101 102 103 104 105 106 107 108 109 110 |
using System; using System.Collections; using System.Collections.Generic; using System.Xml.Linq; using UnityEngine; using UnityEngine.Networking; public class Translator : MonoBehaviour { public static Translator instance; private string translationTokenEndpoint = "https://api.cognitive.microsoft.com/sts/v1.0/issueToken"; private string translationTextEndpoint = "https://api.microsofttranslator.com/v2/http.svc/Translate?"; private const string ocpApimSubscriptionKeyHeader = "Ocp-Apim-Subscription-Key"; //Substitute the value of authorizationKey with your own Key private const string authorizationKey = "--Insert your authorizationKey--"; private string authorizationToken; // languages set below are: // English // French // Italian // Japanese // Korean public enum Languages { en, fr, it, ja, ko }; public Languages from = Languages.en; public Languages to = Languages.it; private void Awake() { // Set this class to behave similar to singleton instance = this; } // Use this for initialization void Start() { // When the application starts, request an auth token StartCoroutine("GetTokenCoroutine", authorizationKey); } /// <summary> /// Request a Token from Azure Translation Service by providing the access key. /// Debugging result is delivered to the Results class. /// </summary> private IEnumerator GetTokenCoroutine(string key) { if (string.IsNullOrEmpty(key)) { throw new InvalidOperationException("Authorization key not set."); } using (UnityWebRequest unityWebRequest = UnityWebRequest.Post(translationTokenEndpoint, string.Empty)) { unityWebRequest.SetRequestHeader("Ocp-Apim-Subscription-Key", key); yield return unityWebRequest.SendWebRequest(); long responseCode = unityWebRequest.responseCode; // Update the UI with the response code Results.instance.SetAzureResponse(responseCode.ToString()); if (unityWebRequest.isNetworkError || unityWebRequest.isHttpError) { Results.instance.azureResponseText.text = unityWebRequest.error; yield return null; } else { authorizationToken = unityWebRequest.downloadHandler.text; } } // After receiving the token, begin capturing Audio with the MicrophoneManager Class MicrophoneManager.instance.StartCapturingAudio(); } /// <summary> /// Request a translation from Azure Translation Service by providing a string. /// Debugging result is delivered to the Results class. /// </summary> public IEnumerator TranslateWithUnityNetworking(string text) { // This query string will contain the parameters for the translation string queryString = string.Concat("text=", Uri.EscapeDataString(text), "&from=", from, "&to=", to); using (UnityWebRequest unityWebRequest = UnityWebRequest.Get(translationTextEndpoint + queryString)) { unityWebRequest.SetRequestHeader("Authorization", "Bearer " + authorizationToken); unityWebRequest.SetRequestHeader("Accept", "application/xml"); yield return unityWebRequest.SendWebRequest(); if (unityWebRequest.isNetworkError || unityWebRequest.isHttpError) { Debug.Log(unityWebRequest.error); yield return null; } // Parse out the response text from the returned Xml string result = XElement.Parse(unityWebRequest.downloadHandler.text).Value; Results.instance.SetTranslatedResult(result); } } // Update is called once per frame void Update () { } } |
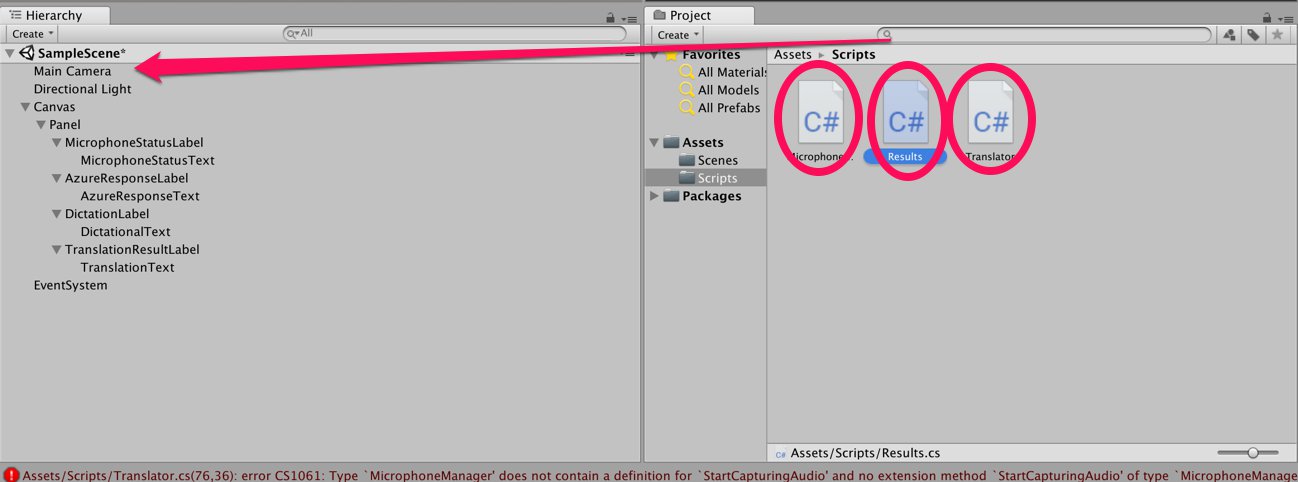
必要なスクリプトは全て揃ったのでスクリプトをMainCameraにドラッグ&ドロップします。
すると、 [MainCamera]内の[Inspector]に以下のドラッグ&ドロップした項目が増えています。
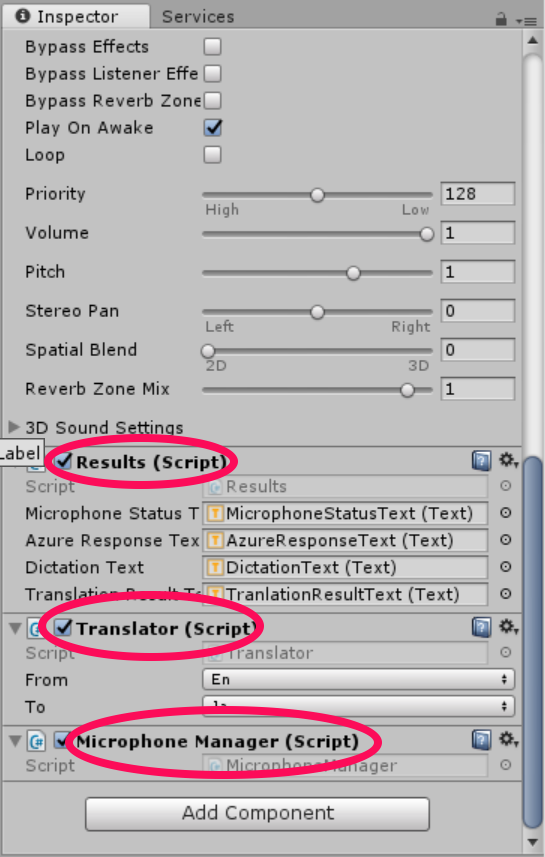
最後にTextを[Results]にドラッグ&ドロップし、

Translatorを以下のように変更すれば完成です。

4.使ってみよう
最後のステップです。今までに実装したものをホロレンズ上で実行してみたいと思います。ビルドする方法はこちらを参照してください。最初に行った設定を変えずに[Build]をすることに注意します。
Buildが無事完了したら、HoloLensを装着してアプリを試してみます。このように翻訳がされればOKです。
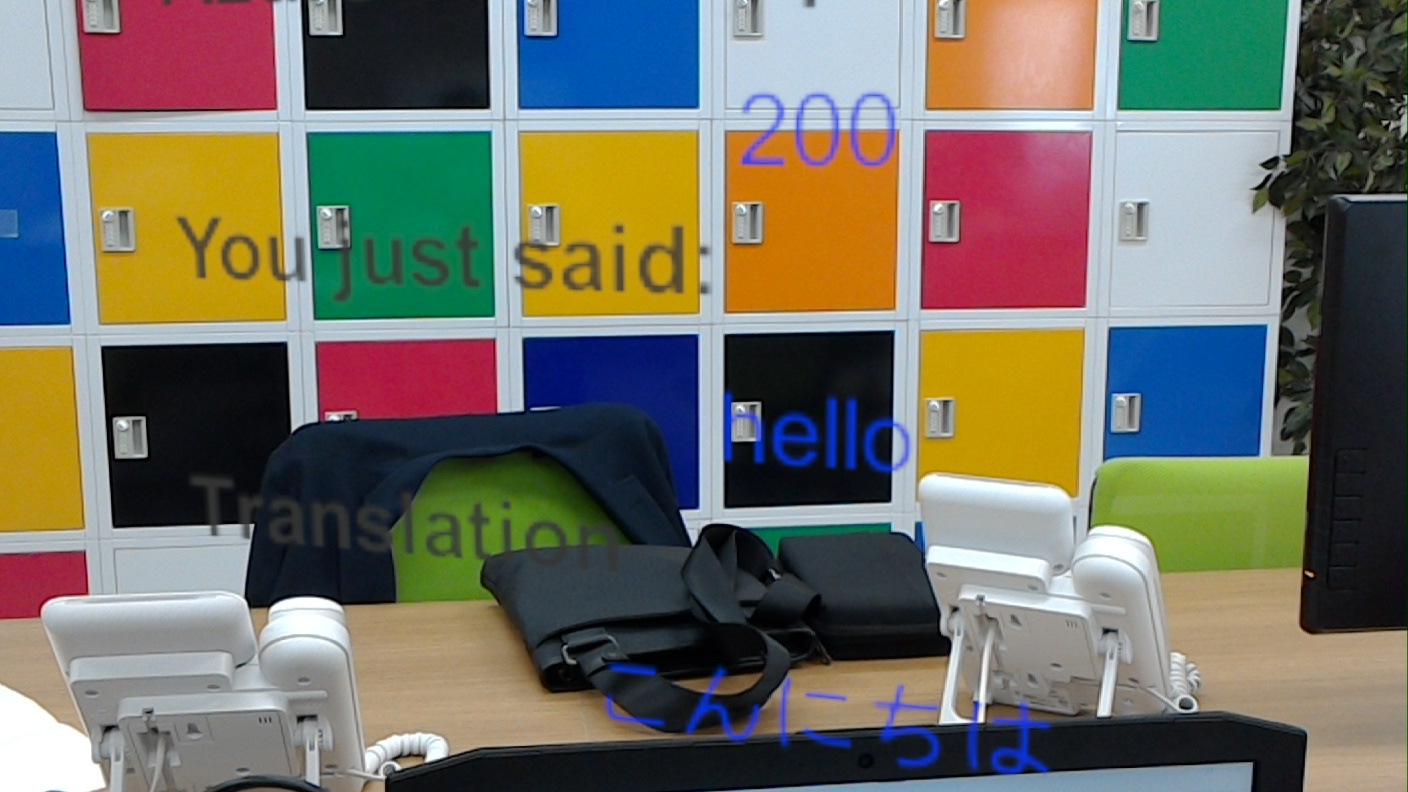
以上となります。 お疲れ様でした!
