渡邊 です。
今回は『 Azure Machine Learning Studio 』で構築した機械学習モデルをWebサービスとして公開する方法を紹介致します。
機械学習モデルのWebサービス公開
Azure Machine Learning Studio にログインし、Webサービスとして公開したい機械学習モデルを構築した Experiment を開きます。
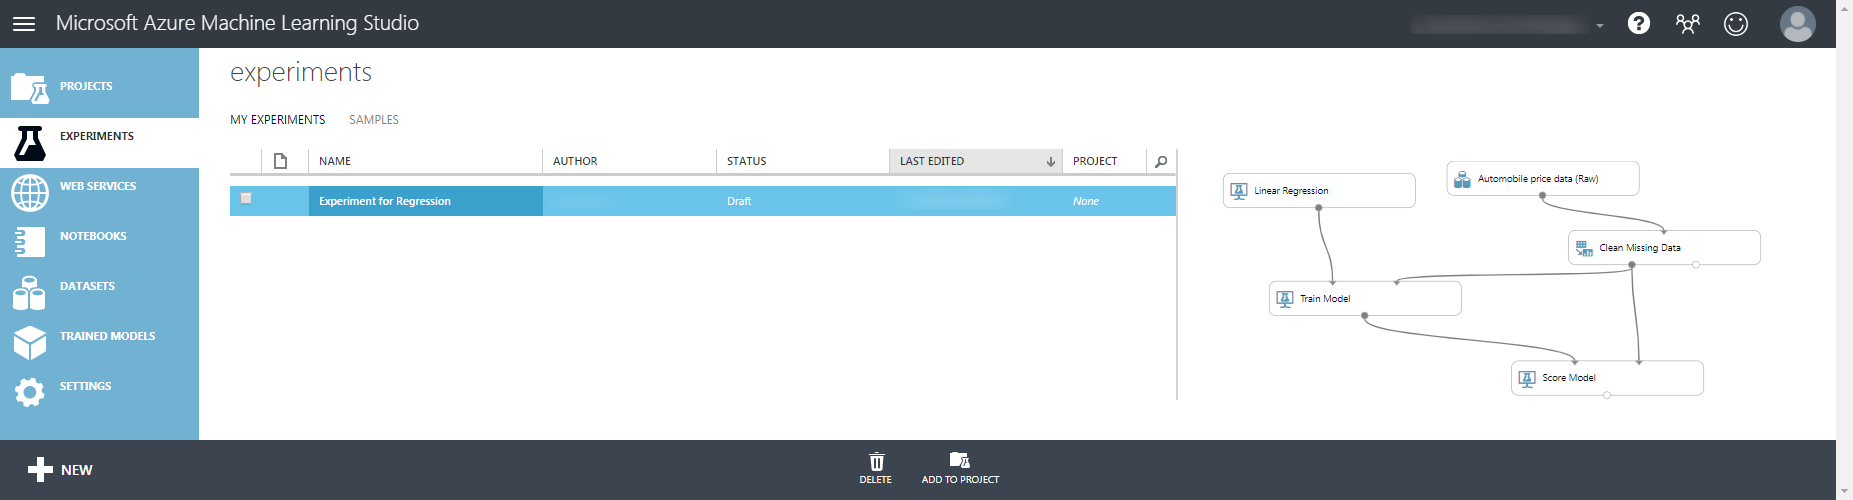
実行済でない場合は、『 Run 』で実行します。
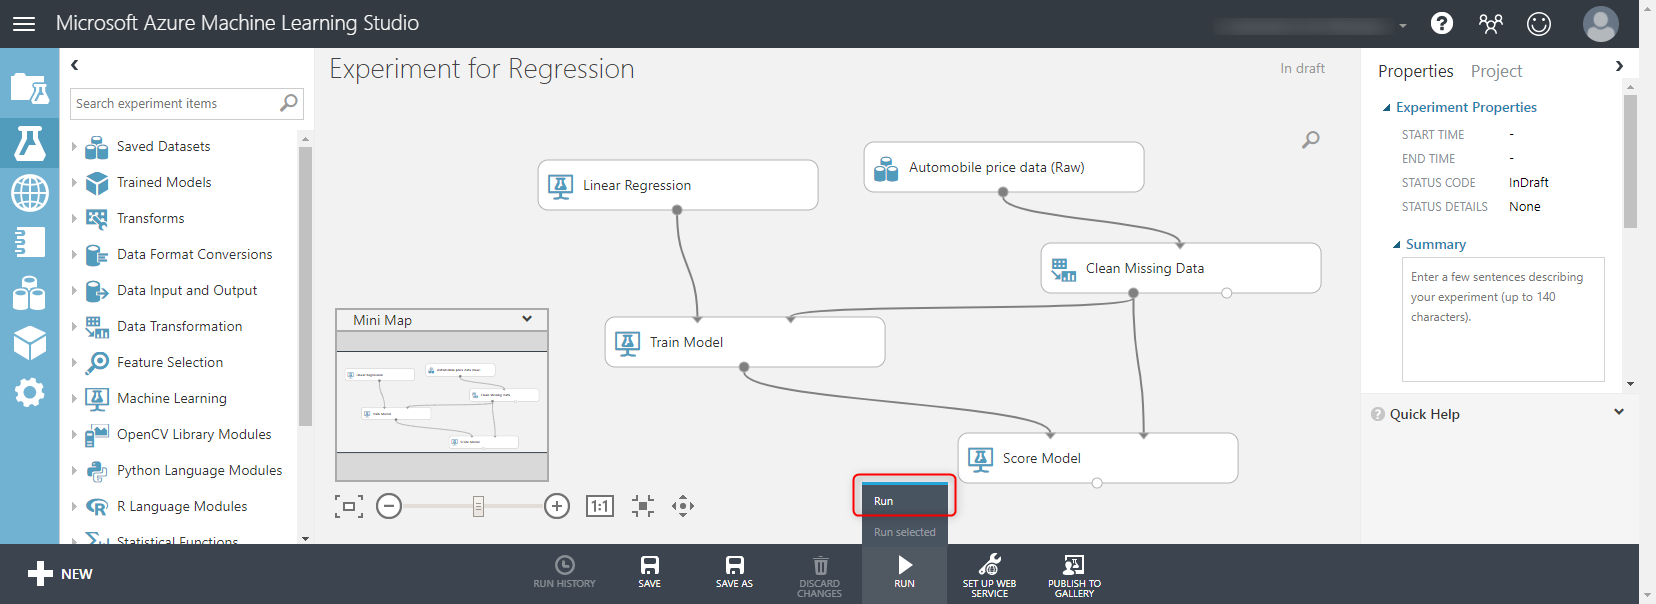
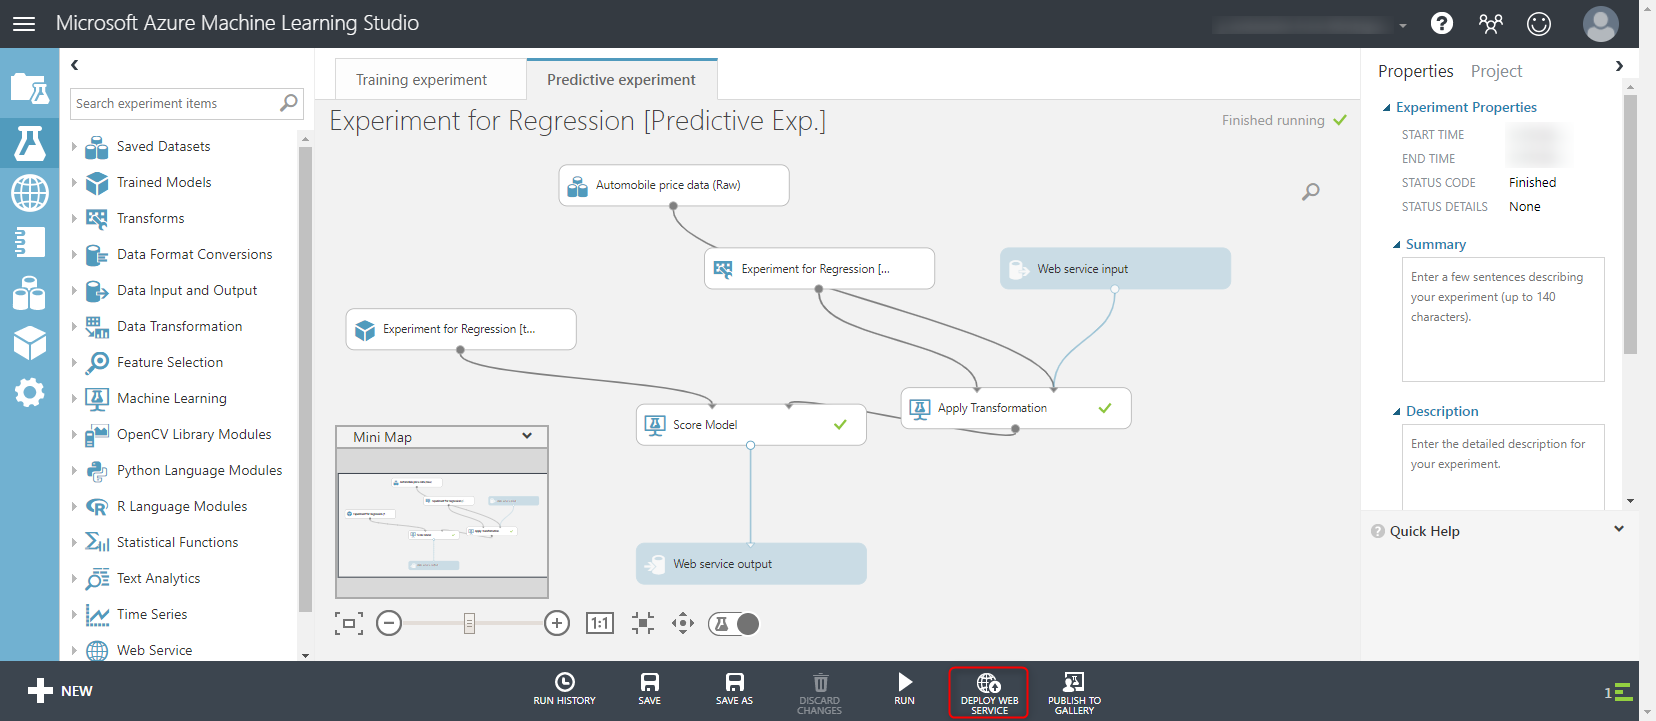
実行が完了したら、『Predictive Web Service』をクリックします。
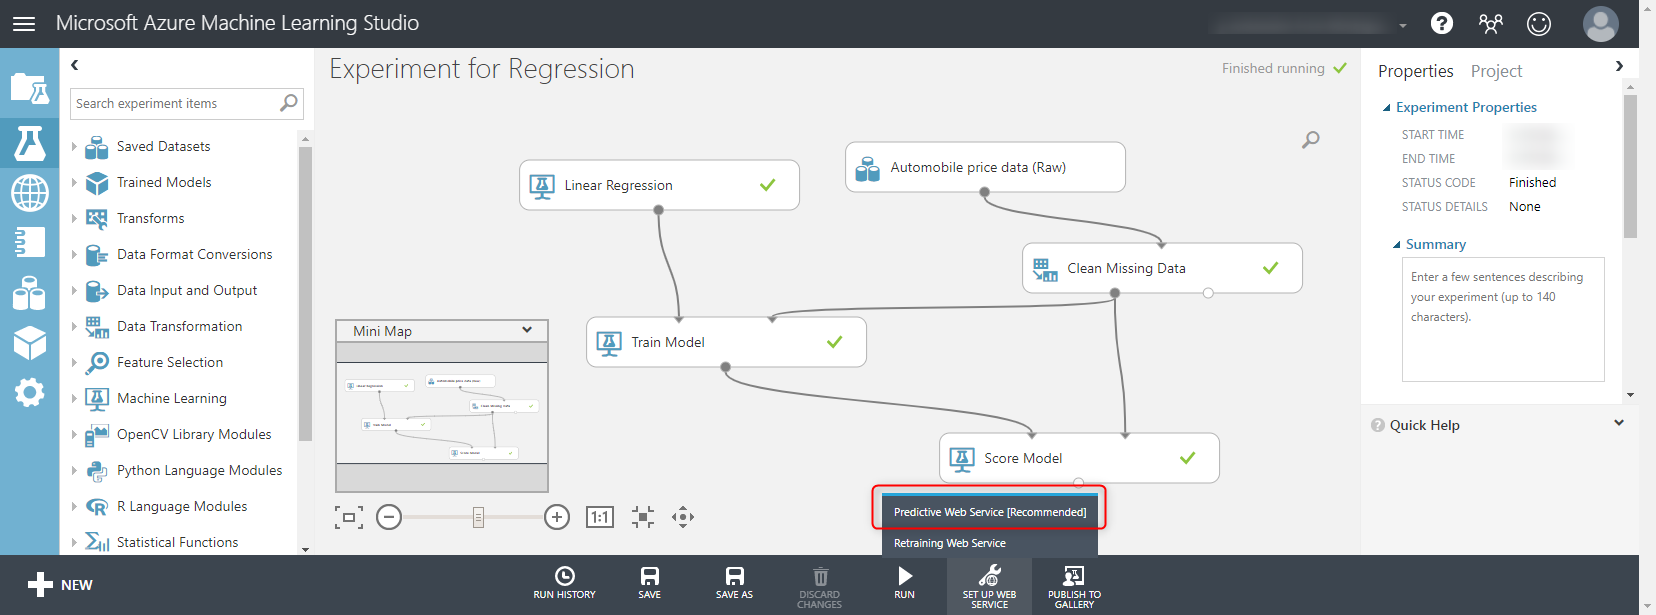
『 Run 』で実行します。
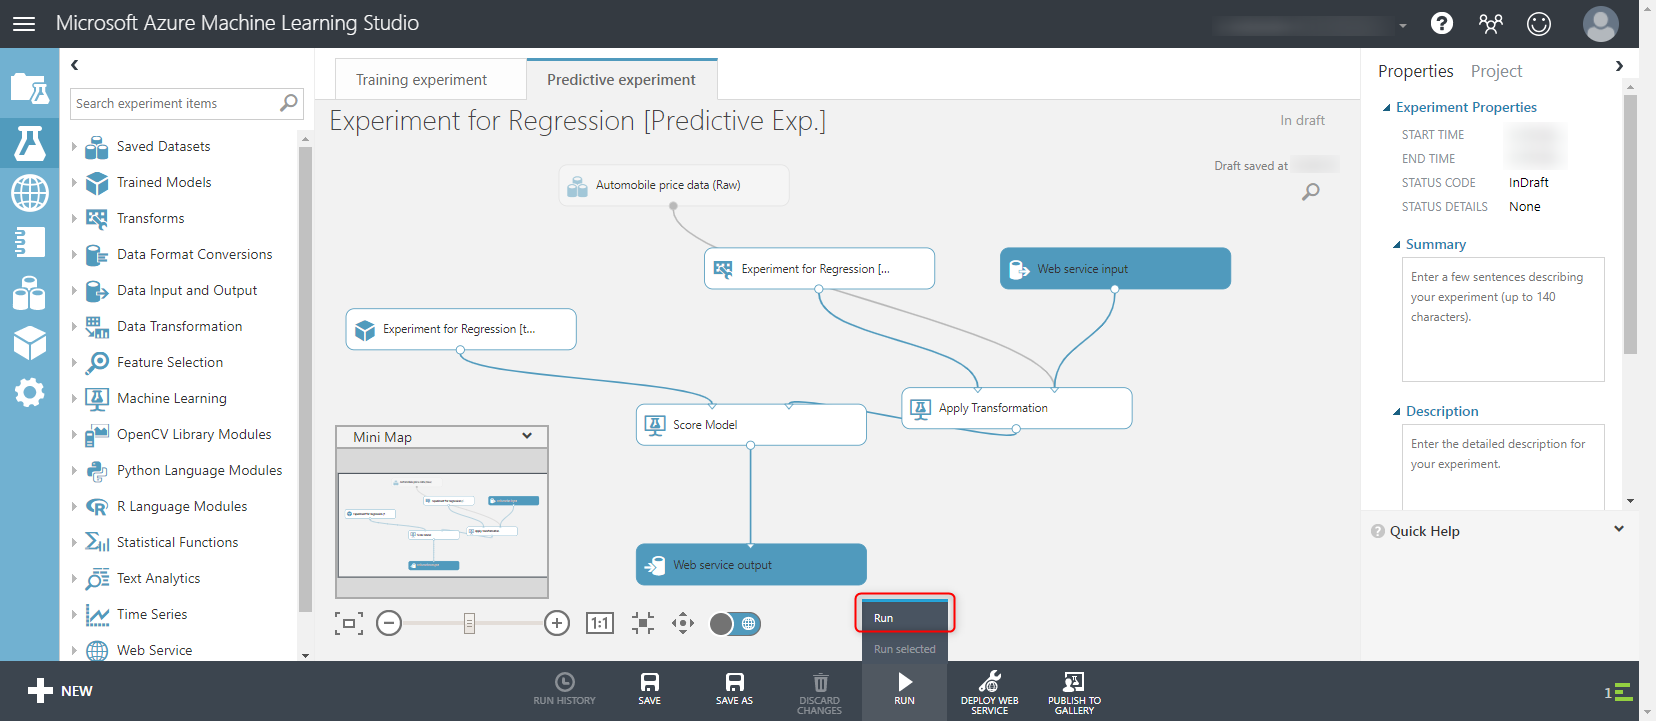
実行が完了したら、『 DEPLOY WEB SERVICE 』をクリックします。
これで機械学習モデルがWebサービスとして公開されました。
Webサービス情報
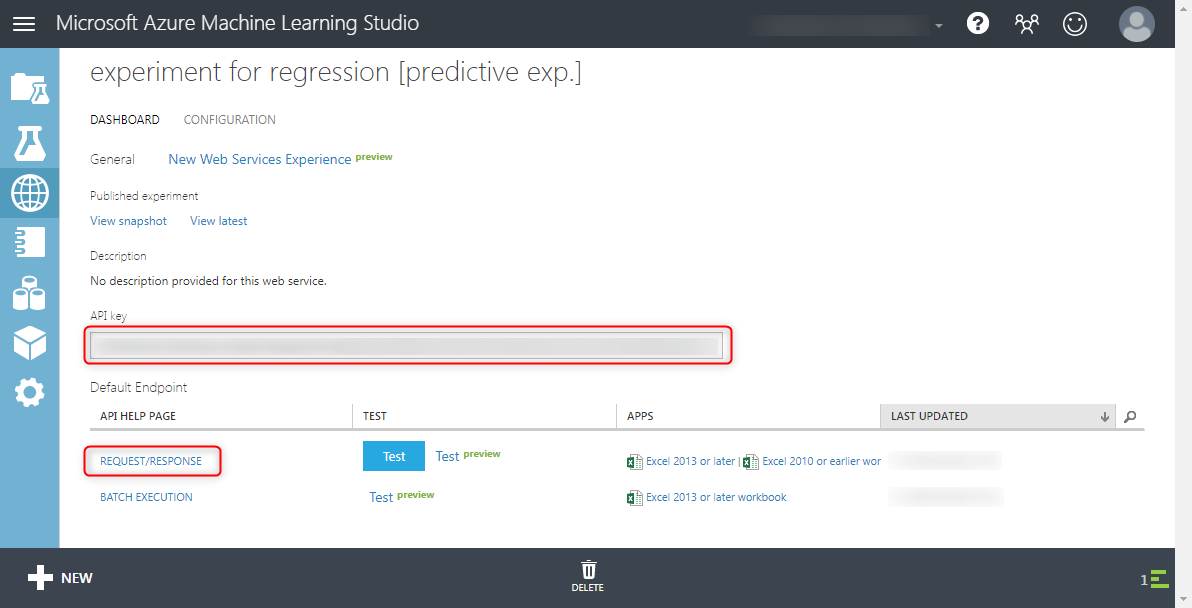
前節で『 DEPLOY WEB SERVICE 』を選択すると、Webサービス(API)のダッシュボードが表示されます。
APIへのリクエストに必要な『 API key 』もこの画面に表示されます。
ここで『 REQUEST/RESPONSE 』をクリックします。
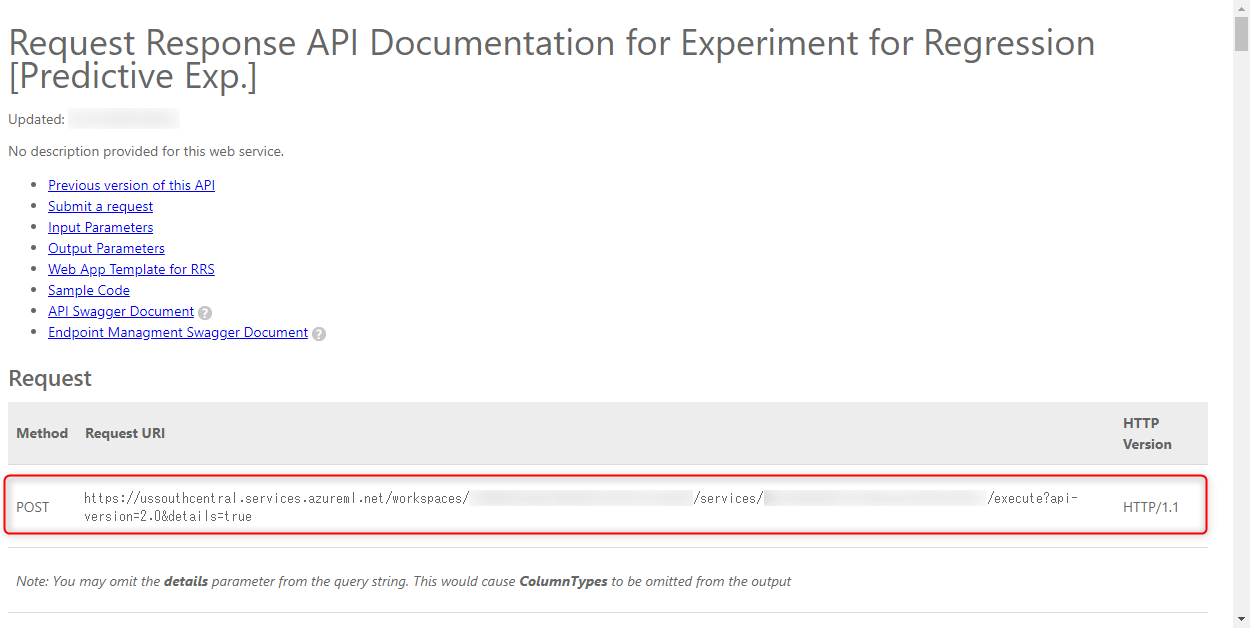
APIへのリクエストに必要な情報とレスポンスの仕様が表示されます。
- HTTPメソッド
- リクエストURI
- HTTPバージョン
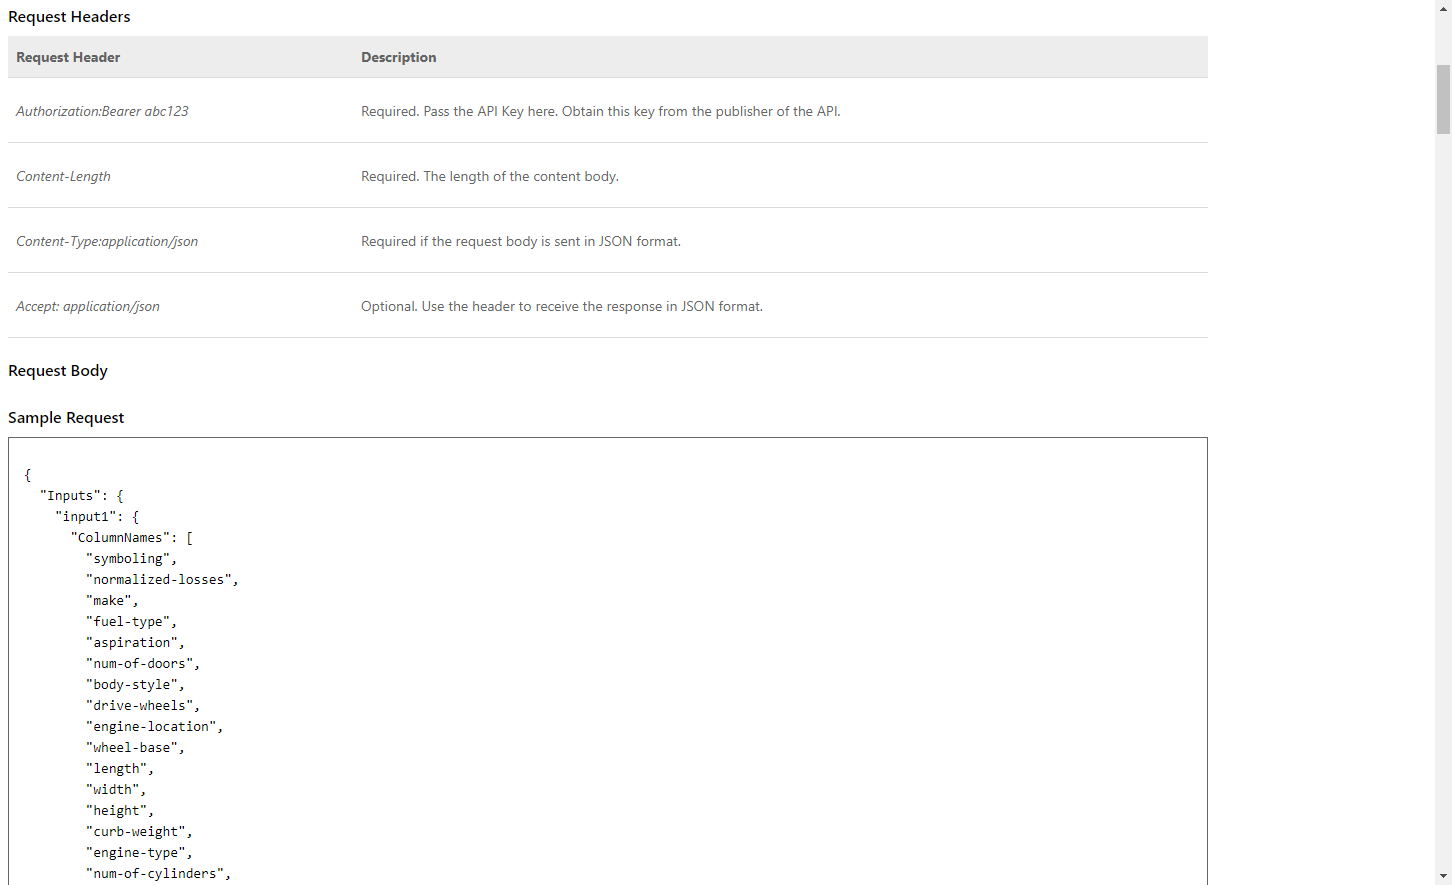
- リクエストヘッダ
- リクエストボディ(サンプルリクエスト)
{
"Inputs": {
"input1": {
"ColumnNames": [
"symboling",
"normalized-losses",
"make",
"fuel-type",
"aspiration",
"num-of-doors",
"body-style",
"drive-wheels",
"engine-location",
"wheel-base",
"length",
"width",
"height",
"curb-weight",
"engine-type",
"num-of-cylinders",
"engine-size",
"fuel-system",
"bore",
"stroke",
"compression-ratio",
"horsepower",
"peak-rpm",
"city-mpg",
"highway-mpg",
"price"
],
"Values": [
[
"0",
"0",
"value",
"value",
"value",
"value",
"value",
"value",
"value",
"0",
"0",
"0",
"0",
"0",
"value",
"value",
"0",
"value",
"0",
"0",
"0",
"0",
"0",
"0",
"0",
"0"
],
[
"0",
"0",
"value",
"value",
"value",
"value",
"value",
"value",
"value",
"0",
"0",
"0",
"0",
"0",
"value",
"value",
"0",
"value",
"0",
"0",
"0",
"0",
"0",
"0",
"0",
"0"
]
]
}
},
"GlobalParameters": {}
}
- レスポンスヘッダ
- レスポンスボディ(サンプルレスポンス)
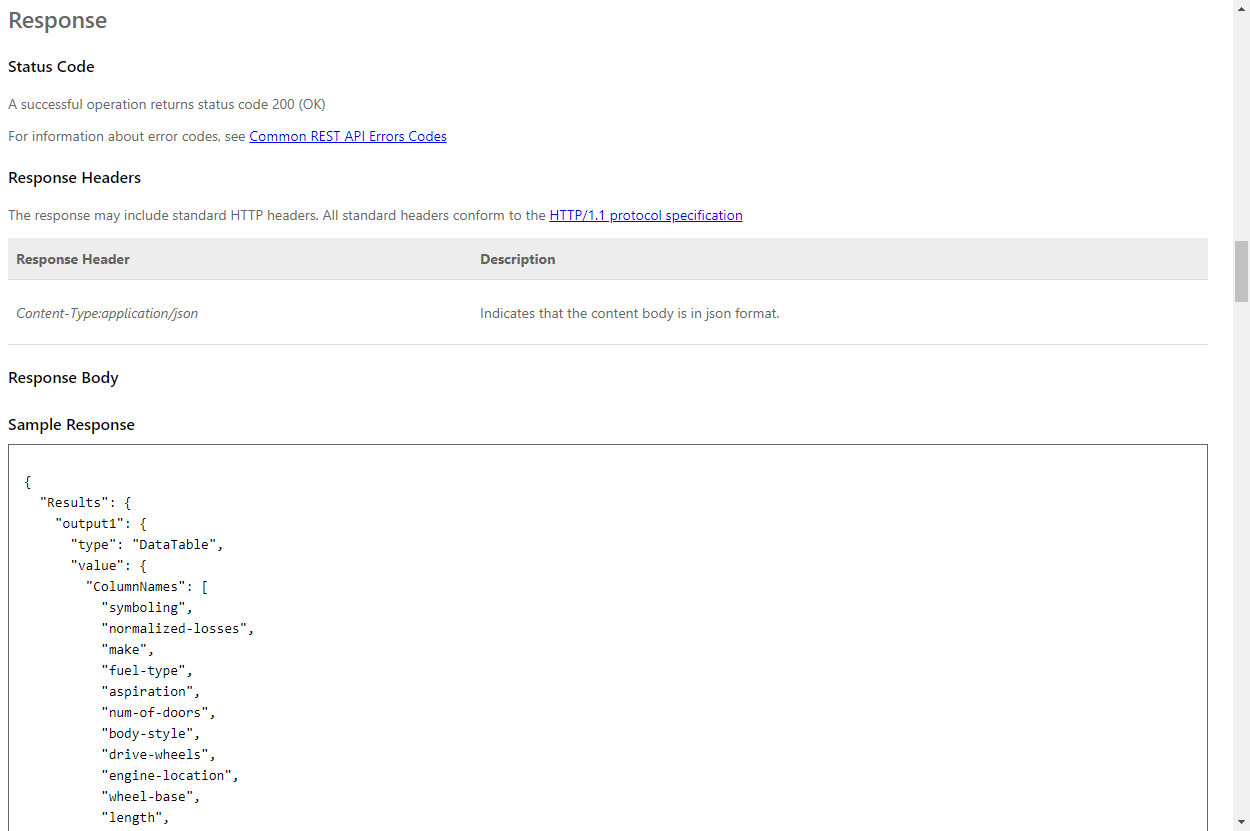
{
"Results": {
"output1": {
"type": "DataTable",
"value": {
"ColumnNames": [
"symboling",
"normalized-losses",
"make",
"fuel-type",
"aspiration",
"num-of-doors",
"body-style",
"drive-wheels",
"engine-location",
"wheel-base",
"length",
"width",
"height",
"curb-weight",
"engine-type",
"num-of-cylinders",
"engine-size",
"fuel-system",
"bore",
"stroke",
"compression-ratio",
"horsepower",
"peak-rpm",
"city-mpg",
"highway-mpg",
"price",
"Scored Labels"
],
"ColumnTypes": [
"Numeric",
"Numeric",
"String",
"String",
"String",
"String",
"String",
"String",
"String",
"Numeric",
"Numeric",
"Numeric",
"Numeric",
"Numeric",
"String",
"String",
"Numeric",
"String",
"Numeric",
"Numeric",
"Numeric",
"Numeric",
"Numeric",
"Numeric",
"Numeric",
"Numeric",
"Numeric"
],
"Values": [
[
"0",
"0",
"value",
"value",
"value",
"value",
"value",
"value",
"value",
"0",
"0",
"0",
"0",
"0",
"value",
"value",
"0",
"value",
"0",
"0",
"0",
"0",
"0",
"0",
"0",
"0",
"0"
],
[
"0",
"0",
"value",
"value",
"value",
"value",
"value",
"value",
"value",
"0",
"0",
"0",
"0",
"0",
"value",
"value",
"0",
"value",
"0",
"0",
"0",
"0",
"0",
"0",
"0",
"0",
"0"
]
]
}
}
}
}
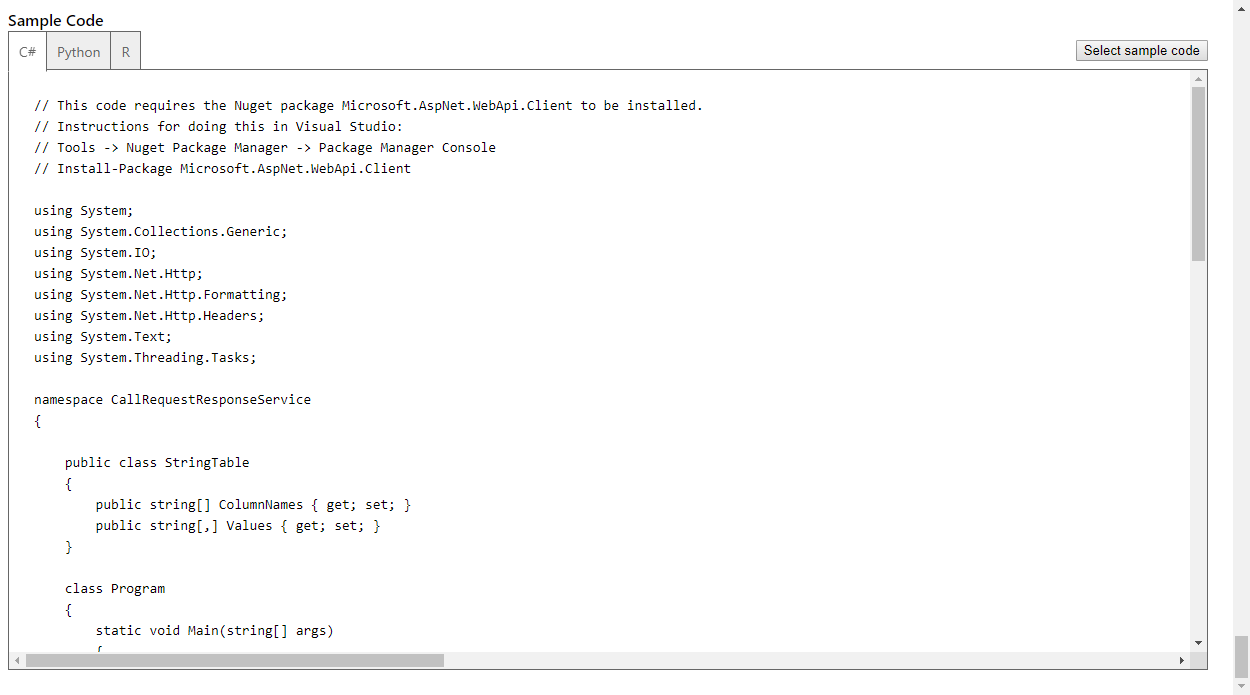
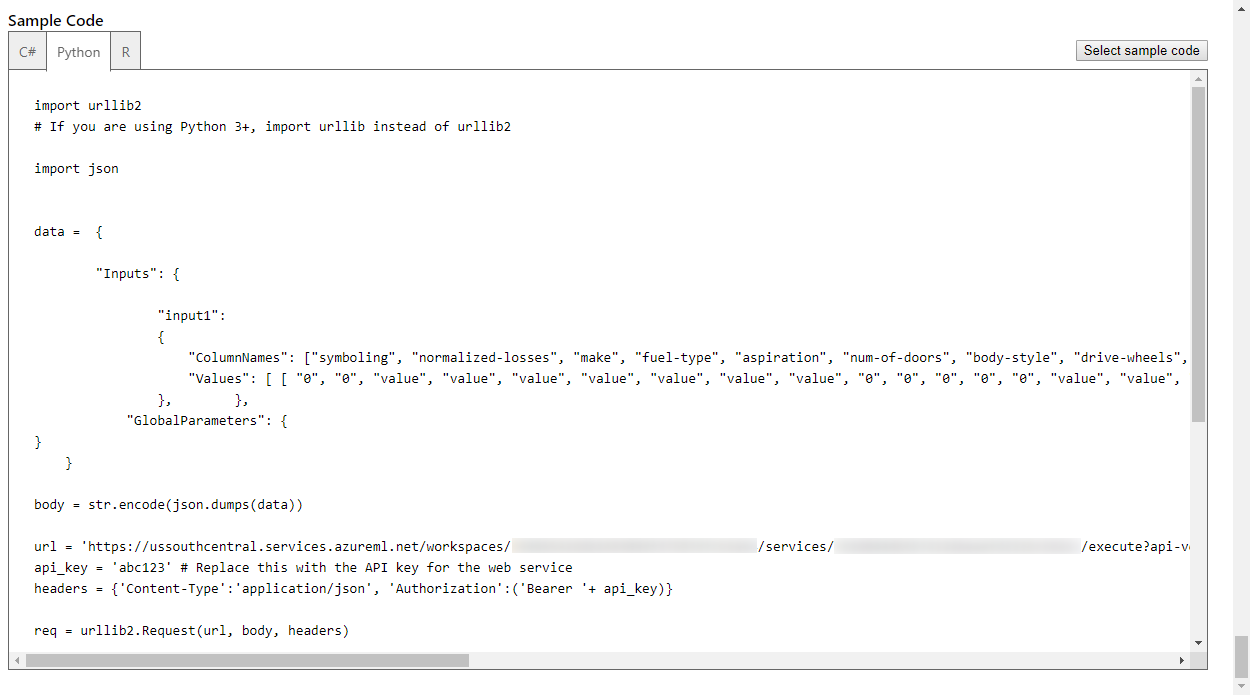
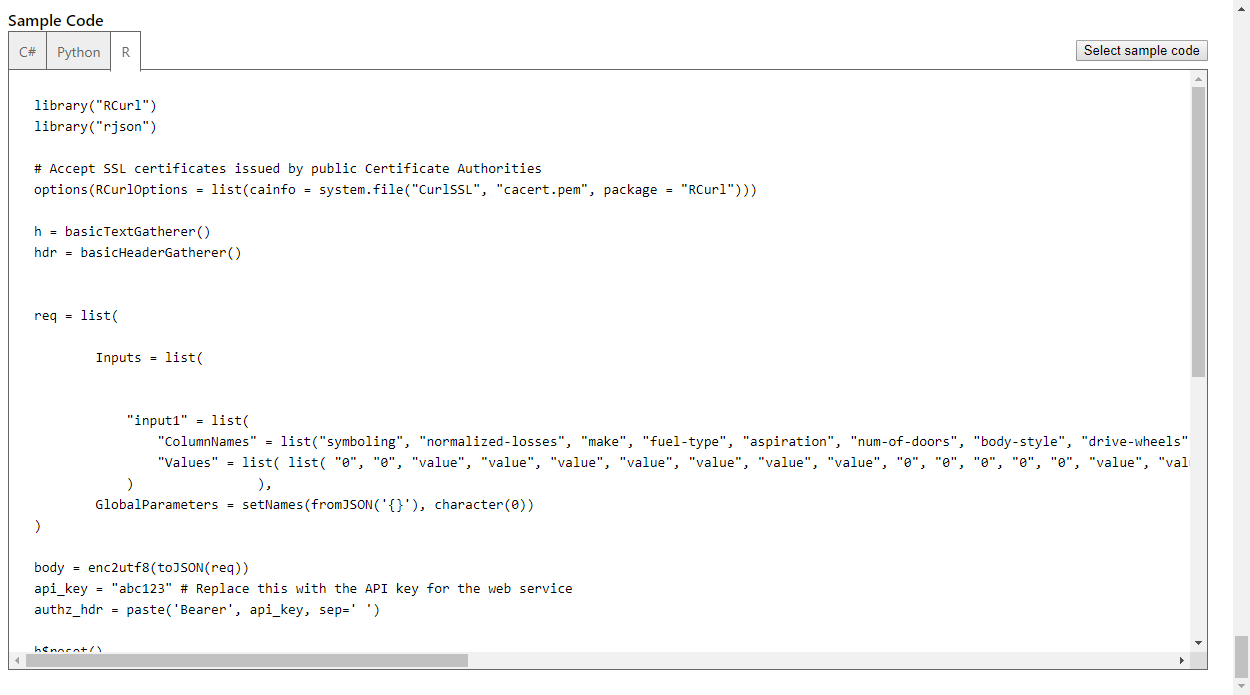
『 C# 』『 Python 』『 R 』の各プログラミング言語で、
このAPIにアクセスする際のサンプルコードも記載されています。
// This code requires the Nuget package Microsoft.AspNet.WebApi.Client to be installed.
// Instructions for doing this in Visual Studio:
// Tools -> Nuget Package Manager -> Package Manager Console
// Install-Package Microsoft.AspNet.WebApi.Client
using System;
using System.Collections.Generic;
using System.IO;
using System.Net.Http;
using System.Net.Http.Formatting;
using System.Net.Http.Headers;
using System.Text;
using System.Threading.Tasks;
namespace CallRequestResponseService
{
public class StringTable
{
public string[] ColumnNames { get; set; }
public string[,] Values { get; set; }
}
class Program
{
static void Main(string[] args)
{
InvokeRequestResponseService().Wait();
}
static async Task InvokeRequestResponseService()
{
using (var client = new HttpClient())
{
var scoreRequest = new
{
Inputs = new Dictionary () {
{
"input1",
new StringTable()
{
ColumnNames = new string[] {"symboling", "normalized-losses", "make", "fuel-type", "aspiration", "num-of-doors", "body-style", "drive-wheels", "engine-location", "wheel-base", "length", "width", "height", "curb-weight", "engine-type", "num-of-cylinders", "engine-size", "fuel-system", "bore", "stroke", "compression-ratio", "horsepower", "peak-rpm", "city-mpg", "highway-mpg", "price"},
Values = new string[,] { { "0", "0", "value", "value", "value", "value", "value", "value", "value", "0", "0", "0", "0", "0", "value", "value", "0", "value", "0", "0", "0", "0", "0", "0", "0", "0" }, { "0", "0", "value", "value", "value", "value", "value", "value", "value", "0", "0", "0", "0", "0", "value", "value", "0", "value", "0", "0", "0", "0", "0", "0", "0", "0" }, }
}
},
},
GlobalParameters = new Dictionary() {
}
};
const string apiKey = "abc123"; // Replace this with the API key for the web service
client.DefaultRequestHeaders.Authorization = new AuthenticationHeaderValue( "Bearer", apiKey);
client.BaseAddress = new Uri("https://ussouthcentral.services.azureml.net/workspaces/*/services/*/execute?api-version=2.0&details=true");
// WARNING: The 'await' statement below can result in a deadlock if you are calling this code from the UI thread of an ASP.Net application.
// One way to address this would be to call ConfigureAwait(false) so that the execution does not attempt to resume on the original context.
// For instance, replace code such as:
// result = await DoSomeTask()
// with the following:
// result = await DoSomeTask().ConfigureAwait(false)
HttpResponseMessage response = await client.PostAsJsonAsync("", scoreRequest);
if (response.IsSuccessStatusCode)
{
string result = await response.Content.ReadAsStringAsync();
Console.WriteLine("Result: {0}", result);
}
else
{
Console.WriteLine(string.Format("The request failed with status code: {0}", response.StatusCode));
// Print the headers - they include the requert ID and the timestamp, which are useful for debugging the failure
Console.WriteLine(response.Headers.ToString());
string responseContent = await response.Content.ReadAsStringAsync();
Console.WriteLine(responseContent);
}
}
}
}
}
If you are using Python 3+, import urllib instead of urllib2
import json
data = {
"Inputs": {
"input1":
{
"ColumnNames": ["symboling", "normalized-losses", "make", "fuel-type", "aspiration", "num-of-doors", "body-style", "drive-wheels", "engine-location", "wheel-base", "length", "width", "height", "curb-weight", "engine-type", "num-of-cylinders", "engine-size", "fuel-system", "bore", "stroke", "compression-ratio", "horsepower", "peak-rpm", "city-mpg", "highway-mpg", "price"],
"Values": [ [ "0", "0", "value", "value", "value", "value", "value", "value", "value", "0", "0", "0", "0", "0", "value", "value", "0", "value", "0", "0", "0", "0", "0", "0", "0", "0" ], [ "0", "0", "value", "value", "value", "value", "value", "value", "value", "0", "0", "0", "0", "0", "value", "value", "0", "value", "0", "0", "0", "0", "0", "0", "0", "0" ], ]
}, },
"GlobalParameters": {
}
}
body = str.encode(json.dumps(data))
url = 'https://ussouthcentral.services.azureml.net/workspaces/*/services/*/execute?api-version=2.0&details=true'
api_key = 'abc123' # Replace this with the API key for the web service
headers = {'Content-Type':'application/json', 'Authorization':('Bearer '+ api_key)}
req = urllib2.Request(url, body, headers)
try:
response = urllib2.urlopen(req)
If you are using Python 3+, replace urllib2 with urllib.request in the above code:
req = urllib.request.Request(url, body, headers)
response = urllib.request.urlopen(req)
result = response.read()
print(result)
except urllib2.HTTPError, error:
print("The request failed with status code: " + str(error.code))
Print the headers - they include the requert ID and the timestamp, which are useful for debugging the failure
print(error.info())
print(error.info())
print(json.loads(error.read()))
Accept SSL certificates issued by public Certificate Authorities
options(RCurlOptions = list(cainfo = system.file("CurlSSL", "cacert.pem", package = "RCurl")))
h = basicTextGatherer()
hdr = basicHeaderGatherer()
req = list(
Inputs = list(
"input1" = list(
"ColumnNames" = list("symboling", "normalized-losses", "make", "fuel-type", "aspiration", "num-of-doors", "body-style", "drive-wheels", "engine-location", "wheel-base", "length", "width", "height", "curb-weight", "engine-type", "num-of-cylinders", "engine-size", "fuel-system", "bore", "stroke", "compression-ratio", "horsepower", "peak-rpm", "city-mpg", "highway-mpg", "price"),
"Values" = list( list( "0", "0", "value", "value", "value", "value", "value", "value", "value", "0", "0", "0", "0", "0", "value", "value", "0", "value", "0", "0", "0", "0", "0", "0", "0", "0" ), list( "0", "0", "value", "value", "value", "value", "value", "value", "value", "0", "0", "0", "0", "0", "value", "value", "0", "value", "0", "0", "0", "0", "0", "0", "0", "0" ) )
) ),
GlobalParameters = setNames(fromJSON('{}'), character(0))
)
body = enc2utf8(toJSON(req))
api_key = "abc123" # Replace this with the API key for the web service
authzhdr = paste('Bearer', apikey, sep=' ')
h$reset()
curlPerform(url = "https://ussouthcentral.services.azureml.net/workspaces/*/services/*/execute?api-version=2.0&details=true",
httpheader=c('Content-Type' = "application/json", 'Authorization' = authz_hdr),
postfields=body,
writefunction = h$update,
headerfunction = hdr$update,
verbose = TRUE
)
headers = hdr$value()
httpStatus = headers["status"]
if (httpStatus >= 400)
{
print(paste("The request failed with status code:", httpStatus, sep=" "))
Print the headers - they include the requert ID and the timestamp, which are useful for debugging the failure
print(headers)
}
print("Result:")
result = h$value()
print(fromJSON(result))
おわりに
以上、『 Azure Machine Learning Studio 』で構築した機械学習モデルをWebサービスとして公開する方法を紹介致しました。
非常に簡単に機械学習モデルをWebサービス化出来ることがお分かり頂けたかと思います。
最後までご覧頂きありがとうございました。
参考書籍
クラウドではじめる機械学習
参考リンク
Azure Machine Learning Studio
Azure Machine Learning Studio のドキュメント

Azure Machine Learning Studio Web サービスをデプロイする
Microsoft Azure Portal
Microsoft Azure Machine Learning Studio