こんにちは、ナレコム菅井です。
今回はMR and Azure303のアプリを作っていきたいと思います。
今回使用したツールは以下の通りです。
・Windows
・Unity 2017.4.11f1
・visual studio2017
・HoloLens
目標はMicrosoft AzureのLanguage Understandingを使って、ユーザーの言葉から意図する通り物体の色を変えるアプリを作ることです。それではさっそく始めて行きましょう!
1.準備(1)
ステップ1. Azure Portalでインスタンスを追加する。
ステップ2. Language Portalでアプリを作る。
ステップ1
1. Azure Portalにログインします。
2. [リソースの作成]からLanguage Understandingと検索します。下のようなアイコンが出てきたら開きます。

3. Language Understandingの説明が出てきますので、[作成]をクリックします。出てこない場合は右に画面をスライドしてみてください。
![]()
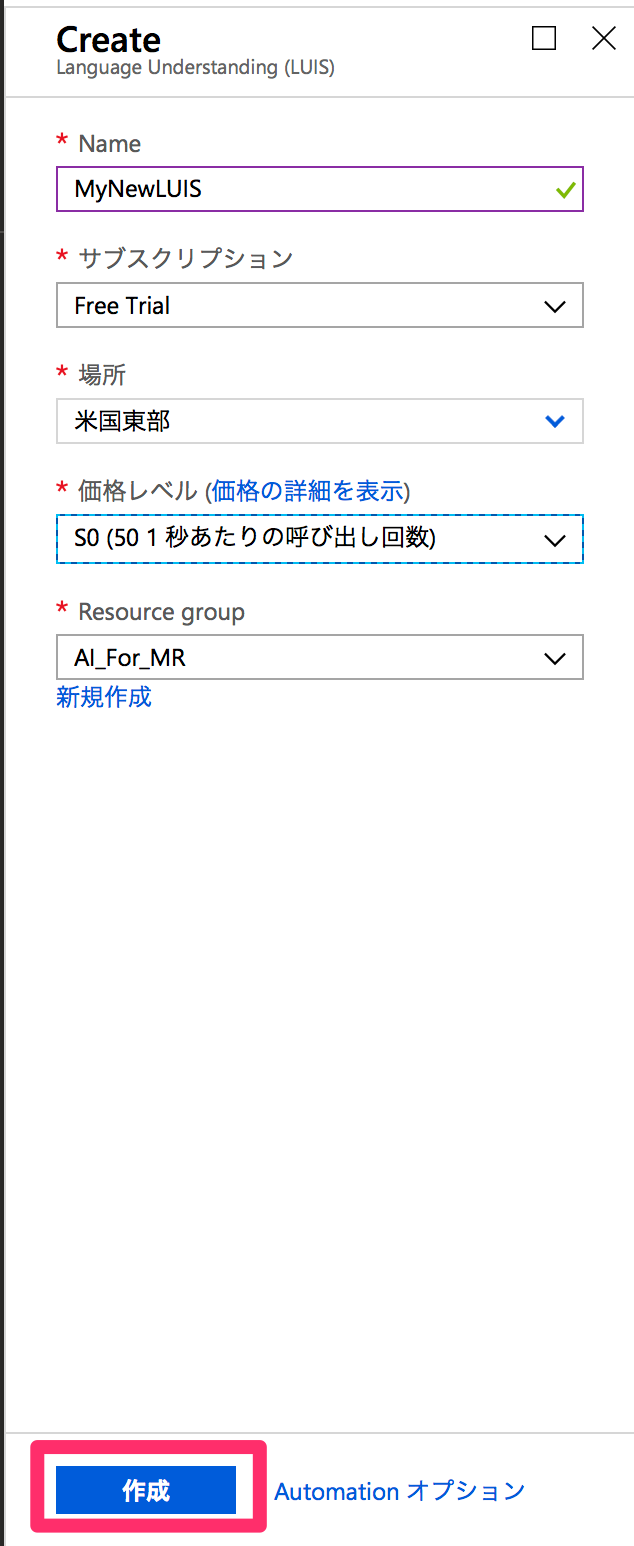
4. Language Understandingに関する情報を入力する画面になりますので、入力していきます(※記入例です)。入力し終わったら、[作成]をクリックします。
5. お知らせタブを開きます。デプロイが終了したら、[リソースへ移動]します。

これでLanguage Understandingサービスのインスタンスが作られました。
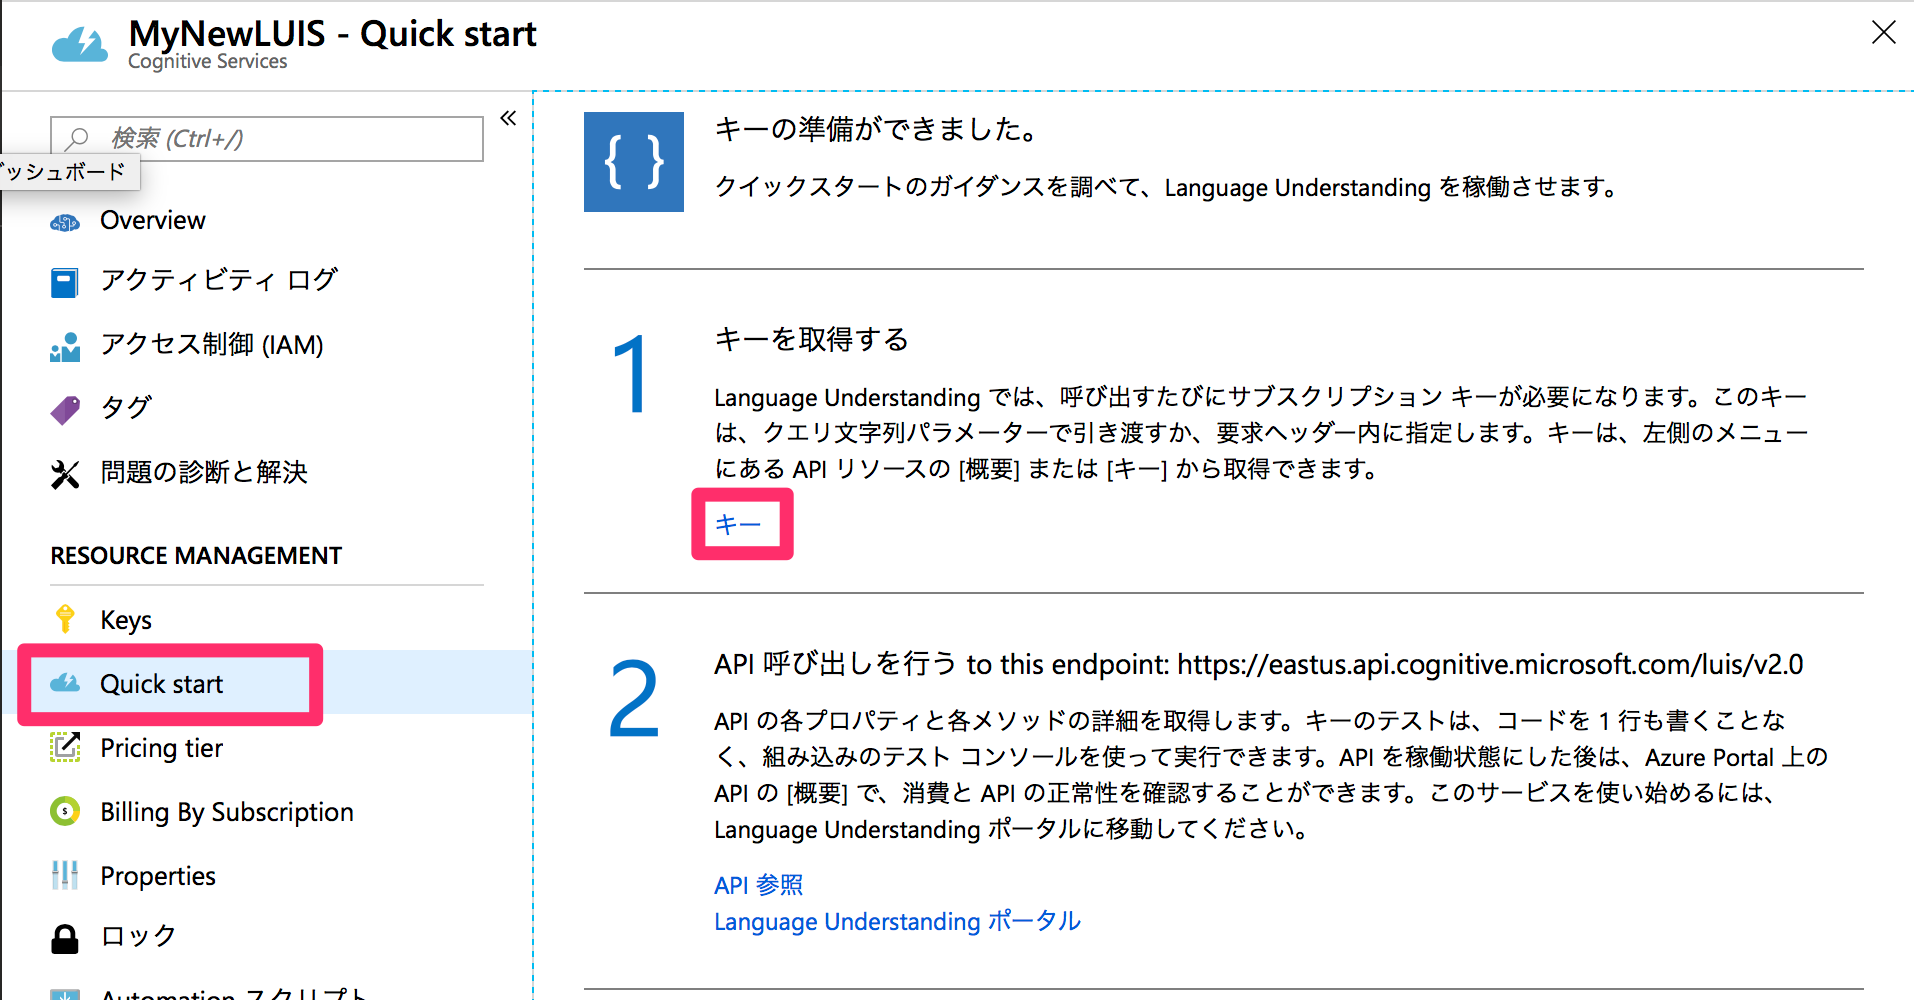
6. [Quick start]->[1 キーを取得する]の[キー]をクリックするとキーを確認できま。このキーは後ほど使います。
ステップ2
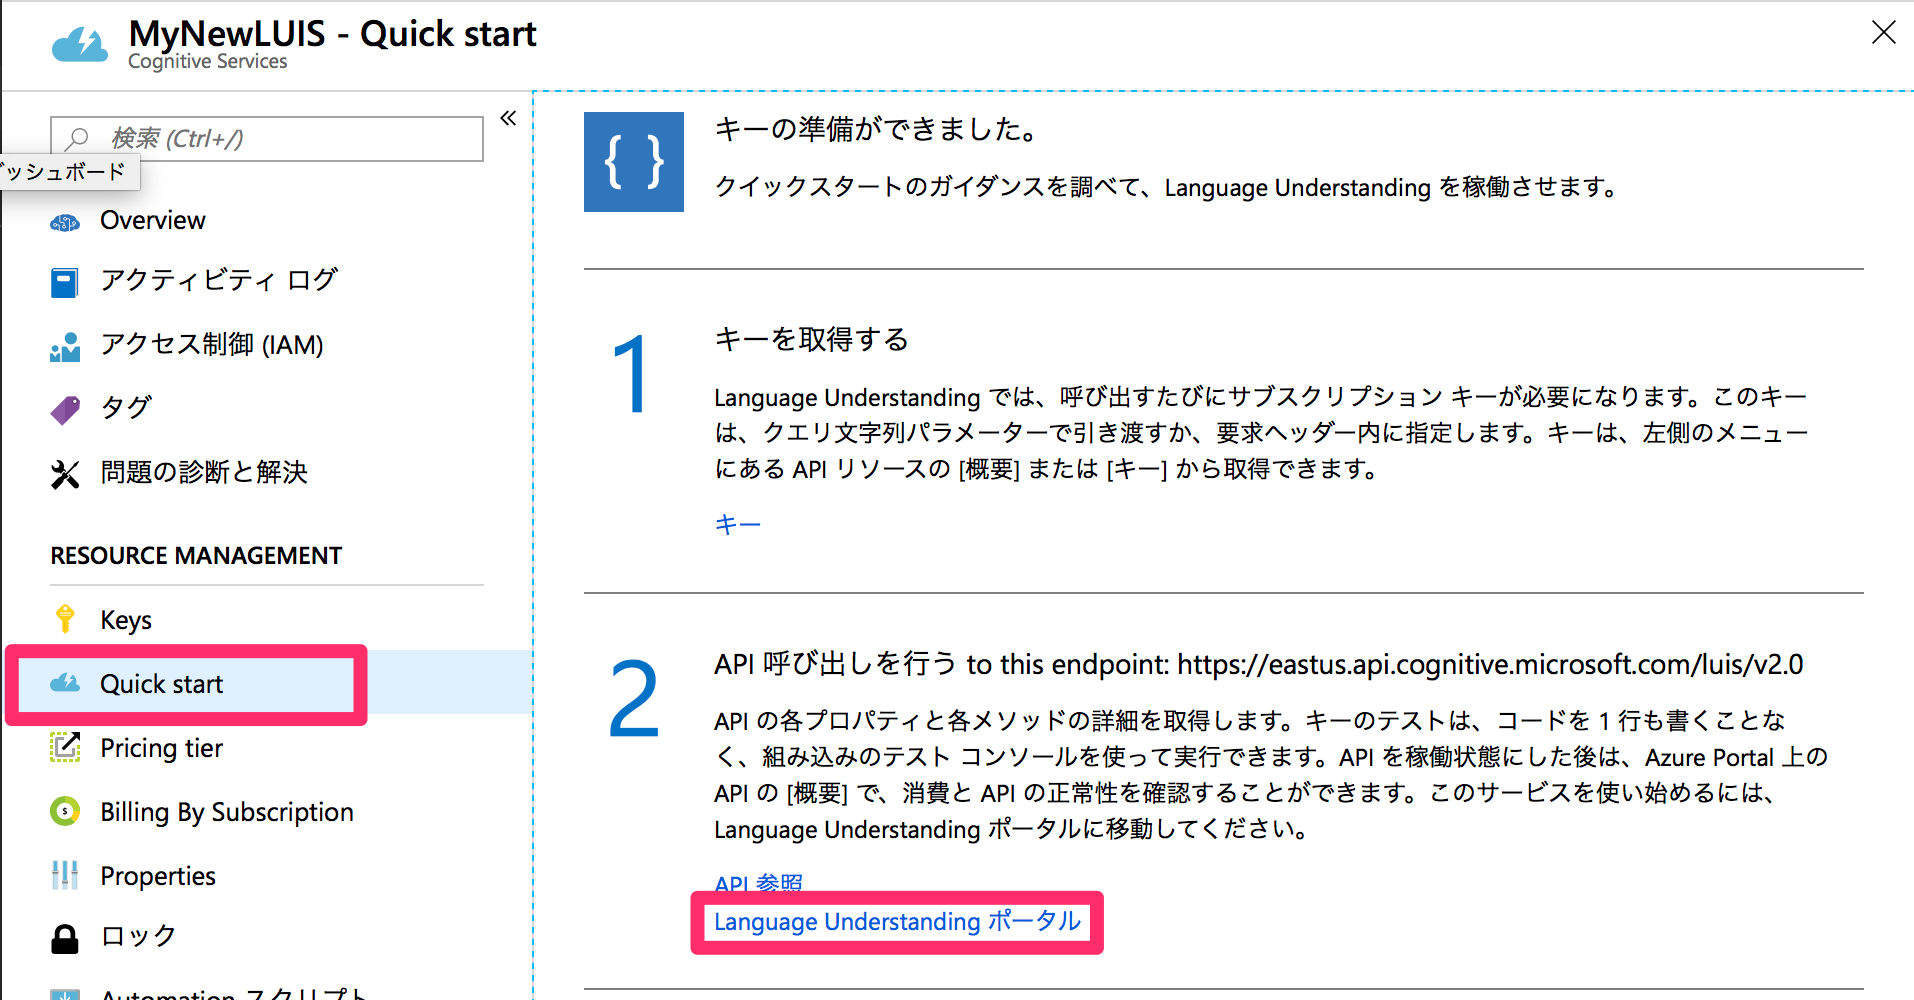
1. [Quick start]->[2 API呼び出しを行う]の[Language Understanding Portal]をクリックするとLanguage Understanding Portalに移動します。
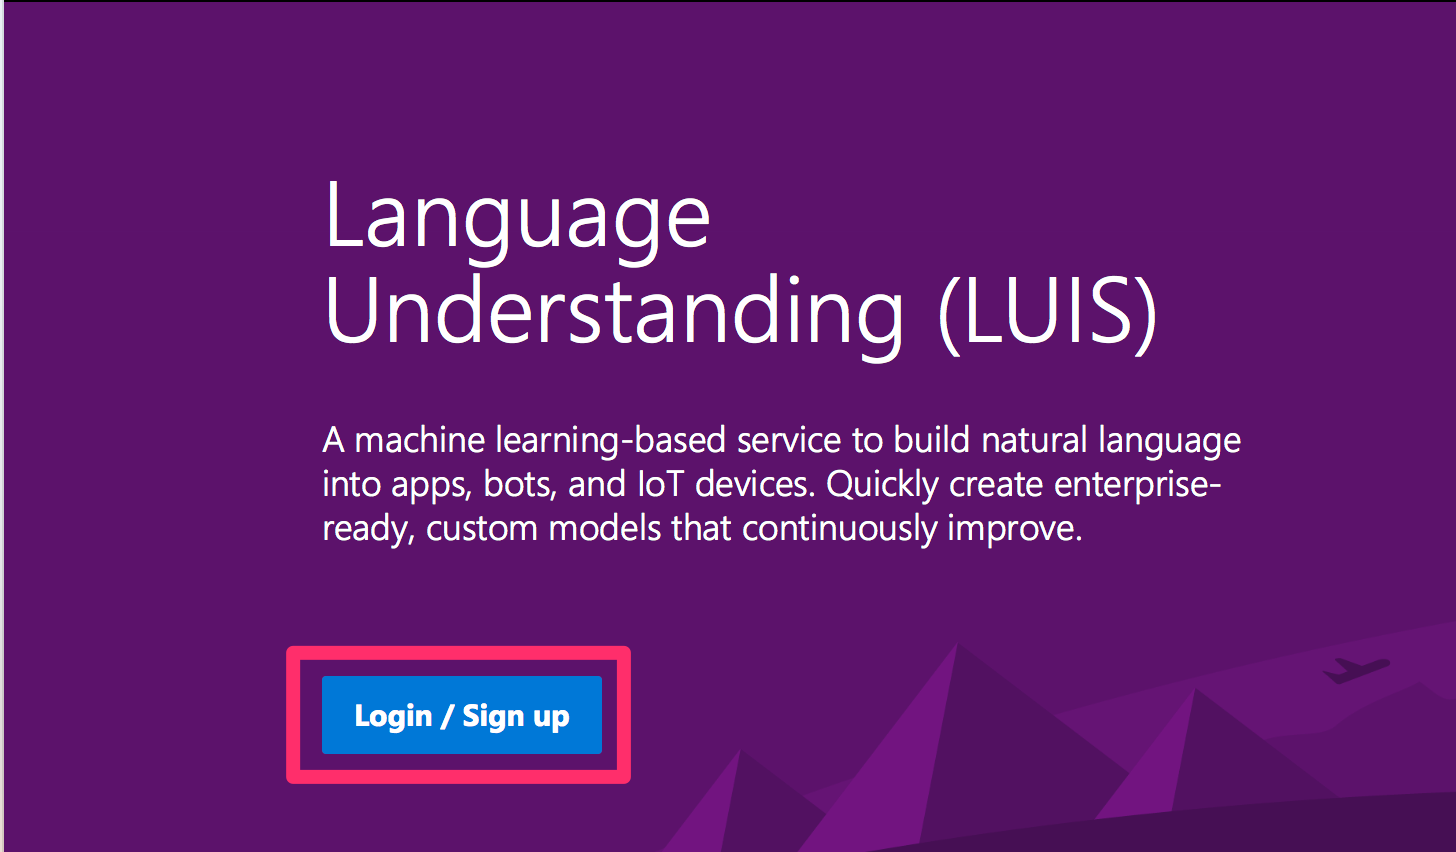
2. [Login/Sign up]をクリックします。
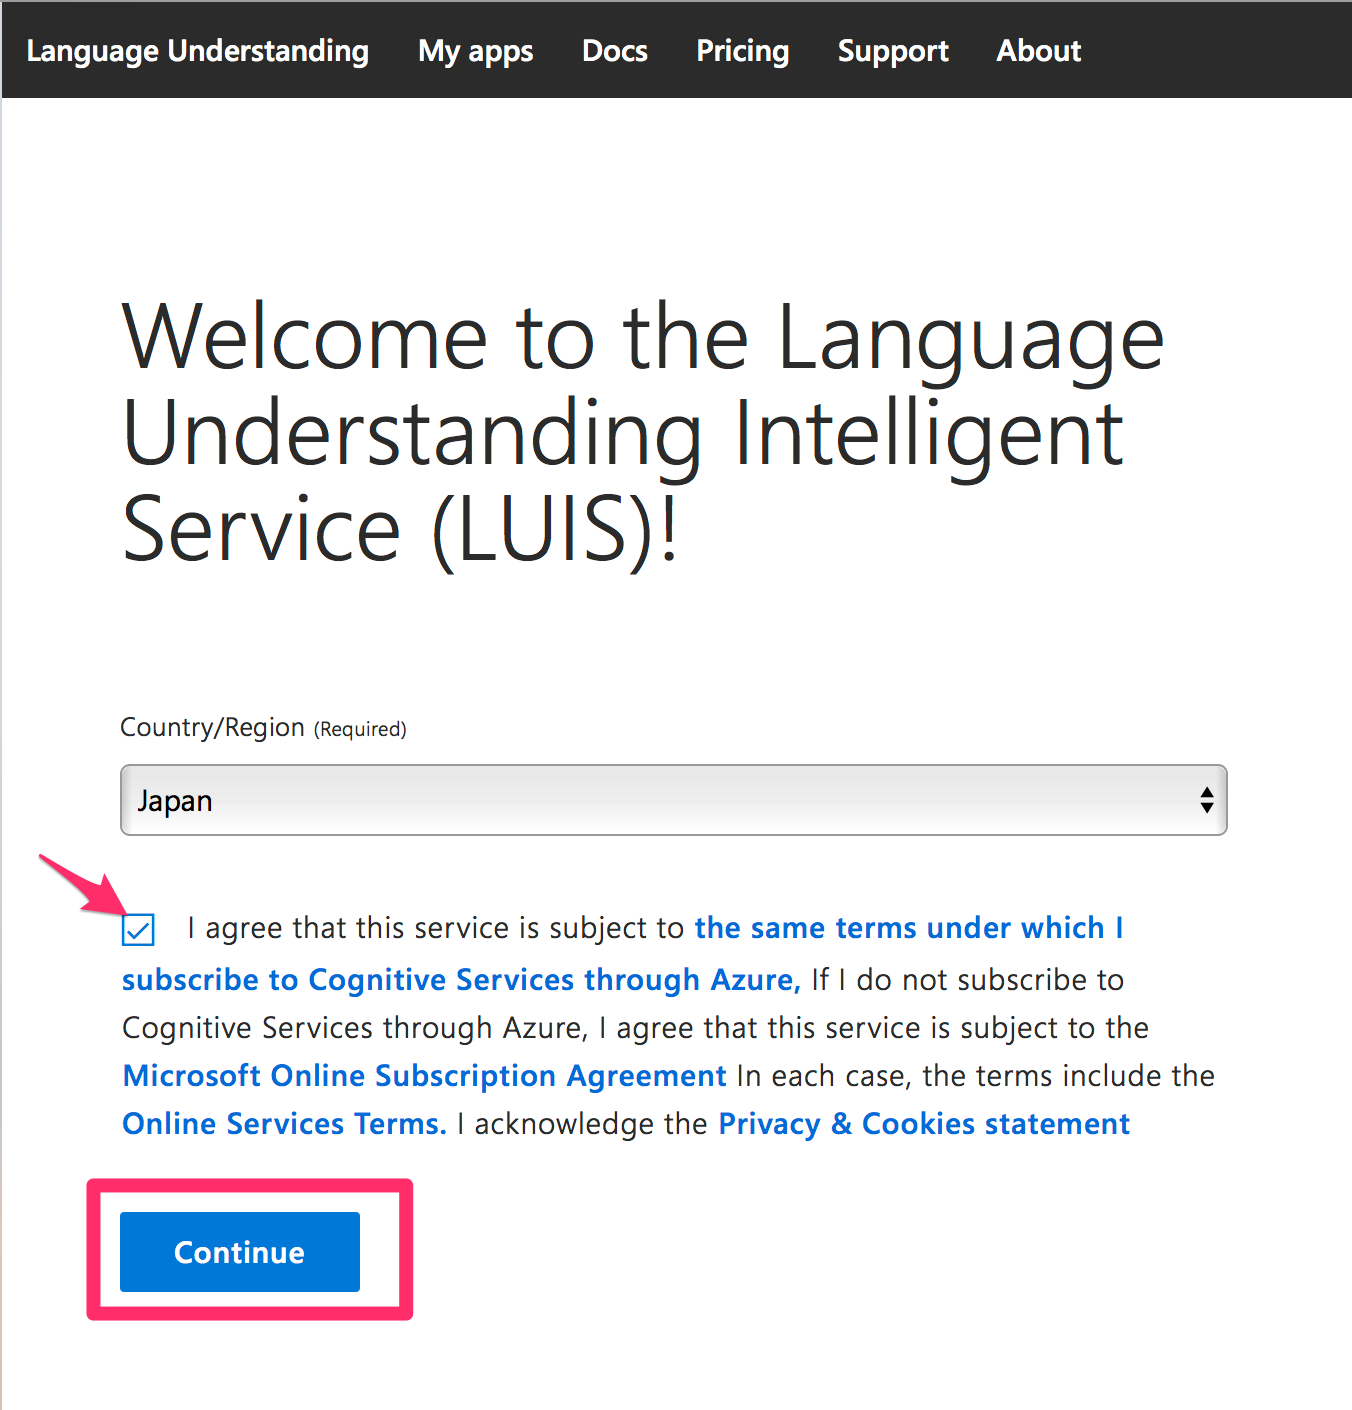
3. 使うのがはじめての場合このような画面が出るかもしれません。国を選択し、チェックボックスにチェックを入れた後、[Continue]をクリックします。
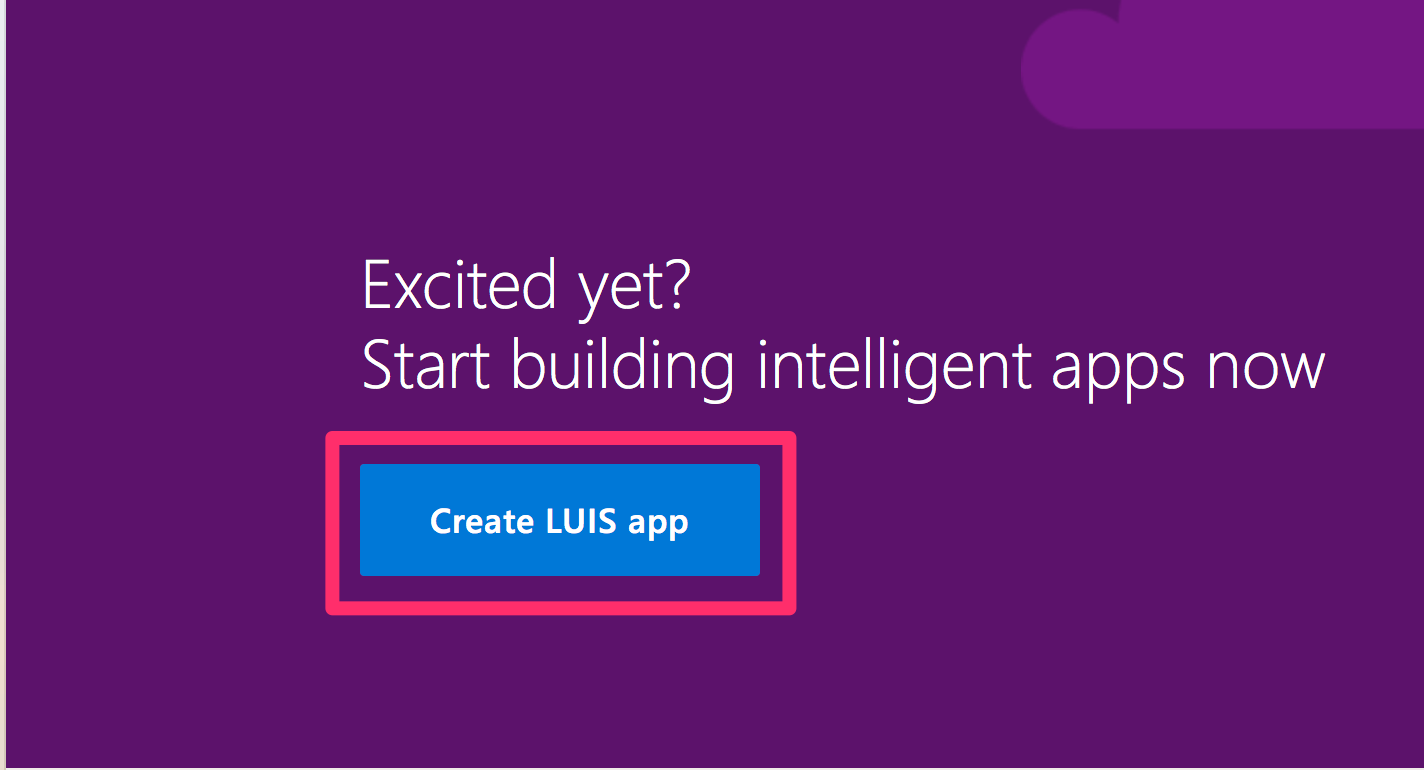
4. 下にスクロールしていき、[Create LUIS app]をクリックします。
5. ログインしたら[My apps]から[Create new app]をクリックします。

6. アプリの情報を入力する画面になります。ここに入力を済ませて[Done]をクリックすればアプリが作られます。しかし、このままでは何の役にも立ちません。
2.準備(2)
この章では、どのような言葉を識別させるかを入力していきたいと思います。
1. 言葉を分類するときに使うタグを作っていきます。
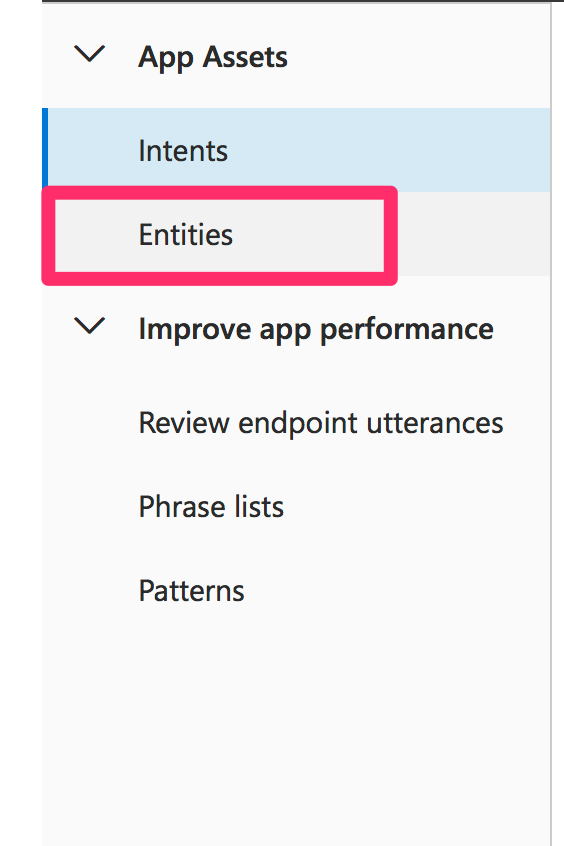
a. まず、[App Assets]->[Entities]に入り、[Create new entity]をクリックします。

b. Entity nameをcolorとし、Entity typeをSimpleとします。[Done]を押して完了です。
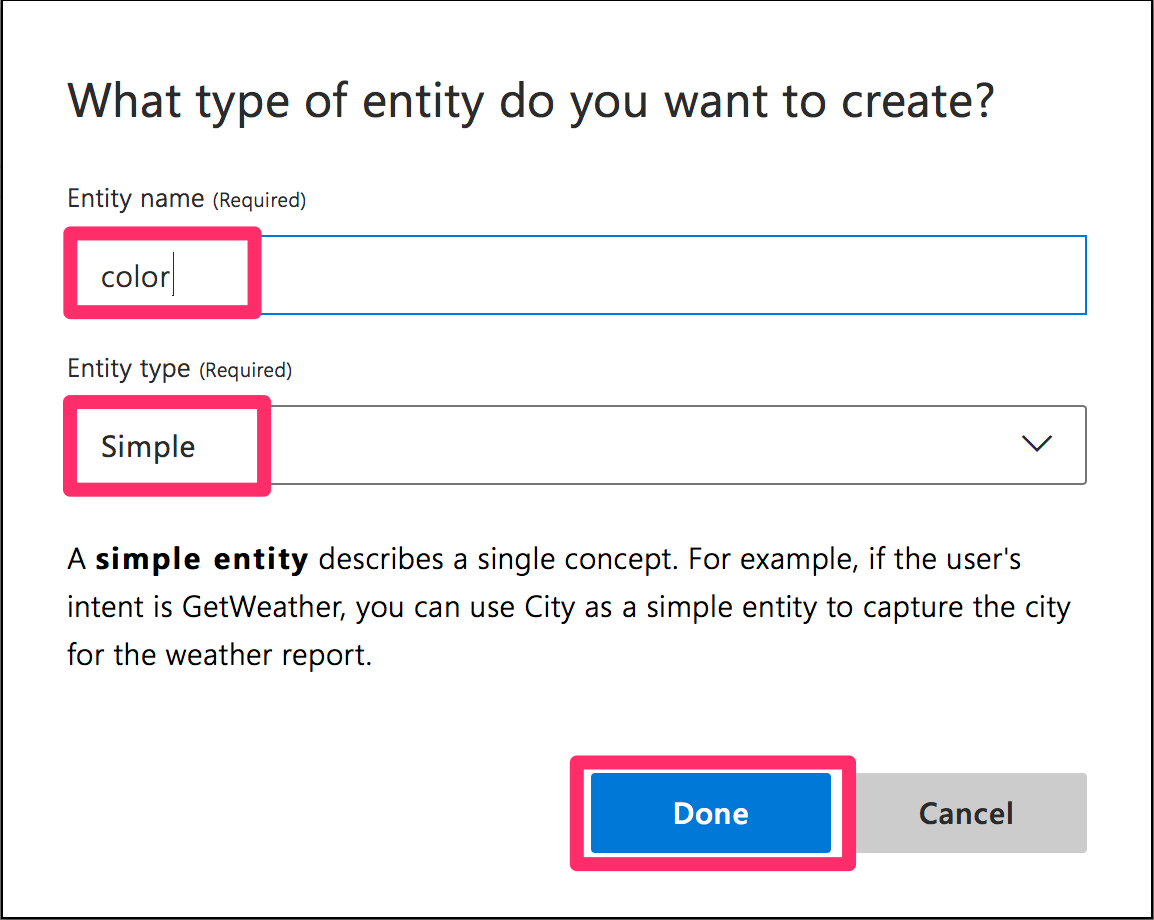
c. 同様にしてtargetも作ります。
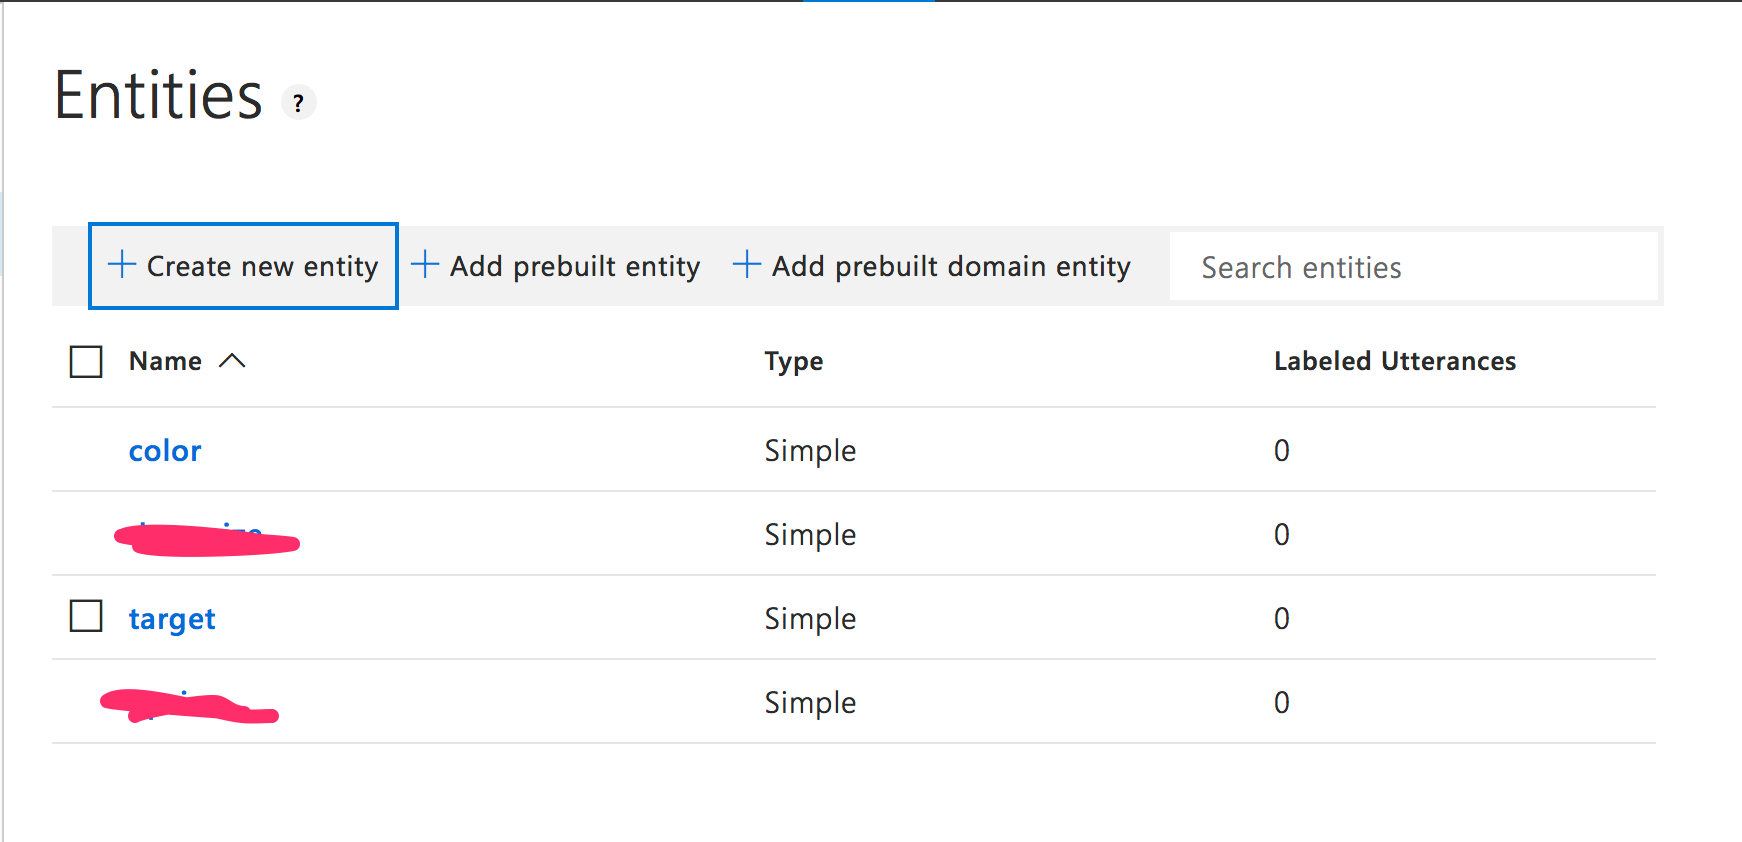
2. 続いて、タグ付けするための言葉を作っていきます。
a. [Intents]->[Create new intent]をクリックし新しいインテントを作ります。

b. 名前をChangeObjectColorとし[Done]とします。
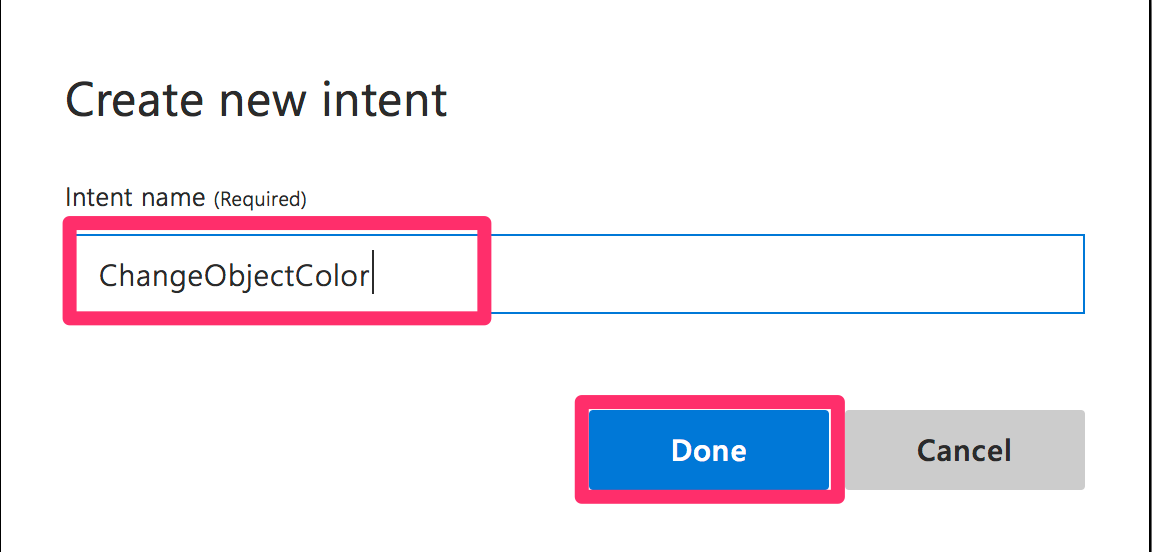
c. ボックスに言葉を入力してエンターを押します。

d. cを繰り返し様々な言葉を作ります。物体[cube,sphere,cylinder,代名詞]を[色]に変えるという文を作るようにします。
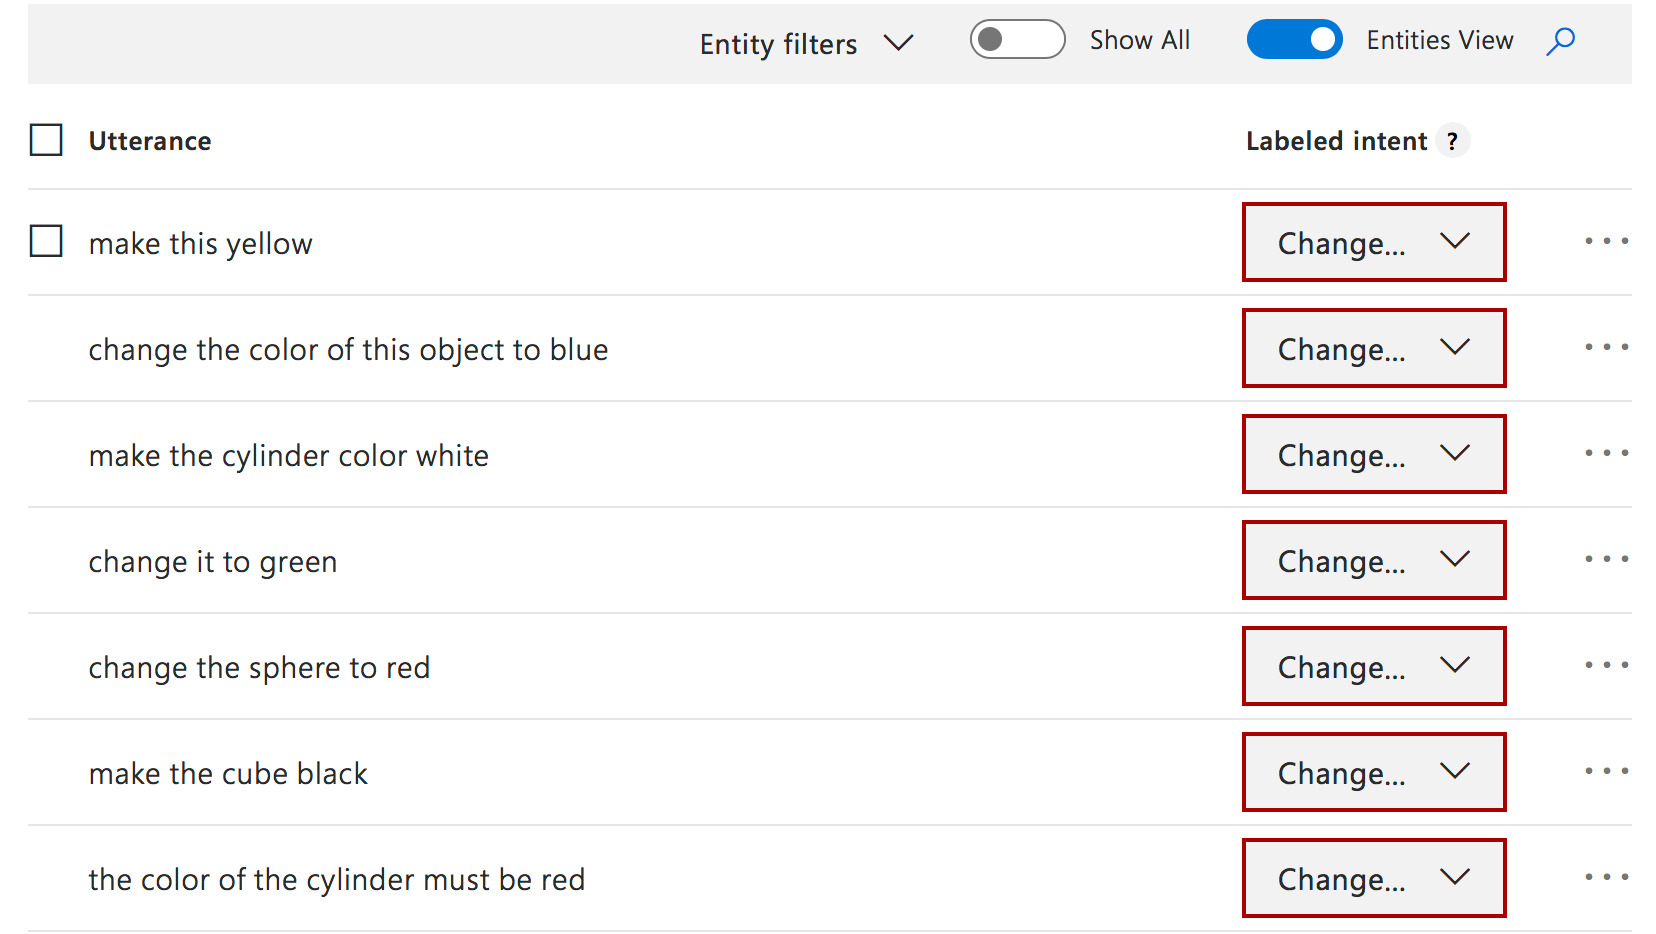
3. 作った文にタグ付けをしていきます。物体にはobject、色にはcolorタグをつけていきます。タグをつけたい単語をクリックし、適切なタグをつけていきます。
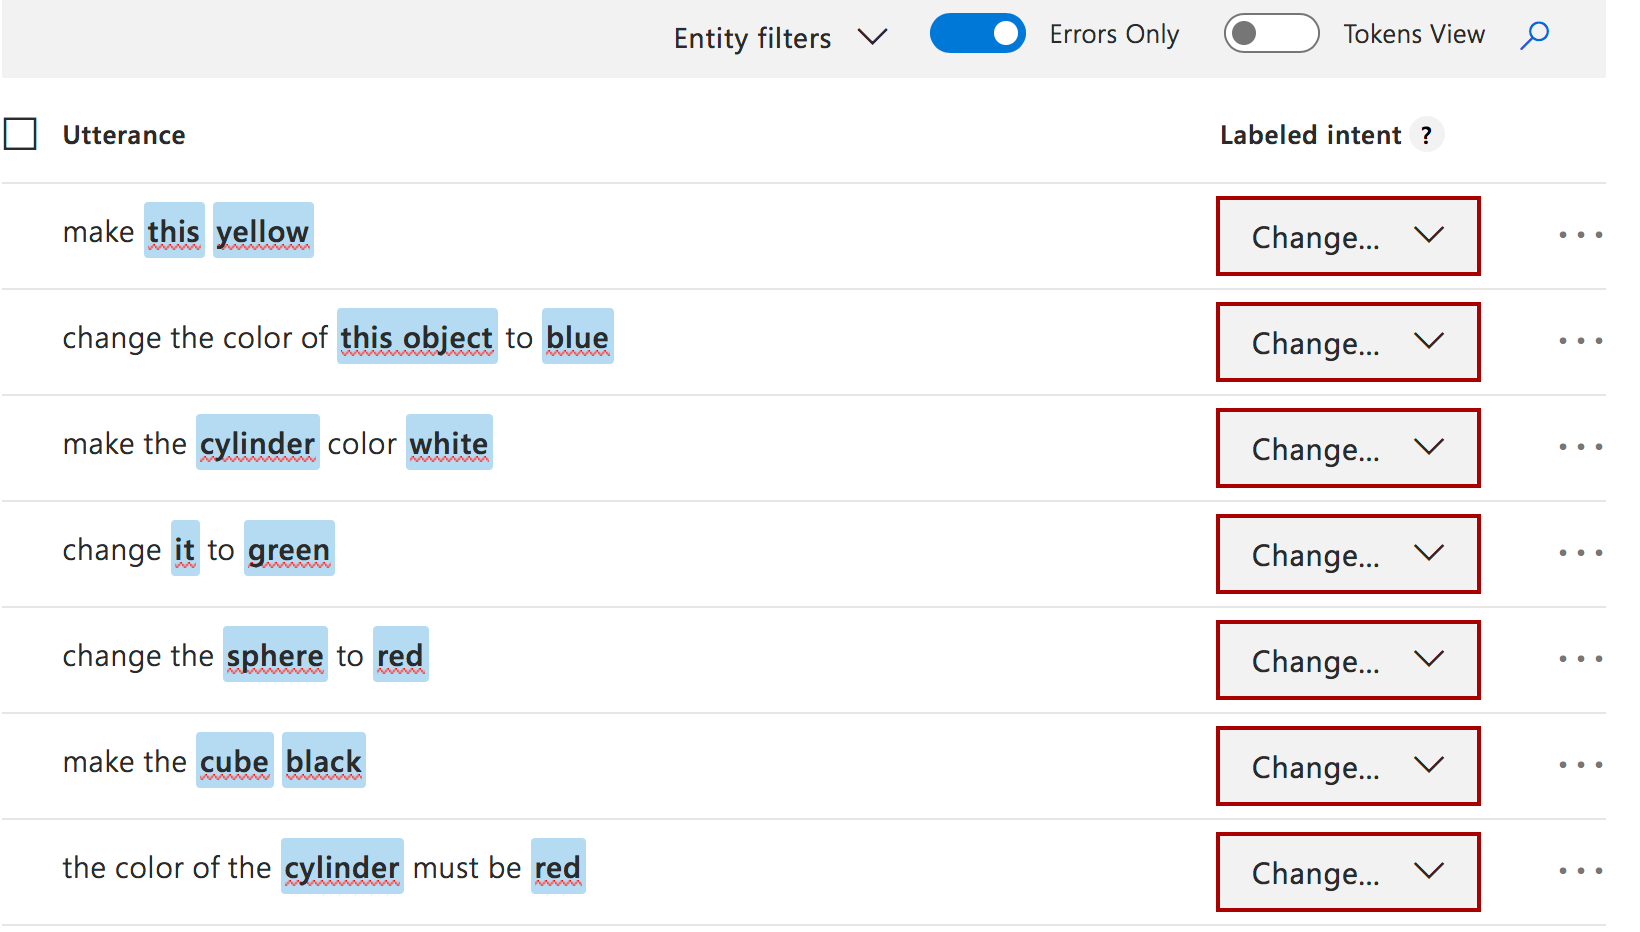
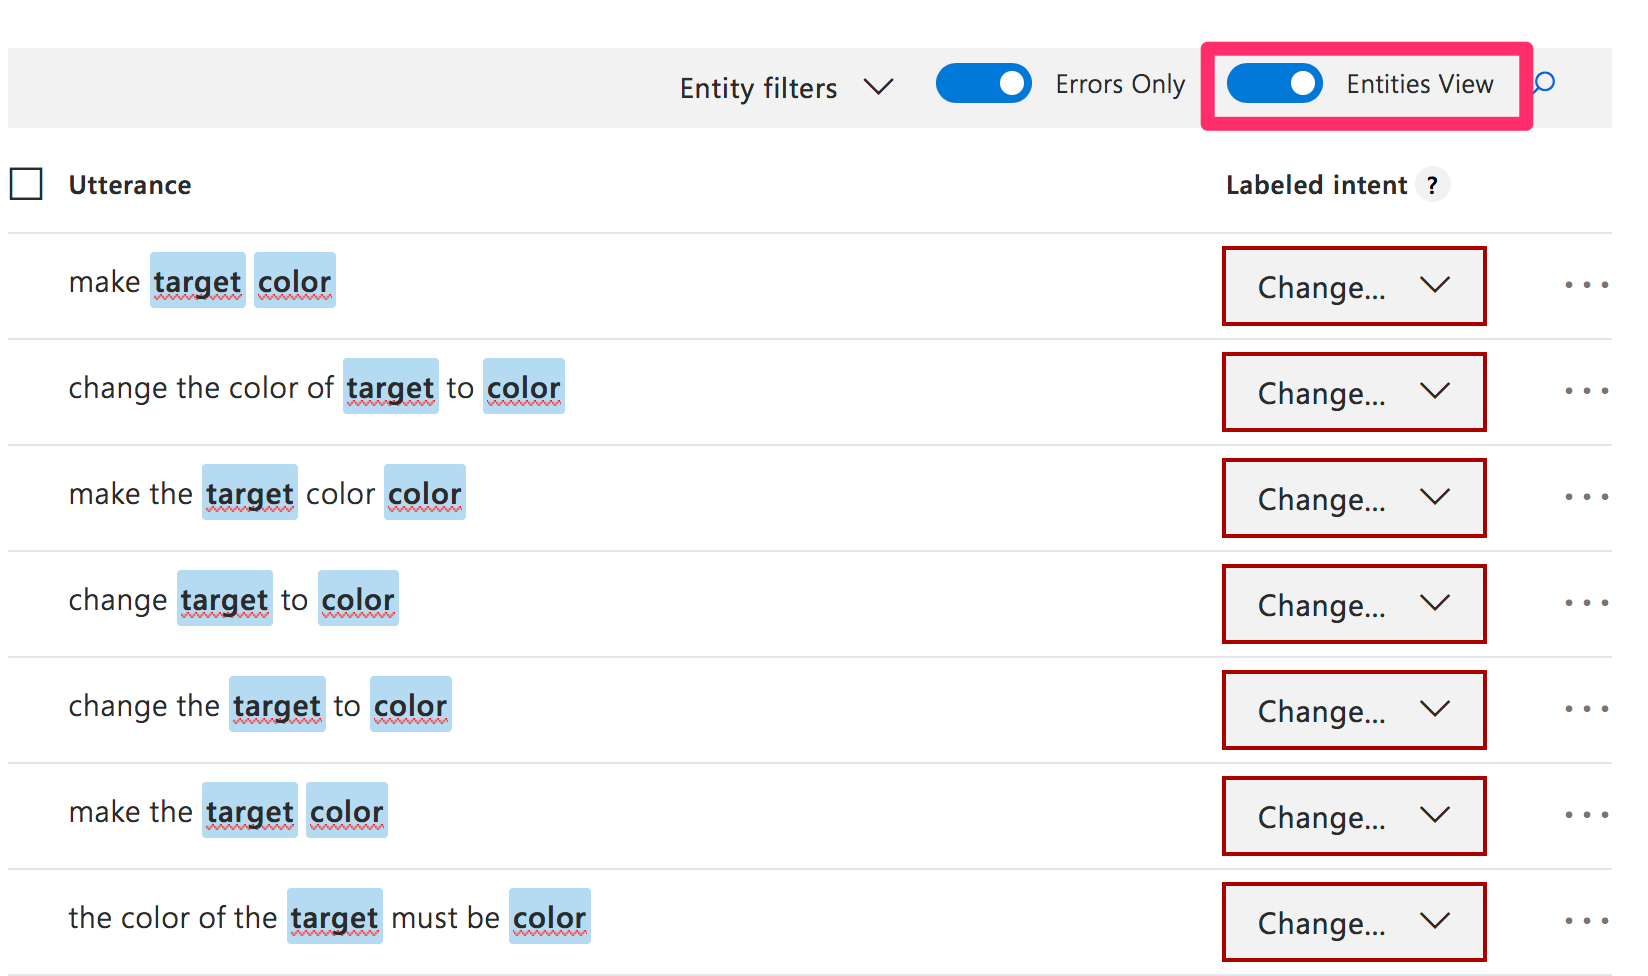
4. 全てにタグをつけ終わったらここで[Train]を押してタグを学習させます。
![]()
5. [PUBLISH]を押して学習させたものを公開します。これによってスクリプトで呼び出すことができるようになります。
![]()
6. 公開が完了したら緑のバーが現れるので[Refer to list of endpoints]をクリックします。
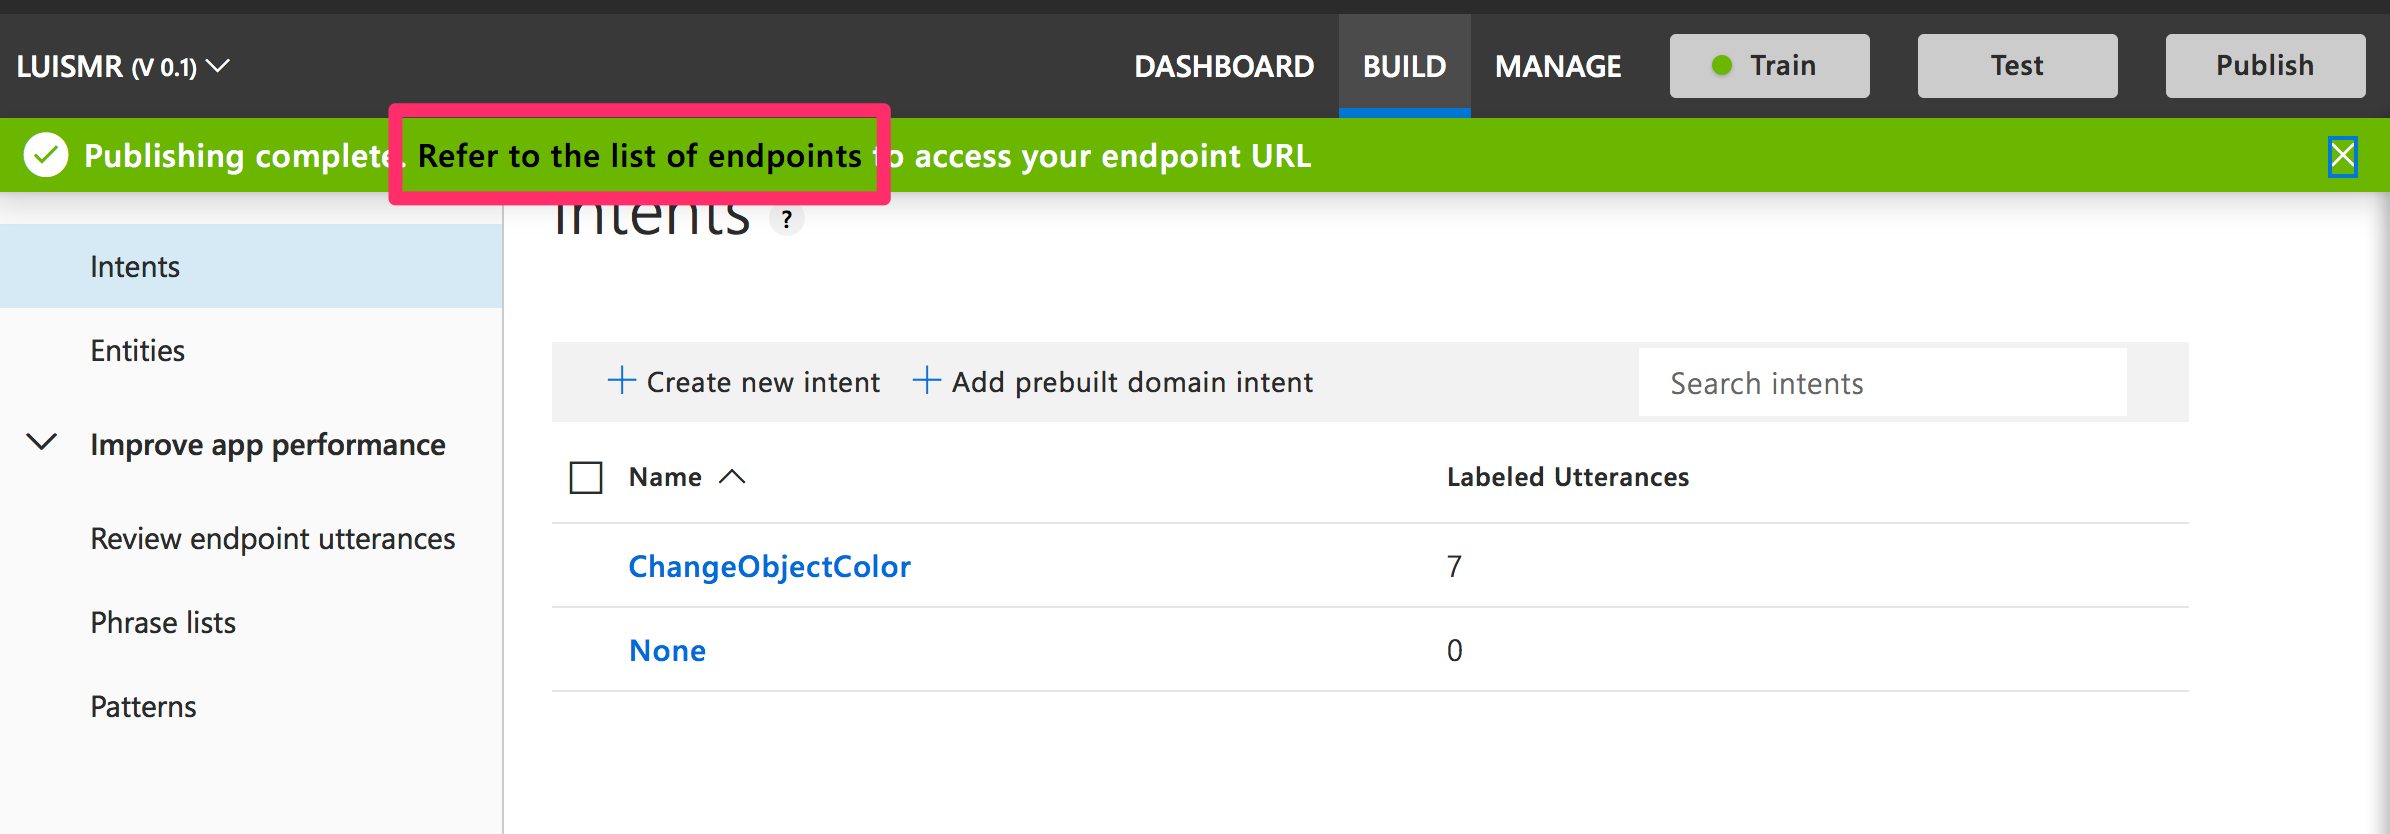
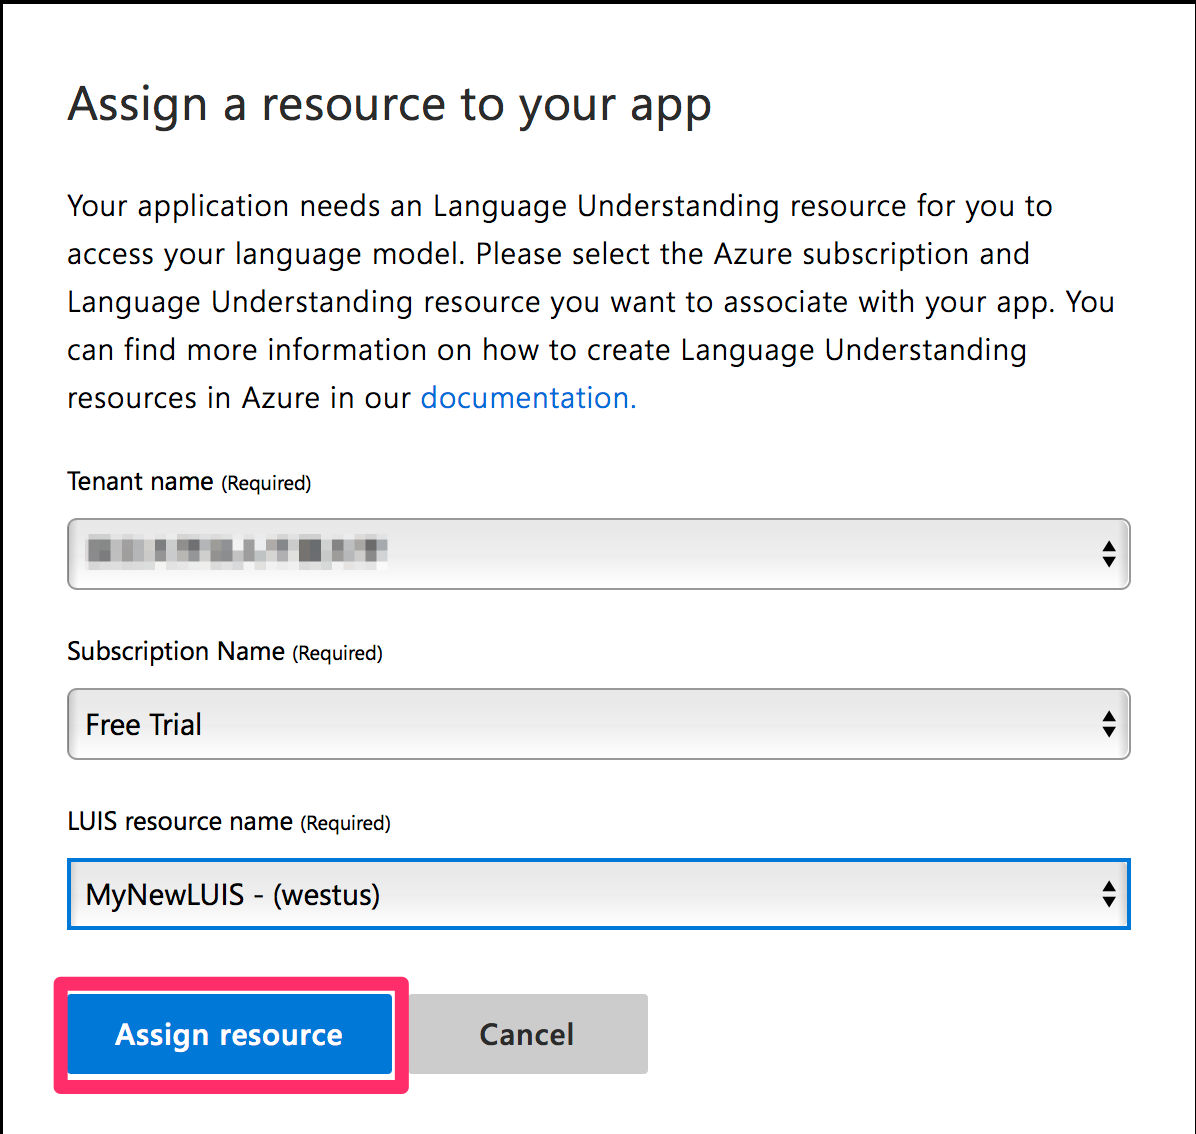
7. このままでは学習させたもののURLが取得できません。[Assign resource]をクリックします。
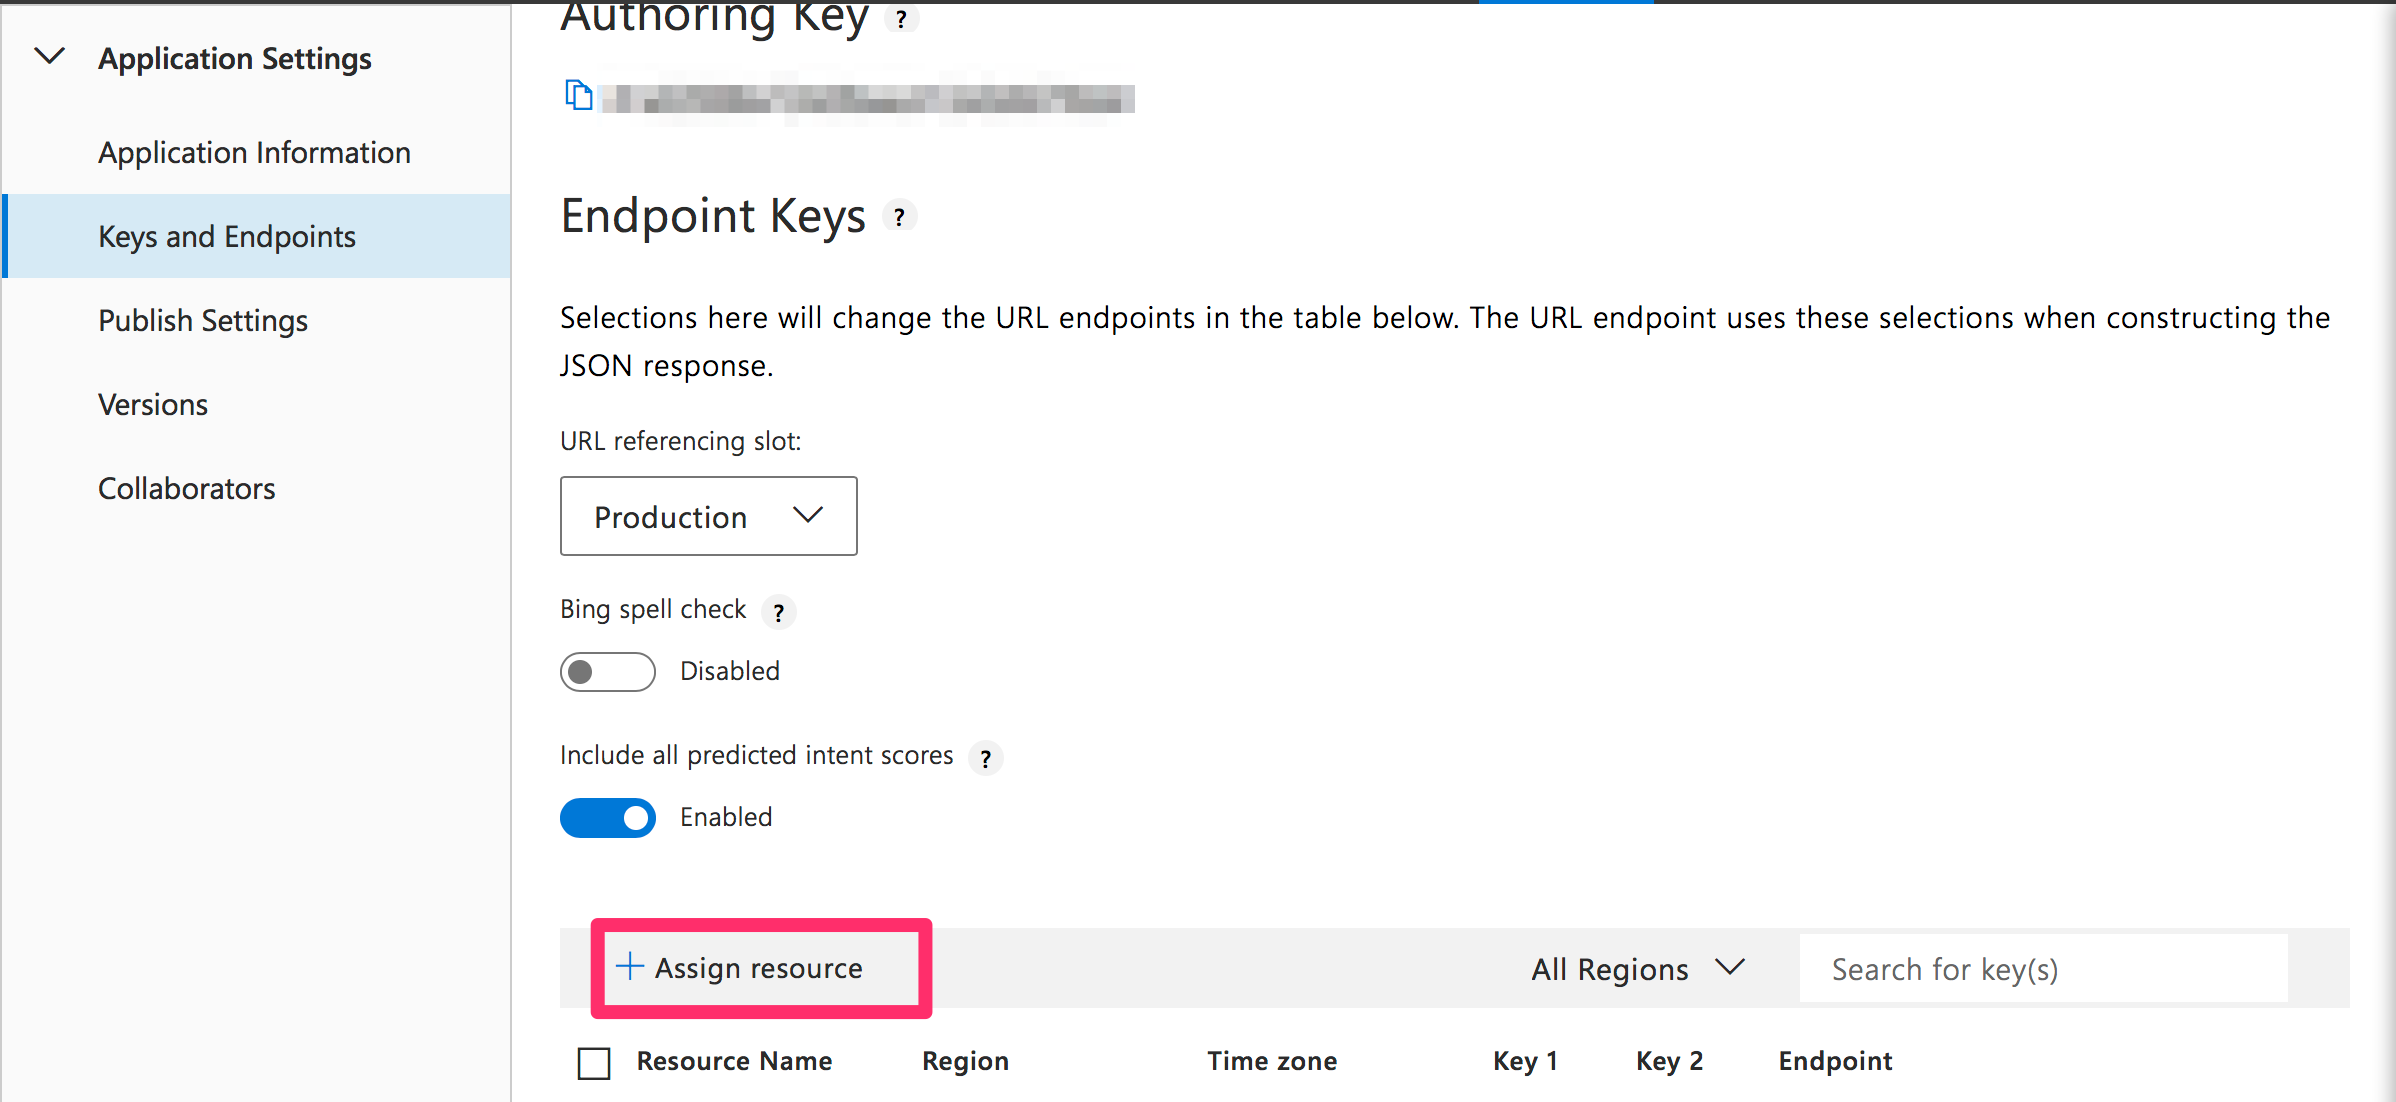
8. 新しい画面がポップします。先ほどAzure Portalで作ったアプリケーションと同じものを選択し[Assign resource]をクリックします。
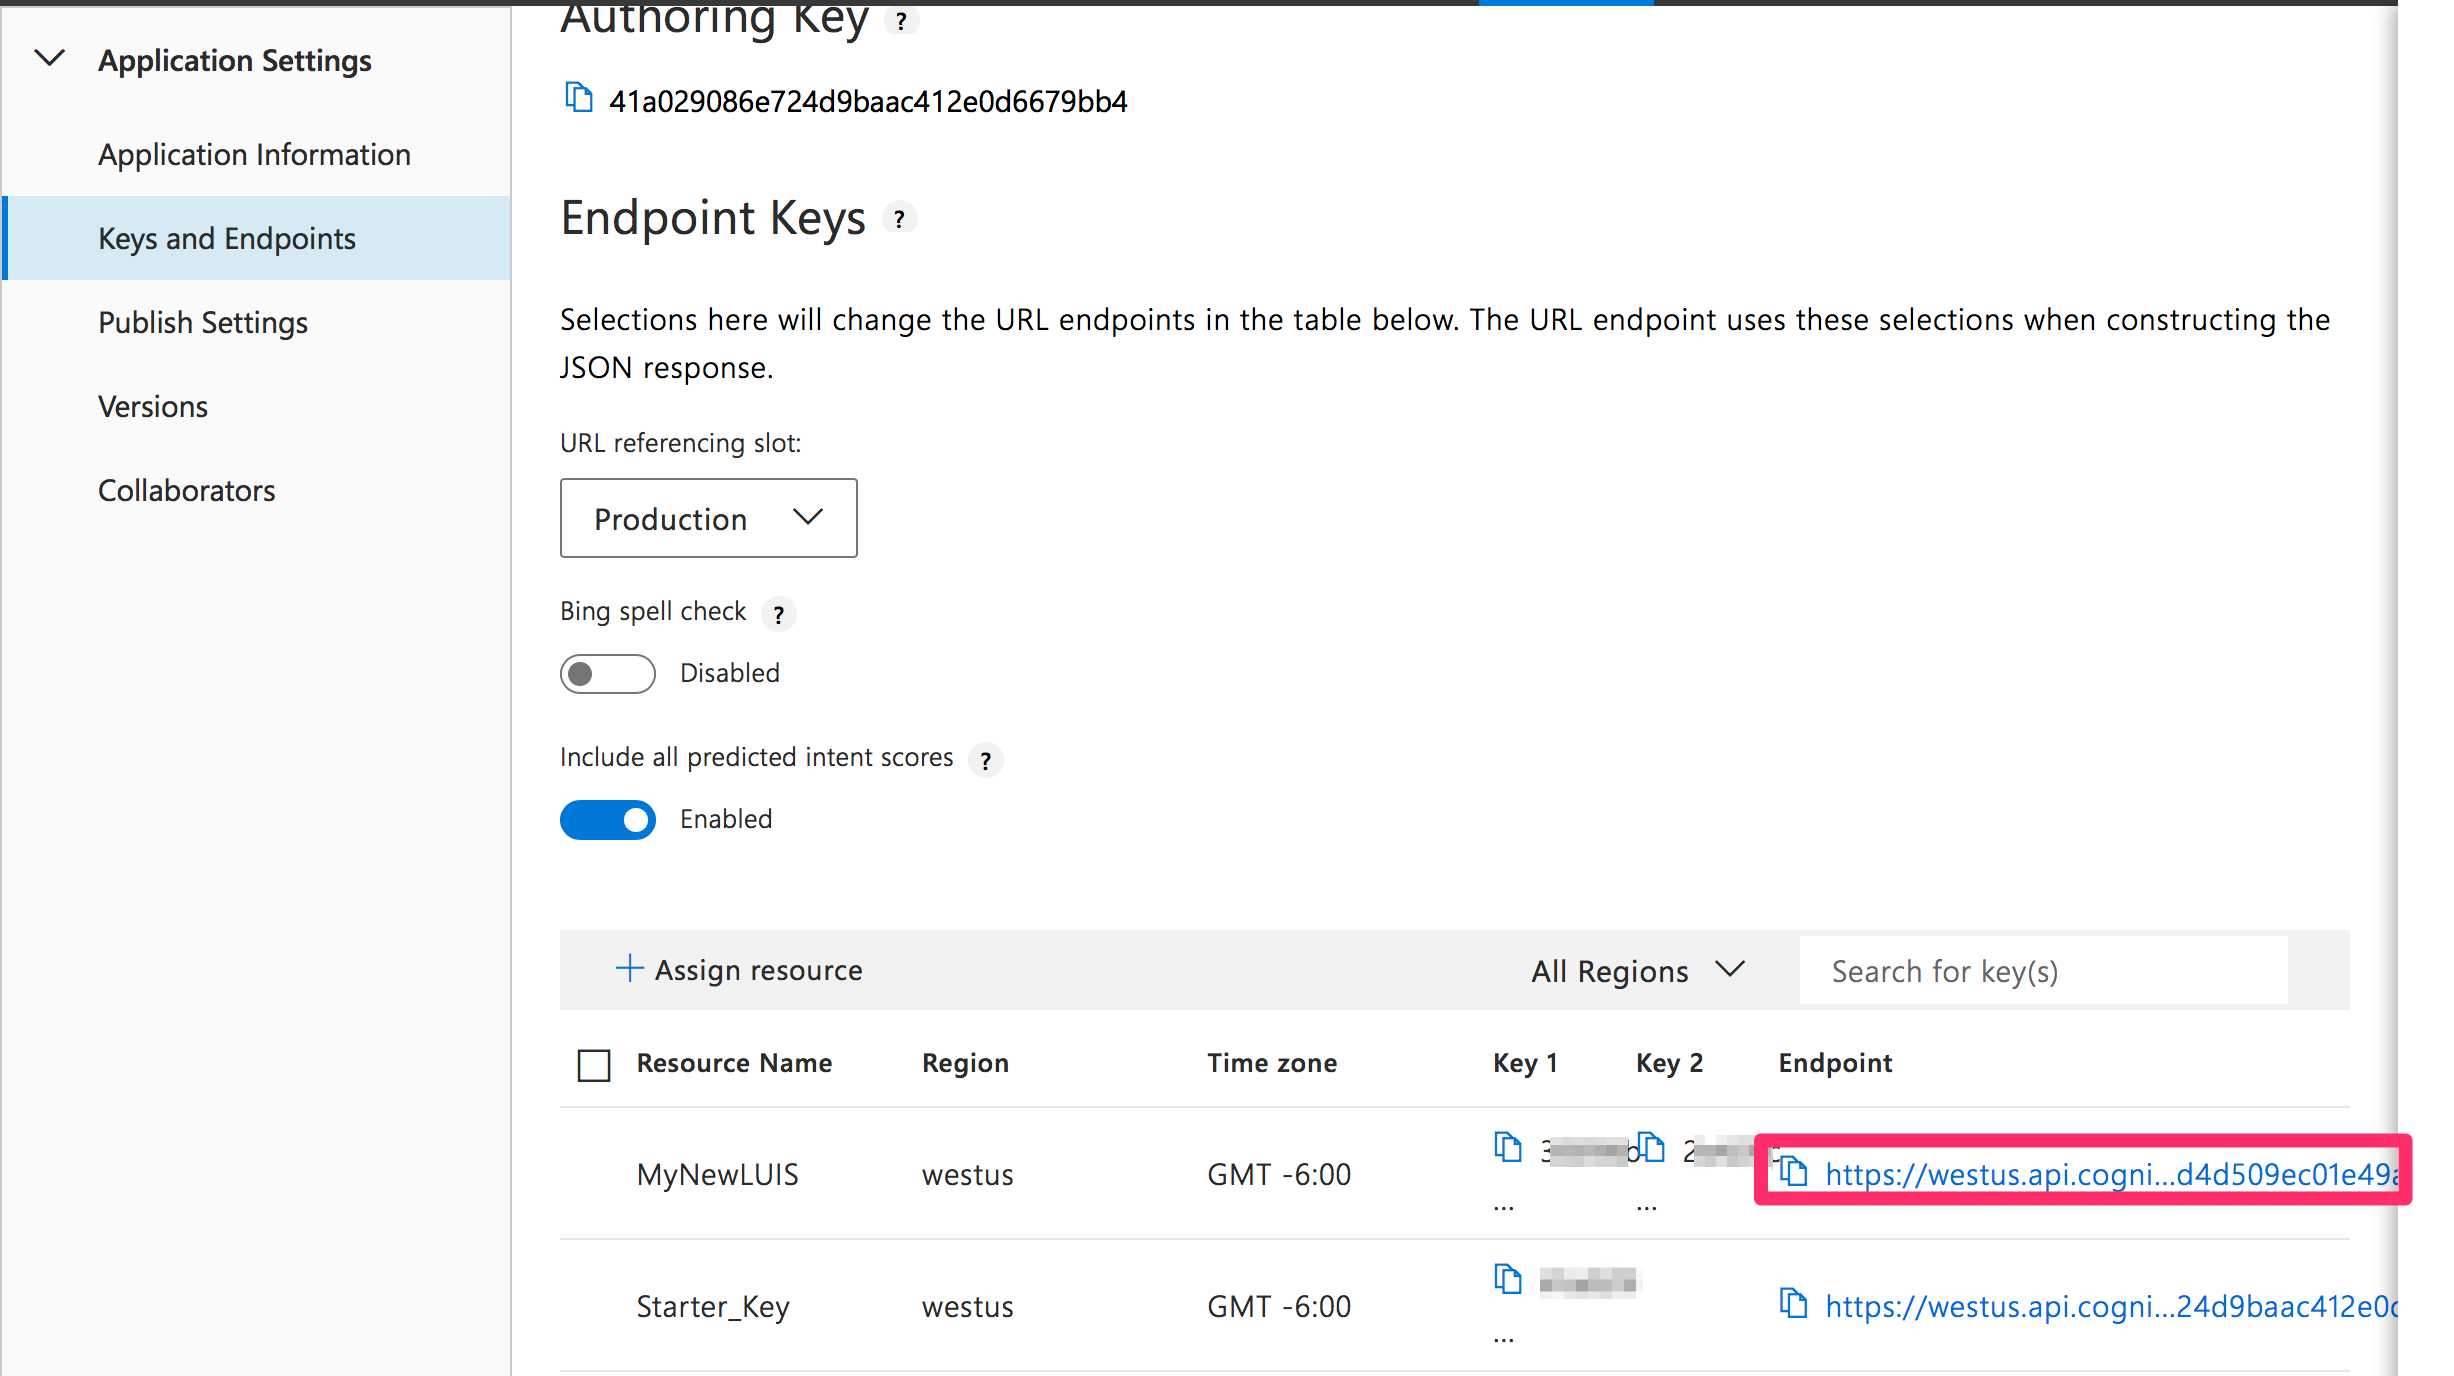
9. 追加した名前でリストに追加されているのがわかると思います。このEndpointは後ほど使いますのでメモしておきましょう。
3.Unityの設定
続いてUnityの設定を行っていきたいと思います。以下の手順で進めていきましょう。
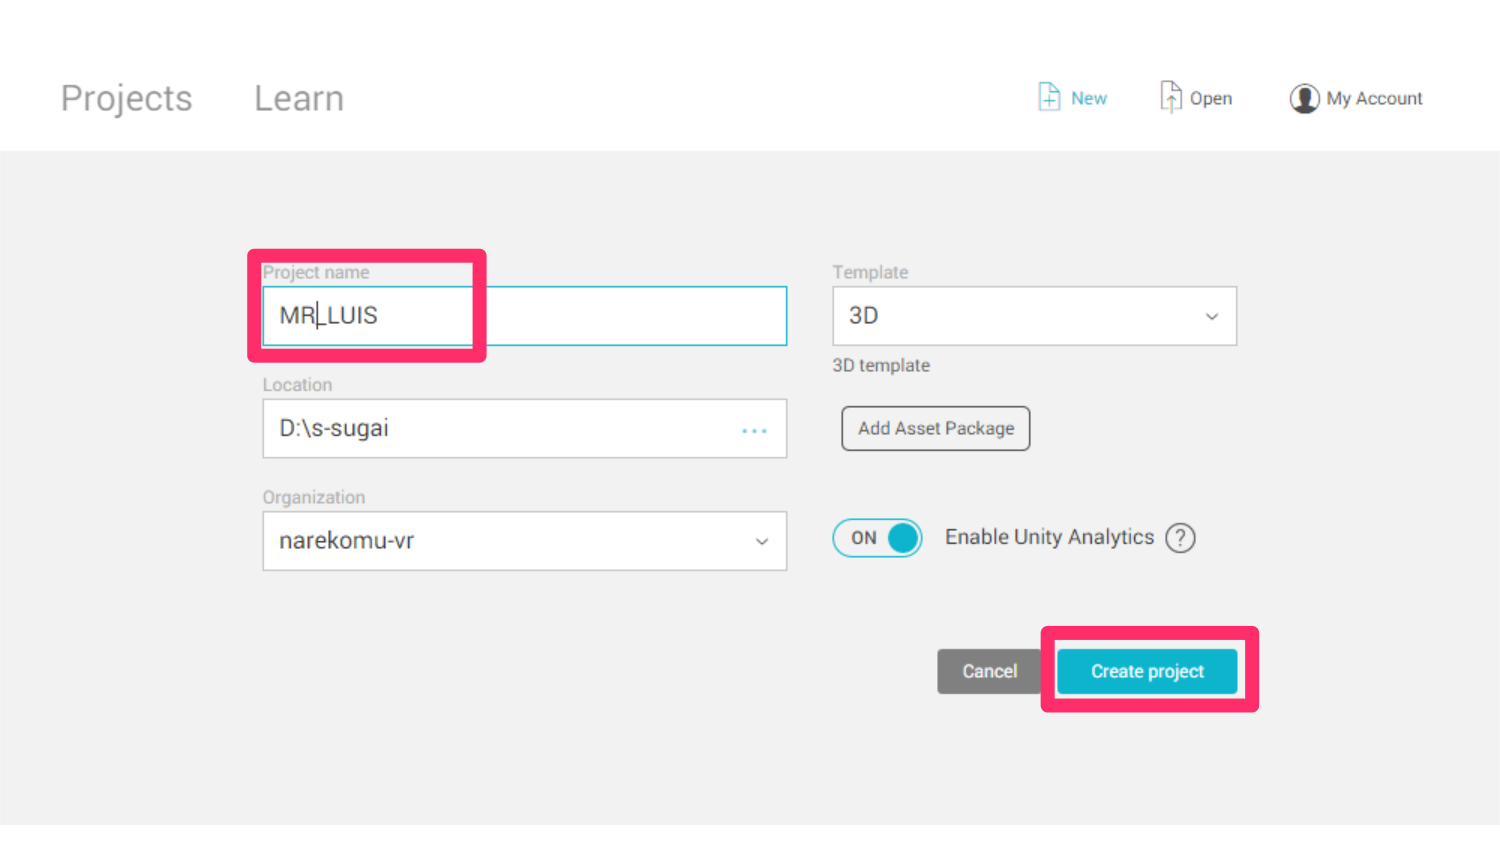
1.Unityを開き、[New]から新しいプロジェクトをつくる。
名前をMR_LUISとして、[Create project]をクリックします。
2. [Build Settings..]からさまざまな項目を編集していく。
[File]->[Build Settings..]を開きます。
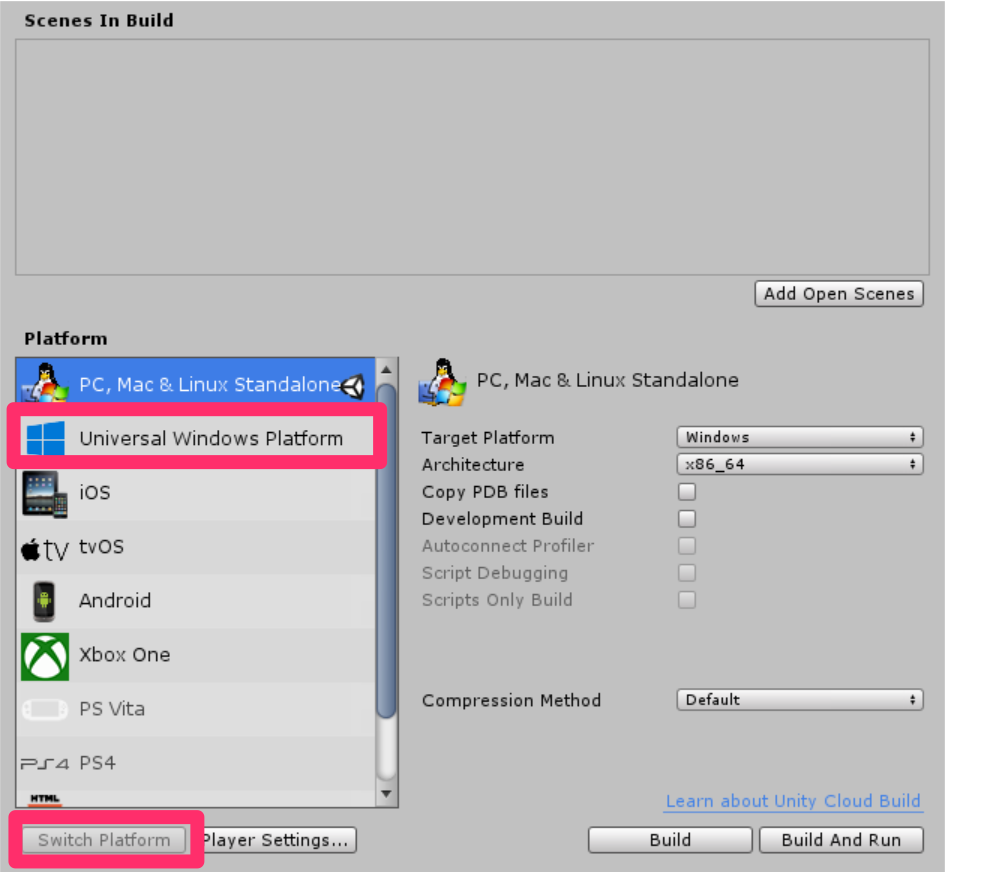
a.プラットフォームの変更
[PC, Mac & Linux Standalone]を[Universal Windows Platform]に変更し、[Switch Platform]をクリックします
b.[Player Settings..]を編集する
[Player Settings..]をクリックします。
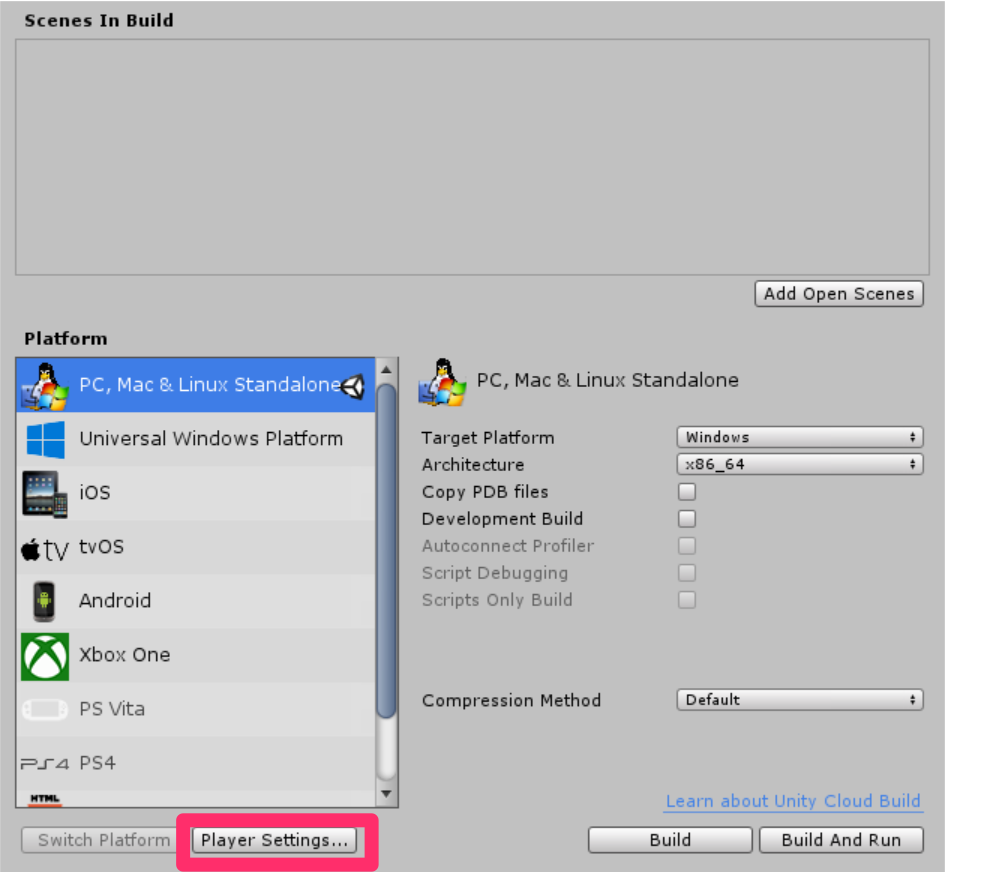
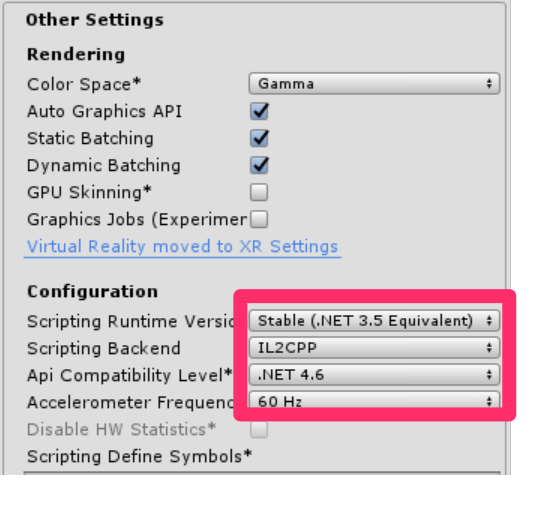
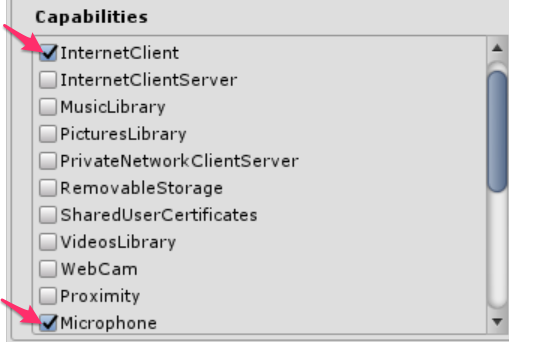
そのあと[Other Settings]、[Publishing Settings]->[Capabilities]、[XR Settings]を以下のように設定してきます。
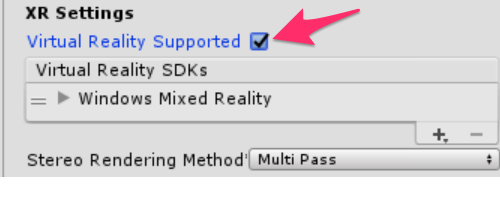
続いて、[Unity C#]にチェックを入れます。
![]()
[Build Settings..]の変更は以上です。
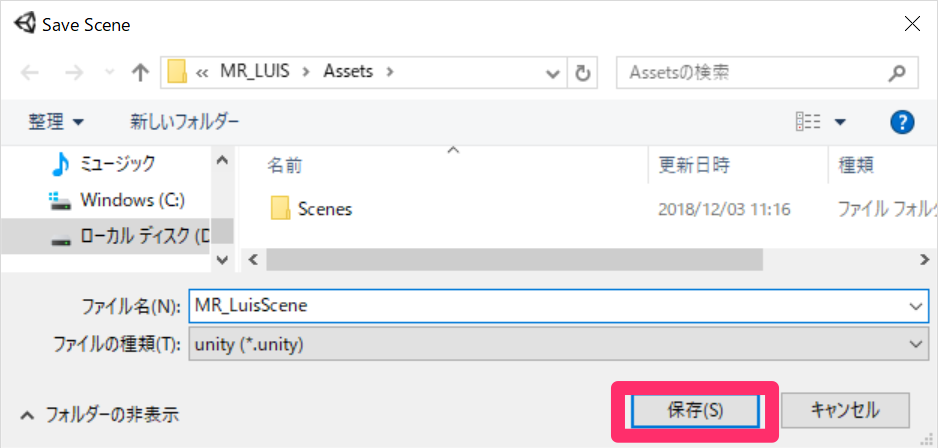
3. 続いてシーンを保存します。[Add Open Scenes]をクリックして、[新しいフォルダー]を選択しScenesと名前をつけた後、そのフォルダー内に名前をMR_LuisSceneとして[保存]します。
4.シーン作成
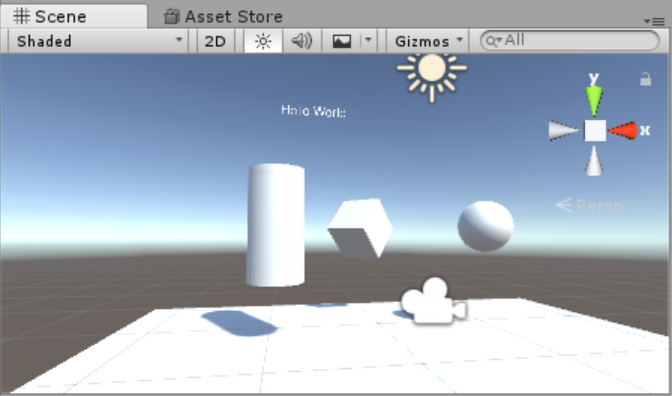
シーン内にオブジェクトを配置していきたいと思います。
1. 土台の配置
[Hierarchy]->[Create]->[3D Object]->[Plane]で土台を作り、[Inspector]->[Transform]を編集していきます。
—————————————–
Position | X : 0 | Y : -1 | Z : 0
—————————————–

2. 球の配置
[Hierarchy]->[Create]->[3D Object]->[Sphere]で球を作り、[Inspector]->[Transform]を編集していきます。
—————————————–
Position | X : 2 | Y : 1 | Z : 2
—————————————–

3. シリンダーの配置
[Hierarchy]->[Create]->[3D Object]->[Cylinder]でシリンダーを作り、[Inspector]->[Transform]を編集していきます。
—————————————–
Position | X : -2 | Y : 1 | Z : 2
—————————————–

4. 正方形の配置
[Hierarchy]->[Create]->[3D Object]->[Cube]で正方形を作り、[Inspector]->[Transform]を編集していきます。
———————————————-
Position | X : 0 | Y : 1 | Z : 4
———————————————-
Rotation | X : 45 | Y : 45 | Z : 45
———————————————-

5. テキストの配置
a. [Hierarchy]->[Create]->[3D Object]->[Text]でテキストを作り、名前をDictationTextとします。[Inspector]->[Transform]を編集していきます。
———————————————
Position | X : -2 | Y : 6 | Z : 9
———————————————
Scale | X : 0.1 | Y : 0.1 | Z : 0.1
———————————————

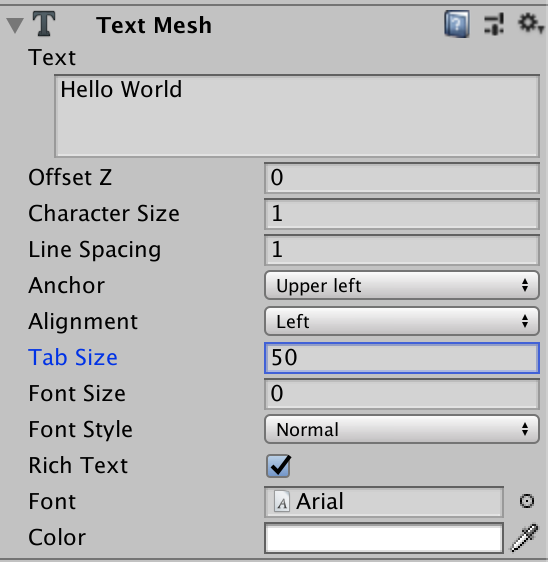
b. [Inspector]内のその他の編集を行っていきます。
6. カメラまわりの編集
デフォルトで備わっているMain Cameraの代わりにHoloToolkitを使います。使うものを以下のリンクからダウンロードしてください。
HoloToolkit-Unity-2017.4.2.0.unitypackage
HoloToolkit-Unity-Example-2017.4.2.0.unitypackage
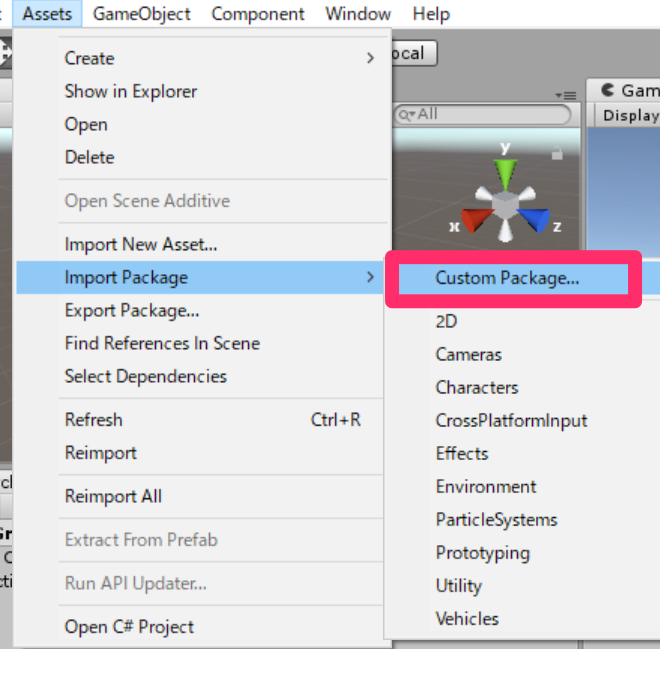
a. [Assets]->[Import Package]->[Custom Package..]からダウンロードしたpackageを二つともインポートします。
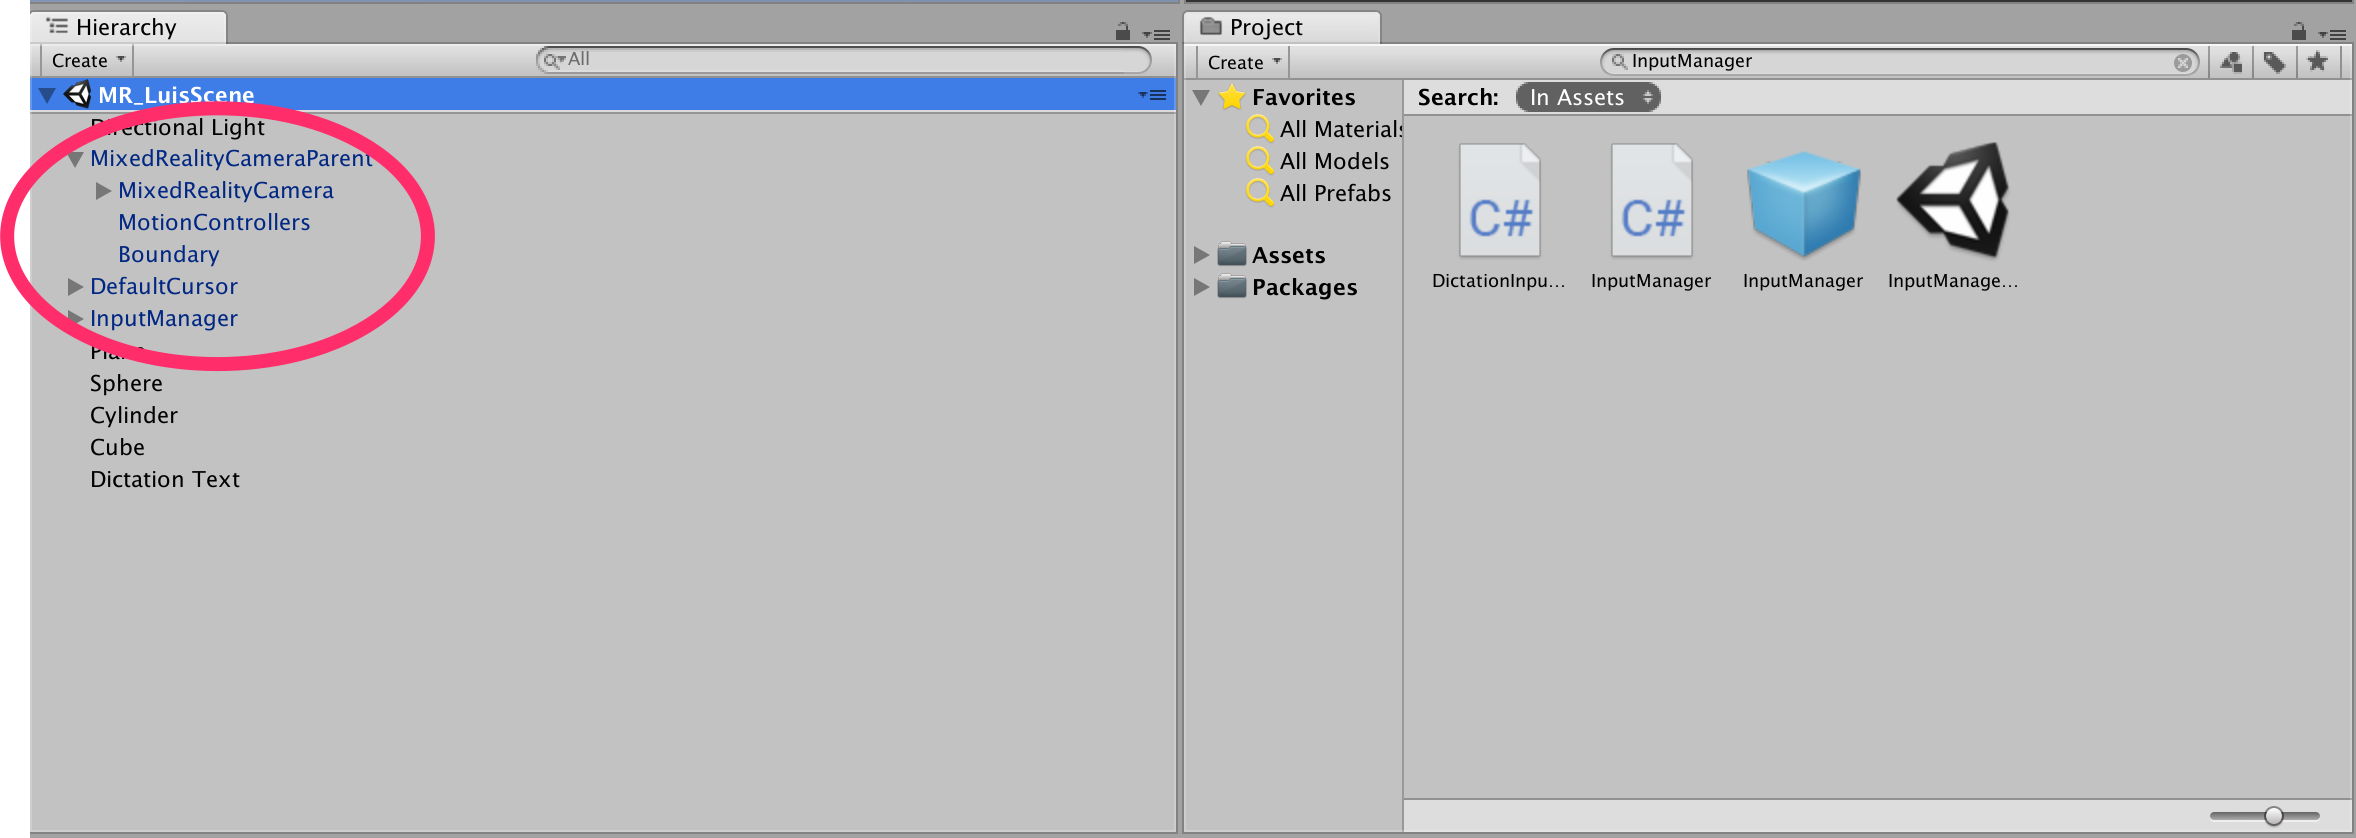
b. [Hierarchy]->[Main camera]をdeleteします。
c. [Project]から以下の三つを検索し、[Hierarchy]パネルへD&Dします。
・MixedRealityCameraParent
・DefaultCursor
・InputManger
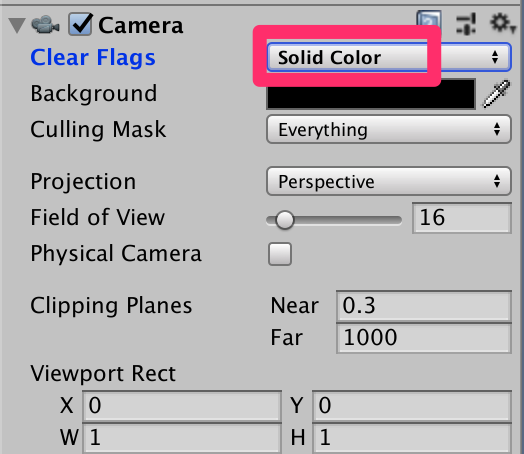
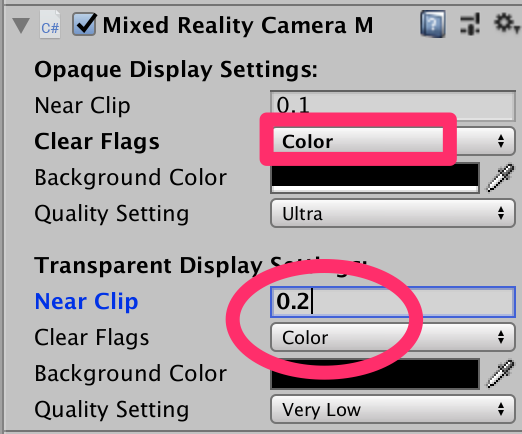
d. [Hierarchy]->[MixedRealityCameraParent]->[MixedRealityCamera]の[Inspector]を編集していきます。
[Camera]
————————————
Clear Flags | Solid Color
————————————
[Mixed Reality Camera Manager]
——————————
Clear Flags | color
——————————
Near clip | 0.2
——————————
Clear Flags | color
——————————
e. [Hierarchy]->[Input Manager]の[Inspector]を編集していきます。[Simple Single Pointer Selector]のCursorへ[Hierarchy]->[Default Cursor]をアタッチします。

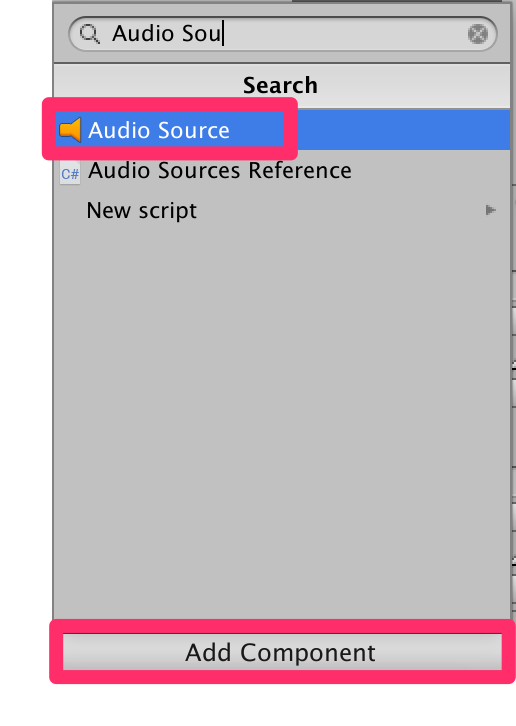
f. [Hierarchy]->[MixedRealityCameraParent]->[MixedRealityCamera]の[Inspector]->[Add Component]からAudioSourceを検索しこれを追加します。
この章で設定した[Inspector]->[Transform]は目安ですので、より見やすいように編集してください。
5.スクリプトの作成
ここでは以下の4つのスクリプトを作っていきたいと思います。
・MicrophoneManagerLuis
・LuisManager
・Behaviours
・Gaze
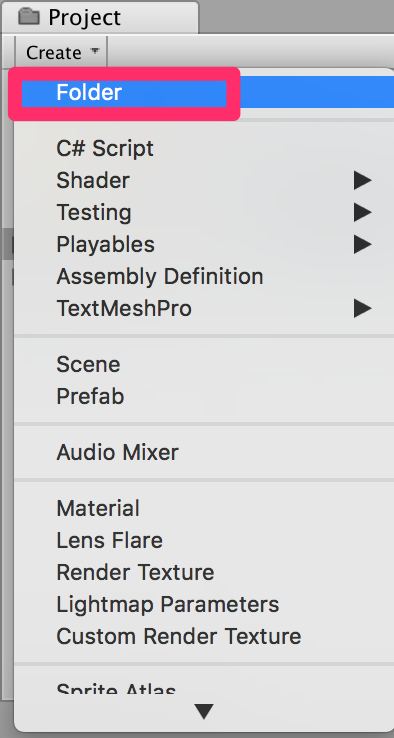
スクリプトの作り方はまず、すべてのスクリプトをまとめておくフォルダーを作成します。[Project]->[Create]をクリックし、[Folder]を選択して新しいフォルダーを作ります。名前をScriptsとします。続いて[Project]->[Create]->[C# Script]をクリックし、クラス名をつけていきます。
・MicrophoneManagerLuis
このクラスはMicrophoneで音声をキャプチャし、そのキャプチャした音声をテキストにするクラスです。聞いた音声を順に文字におこしていきます。今回は簡単のため「change」と聞き取ったらテキストを「The color of the cylinder must be red」として使用することにします。また、しゃべった言葉を直接使う方法については後述します。喋り始めてから一度止まるまでの音声がテキストになります。コードは以下の通りです。
|
1 2 3 4 5 6 7 8 9 10 11 12 13 14 15 16 17 18 19 20 21 22 23 24 25 26 27 28 29 30 31 32 33 34 35 36 37 38 39 40 41 42 43 44 45 46 47 48 49 50 51 52 53 54 55 56 57 |
using System.Collections; using System.Collections.Generic; using UnityEngine; using UnityEngine.Windows.Speech; public class MicrophoneManagerLuis : MonoBehaviour { public static MicrophoneManagerLuis instance; //help to access instance of this object private int frequency = 44100; //recording frequency of mic private AudioSource audioSource; //AudioSource component, provides access to mic private DictationRecognizer dictationRecognizer; //Component converting speech to text public TextMesh dictationText; //a UI object used to debug dictation result private void Awake() { // allows this class instance to behave like a singleton instance = this; } // Use this for initialization void Start() { if (Microphone.devices.Length > 0) { // Once the scene starts, begin to capture the audio audioSource = GetComponent<AudioSource>(); Debug.Log("Mic Detected"); StartCapturingAudio(); } } /// <summary> /// Start microphone capture, by providing the microphone as a continual audio source (looping), /// then initialise the DictationRecognizer, which will capture spoken words /// </summary> public void StartCapturingAudio() { dictationRecognizer = new DictationRecognizer(); dictationRecognizer.DictationHypothesis += DictationRecognizer_DictationHypothesis; dictationRecognizer.Start(); Debug.Log("Capturing Audio..."); } private void DictationRecognizer_DictationHypothesis(string dictationCaptured) { Debug.Log("text:" + dictationCaptured); if(dictationCaptured == "change") { dictationCaptured = "The color of the cylinder must be red"; Debug.Log("text translation:" + dictationCaptured); StartCoroutine(LuisManager.instance.SubmitRequestToLuis(dictationCaptured)); dictationText.text = dictationCaptured; } } } |
喋った言葉を直接使いたい場合は上のコードの以下の部分を変更します。
|
1 2 3 4 5 6 7 8 9 10 11 |
private void DictationRecognizer_DictationHypothesis(string dictationCaptured) { Debug.Log("text:" + dictationCaptured); if(dictationCaptured == "change") { dictationCaptured = "The color of the cylinder must be red"; Debug.Log("text translation:" + dictationCaptured); StartCoroutine(LuisManager.instance.SubmitRequestToLuis(dictationCaptured)); dictationText.text = dictationCaptured; } } |
の部分を
|
1 2 3 4 5 6 |
private void DictationRecognizer_DictationHypothesis(string dictationCaptured) { Debug.Log("text:" + dictationCaptured); StartCoroutine(LuisManager.instance.SubmitRequestToLuis(dictationCaptured)); dictationText.text = dictationCaptured; } |
とします。
・LuisManager
このクラスのやることはMicrophoneManagerLuisクラスからテキストを受け取り、Azure Language Understanding APIにテキストを送ることです。ここで2.準備(2)で取得したEndpointを使用します。–Insert your Endpoint–にEndpointを挿入してください。コードは以下の通りです。
|
1 2 3 4 5 6 7 8 9 10 11 12 13 14 15 16 17 18 19 20 21 22 23 24 25 26 27 28 29 30 31 32 33 34 35 36 37 38 39 40 41 42 43 44 45 46 47 48 49 50 51 52 53 54 55 56 57 58 59 60 61 62 63 64 65 66 67 68 69 70 71 72 73 74 75 76 77 78 79 80 81 82 83 84 85 86 87 88 89 90 91 92 93 94 95 96 97 98 99 100 101 102 103 104 105 106 107 108 109 110 111 112 113 114 115 116 117 118 119 120 121 122 123 124 125 126 127 128 129 130 131 132 133 134 135 136 137 138 139 140 141 142 143 144 145 146 147 148 149 150 151 152 153 154 155 156 157 158 159 |
using System; using System.Collections; using System.Collections.Generic; using System.IO; using UnityEngine; using UnityEngine.Networking; public class LuisManager : MonoBehaviour { [System.Serializable] //this class represents the LUIS response public class AnalysedQuery { public TopScoringIntentData topScoringIntent; public EntityData[] entities; public string query; } // This class contains the Intent LUIS determines // to be the most likely [System.Serializable] public class TopScoringIntentData { public string intent; public float score; } // This class contains data for an Entity [System.Serializable] public class EntityData { public string entity; public string type; public int startIndex; public int endIndex; public float score; } public static LuisManager instance; //Substitute the value of luis Endpoint with your own End Point string luisEndpoint = " --Insert your Endpoint --"; private void Awake() { // allows this class instance to behave like a singleton instance = this; } /// <summary> /// Call LUIS to submit a dictation result. /// </summary> public IEnumerator SubmitRequestToLuis(string dictationResult) { WWWForm webForm = new WWWForm(); string queryString; queryString = string.Concat(Uri.EscapeDataString(dictationResult)); using (UnityWebRequest unityWebRequest = UnityWebRequest.Get(luisEndpoint + queryString)) { unityWebRequest.downloadHandler = new DownloadHandlerBuffer(); yield return unityWebRequest.SendWebRequest(); long responseCode = unityWebRequest.responseCode; try { using (Stream stream = GenerateStreamFromString(unityWebRequest.downloadHandler.text)) { StreamReader reader = new StreamReader(stream); AnalysedQuery analysedQuery = new AnalysedQuery(); analysedQuery = JsonUtility.FromJson<AnalysedQuery>(unityWebRequest.downloadHandler.text); //analyse the elements of the response AnalyseResponseElements(analysedQuery); } } catch (Exception exception) { Debug.Log("Luis Request Exception Message: " + exception.Message); } yield return null; } } public static Stream GenerateStreamFromString(string receivedString) { MemoryStream stream = new MemoryStream(); StreamWriter writer = new StreamWriter(stream); writer.Write(receivedString); writer.Flush(); stream.Position = 0; return stream; } private void AnalyseResponseElements(AnalysedQuery aQuery) { string topIntent = aQuery.topScoringIntent.intent; // Create a dictionary of entities associated with their type Dictionary<string, string> entityDic = new Dictionary<string, string>(); foreach (EntityData ed in aQuery.entities) { entityDic.Add(ed.type, ed.entity); } // Depending on the topmost recognised intent, read the entities name switch (aQuery.topScoringIntent.intent) { case "ChangeObjectColor": string targetForColor = null; string color = null; foreach (var pair in entityDic) { if (pair.Key == "target") { targetForColor = pair.Value; } else if (pair.Key == "color") { color = pair.Value; } } Behaviours.instance.ChangeTargetColor(targetForColor, color); break; case "ChangeObjectSize": string targetForSize = null; foreach (var pair in entityDic) { if (pair.Key == "target") { targetForSize = pair.Value; } } if (entityDic.ContainsKey("upsize") == true) { Behaviours.instance.UpSizeTarget(targetForSize); } else if (entityDic.ContainsKey("downsize") == true) { Behaviours.instance.DownSizeTarget(targetForSize); } break; } } } |
・Behaviours
このクラスは適切なアクションを起こすためのクラスです。変更するオブジェクト、色を指定します。コードは以下の通りです。
|
1 2 3 4 5 6 7 8 9 10 11 12 13 14 15 16 17 18 19 20 21 22 23 24 25 26 27 28 29 30 31 32 33 34 35 36 37 38 39 40 41 42 43 44 45 46 47 48 49 50 51 52 53 54 55 56 57 58 59 60 61 62 63 64 65 66 67 68 69 70 71 72 73 74 75 76 77 78 79 80 81 82 83 84 85 86 87 88 89 90 91 92 93 94 95 96 97 98 99 100 101 102 103 104 105 106 107 108 109 110 111 112 113 114 115 116 117 118 119 |
using System.Collections; using System.Collections.Generic; using UnityEngine; public class Behaviours : MonoBehaviour { public static Behaviours instance; // the following variables are references to possible targets public GameObject sphere; public GameObject cylinder; public GameObject cube; internal GameObject gazedTarget; void Awake() { // allows this class instance to behave like a singleton instance = this; } /// <summary> /// Changes the color of the target GameObject by providing the name of the object /// and the name of the color /// </summary> public void ChangeTargetColor(string targetName, string colorName) { GameObject foundTarget = FindTarget(targetName); if (foundTarget != null) { Debug.Log("color = " + colorName + ", target = " + foundTarget.name); switch (colorName) { case "blue": Debug.Log("change blue"); foundTarget.GetComponent<Renderer>().material.color = Color.blue; break; case "red": Debug.Log("change red"); foundTarget.GetComponent<Renderer>().material.color = Color.red; break; case "yellow": Debug.Log("change yellow"); foundTarget.GetComponent<Renderer>().material.color = Color.yellow; break; case "green": Debug.Log("change green"); foundTarget.GetComponent<Renderer>().material.color = Color.green; break; case "white": Debug.Log("change white"); foundTarget.GetComponent<Renderer>().material.color = Color.white; break; case "black": Debug.Log("change black"); foundTarget.GetComponent<Renderer>().material.color = Color.black; break; } } } /// <summary> /// Reduces the size of the target GameObject by providing its name /// </summary> public void DownSizeTarget(string targetName) { GameObject foundTarget = FindTarget(targetName); foundTarget.transform.localScale -= new Vector3(0.5F, 0.5F, 0.5F); } /// <summary> /// Increases the size of the target GameObject by providing its name /// </summary> public void UpSizeTarget(string targetName) { GameObject foundTarget = FindTarget(targetName); foundTarget.transform.localScale += new Vector3(0.5F, 0.5F, 0.5F); } /// <summary> /// Determines which obejct reference is the target GameObject by providing its name /// </summary> private GameObject FindTarget(string name) { GameObject targetAsGO = null; switch (name) { case "sphere": targetAsGO = sphere; break; case "cylinder": targetAsGO = cylinder; break; case "cube": Debug.Log("change cube"); targetAsGO = cube; break; case "this": // as an example of target words that the user may use when looking at an object case "it": // as this is the default, these are not actually needed in this example case "that": default: // if the target name is none of those above, check if the user is looking at something if (gazedTarget != null) { targetAsGO = gazedTarget; } break; } return targetAsGO; } } |
・Gaze
このクラスはユーザーの視点を更新するクラスです。コードは以下の通りです。
|
1 2 3 4 5 6 7 8 9 10 11 12 13 14 15 16 17 18 19 20 21 22 23 24 25 26 27 28 29 30 31 32 33 34 35 36 37 38 39 40 41 42 43 44 45 46 47 48 49 |
using System; using System.Collections; using System.Collections.Generic; using UnityEngine; using UnityEngine.EventSystems; using UnityEngine.Experimental.XR; using UnityEngine.UI; using UnityEngine.XR; using UnityEngine.XR.WSA.Input; public class Gaze : MonoBehaviour { internal GameObject gazedObject; public float gazeMaxDistance = 300; void Update() { // Uses a raycast from the Main Camera to determine which object is gazed upon. Vector3 fwd = gameObject.transform.TransformDirection(Vector3.forward); Ray ray = new Ray(Camera.main.transform.position, fwd); RaycastHit hit; Debug.DrawRay(Camera.main.transform.position, fwd); if (Physics.Raycast(ray, out hit, gazeMaxDistance) && hit.collider != null) { if (gazedObject == null) { gazedObject = hit.transform.gameObject; // Set the gazedTarget in the Behaviours class Behaviours.instance.gazedTarget = gazedObject; } } else { ResetGaze(); } } // Turn the gaze off, reset the gazeObject in the Behaviours class. public void ResetGaze() { if (gazedObject != null) { Behaviours.instance.gazedTarget = null; gazedObject = null; } } } |
全てのスクリプトが完成したら、動作するようにアタッチしていきたいと思います。記述した全てのスクリプトを[Hierarchy]パネル内の[MixedRealityCamera]にD&Dします。

[MixedRealityCamera]の[Inspector]内に先ほどD&Dしたスクリプトが追加されていると思います。[Behaviours(script)]->[Sphere]、[Cylinder]、[Cube]に[Hierarchy]パネル内の[Sphere]、[Cylinder]、[Cube]を、[Microphone Manager Luis(script)]->[Dictation Text]へ[Hierarchy]パネル内の[Dictation Text]をそれぞれアタッチします。

6.ビルド
[File]->[Build Settings..]->[Build]の順に選択します。新しいフォルダー(BUILDS)を作成し、その中にさらにフォルダー(Luis_V0.1)を作ります。このフォルダーを選択し、保存します。
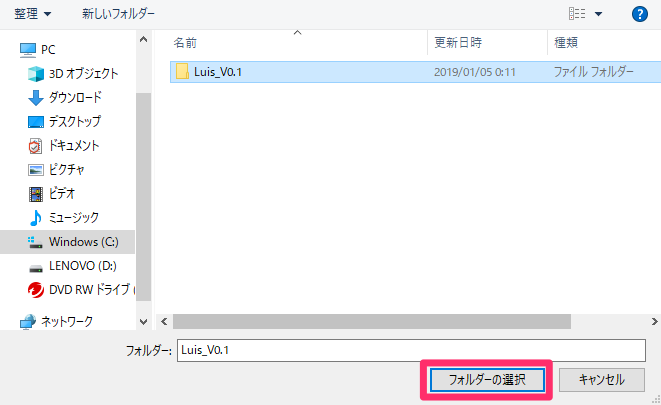
この後の手順についてはこちらを参照してください。
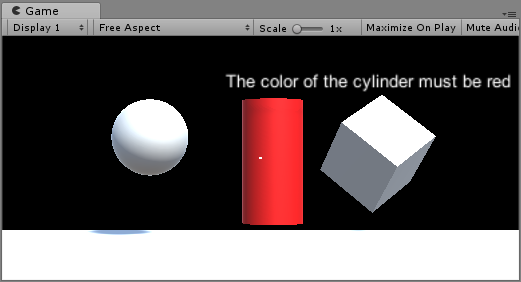
Unity上で実行した様子です。
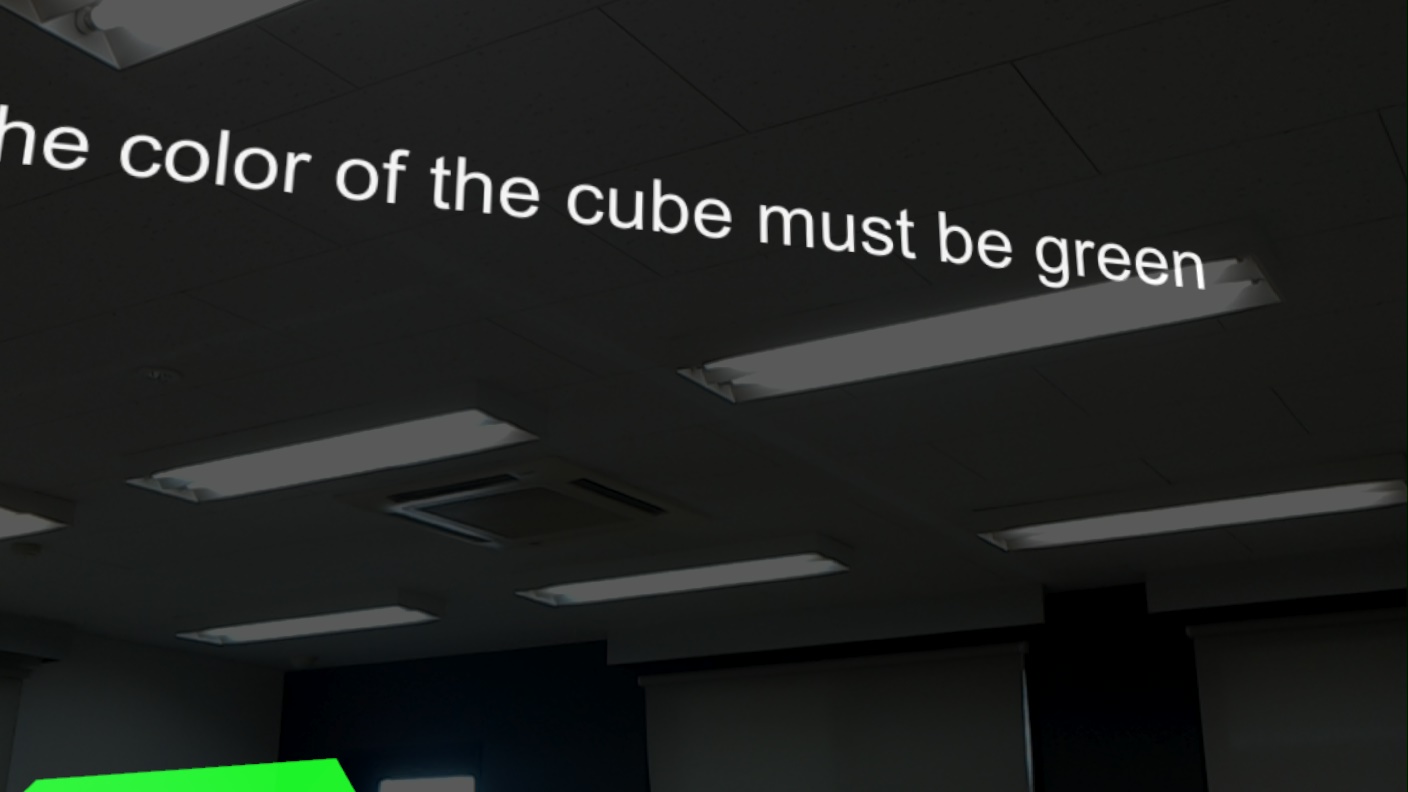
HoloLensで実行した時の様子です。
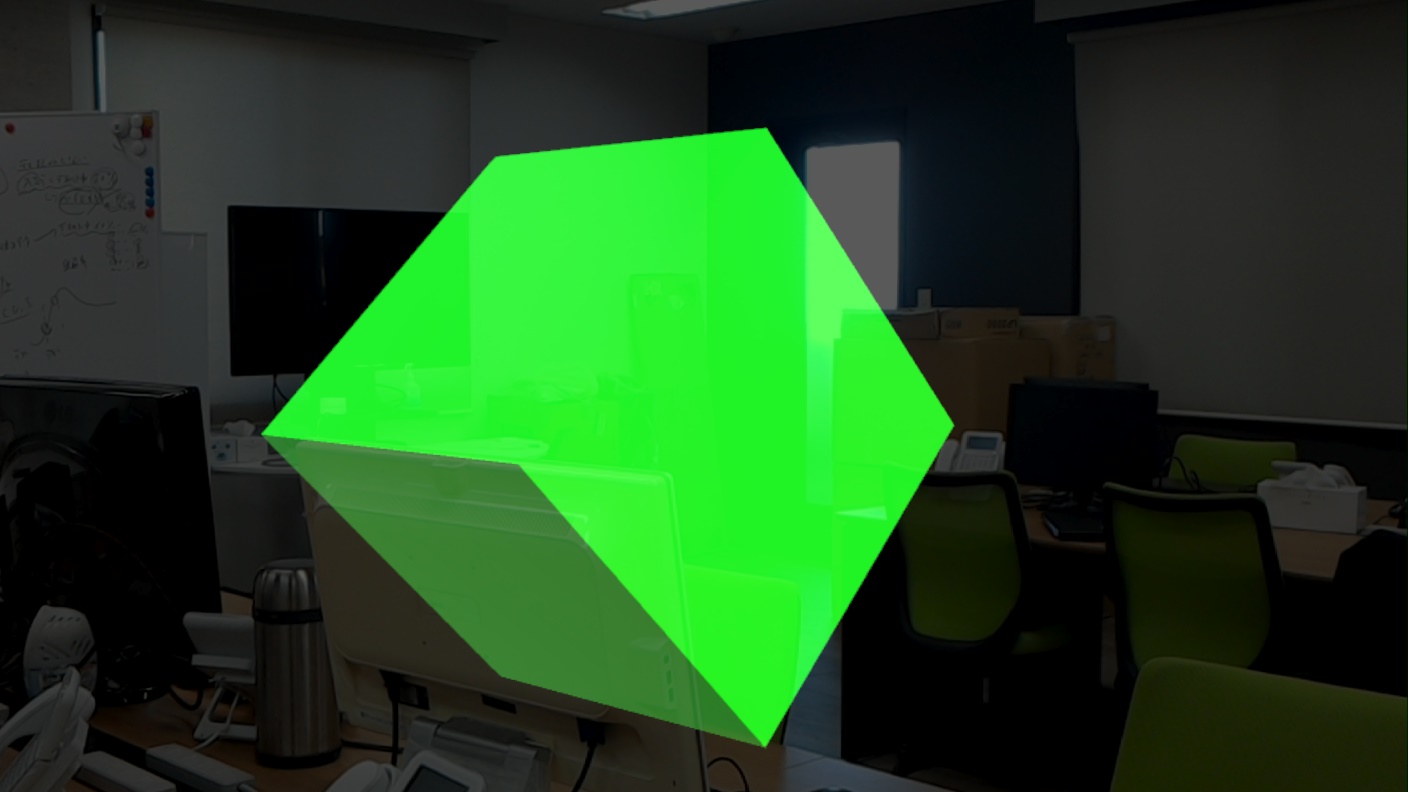
以上となります。 お疲れ様でした。
