こんにちは、ナレコム菅井です。
今回はMR and Azure306のアプリを作っていきます。
開発環境は以下の通りです。
・Windows
・Unity 2017.4.11f1
・visual studio2017
・HoloLens
目標はHoloLensでビデオをストリーミング再生できるようにすることです。HoloLensから360度ビデオを見ることができるようになります。さらに、あるオブジェクトを見ると、他の動画に切り変わるという機能もつけていきます。それではさっそく始めていきましょう!
0.準備
ステップ1. Azure Storage Serviceを使用するため、Azure Portalからストレージアカウントを作成する。
ステップ2. Azure PortalでMedia Servicesを追加する。
ステップ1
1. Azure Portalにログインする。
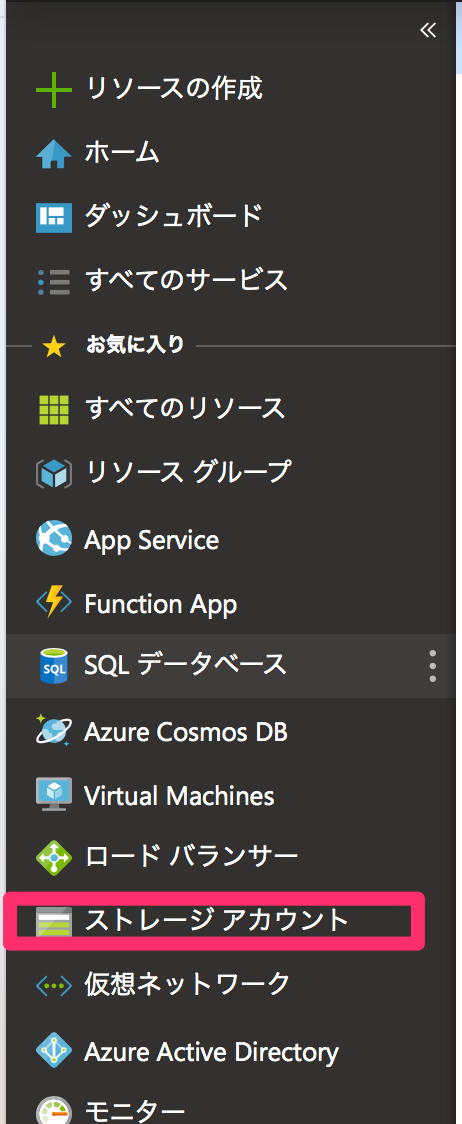
2.[ストレージアカウント]をクリックする。
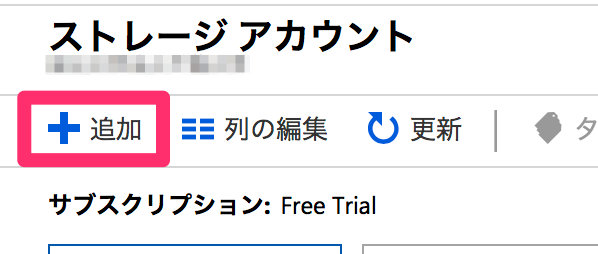
3.[追加]より新しいストレージアカウントを追加する。
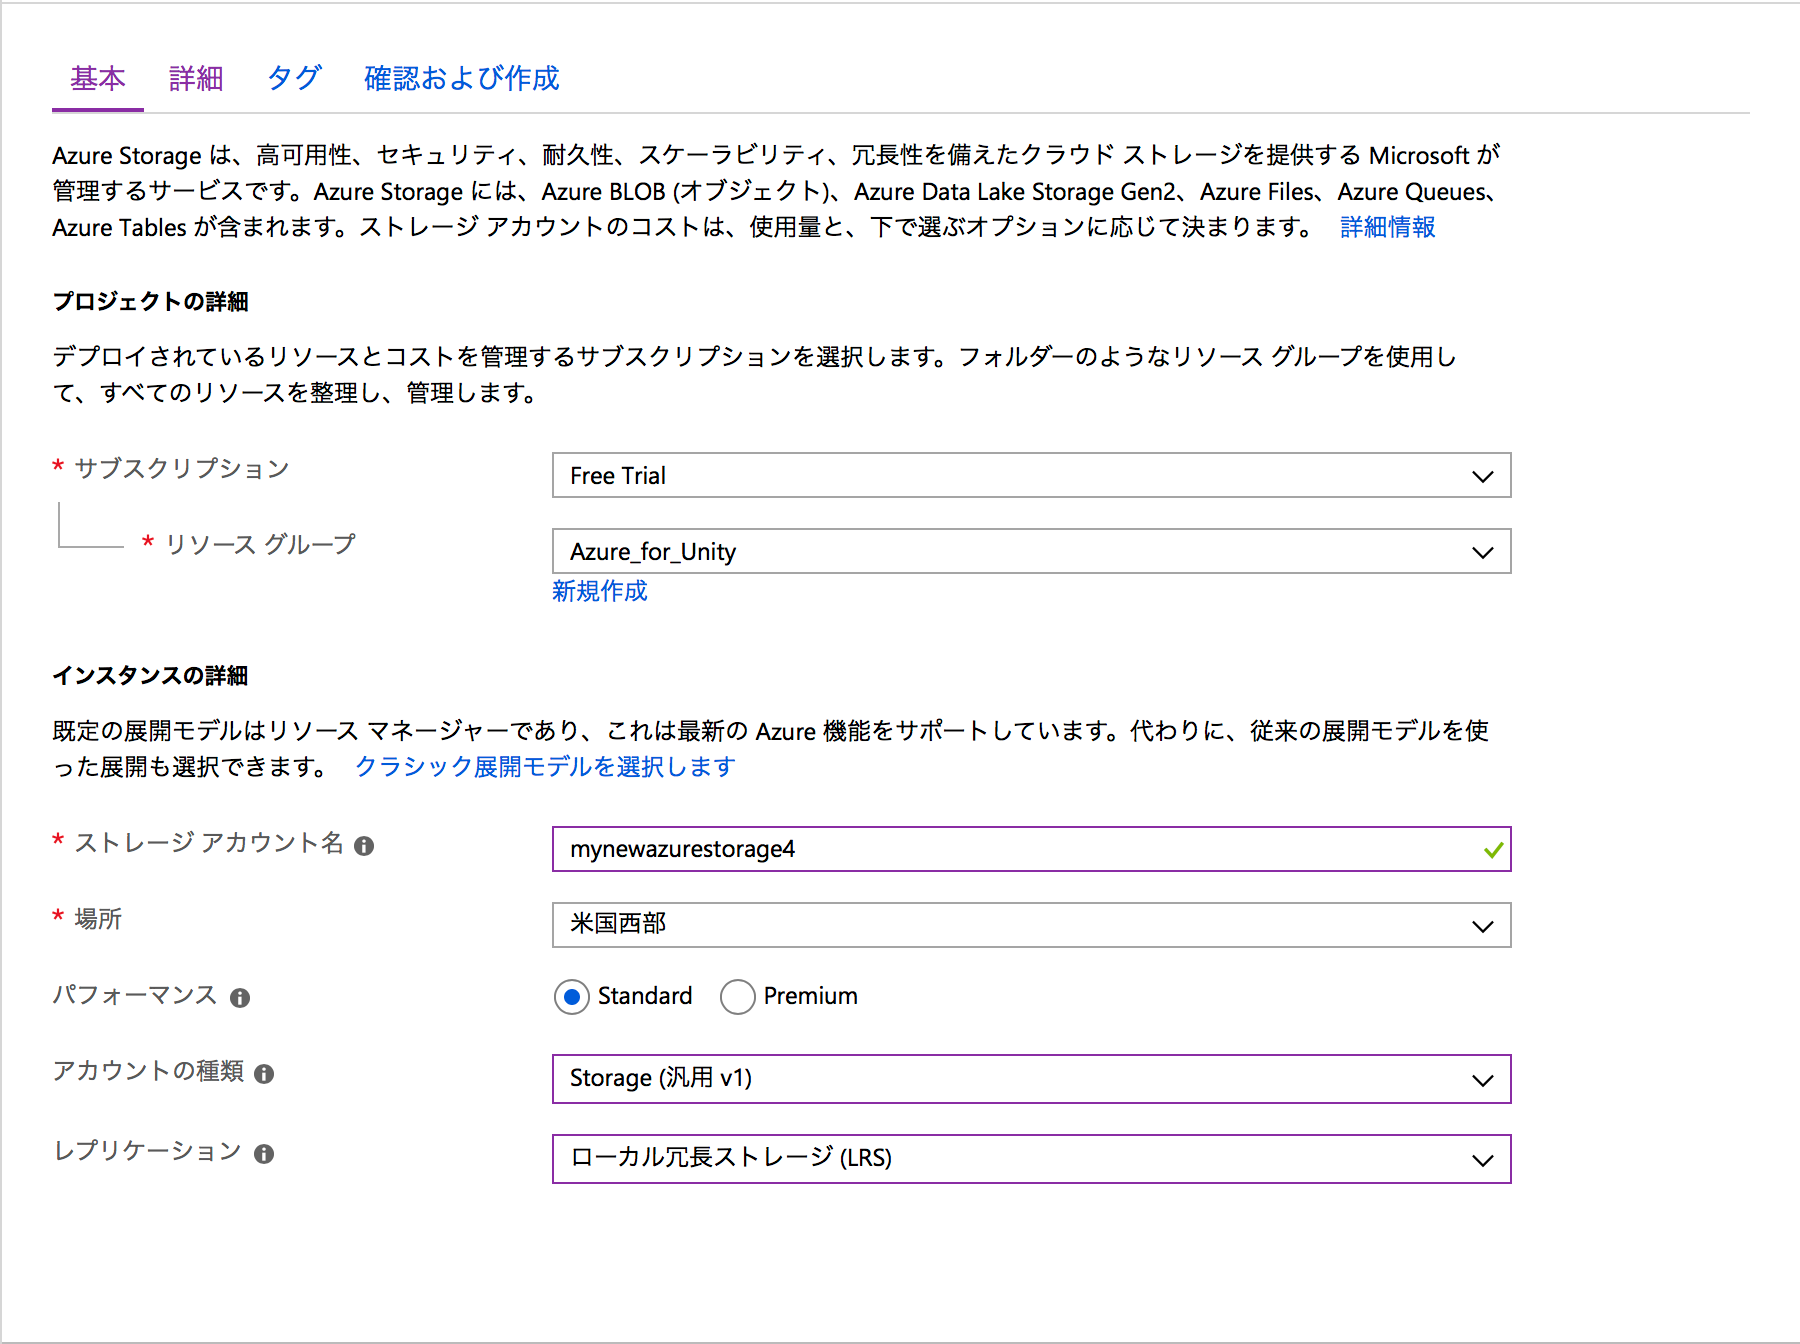
a. ストレージアカウント名を自由に決める
b. アカウントの種類をストレージ(汎用v1)とする
c. レプリケーションをローカル冗長ストレージ(LRS)とする
[次: 詳細>] へ進み
d. 安全な転送が必須を無効とする
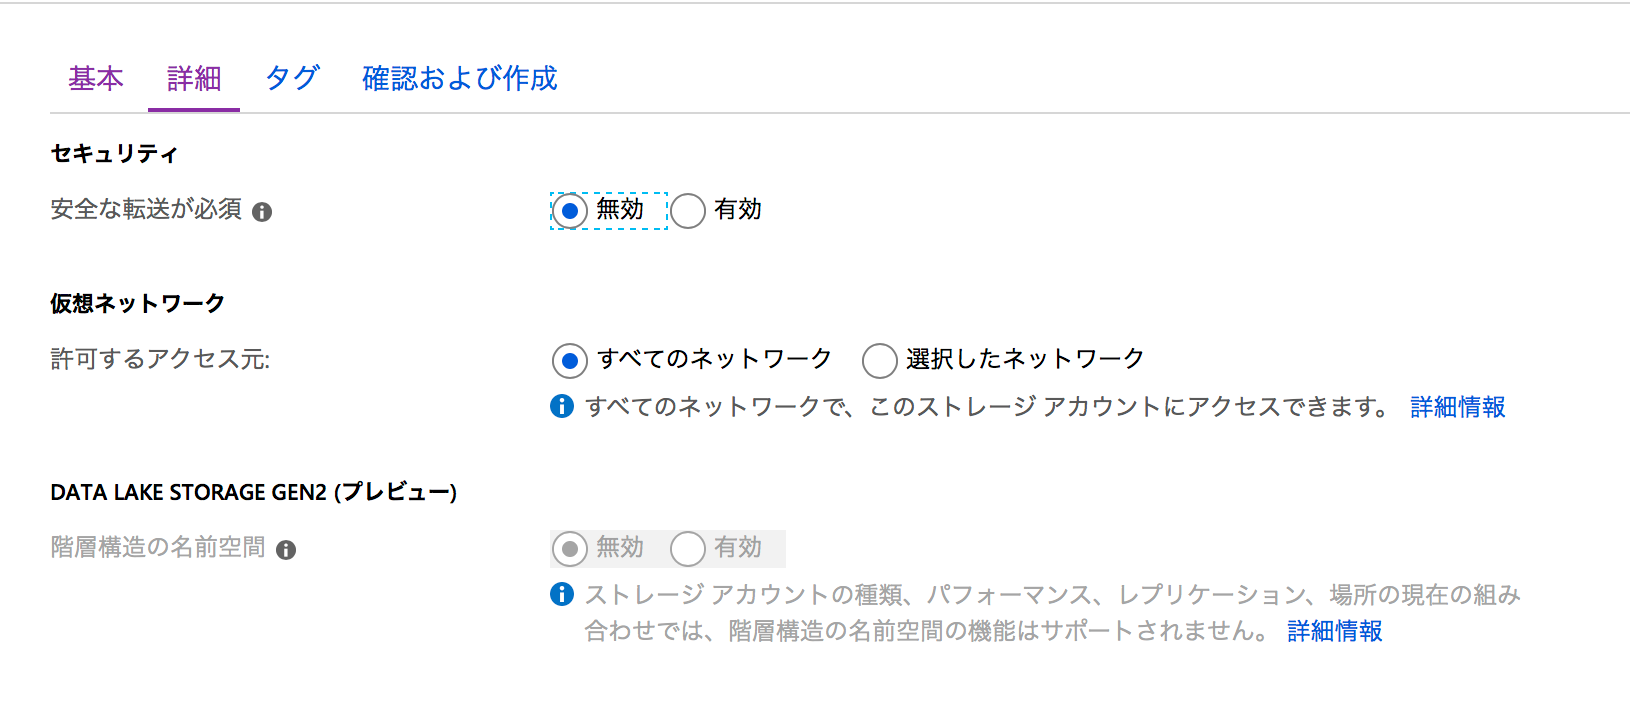
[確認および作成]をクリックし、[作成]を選択します。
![]()
![]()
4. お知らせタブをクリックし、デプロイが完了したことを確認します。
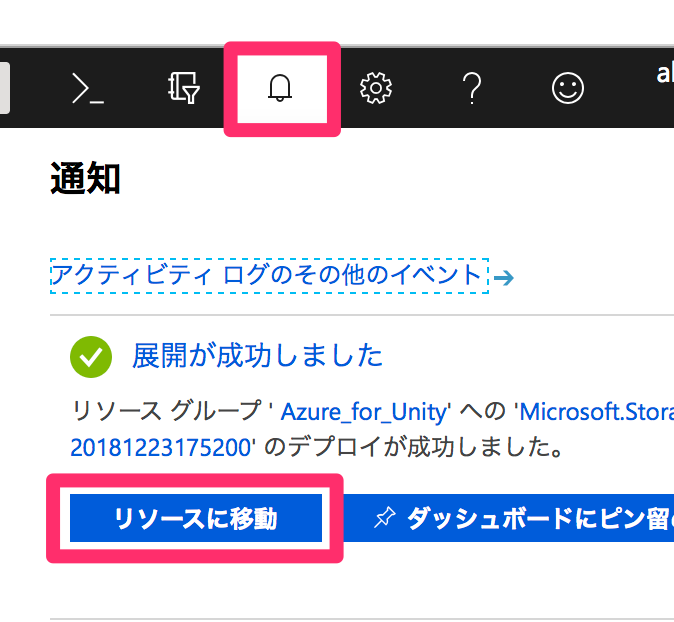
ステップ2
1. [リソースの作成]を開いてMedia Servicesを検索し、Media Servicesの説明の画面にスライドしたら[作成]をクリック。
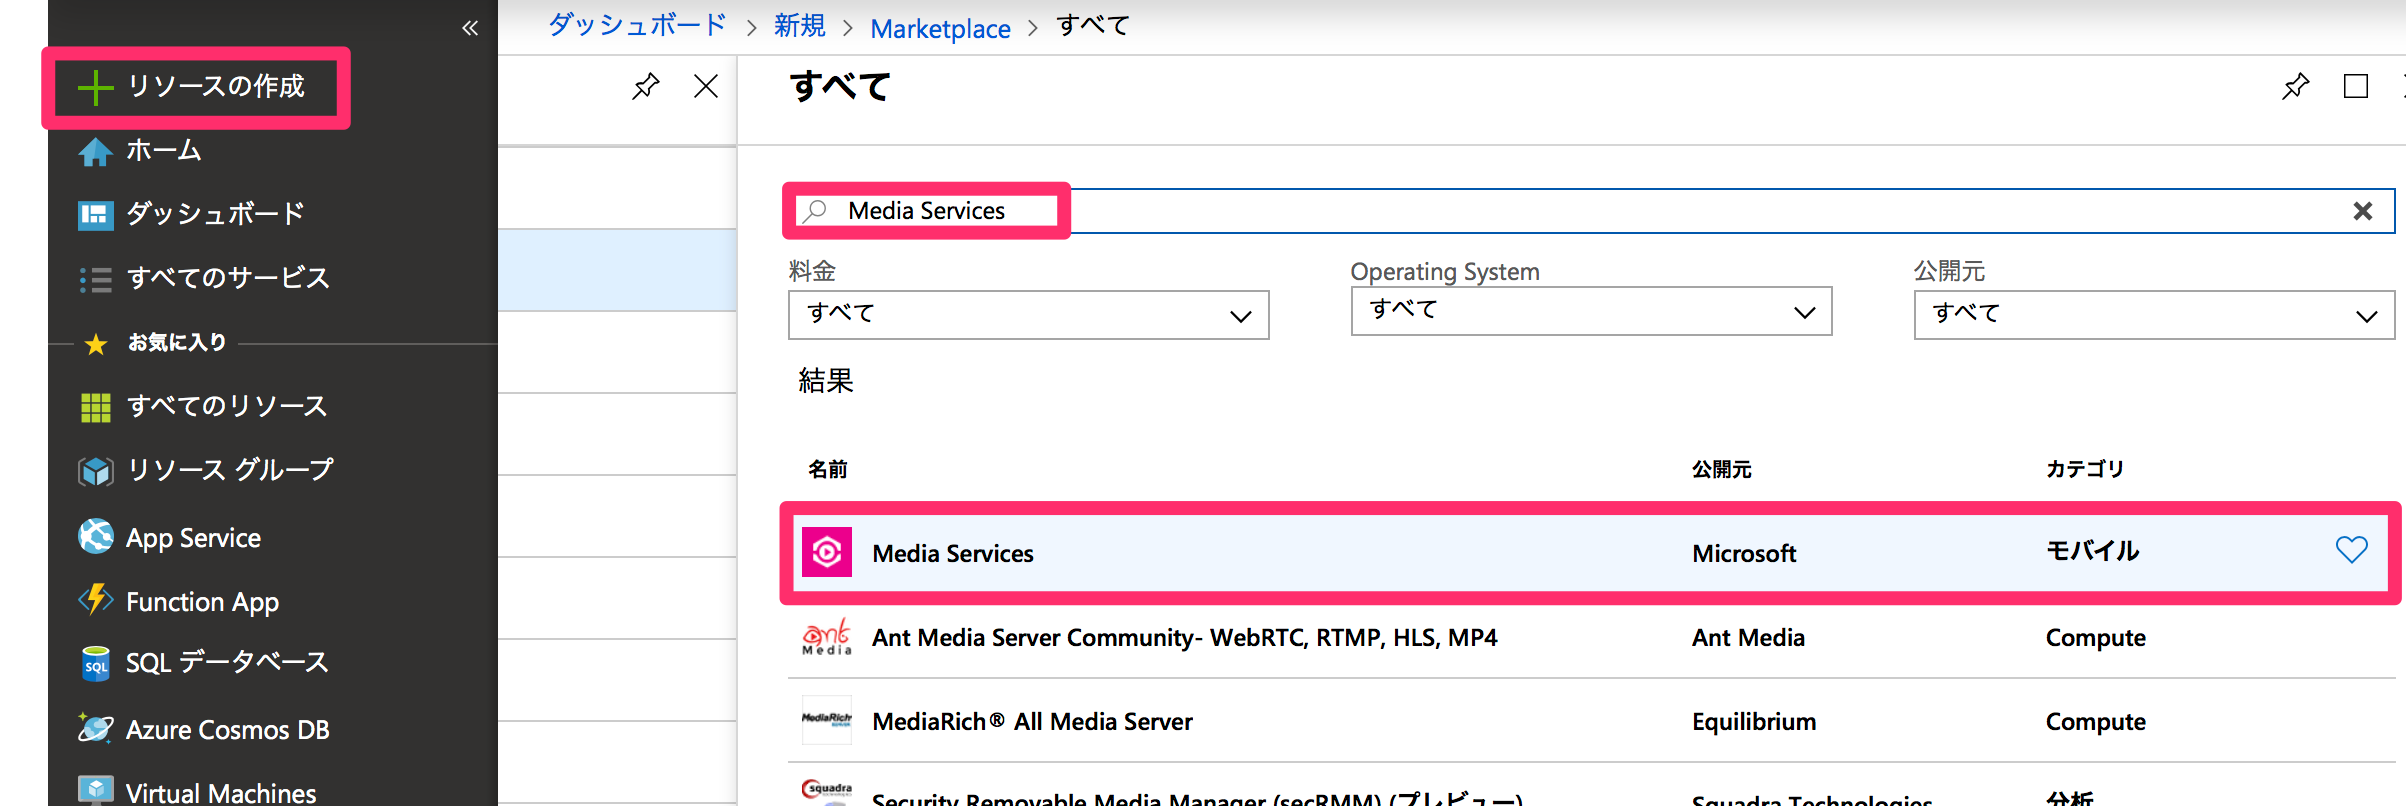
![]()
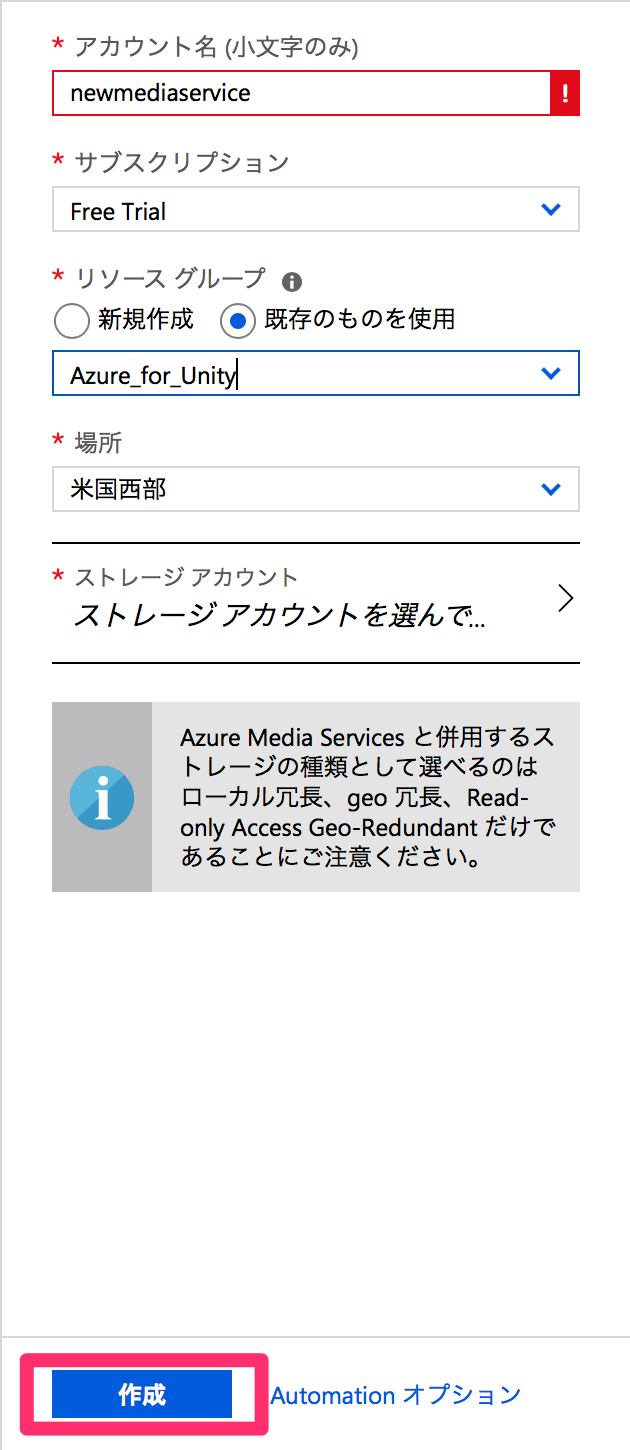
2. 作成するサービスに関する情報を入力し、[作成]をクリック。※記入例です。
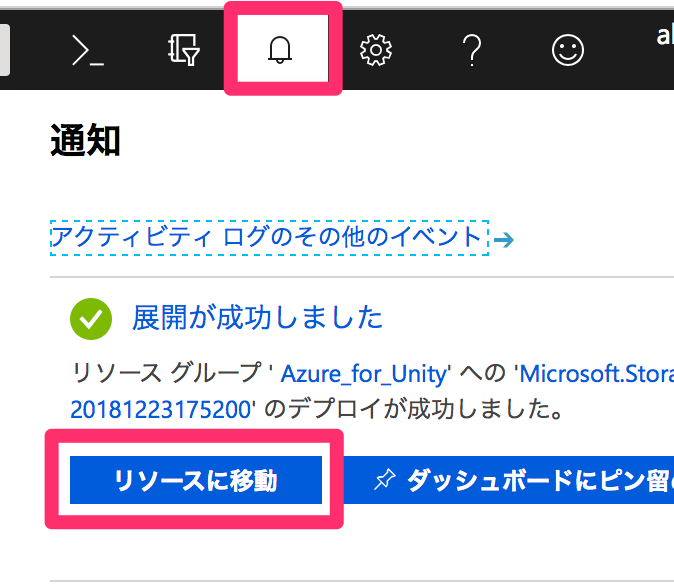
3. お知らせタブをクリックし、デプロイが完了したら[リソースに移動]を選択する。
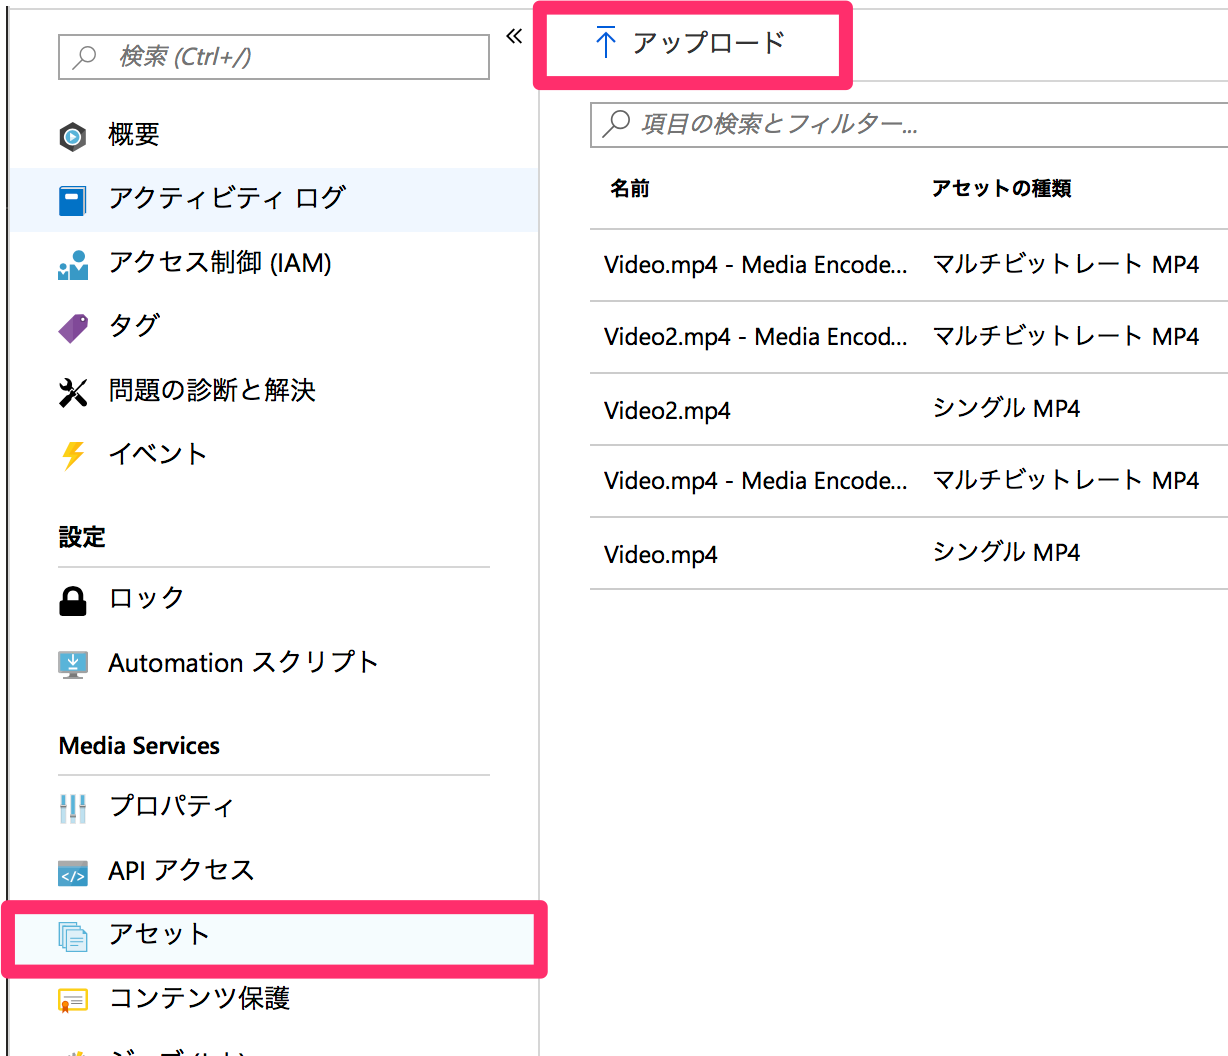
4. [アセット]を開き[アップロード]をクリックする。
5. ビデオを追加していく
a. サンプルビデオをダウンロード
b. フォルダアイコンからダウンロードした動画を追加する。名前は簡単のためVideoとします。
![]()
c. [アセット]に戻り、追加したビデオをクリックする。
![]()
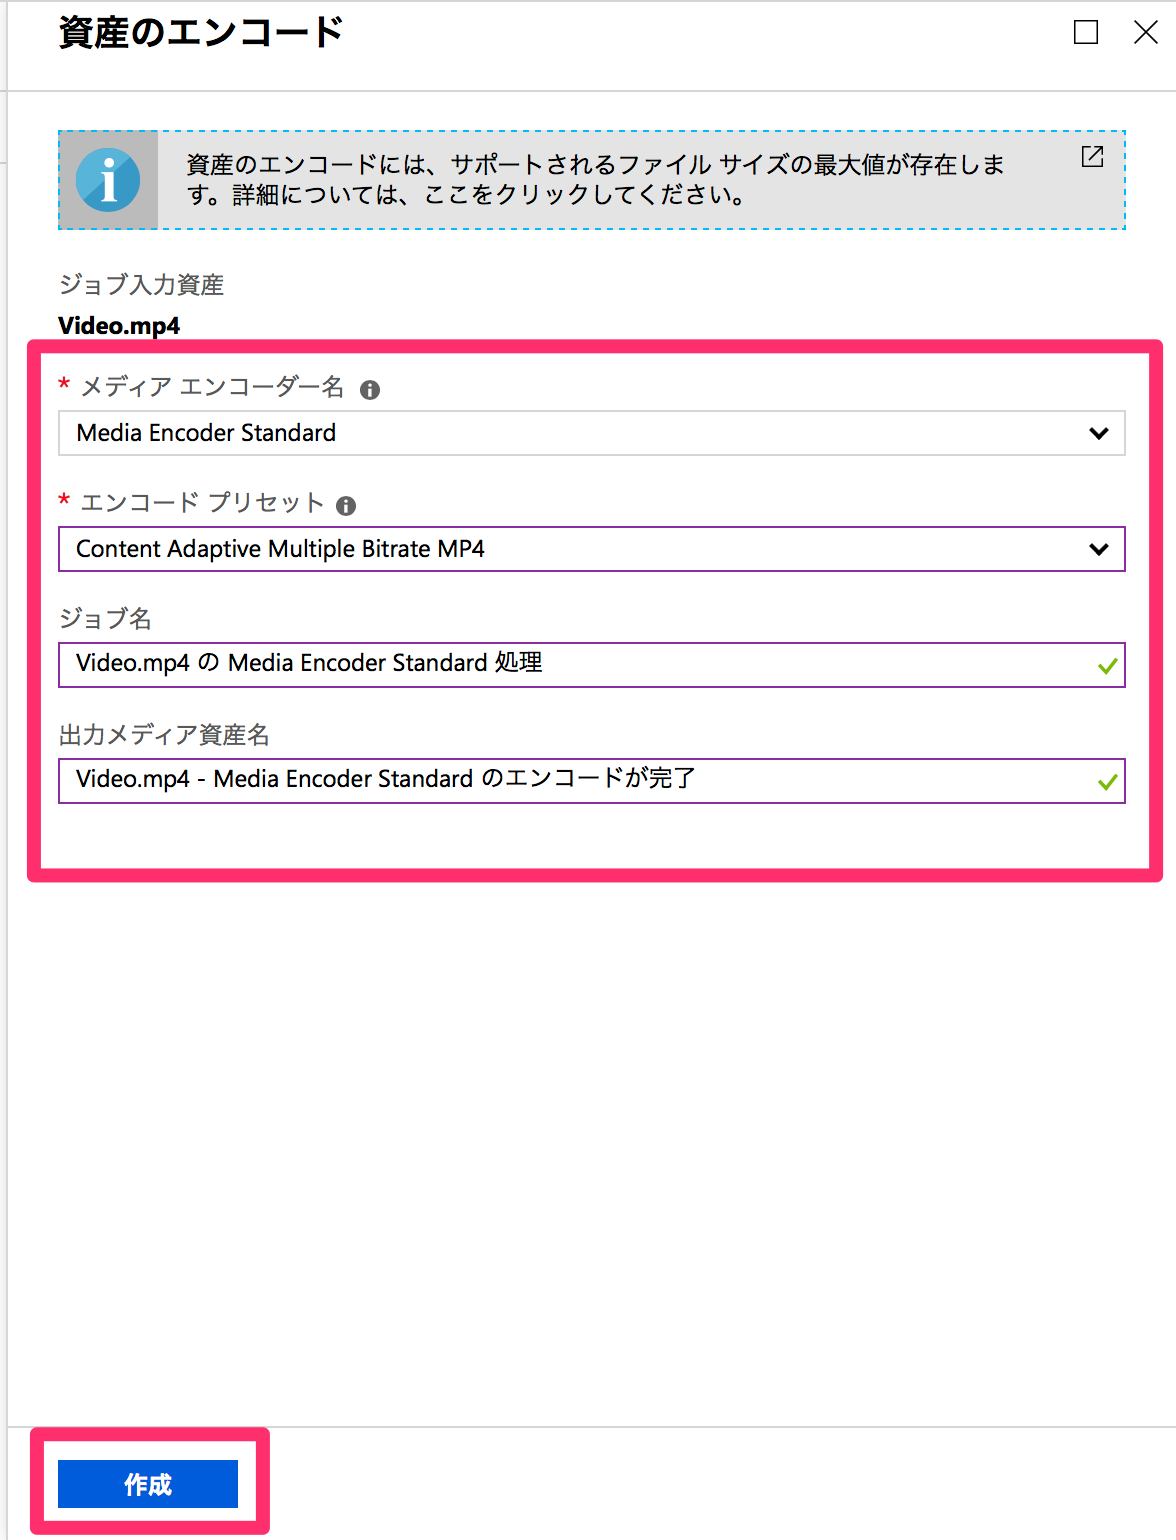
d. [エンコード]をクリックし、[資産のエンコード]が以下のようになっていることを確認して[作成]をクリック。
![]()
e. 再び[アセット]に戻り、新しく追加された項目を選択する。
![]()
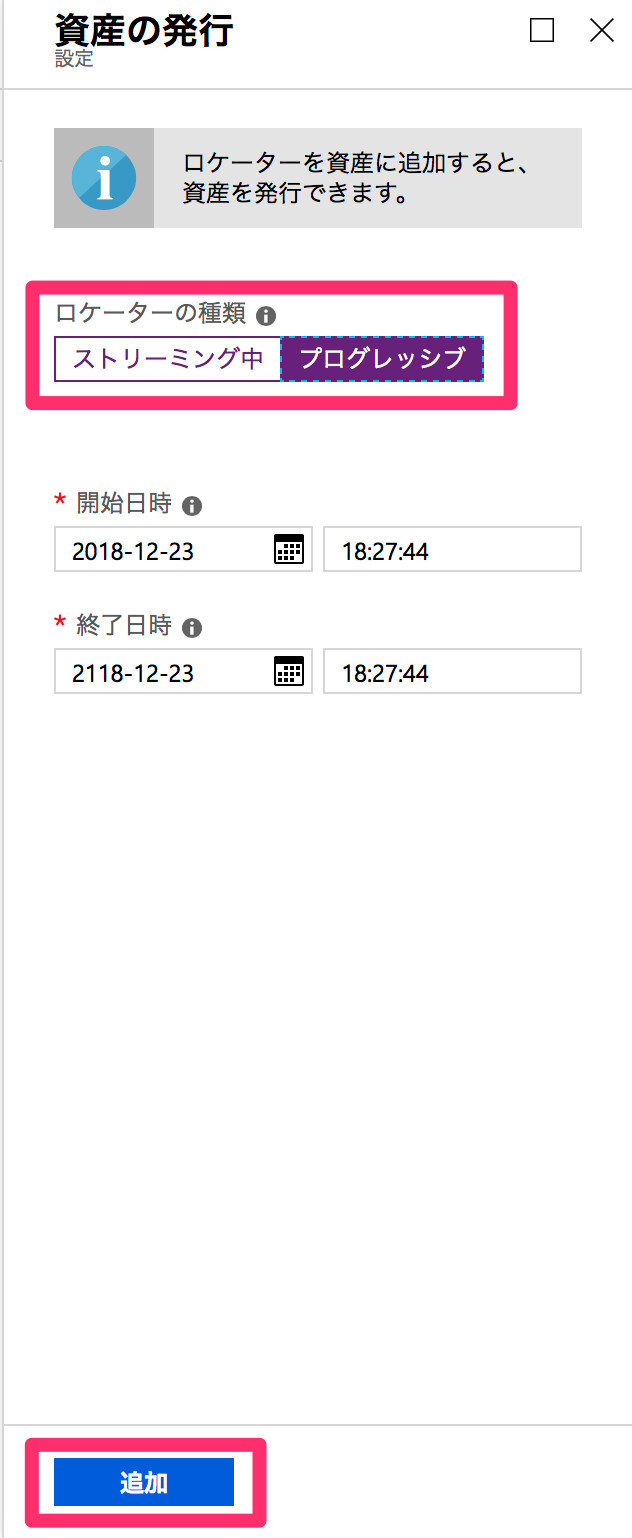
f. [公開]をクリックし[ストリーミング中]を[プログレッシブ]に変更したあと[作成]する。公開したあと、アセットの種類が変わっていることがわかります。これを選択します。
![]()
![]()
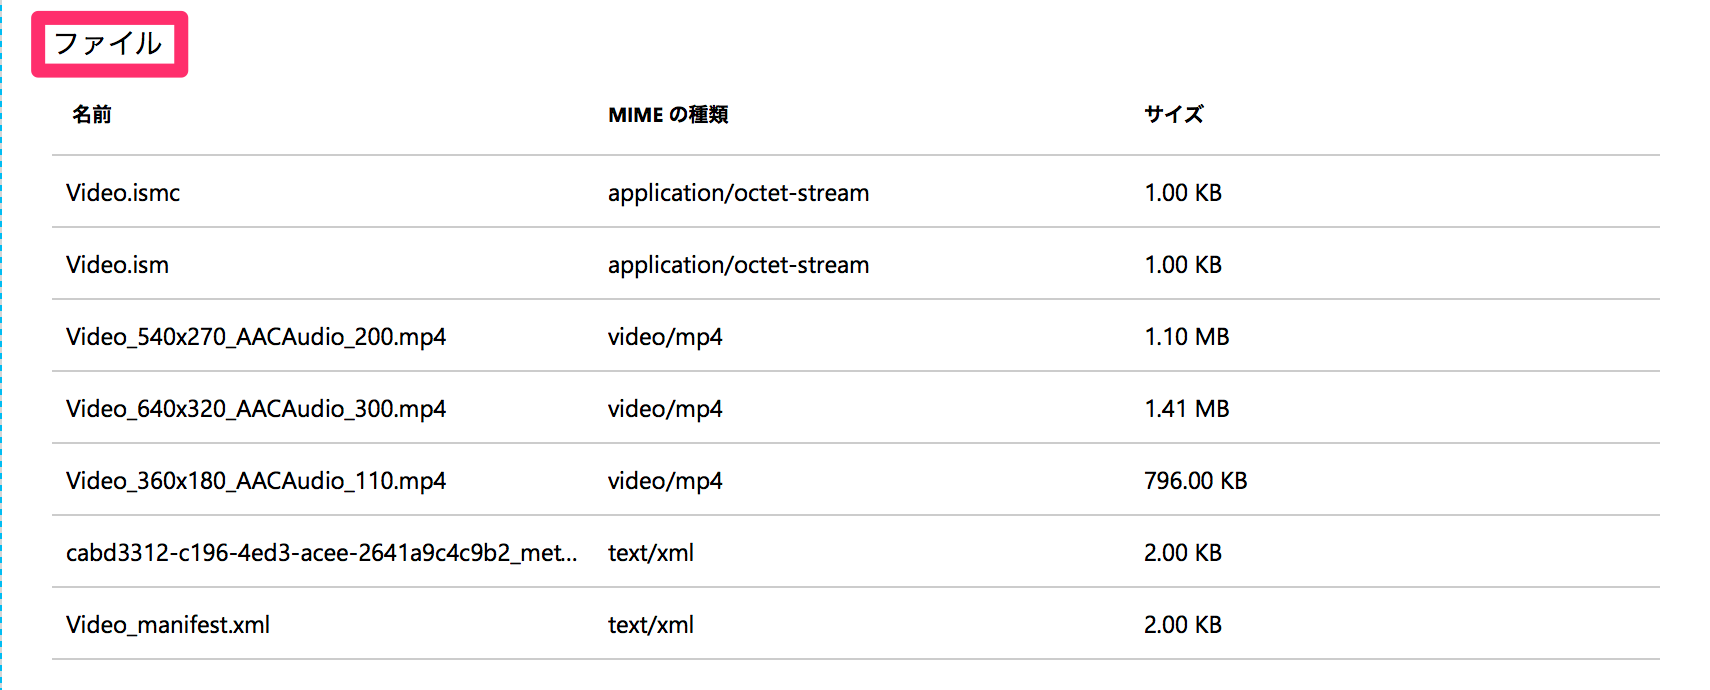
g. ファイルの中から、mp4の拡張子がついたものを選択。ダウンロードURLはのちほど使います。
![]()
h. aからgまでを別のサンプル動画についても行う。
以上で二つの動画が公開され、ホロレンズから取得可能になりました。
1. Unityの設定
続いてUnityの設定を行っていきたいと思います。以下の手順で進めていきましょう。
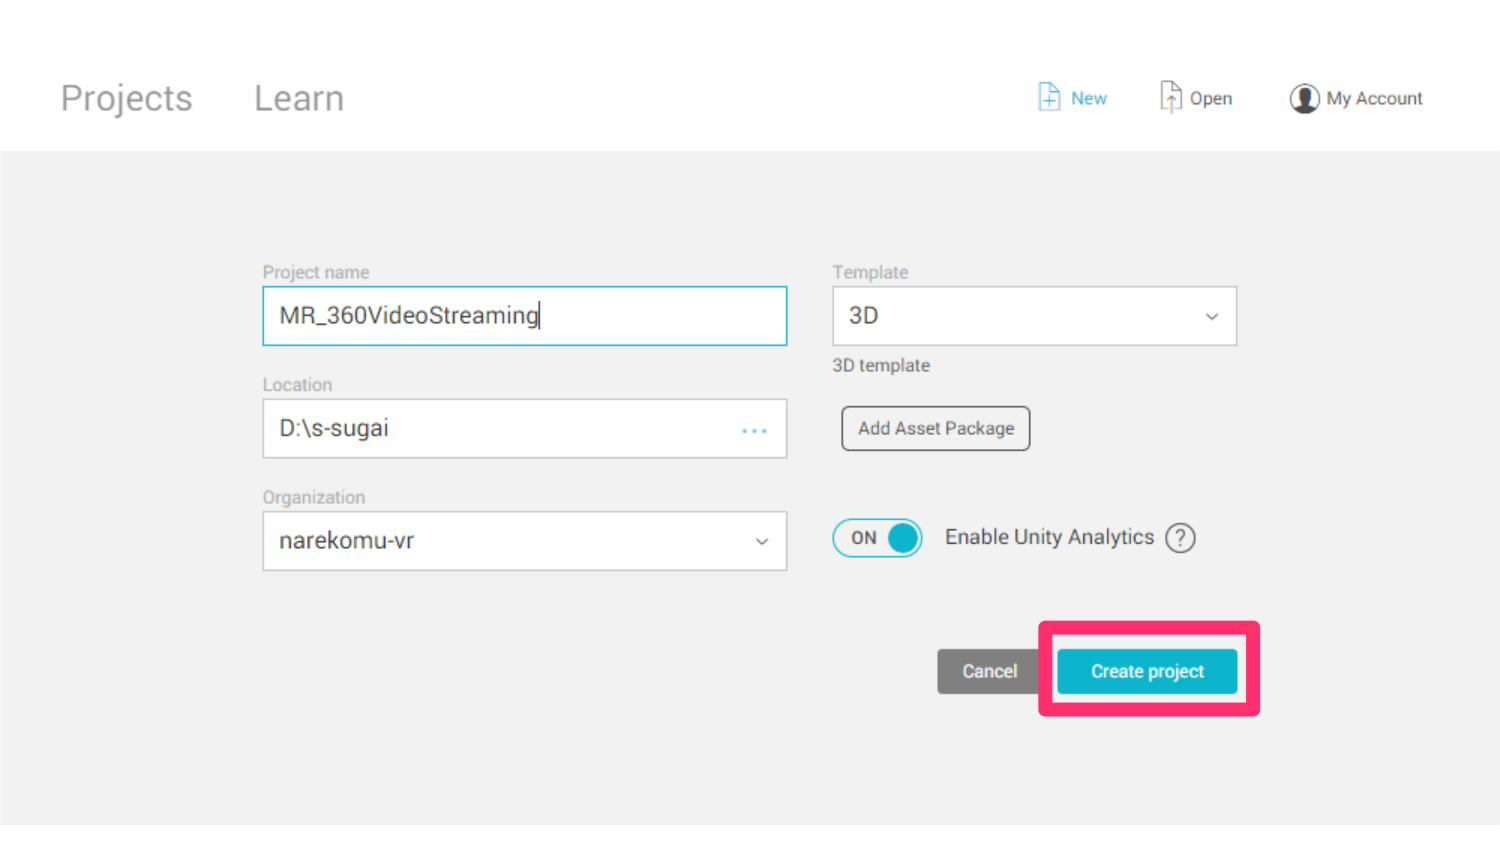
1.Unityを開き、[New]から新しいプロジェクトをつくる。
名前をMR_360VideoStreamingとして、[Create project]をクリックします。
2. [Build Settings..]からさまざまな項目を編集していく。
[File]->[Build Settings..]を開きます。
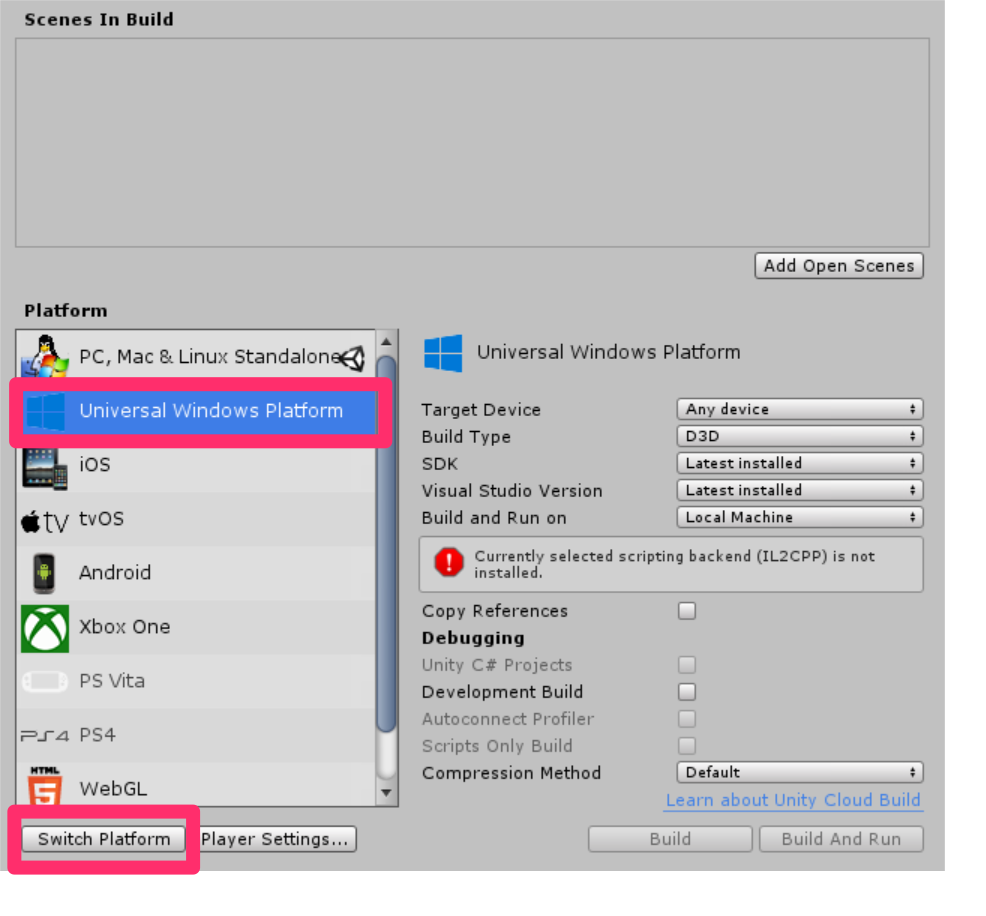
a.プラットフォームの変更
[PC, Mac & Linux Standalone]を[Universal Windows Platform]に変更し、[Switch Platform]をクリックします
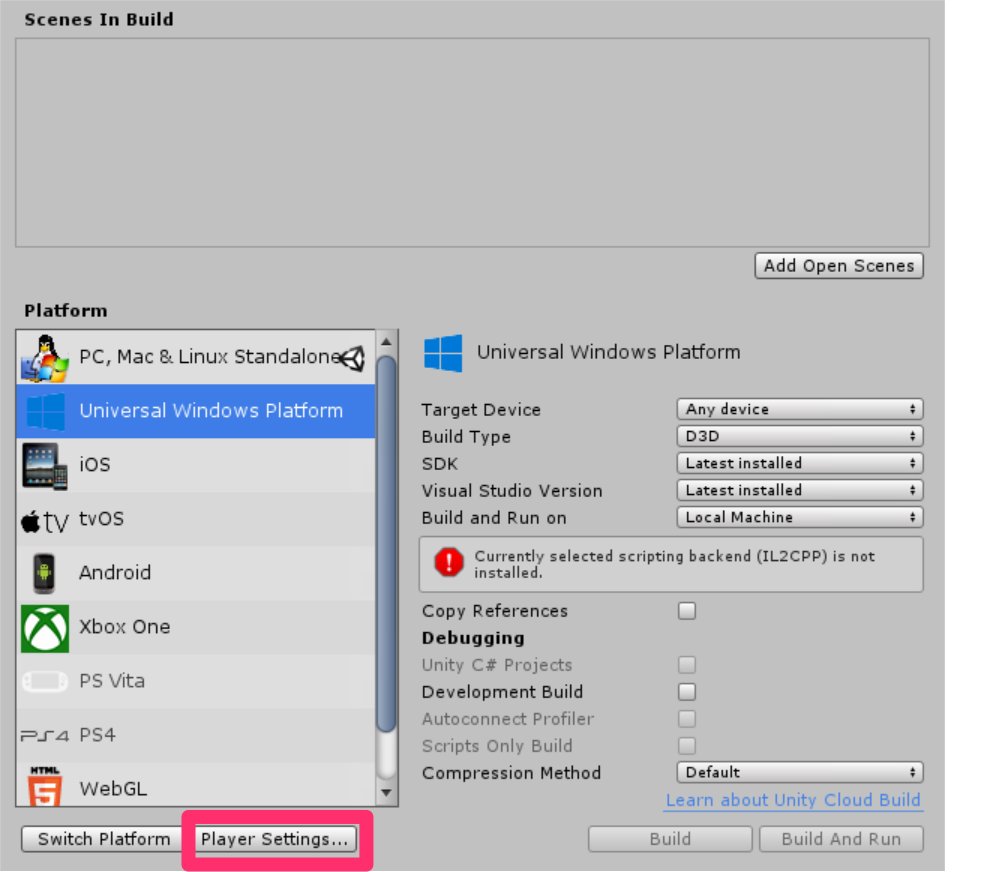
b.[Player Settings..]を編集する
[Player Settings..]をクリックします。
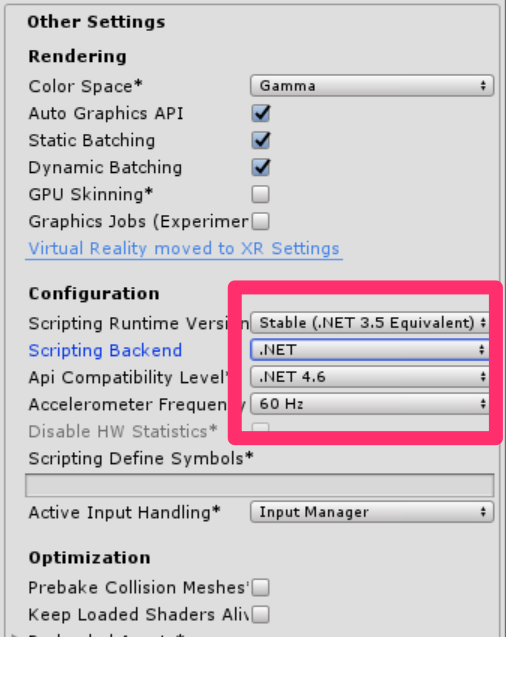
そのあと[Other Settings]、[Publishing Settings]->[Capabilities]、[XR Settings]を以下のように設定してきます。
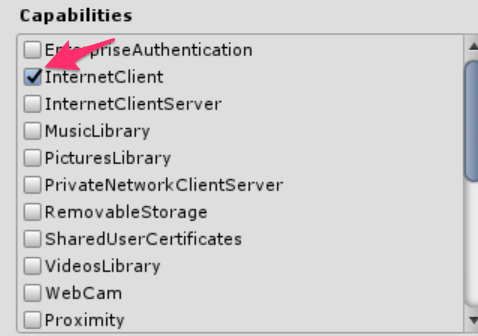
![]()
続いて、[Unity C#]にチェックを入れます。[Build Settings..]の変更は以上です。
![]()
3. InsideOutSphere Unityパッケージのインポート
まず、InsideOutSphereをダウンロードします。[Assets]->[Import Package]->[Custom Package]をクリックします。ダウンロードしたInsideOutSphereをフォルダの中から探し選択し、[Import]をクリックします。
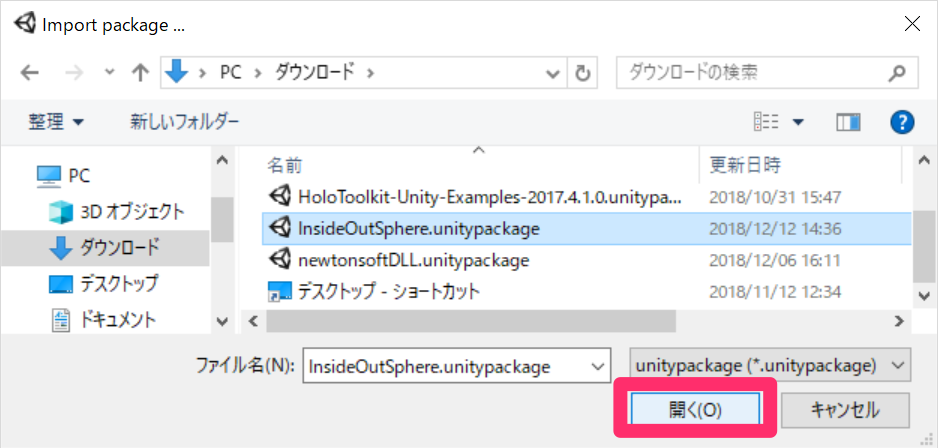
2.カメラの設定、オブジェクトの設定
まず、Main Cameraの設定を行なっていきます。
[Hierarchy]->[Main Camera]を選択して[Inspector]を
a. Transform
————————–
Position | 全て0
————————–
Rotation | 全て0
————————–
Scale | 全て1
————————–
b.[Camera]から[Clear Flags]をSolid Colorに、[Clipping Planes]を[Near]が0.1、[Far]が6
となるように編集します。
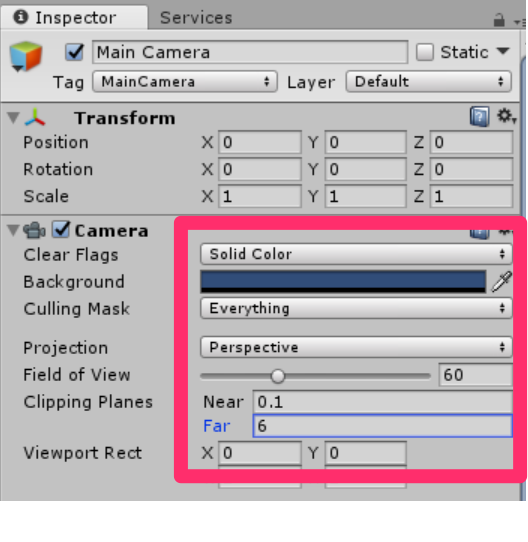
続いて、InsideOutSphereを編集していきます。
a. [Projects]->[Prefab]フォルダから、InsideOutSphereを[Hierarchy]パネルにD&D。
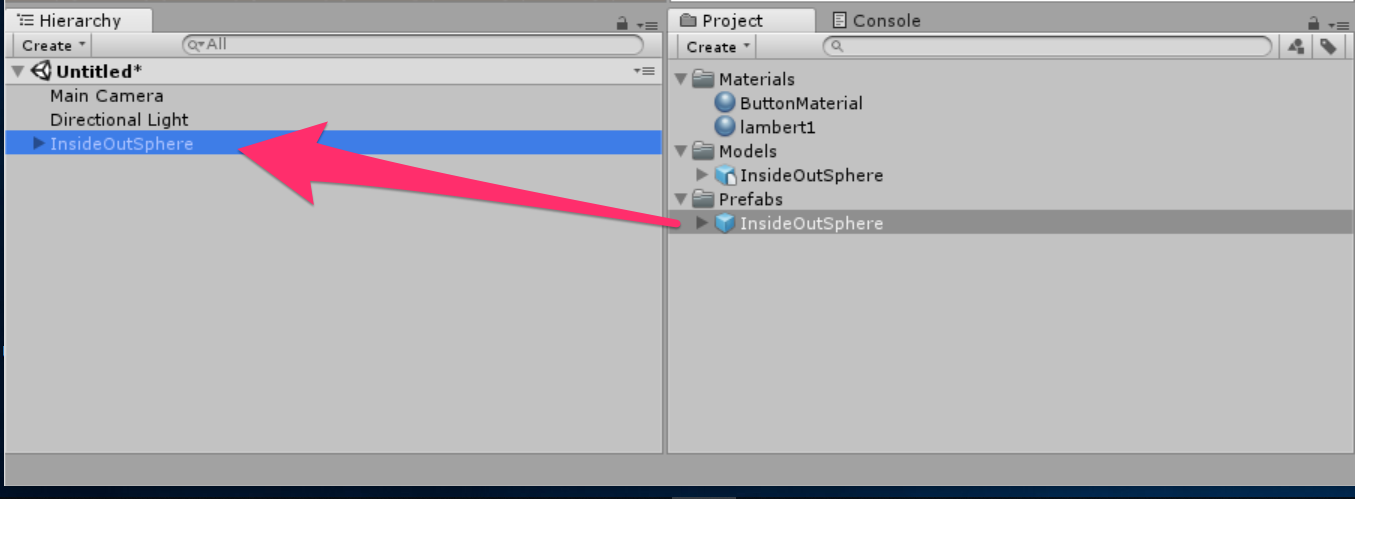
b.[InsideOutSphere]の[Inspector]->[Transform]を
————————————
Position | 全て0
————————————
Rotation | X:0 | Y:-50 | Z:0
————————————
Scale | 全て1
————————————
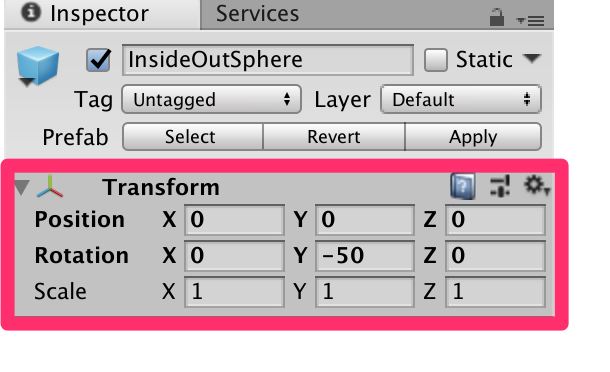
c. [InsideOutSphere]->[GazeButtom]の[Inspector]を
—————————————-
Position | X:3.6 | Y:1.3 | Z:0
—————————————-
Rotation | 全て0
—————————————-
Scale | 全て1
—————————————-
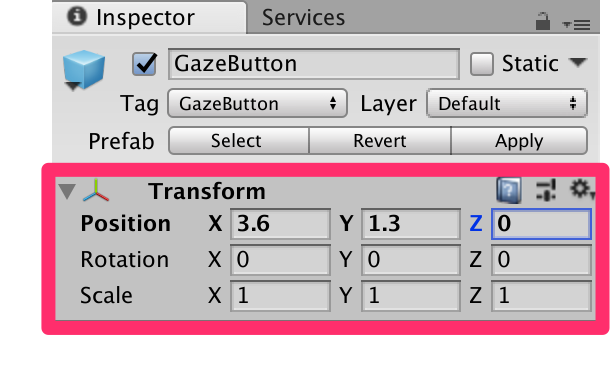
これで指定した位置にオブジェクトが配置されました。
3.スクリプトの作成
ここでは二つのスクリプトを作成していきたいと思います。
・VideoController
・Gaze
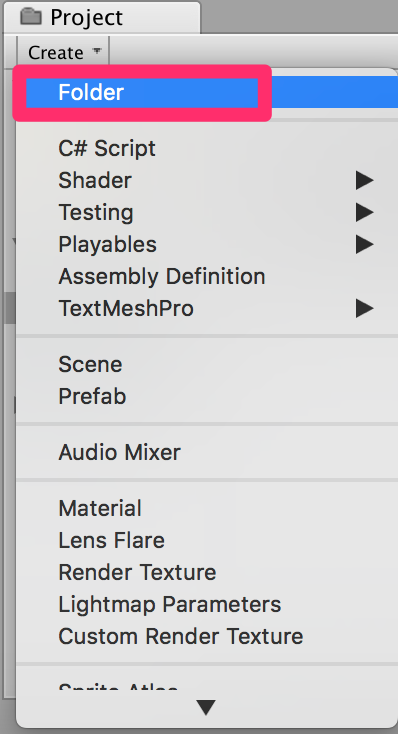
スクリプトの作り方はまず、すべてのスクリプトをまとめておくフォルダーを作成します。[Project]->[Create]をクリックし、[Folder]を選択して新しいフォルダーを作ります。名前をScriptsとします。続いて[Project]->[Create]->[C# Script]をクリックし、クラス名をつけていきます。
・VideoController
このクラスにはMedia Serviceとやりとりするメソッド、ビデオを切り替えるメソッドなどを記述していきます。コードは以下の通りです。ここで、0.準備で取得した二つのダウンロードURLを所定の位置に挿入します。
|
1 2 3 4 5 6 7 8 9 10 11 12 13 14 15 16 17 18 19 20 21 22 23 24 25 26 27 28 29 30 31 32 33 34 35 36 37 38 39 40 41 42 43 44 45 46 47 48 49 50 51 52 53 54 55 56 57 58 59 60 61 62 63 64 65 66 67 68 69 70 71 72 73 74 75 76 77 78 79 80 81 82 83 84 85 86 87 88 89 90 91 92 93 94 95 96 97 98 99 100 101 102 103 104 105 106 107 108 109 110 111 112 113 114 115 116 117 118 119 120 121 122 123 124 125 126 127 128 129 130 131 132 133 |
using System.Collections; using System.Collections.Generic; using UnityEngine; using UnityEngine.SceneManagement; using UnityEngine.Video; public class VideoController : MonoBehaviour { /// <summary> /// Provides Singleton-like behaviour to this class. /// </summary> public static VideoController instance; /// <summary> /// Reference to the Camera VideoPlayer Component. /// </summary> private VideoPlayer videoPlayer; /// <summary> /// Reference to the Camera AudioSource Component. /// </summary> private AudioSource audioSource; /// <summary> /// Reference to the texture used to project the video streaming /// </summary> private RenderTexture videoStreamRenderTexture; /// <summary> /// Insert here the first video endpoint /// </summary> private string video1endpoint = "--Insert video1 endpoint--"; /// <summary> /// Insert here the second video endpoint /// </summary> private string video2endpoint = "--Insert video2 endpoint--"; /// <summary> /// Reference to the Inside-Out Sphere. /// </summary> public GameObject sphere; void Awake() { instance = this; } // Use this for initialization void Start() { Application.runInBackground = true; StartCoroutine(PlayVideo()); } private IEnumerator PlayVideo() { // create a new render texture to display the video videoStreamRenderTexture = new RenderTexture(2160, 1440, 32, RenderTextureFormat.ARGB32); videoStreamRenderTexture.Create(); // assign the render texture to the object material Material sphereMaterial = sphere.GetComponent<Renderer>().sharedMaterial; //create a VideoPlayer component videoPlayer = gameObject.AddComponent<VideoPlayer>(); // Set the video to loop. videoPlayer.isLooping = true; // Set the VideoPlayer component to play the video from the texture videoPlayer.renderMode = VideoRenderMode.RenderTexture; videoPlayer.targetTexture = videoStreamRenderTexture; // Add AudioSource audioSource = gameObject.AddComponent<AudioSource>(); // Pause Audio play on Awake audioSource.playOnAwake = true; audioSource.Pause(); // Set Audio Output to AudioSource videoPlayer.audioOutputMode = VideoAudioOutputMode.AudioSource; videoPlayer.source = VideoSource.Url; // Assign the Audio from Video to AudioSource to be played videoPlayer.EnableAudioTrack(0, true); videoPlayer.SetTargetAudioSource(0, audioSource); // Assign the video Url depending on the current scene switch (SceneManager.GetActiveScene().name) { case "VideoScene1": videoPlayer.url = video1endpoint; break; case "VideoScene2": videoPlayer.url = video2endpoint; break; default: break; } //Set video To Play then prepare Audio to prevent Buffering videoPlayer.Prepare(); while (!videoPlayer.isPrepared) { yield return null; } sphereMaterial.mainTexture = videoStreamRenderTexture; //Play Video videoPlayer.Play(); //Play Sound audioSource.Play(); while (videoPlayer.isPlaying) { yield return null; } } public void ChangeScene() { SceneManager.LoadScene(SceneManager.GetActiveScene().name == "VideoScene1" ? "VideoScene2" : "VideoScene1"); } } |
記述し終えたら、このスクリプトを[Main Camera]にD&Dします。[Main Camera]の[Inspector]を見ると、[Video Controller]が追加されているのがわかります。この[Sphere]に[InsideOutSphere]をD&D します。

・Gaze
このクラスには、ユーザーがビデオ切り替えのための物体を見たかどうかを識別するメソッドなどを記述します。
コードは以下の通りです。
|
1 2 3 4 5 6 7 8 9 10 11 12 13 14 15 16 17 18 19 20 21 22 23 24 25 26 27 28 29 30 31 32 33 34 35 36 37 38 39 40 41 42 43 44 45 46 47 48 49 50 51 52 53 54 55 56 57 58 59 60 61 62 63 64 65 66 67 68 69 70 71 72 73 74 75 76 77 78 79 80 81 82 83 84 85 86 87 |
using System.Collections; using System.Collections.Generic; using UnityEngine; public class GazeButton : MonoBehaviour { /// <summary> /// Provides Singleton-like behaviour to this class. /// </summary> public static GazeButton instance; /// <summary> /// Provides a reference to the object the user is currently looking at. /// </summary> public GameObject FocusedGameObject { get; private set; } /// <summary> /// Provides a reference to compare whether the user is still looking at /// the same object (and has not looked away). /// </summary> private GameObject oldFocusedObject = null; /// <summary> /// Max Ray Distance /// </summary> float gazeMaxDistance = 300; /// <summary> /// Provides whether an object has been successfully hit by the raycast. /// </summary> public bool Hit { get; private set; } private void Awake() { // Set this class to behave similar to singleton instance = this; } void Start() { FocusedGameObject = null; } void Update() { // Set the old focused gameobject. oldFocusedObject = FocusedGameObject; RaycastHit hitInfo; // Initialise Raycasting. Hit = Physics.Raycast(Camera.main.transform.position, Camera.main.transform.forward, out hitInfo, gazeMaxDistance); // Check whether raycast has hit. if (Hit == true) { // Check whether the hit has a collider. if (hitInfo.collider != null) { // Set the focused object with what the user just looked at. FocusedGameObject = hitInfo.collider.gameObject; } else { // Object looked on is not valid, set focused gameobject to null. FocusedGameObject = null; } } else { // No object looked upon, set focused gameobject to null. FocusedGameObject = null; } // Check whether the previous focused object is this same // object (so to stop spamming of function). if (FocusedGameObject != oldFocusedObject) { // Compare whether the new Focused Object has the desired tag we set previously. if (FocusedGameObject.CompareTag("GazeButton")) { FocusedGameObject.SetActive(false); VideoController.instance.ChangeScene(); } } } } |
このクラスも同様に[Main Camera]にD&Dします。
4.Sceneの追加
二つのビデオを切り替えたいので二つのシーンを用意します。以下の手順に従ってシーンを作っていきたいと思います。
1. シーンをまとめるフォルダーの作成、一つ目のシーンの保存
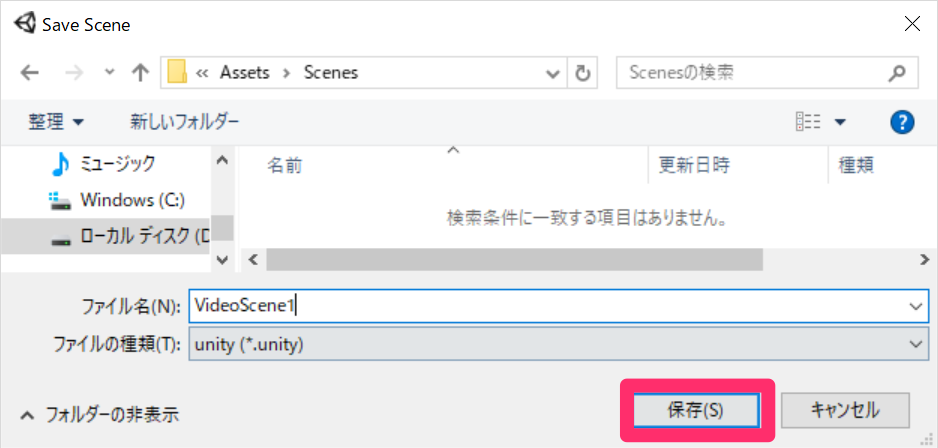
[File]->[Save Scene as..]でフォルダが開くので、[新しいフォルダー]をクリックし、名前をScenesとします。このScenesフォルダーの中に、VideoScene1として[保存]します。
2. 二つ目のシーンの作成。
Unityに戻り先ほどつくった[Scenes]を開き、[VideoScene1]をクリックし、ctrl + Dで複製します。名前はVideoScene2です。
3. 二つのシーンを追加する
[File]->[Build Settings..]に入り、先ほど作った二つのシーンを[Scenes In Build]にD&Dします。
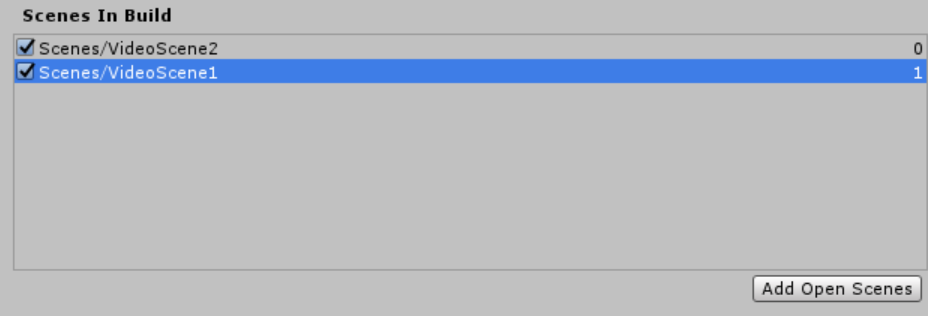
このままでは二つとも同じシーンなのでVideoScene2の方を編集していきたいと思います。
4.GazeButtonを変える。
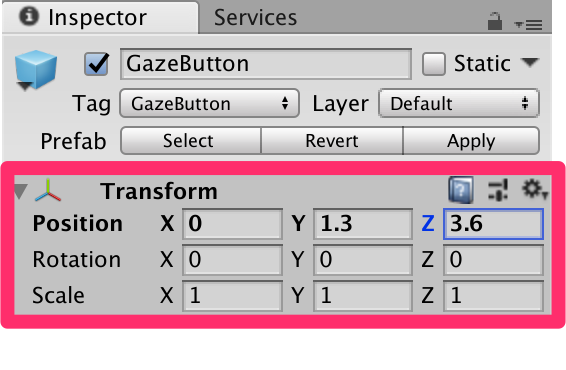
[Hierarchy]->[InsideOutSphere]->[GazeButtom]の[Inspector]を編集していきます。
a. [Transform]
—————————————
Position | X:0 | Y:1.3 | Z:3.6
—————————————
Rotation | 全て0
—————————————
Scale | 全て1
—————————————
b. [Mesh Filter]
[Mesh]をCubeに変更します。

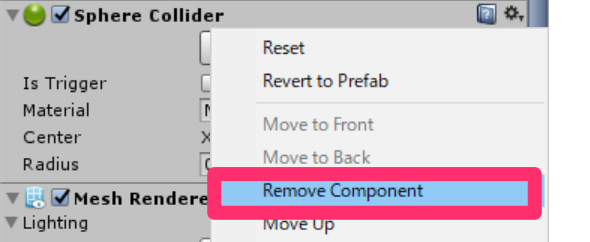
c. [Sphere Collider]の削除、[Box Collider]の追加
[Sphere Collider]の横の歯車をクリックし、[Remove Component]をクリックします。
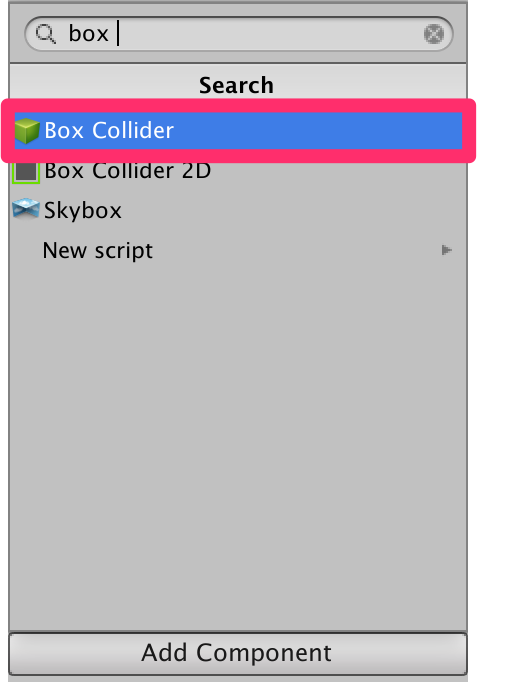
d.[Add Component]から[Box Collider]を追加します。
e. Material
[Project]->[Materials]から[ButtonMaterial]を複製します。 複製したMaterialの[Inspector]から[Albedo]を青にします。
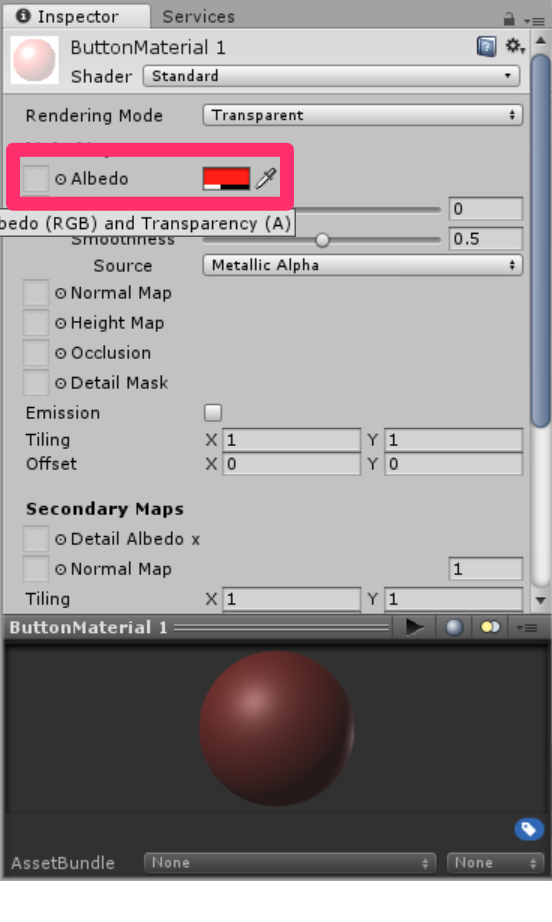
これでシーンを切り替えるためのボタンが異なるものになりました。
5.ビルド
[File]->[Build Settings..]->[Build]の順に選択します。新しいフォルダー(BUILDS)を作成し、その中にさらにフォルダー(VideoStreaming_Build)を作ります。このフォルダーを選択し、保存します。
この後の手順についてはこちらを参照してください。
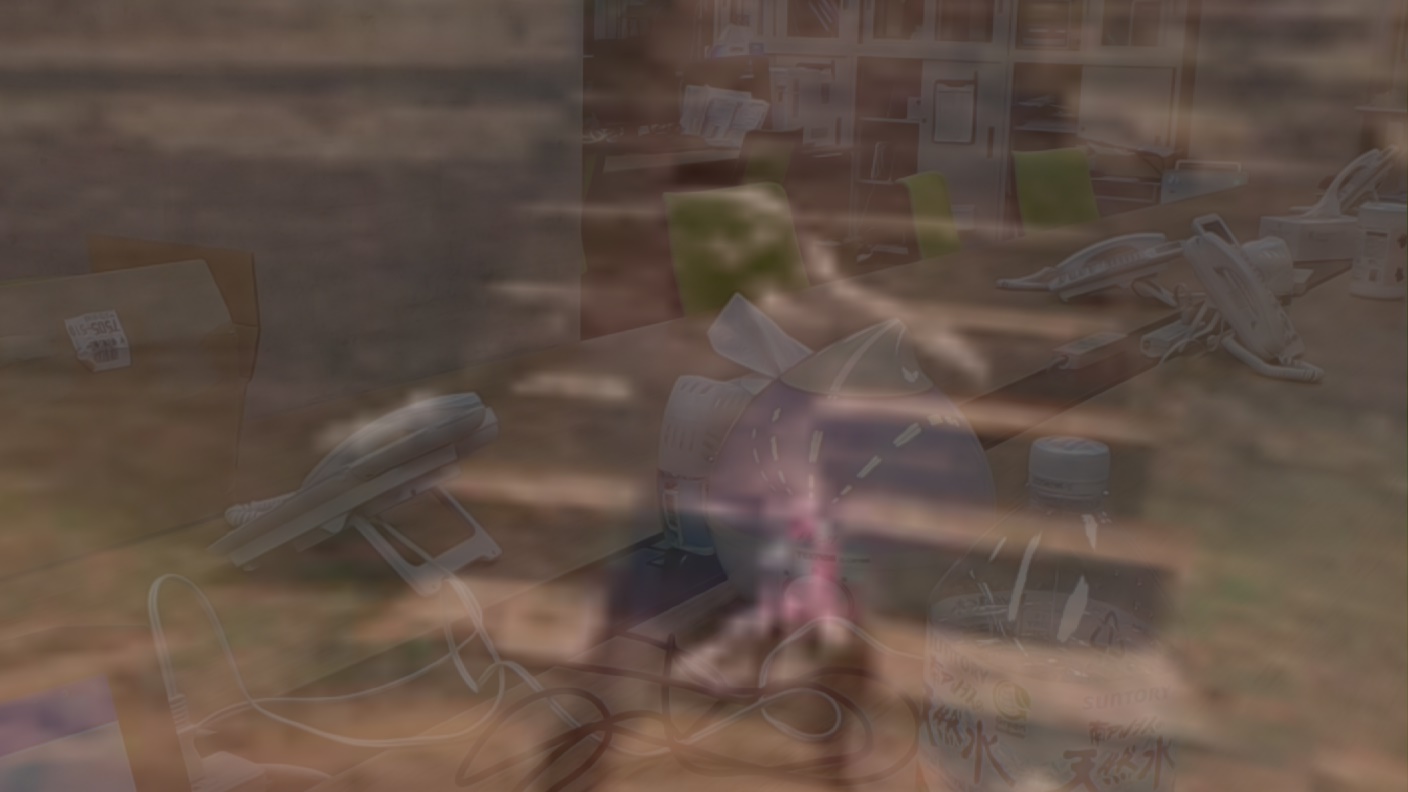
HoloLensで実行した時の様子です。見づらいですが以下のようになればオッケーです。GazeButtonを探して見てください。シーンが切り替わるはずです。
以上となります。 お疲れ様でした。
