こんにちは、ナレコム菅井です。
今回はMR and Azure 310のアプリを作っていきます。
開発環境は以下の通りです。
・Windows
・Unity 2017.4.11f1
・Visual Studio 2017
・HoloLens
0.準備
まずはじめに、画像を学習させます。
1. Custom Vision Serviceにログインします。
[はじめる]をクリックします。
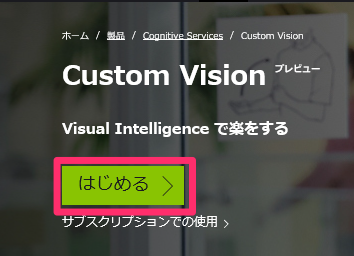
[SIGN IN]をクリックします。

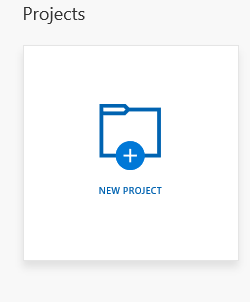
2. 新しいプロジェクトを作ります。[NEW PROJECT]をクリックします。
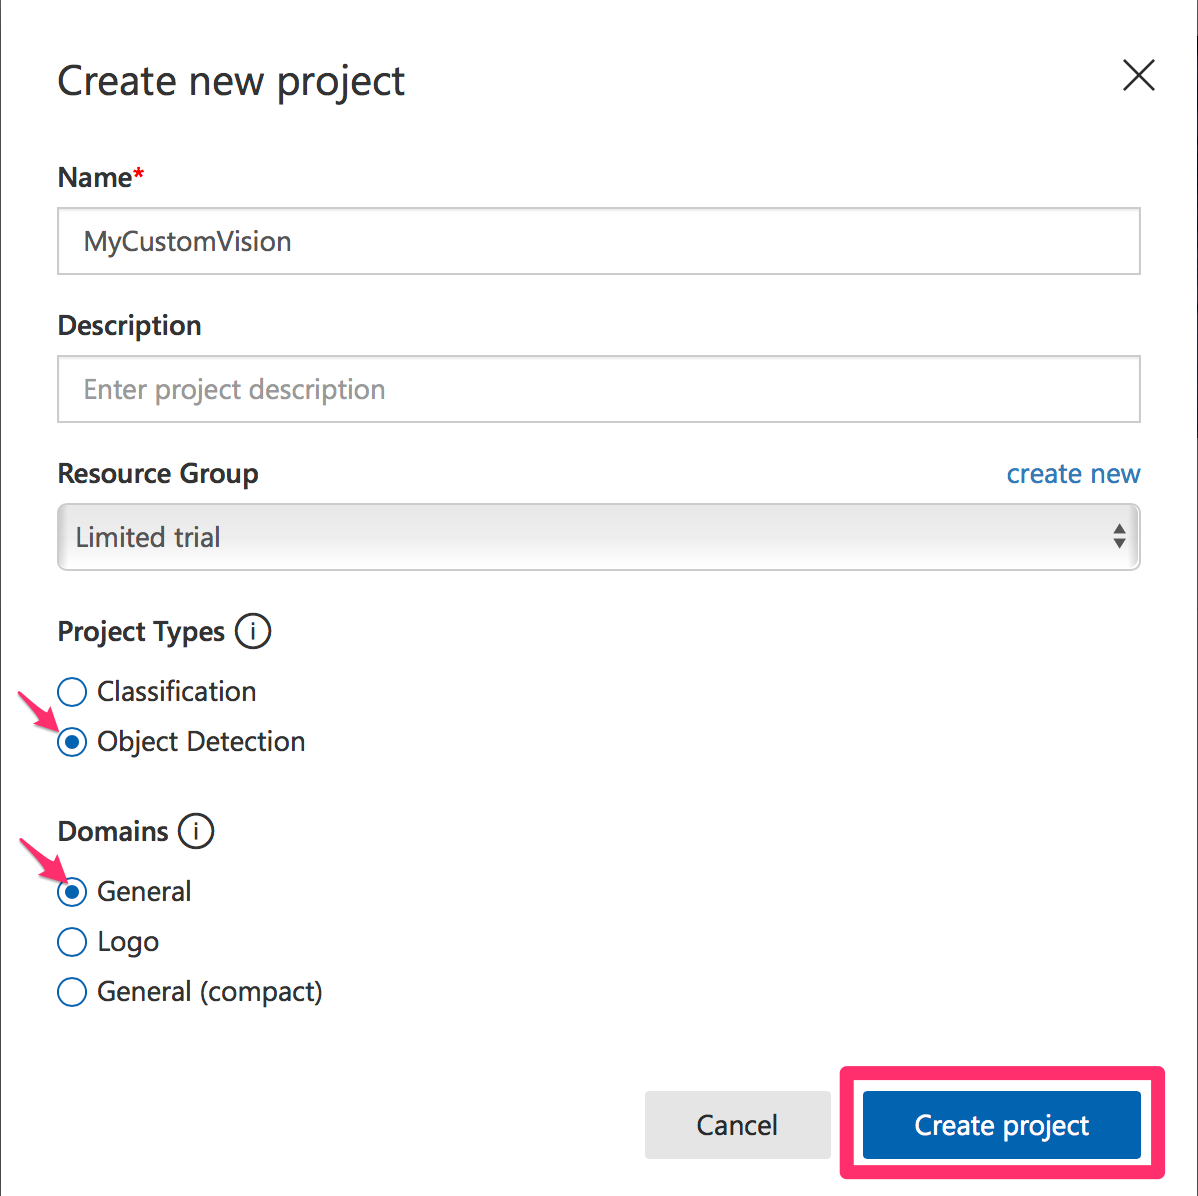
3. 新しいプロジェクトに関する情報を入力していきます。今回はObject Detectionなので、[Object Detection]を選択し、[Create project]をクリックします。
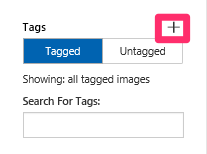
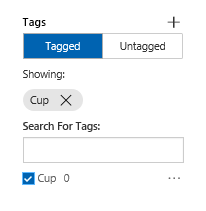
4. 学習させるため、新しいタグを作ります。今回はカップを学習させるためタグの名前をCupとし[保存]します。保存し終わった後、新しくタグが追加されているのがわかります。
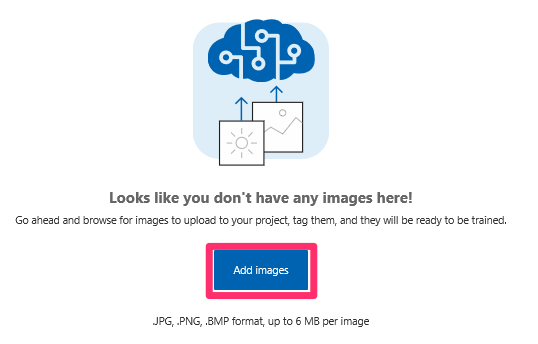
5. 画像をアップしていきます。[Add images]をクリックします。カップの画像15枚以上を学習させます。
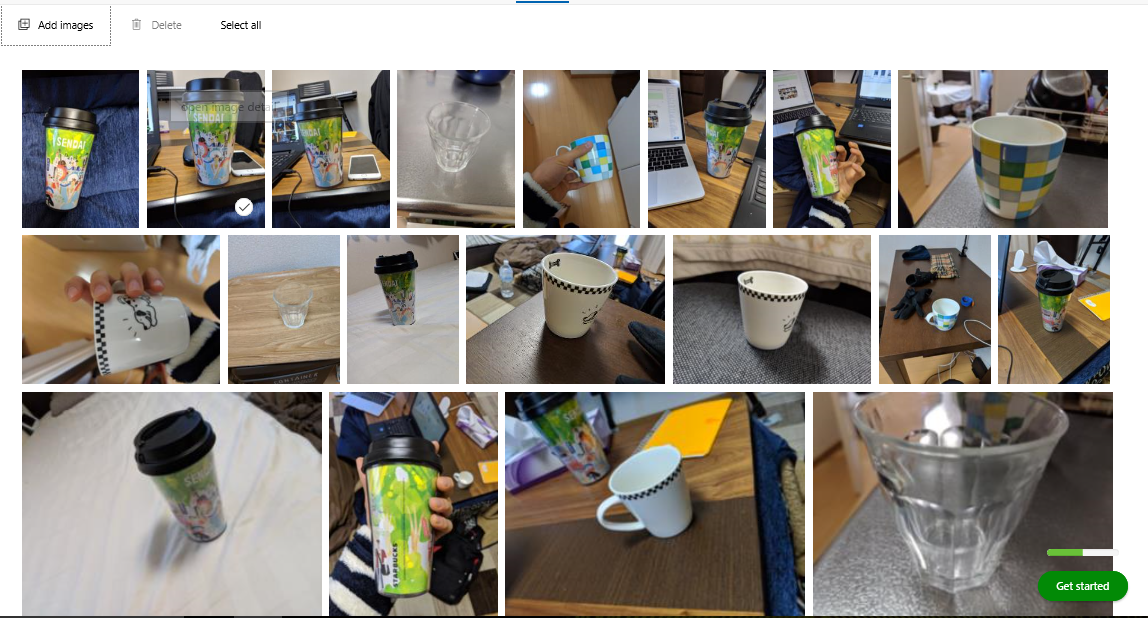
6. アップした画像にタグをつけていきます。画像の上でクリックするとタグがつけられます。全ての画像に関してタグ付けを行っていきます。
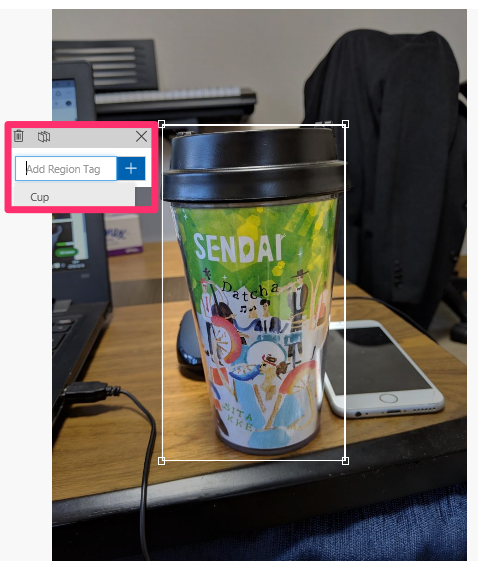
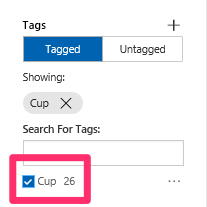
タグ付けされたカップが26枚となりました。
7. 全ての画像にタグをつけ終わったら、[Train]をクリックします。
![]()
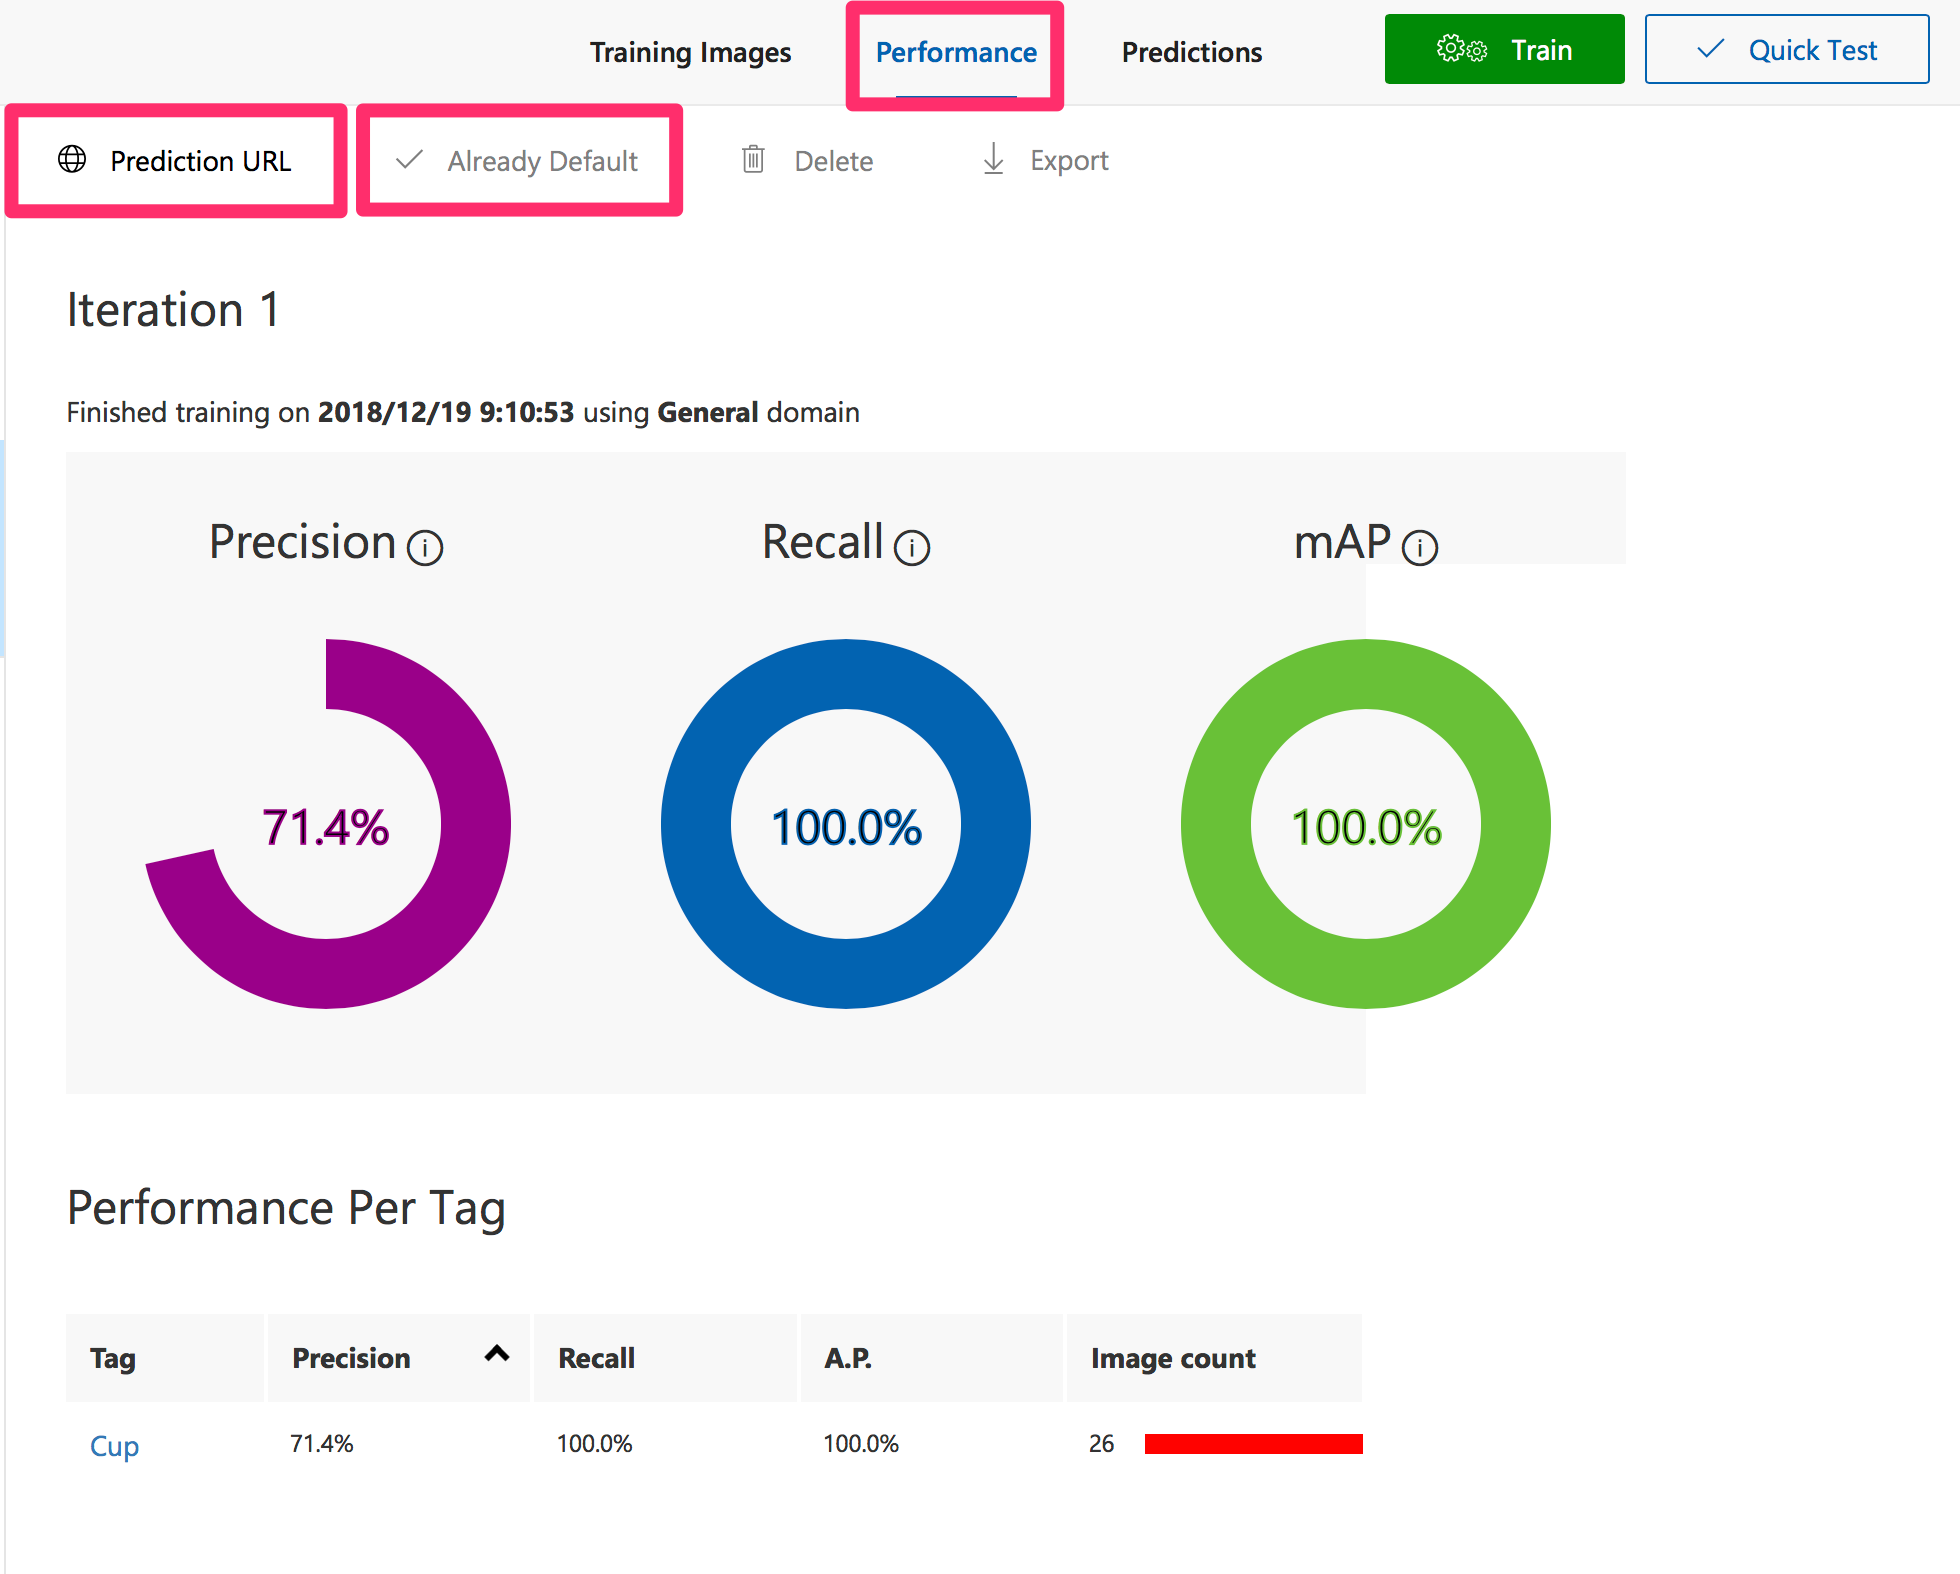
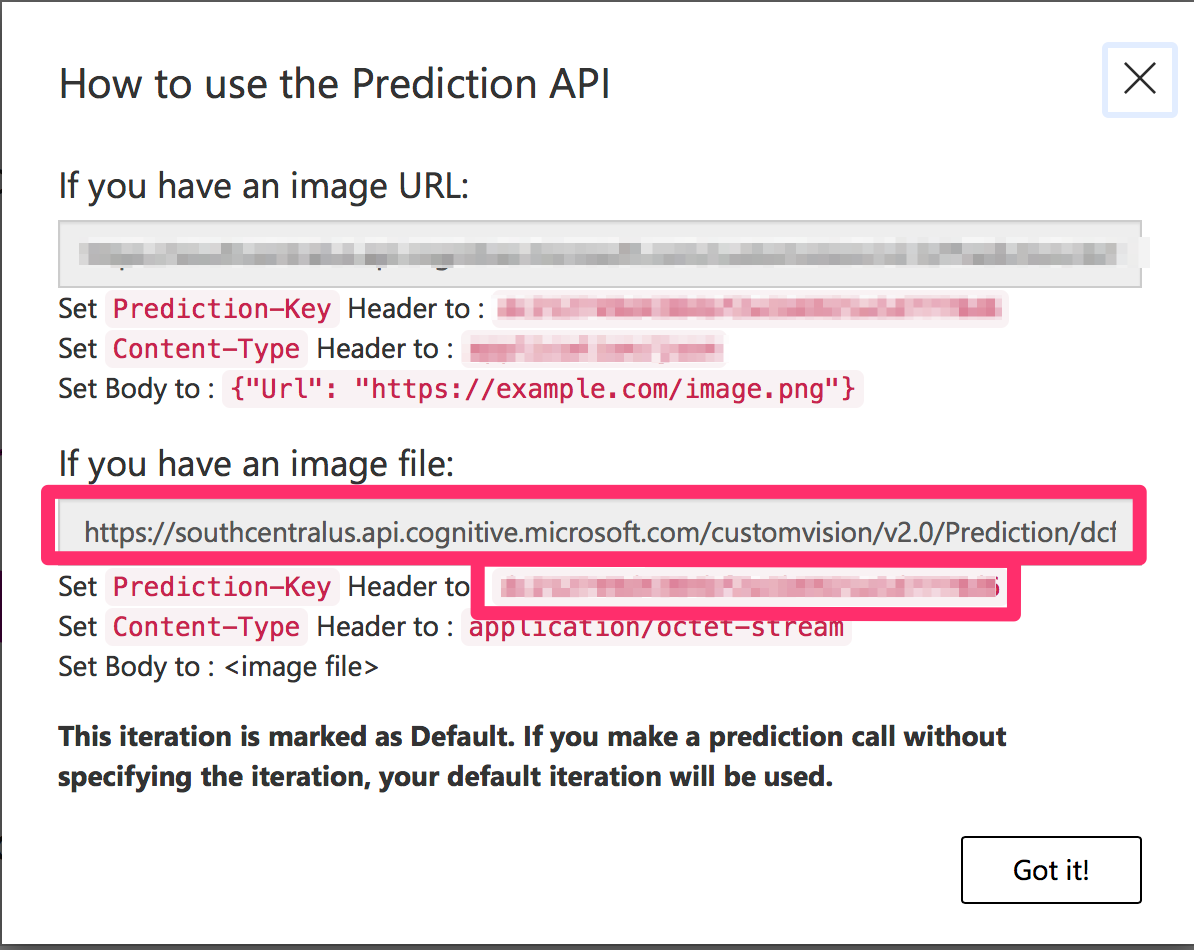
8. Trainが終了したら、[Performance]を開きます。[Make default]をクリックした後、[Prediction URL]を開きます。Prediction URLとPrediction Keyがあるのがわかります。これは後ほど使うのでメモしておきます。
1.Unityの設定
続いてUnityの設定を行っていきたいと思います。以下の手順で進めていきましょう。
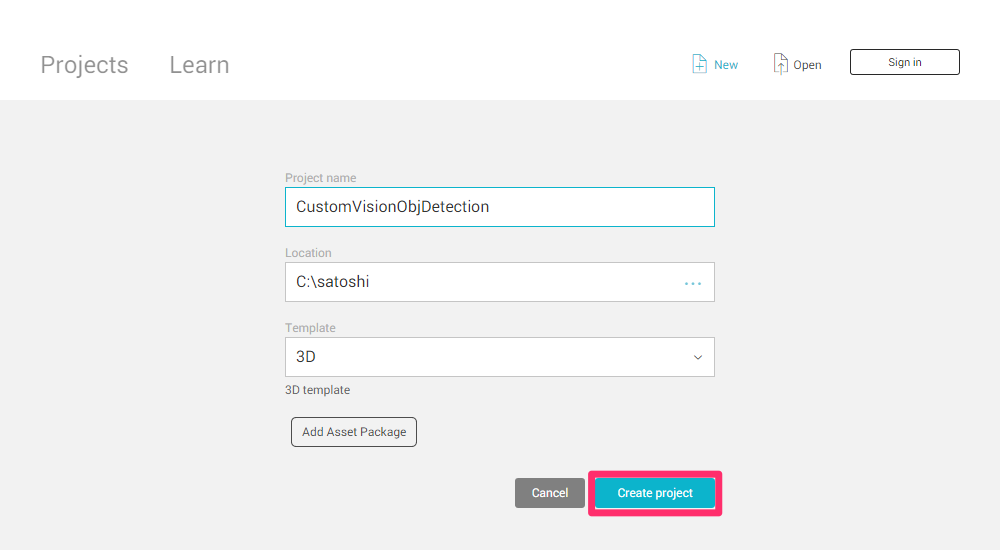
1.Unityを開き、[New]から新しいプロジェクトをつくる。
名前をCustomVisionObjDetectionとして、[Create project]をクリックします。
2. [Build Settings..]からさまざまな項目を編集していく。
[File]->[Build Settings..]を開きます。
a.プラットフォームの変更
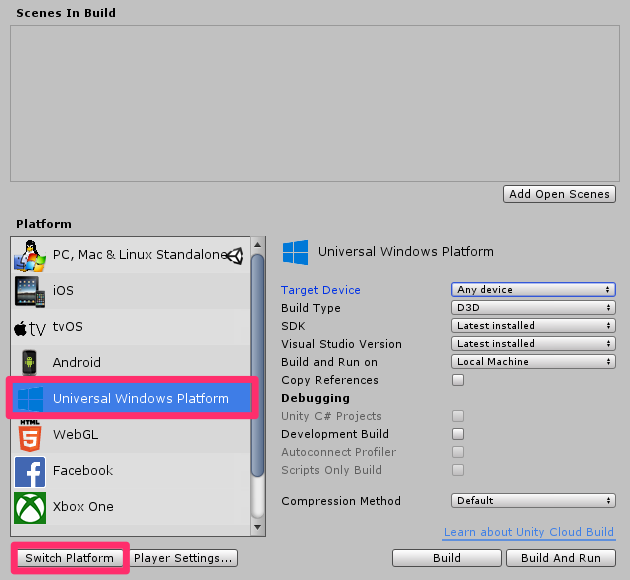
[PC, Mac & Linux Standalone]を[Universal Windows Platform]に変更し、[Switch Platform]をクリックします
b.[Player Settings..]を編集する
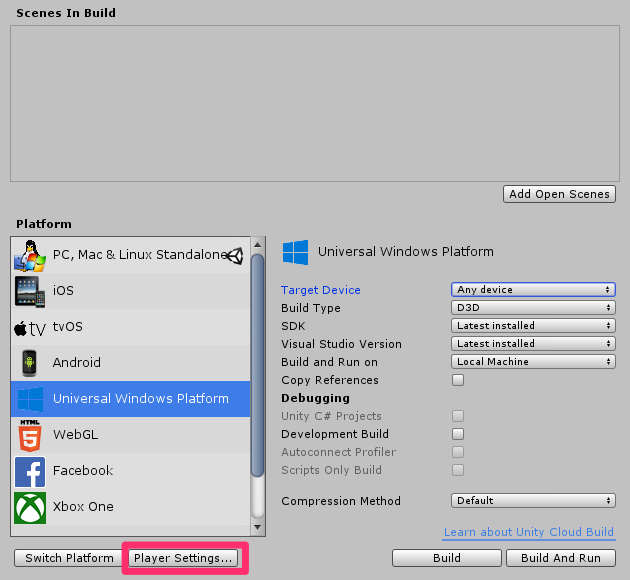
[Player Settings..]をクリックします。
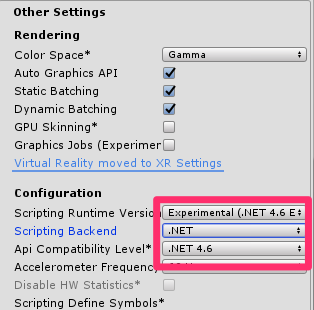
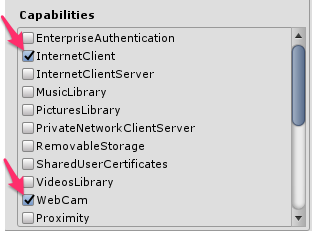
そのあと[Other Settings]、[Publishing Settings]->[Capabilities]、[XR Settings]を以下のように設定してきます。
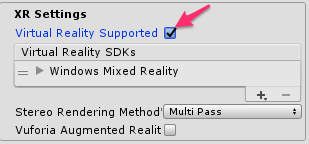
続いて、[Unity C#]にチェックを入れます。
![]()
[Build Settings..]の変更は以上です。
4. Azure-MR-310 packageパッケージのインポート。
まず、Azure-MR-310.packageをダウンロードします。[Assets]->[Import Package]->[Custom Package]をクリックします。ダウンロードしたAzure-MR-310 packageをフォルダの中から探し選択し、[Import]をクリックします。このパッケージの中に、必要なシーンなどが揃っています。
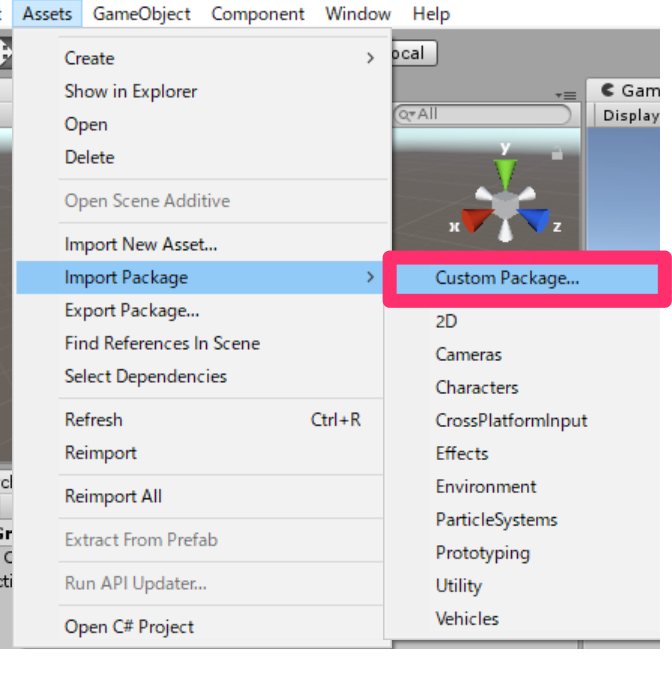
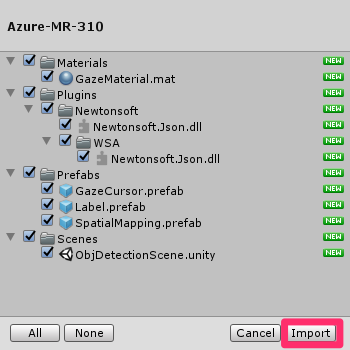
Importが終わったら、シーンをObjDetectionSceneに切り替えます。
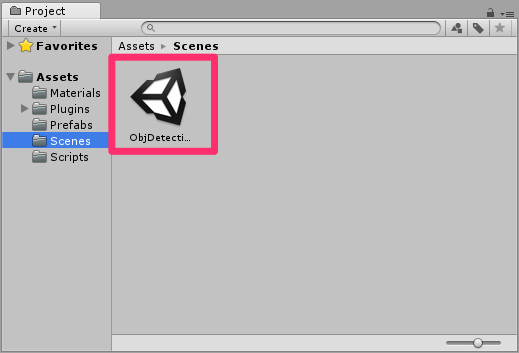
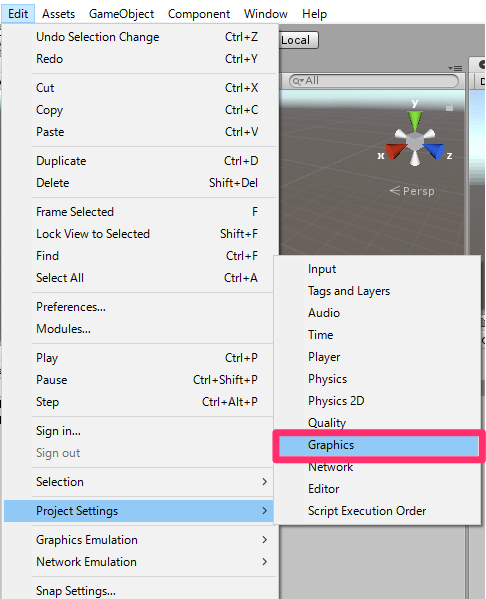
5. [Edit]->[Project Settings]->[Graphics]の[Inspector]を編集していきます。
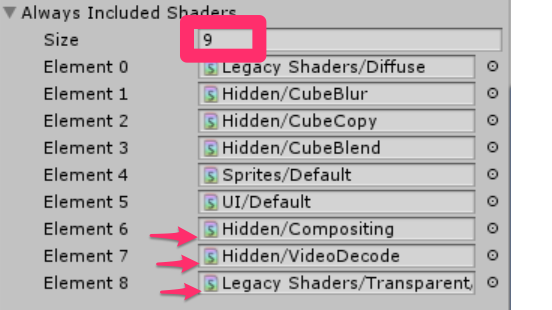
デフォルトでは[Size]が6になっているかと思うので9に変更します。
2.スクリプトの作成
ここでは以下の6つのスクリプトを作っていきたいと思います。
・CustomVisionAnalyser
・CustomVisionObjects
・SpatialMapping
・GazeCursor
・SceneOrganiser
・ImageCapture
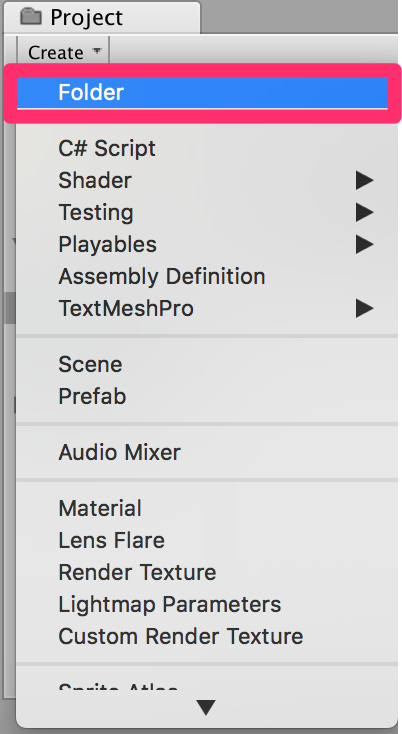
まず、すべてのスクリプトをまとめておくフォルダーを作成します。[Project]->[Create]をクリックし、[Folder]を選択して新しいフォルダーを作ります。名前をScriptsとします。続いて[Project]->[Create]->[C# Script]をクリックし、クラス名をつけていきます。
・CustomVisionAnalyser
このクラスは、撮影された最新の画像の情報をAzure Custom Visionに送信し、その結果を受信して他クラスに渡す役割を担います。コードは以下の通りです。ここで0.準備で取得したPrediction URLとPrediction Keyを使いますので–Insert yourからはじめる文に適切に入れていきます。
|
1 2 3 4 5 6 7 8 9 10 11 12 13 14 15 16 17 18 19 20 21 22 23 24 25 26 27 28 29 30 31 32 33 34 35 36 37 38 39 40 41 42 43 44 45 46 47 48 49 50 51 52 53 54 55 56 57 58 59 60 61 62 63 64 65 66 67 68 69 70 71 72 73 74 75 76 77 78 79 80 81 82 83 84 85 86 87 88 89 90 91 92 93 94 95 96 97 98 |
using System.Collections; using System.Collections.Generic; using UnityEngine; using Newtonsoft.Json; using System.Collections; using System.IO; using UnityEngine; using UnityEngine.Networking; public class CustomVisionAnalyser : MonoBehaviour { /// <summary> /// Unique instance of this class /// </summary> public static CustomVisionAnalyser Instance; /// <summary> /// Insert your prediction key here /// </summary> private string predictionKey = "--Insert your Prediction Key--"; /// <summary> /// Insert your prediction endpoint here /// </summary> private string predictionEndpoint = "--Insert your Prediction URL--"; /// <summary> /// Bite array of the image to submit for analysis /// </summary> [HideInInspector] public byte[] imageBytes; /// <summary> /// Initializes this class /// </summary> private void Awake() { // Allows this instance to behave like a singleton Instance = this; } /// <summary> /// Call the Computer Vision Service to submit the image. /// </summary> public IEnumerator AnalyseLastImageCaptured(string imagePath) { Debug.Log("Analyzing..."); WWWForm webForm = new WWWForm(); using (UnityWebRequest unityWebRequest = UnityWebRequest.Post(predictionEndpoint, webForm)) { // Gets a byte array out of the saved image imageBytes = GetImageAsByteArray(imagePath); unityWebRequest.SetRequestHeader("Content-Type", "application/octet-stream"); unityWebRequest.SetRequestHeader("Prediction-Key", predictionKey); // The upload handler will help uploading the byte array with the request unityWebRequest.uploadHandler = new UploadHandlerRaw(imageBytes); unityWebRequest.uploadHandler.contentType = "application/octet-stream"; // The download handler will help receiving the analysis from Azure unityWebRequest.downloadHandler = new DownloadHandlerBuffer(); // Send the request yield return unityWebRequest.SendWebRequest(); string jsonResponse = unityWebRequest.downloadHandler.text; Debug.Log("response: " + jsonResponse); // Create a texture. Texture size does not matter, since // LoadImage will replace with the incoming image size. Texture2D tex = new Texture2D(1, 1); tex.LoadImage(imageBytes); SceneOrganiser.Instance.quadRenderer.material.SetTexture("_MainTex", tex); // The response will be in JSON format, therefore it needs to be deserialized AnalysisRootObject analysisRootObject = new AnalysisRootObject(); analysisRootObject = JsonConvert.DeserializeObject<AnalysisRootObject>(jsonResponse); SceneOrganiser.Instance.FinaliseLabel(analysisRootObject); } } /// <summary> /// Returns the contents of the specified image file as a byte array. /// </summary> static byte[] GetImageAsByteArray(string imageFilePath) { FileStream fileStream = new FileStream(imageFilePath, FileMode.Open, FileAccess.Read); BinaryReader binaryReader = new BinaryReader(fileStream); return binaryReader.ReadBytes((int)fileStream.Length); } } |
・CustomVisionObjects
このスクリプトは、他のクラスがAzure Custom Visionとのやりとりの際にシリアライズ化やデシリアライズ化するためのクラスをひとまとめにしたものです。コードは以下の通りです。
|
1 2 3 4 5 6 7 8 9 10 11 12 13 14 15 16 17 18 19 20 21 22 23 24 25 26 27 28 29 30 31 32 33 34 35 36 37 38 39 40 41 42 43 44 45 46 47 48 49 50 51 52 53 54 55 56 57 58 59 60 61 62 63 64 65 66 67 68 69 70 71 72 73 74 75 76 77 78 79 80 81 82 83 84 85 86 87 88 89 90 91 92 93 94 95 96 97 98 99 100 101 102 103 104 105 106 107 108 109 110 111 112 113 114 115 116 117 118 119 120 121 122 123 124 125 126 127 128 129 130 131 132 133 134 135 |
using System.Collections; using System.Collections.Generic; using UnityEngine; using System; using UnityEngine.Networking; public class CustomVisionObjects : MonoBehaviour { } // The objects contained in this script represent the deserialized version // of the objects used by this application /// <summary> /// Web request object for image data /// </summary> class MultipartObject : IMultipartFormSection { public string sectionName { get; set; } public byte[] sectionData { get; set; } public string fileName { get; set; } public string contentType { get; set; } } /// <summary> /// JSON of all Tags existing within the project /// contains the list of Tags /// </summary> public class Tags_RootObject { public List<TagOfProject> Tags { get; set; } public int TotalTaggedImages { get; set; } public int TotalUntaggedImages { get; set; } } public class TagOfProject { public string Id { get; set; } public string Name { get; set; } public string Description { get; set; } public int ImageCount { get; set; } } /// <summary> /// JSON of Tag to associate to an image /// Contains a list of hosting the tags, /// since multiple tags can be associated with one image /// </summary> public class Tag_RootObject { public List<Tag> Tags { get; set; } } public class Tag { public string ImageId { get; set; } public string TagId { get; set; } } /// <summary> /// JSON of images submitted /// Contains objects that host detailed information about one or more images /// </summary> public class ImageRootObject { public bool IsBatchSuccessful { get; set; } public List<SubmittedImage> Images { get; set; } } public class SubmittedImage { public string SourceUrl { get; set; } public string Status { get; set; } public ImageObject Image { get; set; } } public class ImageObject { public string Id { get; set; } public DateTime Created { get; set; } public int Width { get; set; } public int Height { get; set; } public string ImageUri { get; set; } public string ThumbnailUri { get; set; } } /// <summary> /// JSON of Service Iteration /// </summary> public class Iteration { public string Id { get; set; } public string Name { get; set; } public bool IsDefault { get; set; } public string Status { get; set; } public string Created { get; set; } public string LastModified { get; set; } public string TrainedAt { get; set; } public string ProjectId { get; set; } public bool Exportable { get; set; } public string DomainId { get; set; } } /// <summary> /// Predictions received by the Service /// after submitting an image for analysis /// Includes Bounding Box /// </summary> public class AnalysisRootObject { public string id { get; set; } public string project { get; set; } public string iteration { get; set; } public DateTime created { get; set; } public List<Prediction> predictions { get; set; } } public class BoundingBox { public double left { get; set; } public double top { get; set; } public double width { get; set; } public double height { get; set; } } public class Prediction { public double probability { get; set; } public string tagId { get; set; } public string tagName { get; set; } public BoundingBox boundingBox { get; set; } } |
・SpatialMapping
このクラスはカーソルとなるキューブと現実世界の衝突を検知し、キューブの大きさを適切に保つためのスクリプトです。コードは以下の通りです。
|
1 2 3 4 5 6 7 8 9 10 11 12 13 14 15 16 17 18 19 20 21 22 23 24 25 26 27 28 29 30 31 32 33 34 35 36 37 38 39 40 41 42 43 44 45 46 47 48 49 50 51 52 53 54 55 |
using System.Collections; using System.Collections.Generic; using UnityEngine; using UnityEngine.XR.WSA; public class SpatialMapping : MonoBehaviour { /// <summary> /// Allows this class to behave like a singleton /// </summary> public static SpatialMapping Instance; /// <summary> /// Used by the GazeCursor as a property with the Raycast call /// </summary> internal static int PhysicsRaycastMask; /// <summary> /// The layer to use for spatial mapping collisions /// </summary> internal int physicsLayer = 31; /// <summary> /// Creates environment colliders to work with physics /// </summary> private SpatialMappingCollider spatialMappingCollider; /// <summary> /// Initializes this class /// </summary> private void Awake() { // Allows this instance to behave like a singleton Instance = this; } /// <summary> /// Runs at initialization right after Awake method /// </summary> void Start() { // Initialize and configure the collider spatialMappingCollider = gameObject.GetComponent<SpatialMappingCollider>(); spatialMappingCollider.surfaceParent = this.gameObject; spatialMappingCollider.freezeUpdates = false; spatialMappingCollider.layer = physicsLayer; // define the mask PhysicsRaycastMask = 1 << physicsLayer; // set the object as active one gameObject.SetActive(true); } } |
・GazeCursor
このクラスはカーソルが現実世界で適切な場所にあるように調整するクラスです。コードは以下の通りです。
|
1 2 3 4 5 6 7 8 9 10 11 12 13 14 15 16 17 18 19 20 21 22 23 24 25 26 27 28 29 30 31 32 33 34 35 36 37 38 39 40 41 42 43 44 45 46 47 48 49 50 51 52 53 |
using System.Collections; using System.Collections.Generic; using UnityEngine; public class GazeCursor : MonoBehaviour { /// <summary> /// The cursor (this object) mesh renderer /// </summary> private MeshRenderer meshRenderer; /// <summary> /// Runs at initialization right after the Awake method /// </summary> void Start() { // Grab the mesh renderer that is on the same object as this script. meshRenderer = gameObject.GetComponent<MeshRenderer>(); // Set the cursor reference SceneOrganiser.Instance.cursor = gameObject; gameObject.GetComponent<Renderer>().material.color = Color.green; // If you wish to change the size of the cursor you can do so here gameObject.transform.localScale = new Vector3(0.01f, 0.01f, 0.01f); } /// <summary> /// Update is called once per frame /// </summary> void Update() { // Do a raycast into the world based on the user's head position and orientation. Vector3 headPosition = Camera.main.transform.position; Vector3 gazeDirection = Camera.main.transform.forward; RaycastHit gazeHitInfo; if (Physics.Raycast(headPosition, gazeDirection, out gazeHitInfo, 30.0f, SpatialMapping.PhysicsRaycastMask)) { // If the raycast hit a hologram, display the cursor mesh. meshRenderer.enabled = true; // Move the cursor to the point where the raycast hit. transform.position = gazeHitInfo.point; // Rotate the cursor to hug the surface of the hologram. transform.rotation = Quaternion.FromToRotation(Vector3.up, gazeHitInfo.normal); } else { // If the raycast did not hit a hologram, hide the cursor mesh. meshRenderer.enabled = false; } } } |
・SceneOrganiser
このクラスは、オブジェクトをメインカメラ内に適切に配置したり、Azure Custom Visionからの結果に合わせて適切にラベルを表示したりするためのクラスです。コードは以下の通りです。
|
1 2 3 4 5 6 7 8 9 10 11 12 13 14 15 16 17 18 19 20 21 22 23 24 25 26 27 28 29 30 31 32 33 34 35 36 37 38 39 40 41 42 43 44 45 46 47 48 49 50 51 52 53 54 55 56 57 58 59 60 61 62 63 64 65 66 67 68 69 70 71 72 73 74 75 76 77 78 79 80 81 82 83 84 85 86 87 88 89 90 91 92 93 94 95 96 97 98 99 100 101 102 103 104 105 106 107 108 109 110 111 112 113 114 115 116 117 118 119 120 121 122 123 124 125 126 127 128 129 130 131 132 133 134 135 136 137 138 139 140 141 142 143 144 145 146 147 148 149 150 151 152 153 154 155 156 157 158 159 160 161 162 163 164 165 166 167 168 |
using System.Collections; using System.Collections.Generic; using UnityEngine; using System.Linq; public class SceneOrganiser : MonoBehaviour { /// <summary> /// Allows this class to behave like a singleton /// </summary> public static SceneOrganiser Instance; /// <summary> /// The cursor object attached to the Main Camera /// </summary> internal GameObject cursor; /// <summary> /// The label used to display the analysis on the objects in the real world /// </summary> public GameObject label; /// <summary> /// Reference to the last Label positioned /// </summary> internal Transform lastLabelPlaced; /// <summary> /// Reference to the last Label positioned /// </summary> internal TextMesh lastLabelPlacedText; /// <summary> /// Current threshold accepted for displaying the label /// Reduce this value to display the recognition more often /// </summary> internal float probabilityThreshold = 0.8f; /// <summary> /// The quad object hosting the imposed image captured /// </summary> private GameObject quad; /// <summary> /// Renderer of the quad object /// </summary> internal Renderer quadRenderer; /// <summary> /// Called on initialization /// </summary> private void Awake() { // Use this class instance as singleton Instance = this; // Add the ImageCapture class to this Gameobject gameObject.AddComponent<ImageCapture>(); // Add the CustomVisionAnalyser class to this Gameobject gameObject.AddComponent<CustomVisionAnalyser>(); // Add the CustomVisionObjects class to this Gameobject gameObject.AddComponent<CustomVisionObjects>(); } /// <summary> /// Instantiate a Label in the appropriate location relative to the Main Camera. /// </summary> public void PlaceAnalysisLabel() { lastLabelPlaced = Instantiate(label.transform, cursor.transform.position, transform.rotation); lastLabelPlacedText = lastLabelPlaced.GetComponent<TextMesh>(); lastLabelPlacedText.text = ""; lastLabelPlaced.transform.localScale = new Vector3(0.005f, 0.005f, 0.005f); // Create a GameObject to which the texture can be applied quad = GameObject.CreatePrimitive(PrimitiveType.Quad); quadRenderer = quad.GetComponent<Renderer>() as Renderer; Material m = new Material(Shader.Find("Legacy Shaders/Transparent/Diffuse")); quadRenderer.material = m; // Here you can set the transparency of the quad. Useful for debugging float transparency = 0f; quadRenderer.material.color = new Color(1, 1, 1, transparency); // Set the position and scale of the quad depending on user position quad.transform.parent = transform; quad.transform.rotation = transform.rotation; // The quad is positioned slightly forward in font of the user quad.transform.localPosition = new Vector3(0.0f, 0.0f, 3.0f); // The quad scale as been set with the following value following experimentation, // to allow the image on the quad to be as precisely imposed to the real world as possible quad.transform.localScale = new Vector3(3f, 1.65f, 1f); quad.transform.parent = null; } /// <summary> /// Set the Tags as Text of the last label created. /// </summary> public void FinaliseLabel(AnalysisRootObject analysisObject) { if (analysisObject.predictions != null) { lastLabelPlacedText = lastLabelPlaced.GetComponent<TextMesh>(); // Sort the predictions to locate the highest one List<Prediction> sortedPredictions = new List<Prediction>(); sortedPredictions = analysisObject.predictions.OrderBy(p => p.probability).ToList(); Prediction bestPrediction = new Prediction(); bestPrediction = sortedPredictions[sortedPredictions.Count - 1]; if (bestPrediction.probability > probabilityThreshold) { quadRenderer = quad.GetComponent<Renderer>() as Renderer; Bounds quadBounds = quadRenderer.bounds; // Position the label as close as possible to the Bounding Box of the prediction // At this point it will not consider depth lastLabelPlaced.transform.parent = quad.transform; lastLabelPlaced.transform.localPosition = CalculateBoundingBoxPosition(quadBounds, bestPrediction.boundingBox); // Set the tag text lastLabelPlacedText.text = bestPrediction.tagName; // Cast a ray from the user's head to the currently placed label, it should hit the object detected by the Service. // At that point it will reposition the label where the ray HL sensor collides with the object, // (using the HL spatial tracking) Debug.Log("Repositioning Label"); Vector3 headPosition = Camera.main.transform.position; RaycastHit objHitInfo; Vector3 objDirection = lastLabelPlaced.position; if (Physics.Raycast(headPosition, objDirection, out objHitInfo, 30.0f, SpatialMapping.PhysicsRaycastMask)) { lastLabelPlaced.position = objHitInfo.point; } } } // Reset the color of the cursor cursor.GetComponent<Renderer>().material.color = Color.green; // Stop the analysis process ImageCapture.Instance.ResetImageCapture(); } /// <summary> /// This method hosts a series of calculations to determine the position /// of the Bounding Box on the quad created in the real world /// by using the Bounding Box received back alongside the Best Prediction /// </summary> public Vector3 CalculateBoundingBoxPosition(Bounds b, BoundingBox boundingBox) { Debug.Log($"BB: left {boundingBox.left}, top {boundingBox.top}, width {boundingBox.width}, height {boundingBox.height}"); double centerFromLeft = boundingBox.left + (boundingBox.width / 2); double centerFromTop = boundingBox.top + (boundingBox.height / 2); Debug.Log($"BB CenterFromLeft {centerFromLeft}, CenterFromTop {centerFromTop}"); double quadWidth = b.size.normalized.x; double quadHeight = b.size.normalized.y; Debug.Log($"Quad Width {b.size.normalized.x}, Quad Height {b.size.normalized.y}"); double normalisedPos_X = (quadWidth * centerFromLeft) - (quadWidth / 2); double normalisedPos_Y = (quadHeight * centerFromTop) - (quadHeight / 2); return new Vector3((float)normalisedPos_X, (float)normalisedPos_Y, 0); } } |
・ImageCapture
このクラスは、HoloLensで画像をキャプチャしたり、ユーザーのジェスチャーを処理したりするためのクラスです。
|
1 2 3 4 5 6 7 8 9 10 11 12 13 14 15 16 17 18 19 20 21 22 23 24 25 26 27 28 29 30 31 32 33 34 35 36 37 38 39 40 41 42 43 44 45 46 47 48 49 50 51 52 53 54 55 56 57 58 59 60 61 62 63 64 65 66 67 68 69 70 71 72 73 74 75 76 77 78 79 80 81 82 83 84 85 86 87 88 89 90 91 92 93 94 95 96 97 98 99 100 101 102 103 104 105 106 107 108 109 110 111 112 113 114 115 116 117 118 119 120 121 122 123 124 125 126 127 128 129 130 131 132 133 134 135 136 137 138 139 140 141 142 143 144 145 146 147 148 149 150 151 152 153 154 155 156 157 158 159 160 161 162 163 164 165 166 167 168 169 170 171 172 173 174 175 176 177 178 179 180 181 |
using System.Collections; using System.Collections.Generic; using UnityEngine; using System; using System.IO; using System.Linq; using UnityEngine.XR.WSA.Input; using UnityEngine.XR.WSA.WebCam; public class ImageCapture : MonoBehaviour { /// <summary> /// Allows this class to behave like a singleton /// </summary> public static ImageCapture Instance; /// <summary> /// Keep counts of the taps for image renaming /// </summary> private int captureCount = 0; /// <summary> /// Photo Capture object /// </summary> private PhotoCapture photoCaptureObject = null; /// <summary> /// Allows gestures recognition in HoloLens /// </summary> private GestureRecognizer recognizer; /// <summary> /// Flagging if the capture loop is running /// </summary> internal bool captureIsActive; /// <summary> /// File path of current analysed photo /// </summary> internal string filePath = string.Empty; /// <summary> /// Called on initialization /// </summary> private void Awake() { Instance = this; } /// <summary> /// Runs at initialization right after Awake method /// </summary> void Start() { // Clean up the LocalState folder of this application from all photos stored DirectoryInfo info = new DirectoryInfo(Application.persistentDataPath); var fileInfo = info.GetFiles(); foreach (var file in fileInfo) { try { file.Delete(); } catch (Exception) { Debug.LogFormat("Cannot delete file: ", file.Name); } } // Subscribing to the Microsoft HoloLens API gesture recognizer to track user gestures recognizer = new GestureRecognizer(); recognizer.SetRecognizableGestures(GestureSettings.Tap); recognizer.Tapped += TapHandler; recognizer.StartCapturingGestures(); } /// <summary> /// Respond to Tap Input. /// </summary> private void TapHandler(TappedEventArgs obj) { if (!captureIsActive) { captureIsActive = true; // Set the cursor color to red SceneOrganiser.Instance.cursor.GetComponent<Renderer>().material.color = Color.red; // Begin the capture loop Invoke("ExecuteImageCaptureAndAnalysis", 0); } } /// <summary> /// Begin process of image capturing and send to Azure Custom Vision Service. /// </summary> private void ExecuteImageCaptureAndAnalysis() { // Create a label in world space using the ResultsLabel class // Invisible at this point but correctly positioned where the image was taken SceneOrganiser.Instance.PlaceAnalysisLabel(); // Set the camera resolution to be the highest possible Resolution cameraResolution = PhotoCapture.SupportedResolutions.OrderByDescending ((res) => res.width * res.height).First(); Texture2D targetTexture = new Texture2D(cameraResolution.width, cameraResolution.height); // Begin capture process, set the image format PhotoCapture.CreateAsync(true, delegate (PhotoCapture captureObject) { photoCaptureObject = captureObject; Debug.Log("start capture"); CameraParameters camParameters = new CameraParameters { hologramOpacity = 1.0f, cameraResolutionWidth = targetTexture.width, cameraResolutionHeight = targetTexture.height, pixelFormat = CapturePixelFormat.BGRA32 }; // Capture the image from the camera and save it in the App internal folder captureObject.StartPhotoModeAsync(camParameters, delegate (PhotoCapture.PhotoCaptureResult result) { string filename = string.Format(@"CapturedImage{0}.jpg", captureCount); filePath = Path.Combine(Application.persistentDataPath, filename); captureCount++; photoCaptureObject.TakePhotoAsync(filePath, PhotoCaptureFileOutputFormat.JPG, OnCapturedPhotoToDisk); }); }); } /// <summary> /// Register the full execution of the Photo Capture. /// </summary> void OnCapturedPhotoToDisk(PhotoCapture.PhotoCaptureResult result) { try { // Call StopPhotoMode once the image has successfully captured photoCaptureObject.StopPhotoModeAsync(OnStoppedPhotoMode); } catch (Exception e) { Debug.LogFormat("Exception capturing photo to disk: {0}", e.Message); } } /// <summary> /// The camera photo mode has stopped after the capture. /// Begin the image analysis process. /// </summary> void OnStoppedPhotoMode(PhotoCapture.PhotoCaptureResult result) { Debug.LogFormat("Stopped Photo Mode"); // Dispose from the object in memory and request the image analysis photoCaptureObject.Dispose(); photoCaptureObject = null; // Call the image analysis StartCoroutine(CustomVisionAnalyser.Instance.AnalyseLastImageCaptured(filePath)); } /// <summary> /// Stops all capture pending actions /// </summary> internal void ResetImageCapture() { captureIsActive = false; // Set the cursor color to green SceneOrganiser.Instance.cursor.GetComponent<Renderer>().material.color = Color.green; // Stop the capture loop if active CancelInvoke(); } } |
全てのコードを記述し終わったら、それらが正しく機能するようにアタッチしていきます。
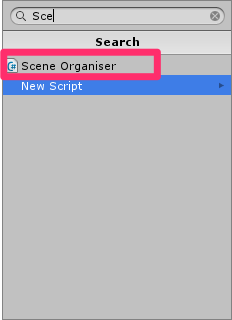
1. [Hierarchy]->[Main Camera]の[Inspector]->[Add Component]からSceneOrganiserを検索し、選択してダブルクリックします。
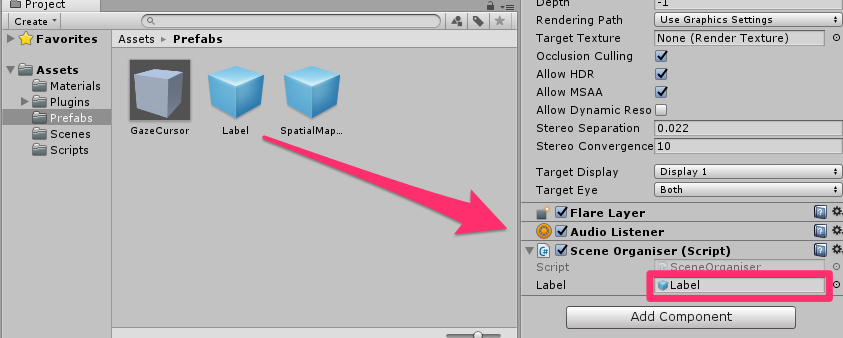
2. 今追加した[Main Camera]の[Inspector]->[Scene Organiser]->[Label]に[Project]->[Prefabs]->[Label]をD&Dします。
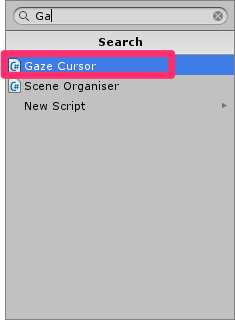
3. [Main Camera]->[GazeCursor]の[Inspector]->[Add Componet]からGazeCursorを検索し、選択してダブルクリックします。
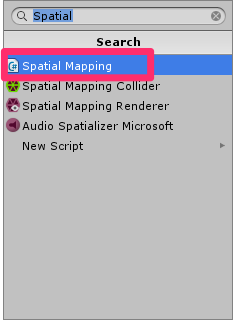
4. [Main Camera]->[SpatialMapping]の[Inspector]->[Add Componet]からSpatialMappingを検索し、選択してダブルクリックします。
3.ビルド
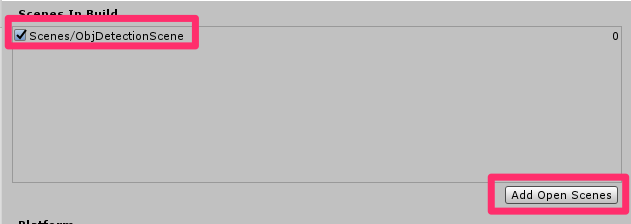
[File]->[Build Settings..]->[Add Open Scene]とし、シーンを追加します。
続いて[File]->[Build Settings..]->[Build]の順に選択します。新しいフォルダー(App)を作ります。このフォルダーを選択し、保存します。
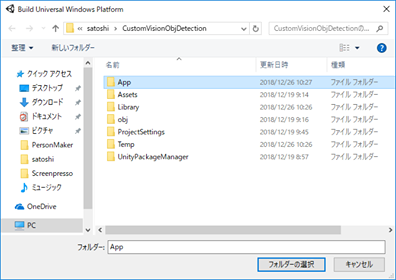
この後の手順についてはこちらを参照してください。
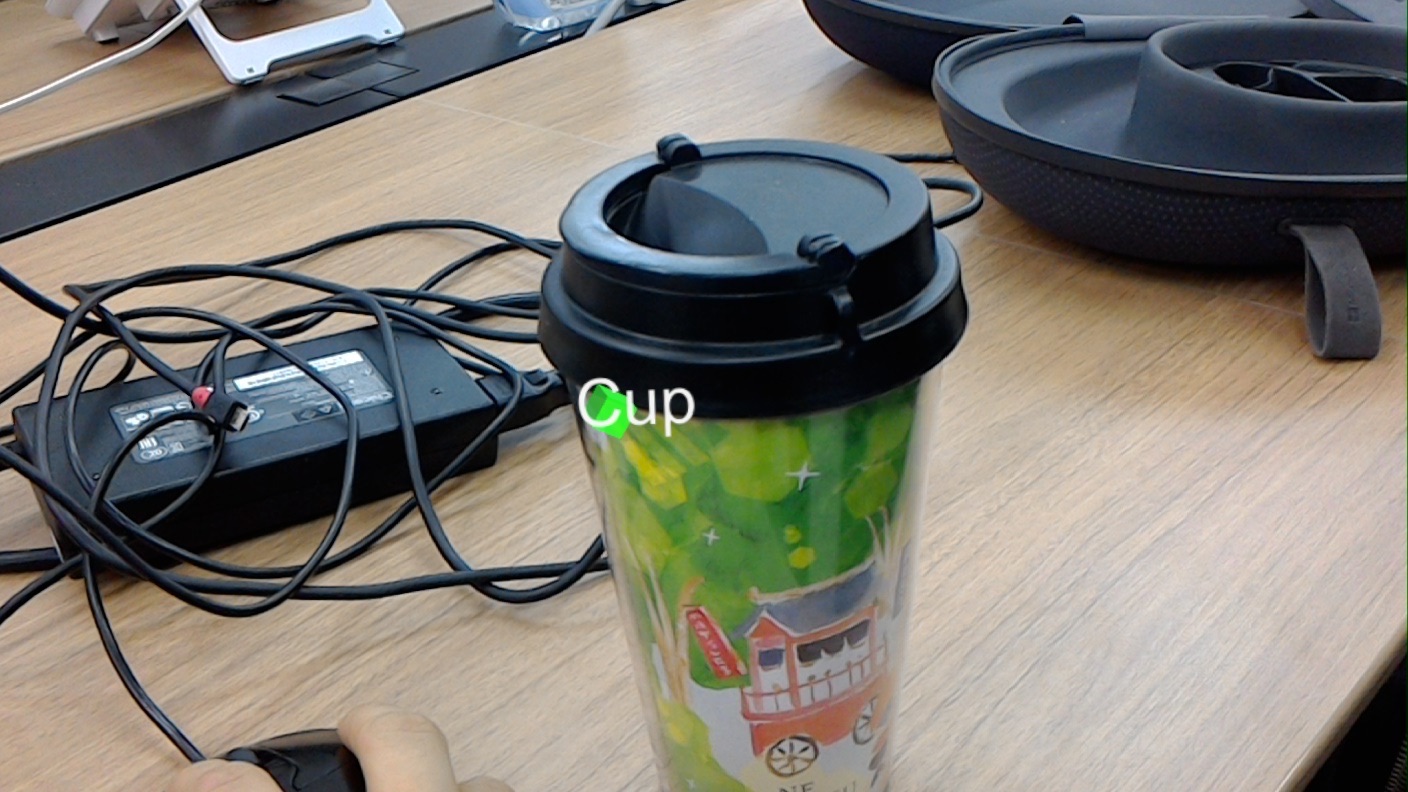
HoloLensで実行した時の様子です。カップに視線を合わせエアタップすると、カップと認識することができました。
以上となります。 お疲れ様でした。
