渡邊 です。
前回は『 Azure Machine Learning Studio 』で機械学習モデルをWebサービスとして公開する方法を紹介致しました。
今回は、公開したWebサービスにアクセスする方法を紹介致します。
アクセスに必要な情報は、Webサービス公開時に生成される『Request Response API Documentation』(前回参照)から得られます。
Python 3
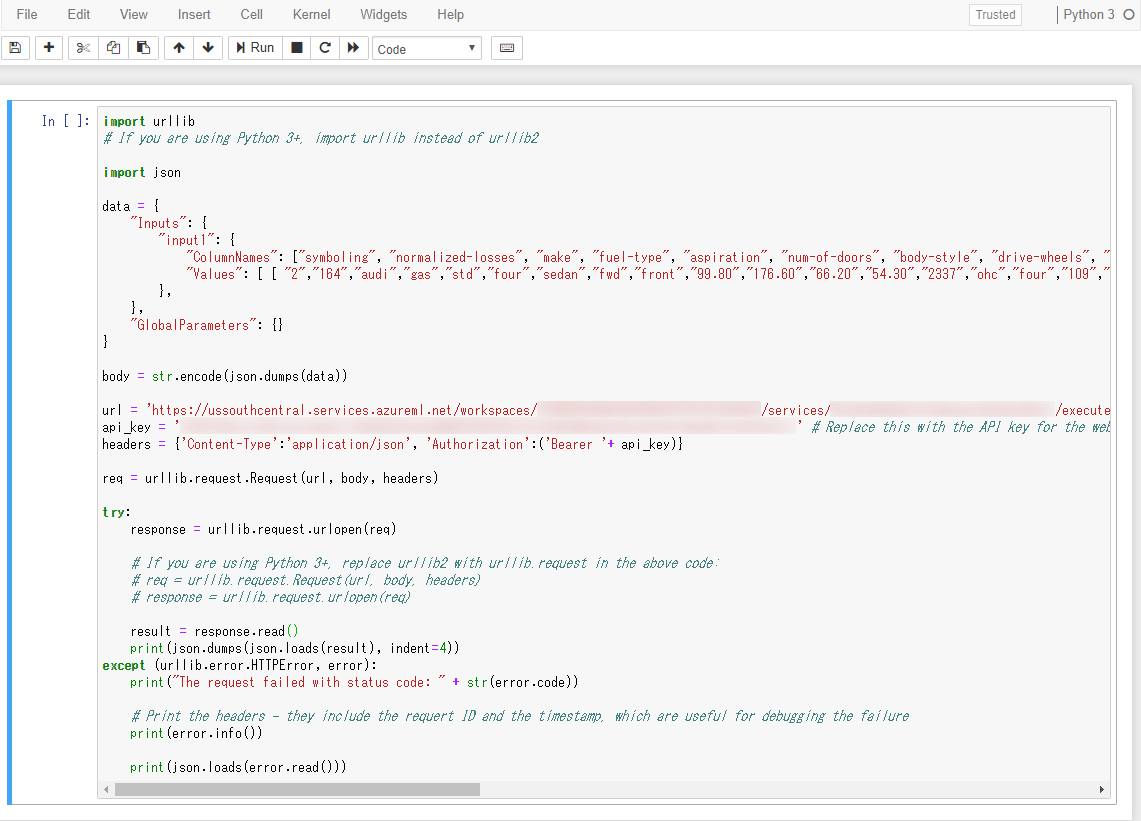
まずは、『 Python 3 』でアクセスする方法を紹介致します。
『Request Response API Documentation』で『Python 2』のサンプルコードが得られるので、
それを元に『 Python 3 』のコードに書き換えます。
ここでは、環境として Jupyter Notebook を使用しています。
|
1 2 3 4 5 6 7 8 9 10 11 12 13 14 15 16 17 18 19 20 21 22 23 24 25 26 27 28 29 30 31 32 33 34 35 36 37 38 39 |
import urllib # If you are using Python 3+, import urllib instead of urllib2 import json data = { "Inputs": { "input1": { "ColumnNames": ["symboling", "normalized-losses", "make", "fuel-type", "aspiration", "num-of-doors", "body-style", "drive-wheels", "engine-location", "wheel-base", "length", "width", "height", "curb-weight", "engine-type", "num-of-cylinders", "engine-size", "fuel-system", "bore", "stroke", "compression-ratio", "horsepower", "peak-rpm", "city-mpg", "highway-mpg", "price"], "Values": [ [ "2","164","audi","gas","std","four","sedan","fwd","front","99.80","176.60","66.20","54.30","2337","ohc","four","109","mpfi","3.19","3.40","10.00","102","5500","24","30","13950" ] ] }, }, "GlobalParameters": {} } body = str.encode(json.dumps(data)) url = 'https://ussouthcentral.services.azureml.net/workspaces/***/services/***/execute?api-version=2.0&details=true' api_key = '***' # Replace this with the API key for the web service headers = {'Content-Type':'application/json', 'Authorization':('Bearer '+ api_key)} req = urllib.request.Request(url, body, headers) try: response = urllib.request.urlopen(req) # If you are using Python 3+, replace urllib2 with urllib.request in the above code: # req = urllib.request.Request(url, body, headers) # response = urllib.request.urlopen(req) result = response.read() print(json.dumps(json.loads(result), indent=4)) except (urllib.error.HTTPError, error): print("The request failed with status code: " + str(error.code)) # Print the headers - they include the requert ID and the timestamp, which are useful for debugging the failure print(error.info()) print(json.loads(error.read())) |
実行すると、次のような結果が返ってきます。
|
1 2 3 4 5 6 7 8 9 10 11 12 13 14 15 16 17 18 19 20 21 22 23 24 25 26 27 28 29 30 31 32 33 34 35 36 37 38 39 40 41 42 43 44 45 46 47 48 49 50 51 52 53 54 55 56 57 58 59 60 61 62 63 64 65 66 67 68 69 70 71 72 73 74 75 76 77 78 79 80 81 82 83 84 85 86 87 88 89 90 91 92 93 94 95 96 97 98 |
{ "Results": { "output1": { "type": "table", "value": { "ColumnNames": [ "symboling", "normalized-losses", "make", "fuel-type", "aspiration", "num-of-doors", "body-style", "drive-wheels", "engine-location", "wheel-base", "length", "width", "height", "curb-weight", "engine-type", "num-of-cylinders", "engine-size", "fuel-system", "bore", "stroke", "compression-ratio", "horsepower", "peak-rpm", "city-mpg", "highway-mpg", "price", "Scored Labels" ], "ColumnTypes": [ "Int32", "Int32", "String", "String", "String", "String", "String", "String", "String", "Double", "Double", "Double", "Double", "Int32", "String", "String", "Int32", "String", "Nullable`1", "Nullable`1", "Double", "Nullable`1", "Nullable`1", "Int32", "Int32", "Nullable`1", "Double" ], "Values": [ [ "2", "164", "audi", "gas", "std", "four", "sedan", "fwd", "front", "99.8", "176.6", "66.2", "54.3", "2337", "ohc", "four", "109", "mpfi", "3.19", "3.4", "10", "102", "5500", "24", "30", "13950", "13271.3472331043" ] ] } } } } |
Postman
次に、REST APIテストツール『 Postman 』でアクセスする方法を紹介致します。
次の項目を入力して、『 Send 』ボダンを押下するとレスポンスが返ってきます。
- HTTPメソッド
- リクエストURI
- リクエストヘッダ( Authorization / Content-Type )
- リクエストボディ

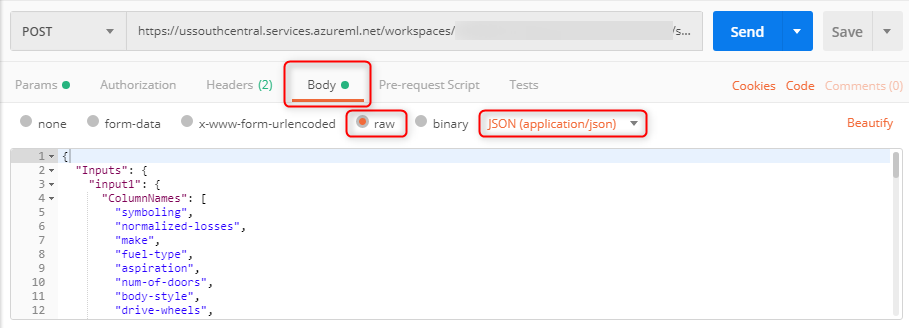

リクエストボディとレスポンスボディはそれぞれ次のような形式です。
|
1 2 3 4 5 6 7 8 9 10 11 12 13 14 15 16 17 18 19 20 21 22 23 24 25 26 27 28 29 30 31 32 33 34 35 36 37 38 39 40 41 42 43 44 45 46 47 48 49 50 51 52 53 54 55 56 57 58 59 60 61 62 63 64 65 |
{ "Inputs": { "input1": { "ColumnNames": [ "symboling", "normalized-losses", "make", "fuel-type", "aspiration", "num-of-doors", "body-style", "drive-wheels", "engine-location", "wheel-base", "length", "width", "height", "curb-weight", "engine-type", "num-of-cylinders", "engine-size", "fuel-system", "bore", "stroke", "compression-ratio", "horsepower", "peak-rpm", "city-mpg", "highway-mpg", "price" ], "Values": [ [ "2", "164", "audi", "gas", "std", "four", "sedan", "fwd", "front", "99.80", "176.60", "66.20", "54.30", "2337", "ohc", "four", "109", "mpfi", "3.19", "3.40", "10.00", "102", "5500", "24", "30", "13950" ] ] } }, "GlobalParameters": {} } |
|
1 2 3 4 5 6 7 8 9 10 11 12 13 14 15 16 17 18 19 20 21 22 23 24 25 26 27 28 29 30 31 32 33 34 35 36 37 38 39 40 41 42 43 44 45 46 47 48 49 50 51 52 53 54 55 56 57 58 59 60 61 62 63 64 65 66 67 68 69 70 71 72 73 74 75 76 77 78 79 80 81 82 83 84 85 86 87 88 89 90 91 92 93 94 95 96 97 98 |
{ "Results": { "output1": { "type": "table", "value": { "ColumnNames": [ "symboling", "normalized-losses", "make", "fuel-type", "aspiration", "num-of-doors", "body-style", "drive-wheels", "engine-location", "wheel-base", "length", "width", "height", "curb-weight", "engine-type", "num-of-cylinders", "engine-size", "fuel-system", "bore", "stroke", "compression-ratio", "horsepower", "peak-rpm", "city-mpg", "highway-mpg", "price", "Scored Labels" ], "ColumnTypes": [ "Int32", "Int32", "String", "String", "String", "String", "String", "String", "String", "Double", "Double", "Double", "Double", "Int32", "String", "String", "Int32", "String", "Nullable`1", "Nullable`1", "Double", "Nullable`1", "Nullable`1", "Int32", "Int32", "Nullable`1", "Double" ], "Values": [ [ "2", "164", "audi", "gas", "std", "four", "sedan", "fwd", "front", "99.8", "176.6", "66.2", "54.3", "2337", "ohc", "four", "109", "mpfi", "3.19", "3.4", "10", "102", "5500", "24", "30", "13950", "13271.3472331043" ] ] } } } } |
Azure Functions ( JavaScript )
最後に、Azure Functions ( JavaScript ) でアクセスする方法を紹介致します。
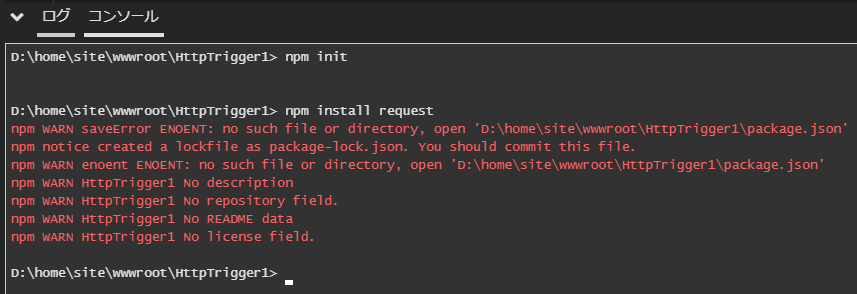
まずは、 npm request をインストールします。
|
1 2 3 4 5 6 7 8 9 10 11 |
D:\home\site\wwwroot\HttpTrigger1> npm init D:\home\site\wwwroot\HttpTrigger1> npm install request npm WARN saveError ENOENT: no such file or directory, open 'D:\home\site\wwwroot\HttpTrigger1\package.json' npm notice created a lockfile as package-lock.json. You should commit this file. npm WARN enoent ENOENT: no such file or directory, open 'D:\home\site\wwwroot\HttpTrigger1\package.json' npm WARN HttpTrigger1 No description npm WARN HttpTrigger1 No repository field. npm WARN HttpTrigger1 No README data npm WARN HttpTrigger1 No license field. |
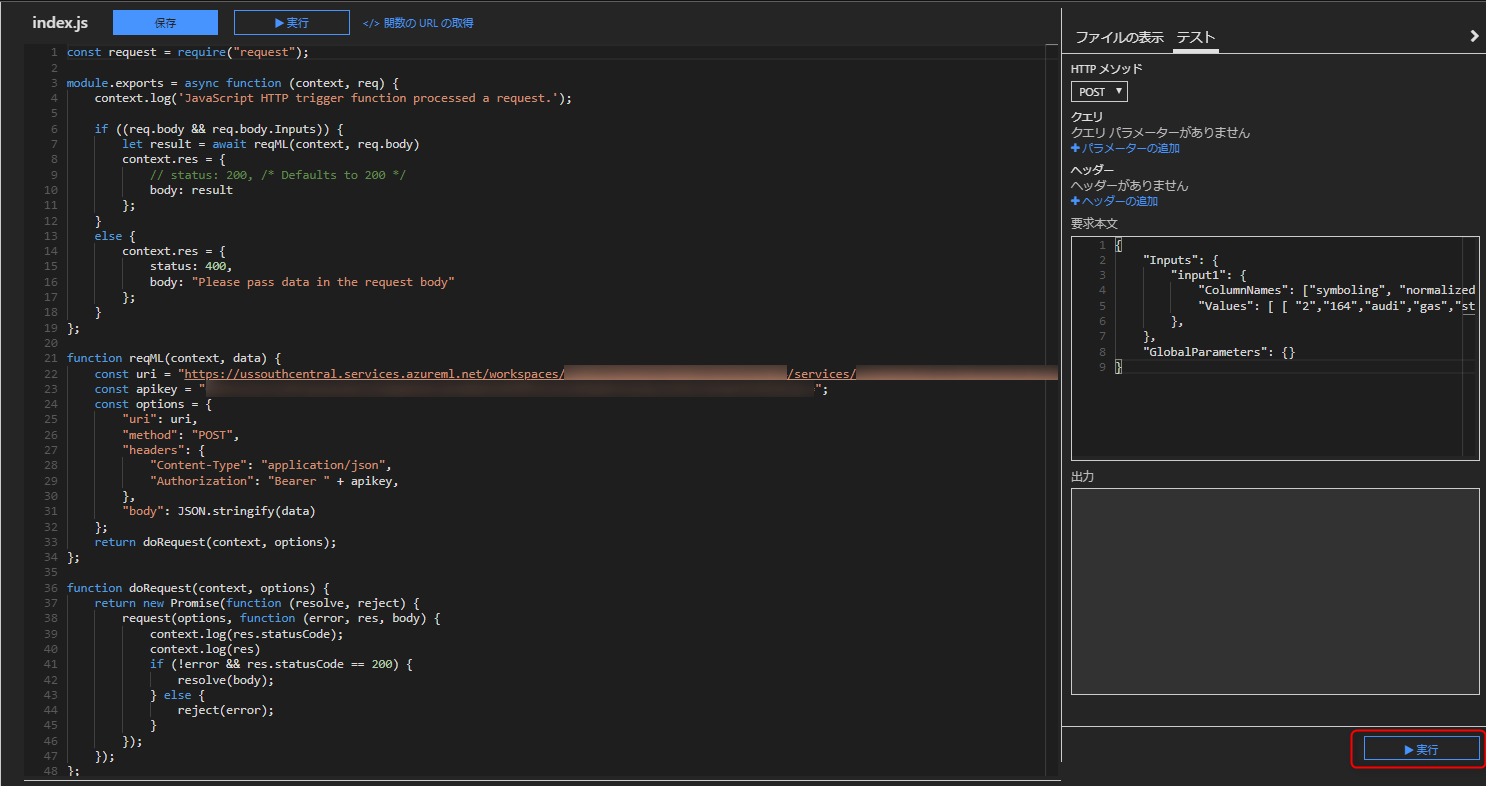
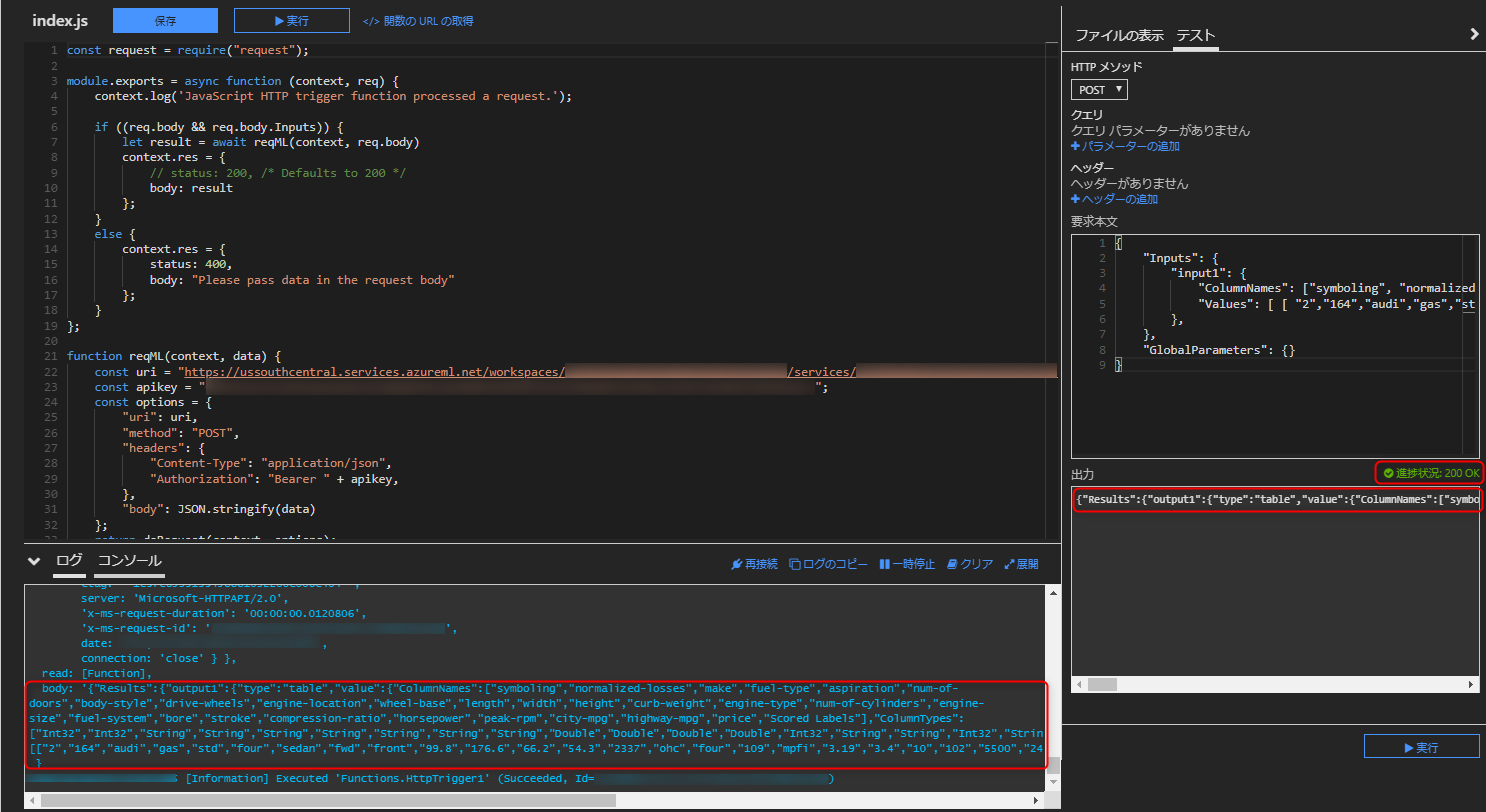
一例として、次のようなプログラムを作成し、 Azureポータル上から実行します。
|
1 2 3 4 5 6 7 8 9 10 11 12 13 14 15 16 17 18 19 20 21 22 23 24 25 26 27 28 29 30 31 32 33 34 35 36 37 38 39 40 41 42 43 44 45 46 47 48 |
const request = require("request"); module.exports = async function (context, req) { context.log('JavaScript HTTP trigger function processed a request.'); if ((req.body && req.body.Inputs)) { let result = await reqML(context, req.body) context.res = { // status: 200, /* Defaults to 200 */ body: result }; } else { context.res = { status: 400, body: "Please pass data in the request body" }; } }; function reqML(context, data) { const uri = "https://ussouthcentral.services.azureml.net/workspaces/***/services/***/execute?api-version=2.0&details=true"; const apikey = "***"; const options = { "uri": uri, "method": "POST", "headers": { "Content-Type": "application/json", "Authorization": "Bearer " + apikey, }, "body": JSON.stringify(data) }; return doRequest(context, options); }; function doRequest(context, options) { return new Promise(function (resolve, reject) { request(options, function (error, res, body) { context.log(res.statusCode); context.log(res) if (!error && res.statusCode == 200) { resolve(body); } else { reject(error); } }); }); }; |
実行すると、次のような結果が返ってきます。
|
1 |
{"Results":{"output1":{"type":"table","value":{"ColumnNames":["symboling","normalized-losses","make","fuel-type","aspiration","num-of-doors","body-style","drive-wheels","engine-location","wheel-base","length","width","height","curb-weight","engine-type","num-of-cylinders","engine-size","fuel-system","bore","stroke","compression-ratio","horsepower","peak-rpm","city-mpg","highway-mpg","price","Scored Labels"],"ColumnTypes":["Int32","Int32","String","String","String","String","String","String","String","Double","Double","Double","Double","Int32","String","String","Int32","String","Nullable`1","Nullable`1","Double","Nullable`1","Nullable`1","Int32","Int32","Nullable`1","Double"],"Values":[["2","164","audi","gas","std","four","sedan","fwd","front","99.8","176.6","66.2","54.3","2337","ohc","four","109","mpfi","3.19","3.4","10","102","5500","24","30","13950","13271.3472331043"]]}}}} |
おわりに
以上、『 Azure Machine Learning Studio 』でWebサービスとして公開した機械学習モデルへアクセスする方法を紹介致しました。
REST API ですので、他にもアクセス方法はあります。ご自身の要件に合わせた方法をご選択下さい。
最後までご覧頂きありがとうございました。
参考リンク
Azure Machine Learning Studioで機械学習モデルをWebサービス化する | ナレコムAzureレシピ
https://azure-recipe.kc-cloud.jp/2019/01/azure-machine-learning-studio-web-service/
Postman | API Development Environment
https://www.getpostman.com/
Azure Functions—サーバーレス アーキテクチャ | Microsoft Azure
https://azure.microsoft.com/ja-jp/services/functions/
