こんにちは、ナレコム菅井です。
今回はMR and Azure 304のアプリを作っていきます。
開発環境は以下の通りです。
・Windows
・Unity 2017.4.11f1
・Visual Studio 2017
・HoloLens
目標はAzure Cognitive ServiceとBluetooth対応キーボードを使って顔認識アプリを作ることです。それではさっそく始めていきましょう!
0.準備
はじめに、以下の順に準備を進めていきます。
ステップ1. Azure PortalでFace APIを追加する。
ステップ2. Person MakerでFace APIに顔を学習させる。
ステップ1
1. Azure Portalにログインします。
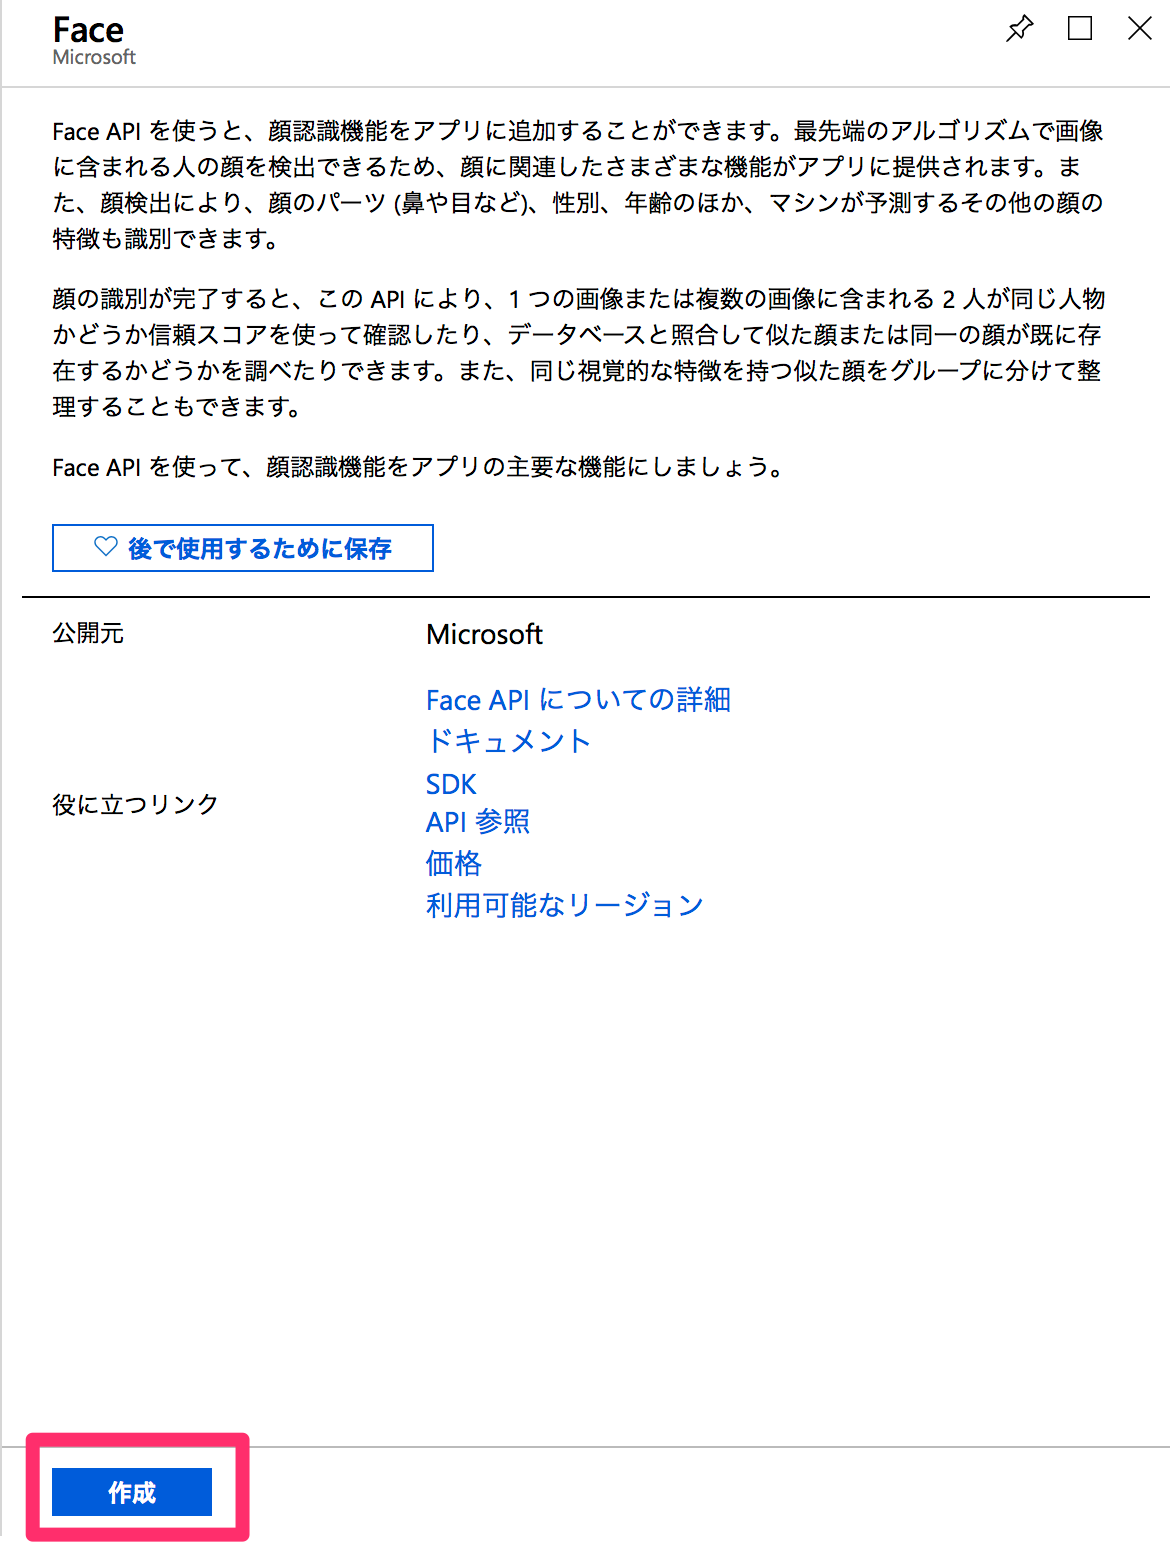
2. [リソースの作成]からFace APIと検索します。下のようなアイコンが出てきたら開きます。

3. Face APIの説明画面にスライドしますので、[作成]をクリックします。
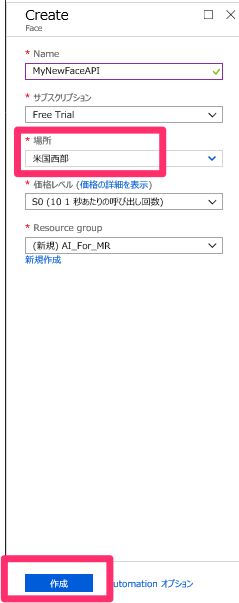
4. Face APIに関する情報を入力する画面になりますので、入力していきます(※記入例です)。ただし、[場所]は米国西部とします。入力し終わったら、[作成]をクリックします。
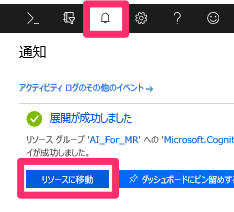
5. お知らせタブを開きます。デプロイが終了したら、[リソースへ移動]します。
6. [Quick start]->[1 キーを取得する]->[key]をクリックし、キーを確認します。これは後ほど使いますのでメモしておきます。

ステップ2
1. Person Makerをダウンロードします。
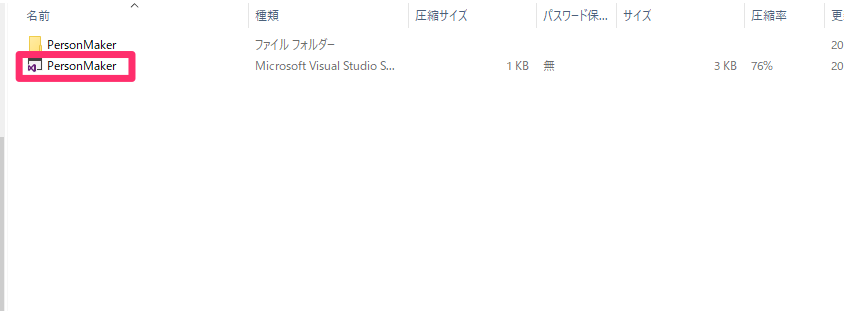
2. ダウンロードしたPerson Makerフォルダー内のPerson Makerをダブルクリックします。Visual Studioが開きます。
3. [ソリューションの構成]をDebug、[ソリューション プラットフォーム]をx86、[ターゲットプラットフォーム]をローカルコンピュータに変更します。
![]()
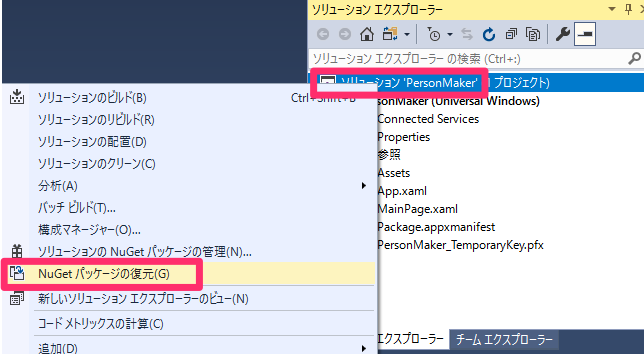
4. (おそらく)画面右側にある[ソリューションエクスプローラー]から[ソリューション’Person Maker’]を右クリックし[NuGetパッケージの復元]をクリックします。
5. ローカルコンピューターの左側の再生▶︎をおします。
![]()
6. PERSON MAKERが開きますので必要な項目を入力していきます。
a. 1で先ほどのFace API の鍵を入れます。
b. 2で Person Group IDとPerson Group Nameを決めます。入力し終わったら、[Create a Person Name]をクリックします。※Person Group IDは後ほど使います。
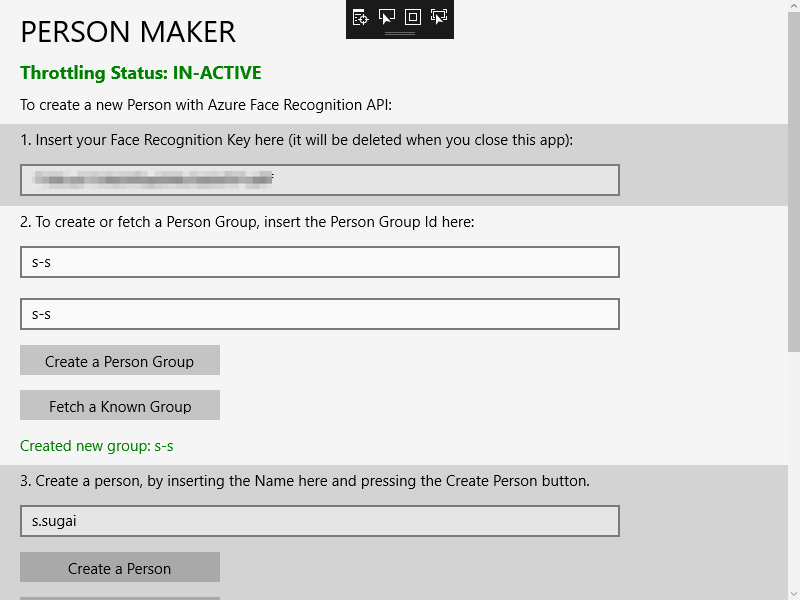
c. 3で認識したい人物の名前を入力します。入力し終わったら、[Create a Person ]をクリックします。※仮名で大丈夫です。
d. 5で[Create and Open Folder]をクリックして、認識したい人物の画像を10枚以上(多いとなお良い)を選択し、6の[Submit To Azure]をクリックします。無事送信された旨が表示されるたらオッケーです。
e. 7で[Train]をクリックします。学習された旨が表示されるはずです。
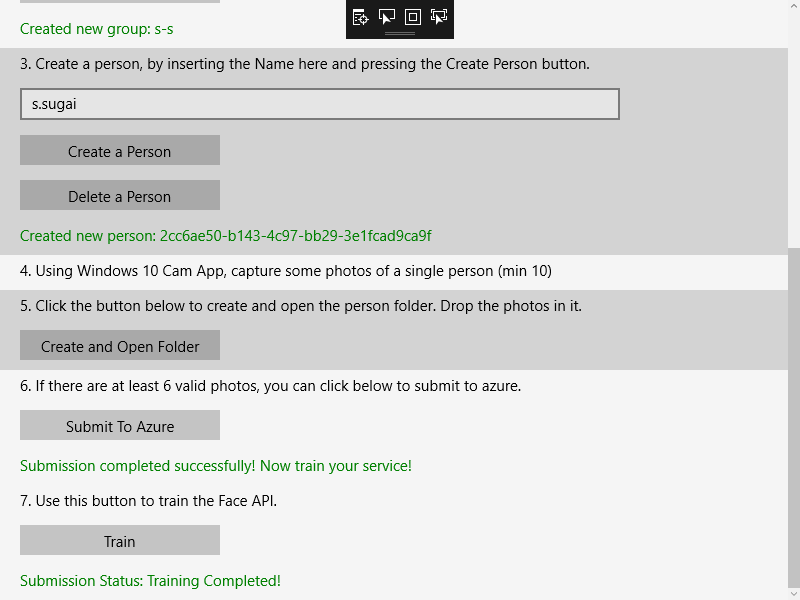
以上で準備完了です。
1.Unityの設定
続いてUnityの設定を行っていきます。以下の手順で進めていきましょう。
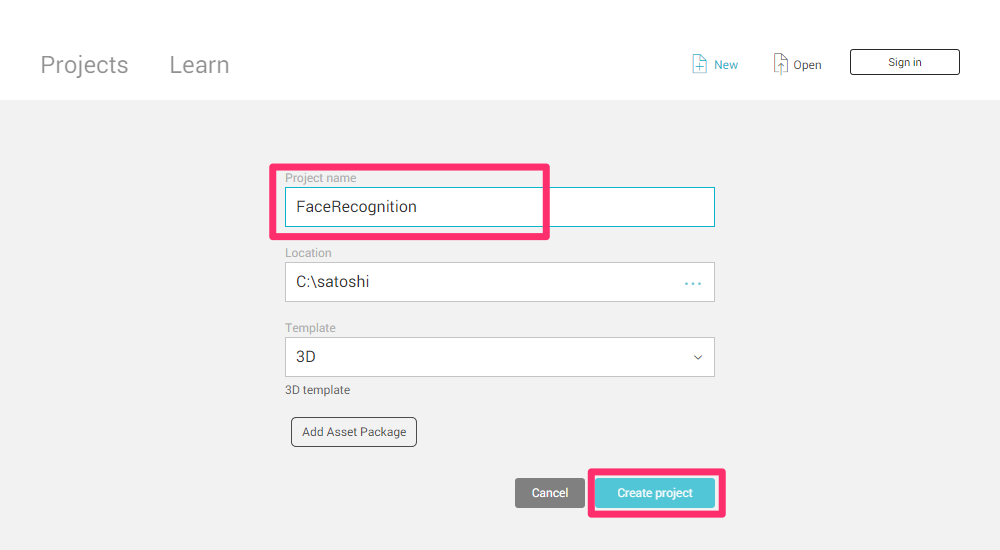
1.Unityを開き、[New]から新しいプロジェクトを作成します。
名前をFaceRecognitionとして、[Create project]をクリックします。
2. [Build Settings..]からさまざまな項目を編集します。
[File]->[Build Settings..]を開きます。
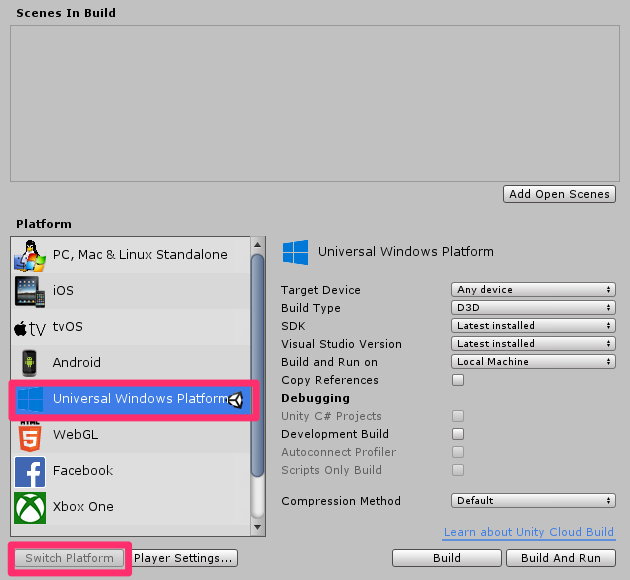
a.プラットフォームの変更
[PC, Mac & Linux Standalone]を[Universal Windows Platform]に変更し、[Switch Platform]をクリックします
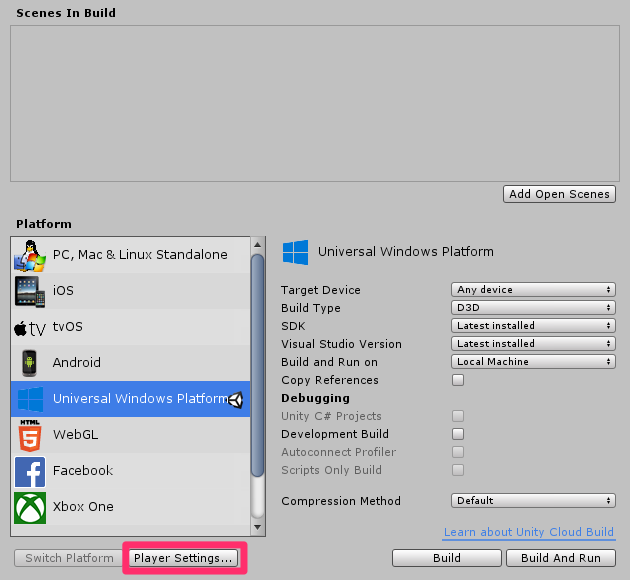
b.[Player Settings..]を編集します。
[Player Settings..]をクリックします。
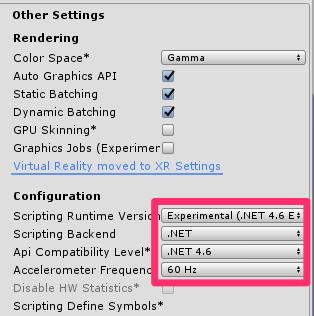
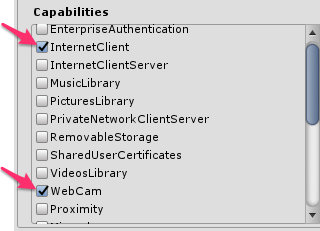
そのあと[Other Settings]、[Publishing Settings]->[Capabilities]、[XR Settings]を以下のように設定します。
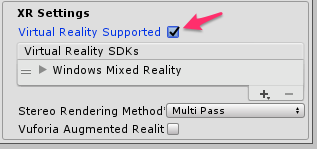
続いて、[Unity C#]にチェックを入れます。
![]()
[Build Settings..]の変更は以上です。
3. 続いてシーンを保存します。[Add Open Scenes]をクリックして、[新しいフォルダー]を選択しScenesと名前をつけた後、そのフォルダー内に名前をSceneとして[保存]します。
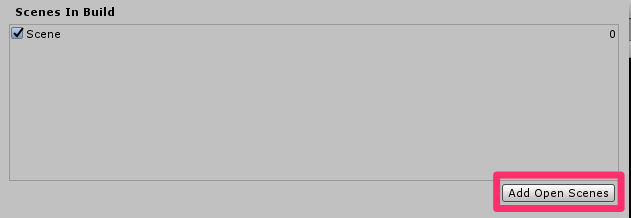
2.シーンの編集
デフォルトで備わっているMain Cameraの代わりにHoloToolkitを使います。使うものをこちらから以下のToolkitをダウンロードしてください。
HoloToolkit-Unity-2017.4.2.0.unitypackage
HoloToolkit-Unity-Example-2017.4.2.0.unitypackage
a. [Assets]->[Import Package]->[Custom Package..]からダウンロードしたpackageを二つともインポートします。
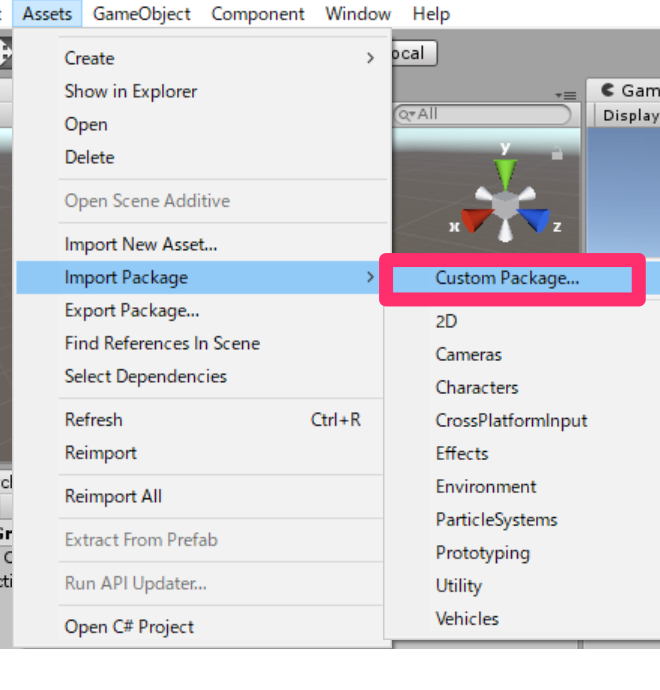
b. [Hierarchy]->[Main camera]をdeleteします。
c. [Project]から以下の2つを検索し、[Hierarchy]パネルへD&Dします。
・MixedRealityCameraParent
・InputManger

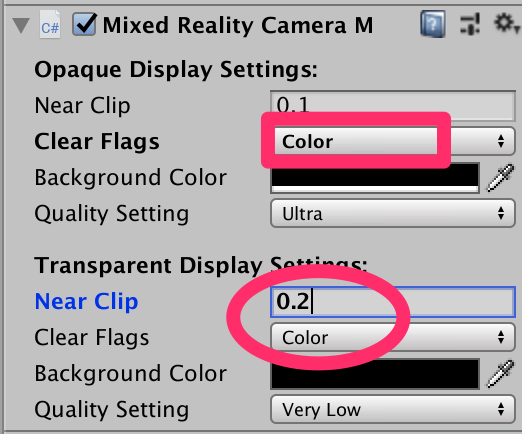
d. [Hierarchy]->[MixedRealityCameraParent]->[MixedRealityCamera]の[Inspector]を編集していきます。
[Camera]
Clear Flags : Solid Color
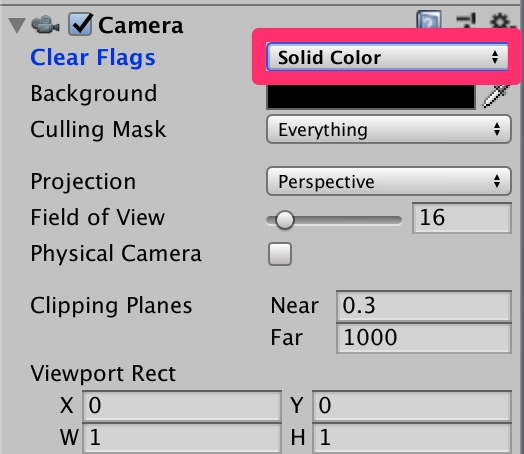
[Mixed Reality Camera Manager]
Clear Flags : color
Near clip : 0.2
Clear Flags : color
3.スクリプトの作成
ここでは以下の2つのスクリプトを作ります。
・FaceAnalysis
・ImageCaptureFace
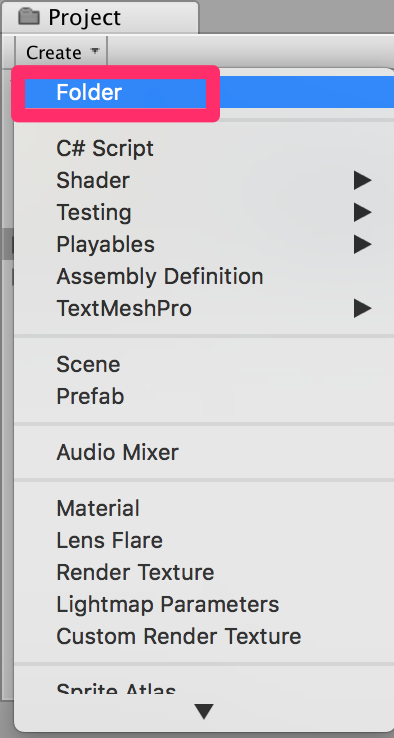
スクリプトの作り方はまず、すべてのスクリプトをまとめておくフォルダーを作成します。[Project]->[Create]をクリックし、[Folder]を選択して新しいフォルダーを作ります。名前をScriptsとします。続いて[Project]->[Create]->[C# Script]をクリックし、クラス名をつけていきます。
・FaceAnalysis
このスクリプトはAzure Face Recognition Serviceとやりとりしたり、データをシリアライズ、デシリアライズしたりするためのクラスやメソッドが記述されています。ここで0.準備で取得したFace APIの鍵と入力したPerson Group IDを使います。–Insert your key–、–Insert your ID–へそれぞれ挿入します。コードは以下の通りです。
|
1 2 3 4 5 6 7 8 9 10 11 12 13 14 15 16 17 18 19 20 21 22 23 24 25 26 27 28 29 30 31 32 33 34 35 36 37 38 39 40 41 42 43 44 45 46 47 48 49 50 51 52 53 54 55 56 57 58 59 60 61 62 63 64 65 66 67 68 69 70 71 72 73 74 75 76 77 78 79 80 81 82 83 84 85 86 87 88 89 90 91 92 93 94 95 96 97 98 99 100 101 102 103 104 105 106 107 108 109 110 111 112 113 114 115 116 117 118 119 120 121 122 123 124 125 126 127 128 129 130 131 132 133 134 135 136 137 138 139 140 141 142 143 144 145 146 147 148 149 150 151 152 153 154 155 156 157 158 159 160 161 162 163 164 165 166 167 168 169 170 171 172 173 174 175 176 177 178 179 180 181 182 183 184 185 186 187 188 189 190 191 192 193 194 195 196 197 198 199 200 201 202 203 204 205 206 207 208 209 210 211 212 213 214 215 216 217 218 219 220 221 222 223 224 225 226 227 228 229 230 231 232 233 234 235 236 237 238 239 240 241 242 243 244 245 246 247 248 249 250 251 252 253 254 255 256 257 |
using Newtonsoft.Json; using System.Collections; using System.Collections.Generic; using System.IO; using System.Text; using UnityEngine; using UnityEngine.Networking; public class FaceAnalysis : MonoBehaviour { /// <summary> /// Allows this class to behave like a singleton /// </summary> public static FaceAnalysis Instance; /// <summary> /// The analysis result text /// </summary> private TextMesh labelText; /// <summary> /// Bytes of the image captured with camera /// </summary> internal byte[] imageBytes; /// <summary> /// Path of the image captured with camera /// </summary> internal string imagePath; /// <summary> /// Base endpoint of Face Recognition Service /// </summary> const string baseEndpoint = "https://westus.api.cognitive.microsoft.com/face/v1.0/"; /// <summary> /// Auth key of Face Recognition Service /// </summary> private const string key = "--Insert your key--"; /// <summary> /// Id (name) of the created person group /// </summary> private const string personGroupId = "--Insert your ID--"; /// <summary> /// Initialises this class /// </summary> private void Awake() { // Allows this instance to behave like a singleton Instance = this; // Add the ImageCapture Class to this Game Object gameObject.AddComponent<ImageCaptureFace>(); // Create the text label in the scene CreateLabel(); Debug.Log("createLabel"); } /// <summary> /// Spawns cursor for the Main Camera /// </summary> private void CreateLabel() { // Create a sphere as new cursor GameObject newLabel = new GameObject(); // Attach the label to the Main Camera newLabel.transform.parent = gameObject.transform; // Resize and position the new cursor newLabel.transform.localScale = new Vector3(0.4f, 0.4f, 0.4f); newLabel.transform.position = new Vector3(0f, 3f, 60f); // Creating the text of the Label labelText = newLabel.AddComponent<TextMesh>(); labelText.anchor = TextAnchor.MiddleCenter; labelText.alignment = TextAlignment.Center; labelText.tabSize = 4; labelText.fontSize = 50; labelText.text = "."; } /// <summary> /// Detect faces from a submitted image /// </summary> internal IEnumerator DetectFacesFromImage() { WWWForm webForm = new WWWForm(); string detectFacesEndpoint = $"{baseEndpoint}detect"; // Change the image into a bytes array imageBytes = GetImageAsByteArray(imagePath); using (UnityWebRequest www = UnityWebRequest.Post(detectFacesEndpoint, webForm)) { www.SetRequestHeader("Ocp-Apim-Subscription-Key", key); www.SetRequestHeader("Content-Type", "application/octet-stream"); www.uploadHandler.contentType = "application/octet-stream"; www.uploadHandler = new UploadHandlerRaw(imageBytes); www.downloadHandler = new DownloadHandlerBuffer(); yield return www.SendWebRequest(); string jsonResponse = www.downloadHandler.text; Face_RootObject[] face_RootObject = JsonConvert.DeserializeObject<Face_RootObject[]>(jsonResponse); List<string> facesIdList = new List<string>(); // Create a list with the face Ids of faces detected in image foreach (Face_RootObject faceRO in face_RootObject) { facesIdList.Add(faceRO.faceId); Debug.Log($"Detected face - Id: {faceRO.faceId}"); } StartCoroutine(IdentifyFaces(facesIdList)); } } /// <summary> /// Returns the contents of the specified file as a byte array. /// </summary> static byte[] GetImageAsByteArray(string imageFilePath) { FileStream fileStream = new FileStream(imageFilePath, FileMode.Open, FileAccess.Read); BinaryReader binaryReader = new BinaryReader(fileStream); return binaryReader.ReadBytes((int)fileStream.Length); } /// <summary> /// Identify the faces found in the image within the person group /// </summary> internal IEnumerator IdentifyFaces(List<string> listOfFacesIdToIdentify) { // Create the object hosting the faces to identify FacesToIdentify_RootObject facesToIdentify = new FacesToIdentify_RootObject(); facesToIdentify.faceIds = new List<string>(); facesToIdentify.personGroupId = personGroupId; foreach (string facesId in listOfFacesIdToIdentify) { facesToIdentify.faceIds.Add(facesId); } facesToIdentify.maxNumOfCandidatesReturned = 1; facesToIdentify.confidenceThreshold = 0.5; // Serialise to Json format string facesToIdentifyJson = JsonConvert.SerializeObject(facesToIdentify); // Change the object into a bytes array byte[] facesData = Encoding.UTF8.GetBytes(facesToIdentifyJson); WWWForm webForm = new WWWForm(); string detectFacesEndpoint = $"{baseEndpoint}identify"; using (UnityWebRequest www = UnityWebRequest.Post(detectFacesEndpoint, webForm)) { www.SetRequestHeader("Ocp-Apim-Subscription-Key", key); www.SetRequestHeader("Content-Type", "application/json"); www.uploadHandler.contentType = "application/json"; www.uploadHandler = new UploadHandlerRaw(facesData); www.downloadHandler = new DownloadHandlerBuffer(); yield return www.SendWebRequest(); string jsonResponse = www.downloadHandler.text; Debug.Log($"Get Person - jsonResponse: {jsonResponse}"); Candidate_RootObject[] candidate_RootObject = JsonConvert.DeserializeObject<Candidate_RootObject[]>(jsonResponse); // For each face to identify that ahs been submitted, display its candidate foreach (Candidate_RootObject candidateRO in candidate_RootObject) { StartCoroutine(GetPerson(candidateRO.candidates[0].personId)); // Delay the next "GetPerson" call, so all faces candidate are displayed properly yield return new WaitForSeconds(3); } } } /// <summary> /// Provided a personId, retrieve the person name associated with it /// </summary> internal IEnumerator GetPerson(string personId) { string getGroupEndpoint = $"{baseEndpoint}persongroups/{personGroupId}/persons/{personId}?"; WWWForm webForm = new WWWForm(); using (UnityWebRequest www = UnityWebRequest.Get(getGroupEndpoint)) { www.SetRequestHeader("Ocp-Apim-Subscription-Key", key); www.downloadHandler = new DownloadHandlerBuffer(); yield return www.SendWebRequest(); string jsonResponse = www.downloadHandler.text; Debug.Log($"Get Person - jsonResponse: {jsonResponse}"); IdentifiedPerson_RootObject identifiedPerson_RootObject = JsonConvert.DeserializeObject<IdentifiedPerson_RootObject>(jsonResponse); // Display the name of the person in the UI labelText.text = identifiedPerson_RootObject.name; } } /// <summary> /// The Person Group object /// </summary> public class Group_RootObject { public string personGroupId { get; set; } public string name { get; set; } public object userData { get; set; } } /// <summary> /// The Person Face object /// </summary> public class Face_RootObject { public string faceId { get; set; } } /// <summary> /// Collection of faces that needs to be identified /// </summary> public class FacesToIdentify_RootObject { public string personGroupId { get; set; } public List<string> faceIds { get; set; } public int maxNumOfCandidatesReturned { get; set; } public double confidenceThreshold { get; set; } } /// <summary> /// Collection of Candidates for the face /// </summary> public class Candidate_RootObject { public string faceId { get; set; } public List<Candidate> candidates { get; set; } } public class Candidate { public string personId { get; set; } public double confidence { get; set; } } /// <summary> /// Name and Id of the identified Person /// </summary> public class IdentifiedPerson_RootObject { public string personId { get; set; } public string name { get; set; } } } |
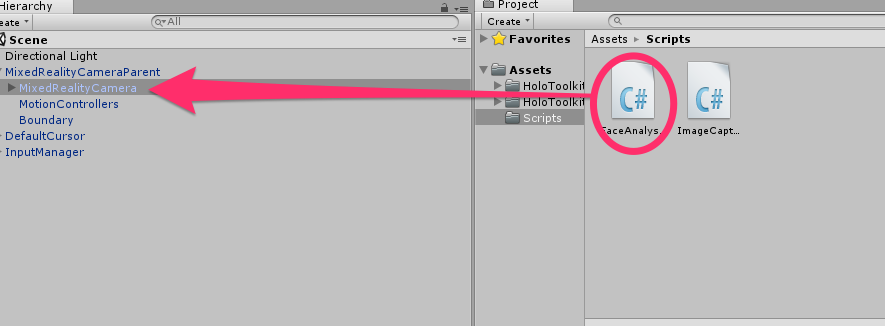
記述し終わったら、スクリプトを[Hierarchy]->[MixedRealityCameraParent]->[MixedRealityCamera]へD&Dします。
・ImageCaptureFace
このクラスにはtapジェスチャーやキーボード上の操作を利用して認識を始めるためのメソッドや画像の情報などを利用するためのメソッドなどが記述されています。コードは以下の通りです。
|
1 2 3 4 5 6 7 8 9 10 11 12 13 14 15 16 17 18 19 20 21 22 23 24 25 26 27 28 29 30 31 32 33 34 35 36 37 38 39 40 41 42 43 44 45 46 47 48 49 50 51 52 53 54 55 56 57 58 59 60 61 62 63 64 65 66 67 68 69 70 71 72 73 74 75 76 77 78 79 80 81 82 83 84 85 86 87 88 89 90 91 92 93 94 95 96 97 98 99 100 101 102 103 104 105 106 107 108 109 110 111 112 113 114 115 116 117 118 119 120 121 122 123 124 125 126 127 128 129 130 131 132 133 134 135 |
using System.IO; using System.Linq; using UnityEngine; using System.Collections; using System.Collections.Generic; using UnityEngine.XR.WSA.Input; using UnityEngine.XR.WSA.WebCam; using HoloToolkit.Unity.InputModule; public class ImageCaptureFace : MonoBehaviour//, IInputClickHandler { /// <summary> /// Allows this class to behave like a singleton /// </summary> public static ImageCaptureFace instance; /// <summary> /// Keeps track of tapCounts to name the captured images /// </summary> private int tapsCount; /// <summary> /// PhotoCapture object used to capture images on HoloLens /// </summary> private PhotoCapture photoCaptureObject = null; /// <summary> /// HoloLens class to capture user gestures /// </summary> //private GestureRecognizer recognizer; /// <summary> /// Initialises this class /// </summary> private void Awake() { instance = this; Debug.Log("awake imagecapture"); } /// <summary> /// Called right after Awake /// </summary> void Start() { // Initialises user gestures capture //recognizer = new GestureRecognizer(); //recognizer.SetRecognizableGestures(GestureSettings.Tap); //recognizer.Tapped += TapHandler; //recognizer.StartCapturingGestures(); InputManager.Instance.PushFallbackInputHandler(gameObject); Debug.Log("start"); } /// <summary> /// Respond to Tap Input. /// </summary> //private void TapHandler(TappedEventArgs obj) //{ // tapsCount++; // ExecuteImageCaptureAndAnalysis(); //} /*public void OnInputClicked(InputClickedEventData eventData) { tapsCount++; Debug.Log("call analisis"); ExecuteImageCaptureAndAnalysis(); }*/ void Update() { if (Input.GetKey(KeyCode.Return)) { tapsCount++; Debug.Log("call analisis"); ExecuteImageCaptureAndAnalysis(); } } /// <summary> /// Begin process of Image Capturing and send To Azure Computer Vision service. /// </summary> private void ExecuteImageCaptureAndAnalysis() { Resolution cameraResolution = PhotoCapture.SupportedResolutions.OrderByDescending ((res) => res.width * res.height).First(); Texture2D targetTexture = new Texture2D(cameraResolution.width, cameraResolution.height); PhotoCapture.CreateAsync(false, delegate (PhotoCapture captureObject) { photoCaptureObject = captureObject; CameraParameters c = new CameraParameters(); c.hologramOpacity = 0.0f; c.cameraResolutionWidth = targetTexture.width; c.cameraResolutionHeight = targetTexture.height; c.pixelFormat = CapturePixelFormat.BGRA32; captureObject.StartPhotoModeAsync(c, delegate (PhotoCapture.PhotoCaptureResult result) { string filename = string.Format(@"CapturedImage{0}.jpg", tapsCount); string filePath = Path.Combine(Application.persistentDataPath, filename); // Set the image path on the FaceAnalysis class FaceAnalysis.Instance.imagePath = filePath; photoCaptureObject.TakePhotoAsync (filePath, PhotoCaptureFileOutputFormat.JPG, OnCapturedPhotoToDisk); }); }); } /// <summary> /// Called right after the photo capture process has concluded /// </summary> void OnCapturedPhotoToDisk(PhotoCapture.PhotoCaptureResult result) { photoCaptureObject.StopPhotoModeAsync(OnStoppedPhotoMode); } /// <summary> /// Register the full execution of the Photo Capture. If successfull, it will begin the Image Analysis process. /// </summary> void OnStoppedPhotoMode(PhotoCapture.PhotoCaptureResult result) { photoCaptureObject.Dispose(); photoCaptureObject = null; // Request image caputer analysis StartCoroutine(FaceAnalysis.Instance.DetectFacesFromImage()); } } |
4.ビルド
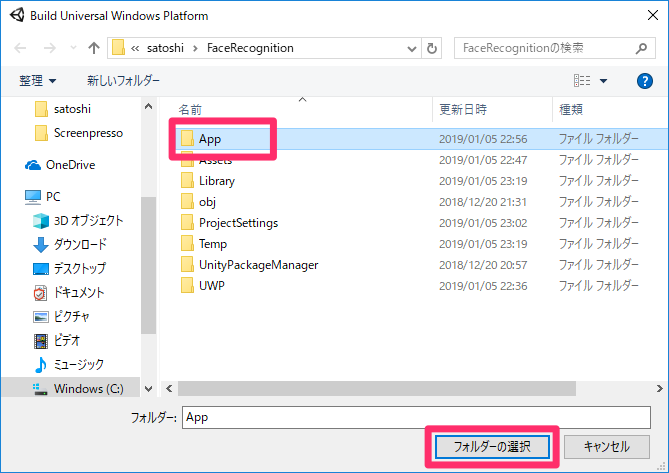
[File]->[Build Settings..]->[Build]の順に選択します。新しいフォルダー(App)を作ります。このフォルダーを選択し、保存します。
この後の手順についてはこちらを参照してください。
Unity上で実行した時の様子です。
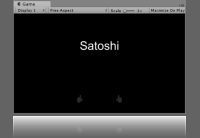
続いてHoloLens上で実行していきたいと思います。Bluetoothキーボードの接続方法はこちらを参考にしました(同じキーボードを使いました)。
HoloLensで実行した時の様子です。エンターキーで画像のキャプチャを始めます。対象の人物にカーソルを合わせてエンターキーを押しましょう。
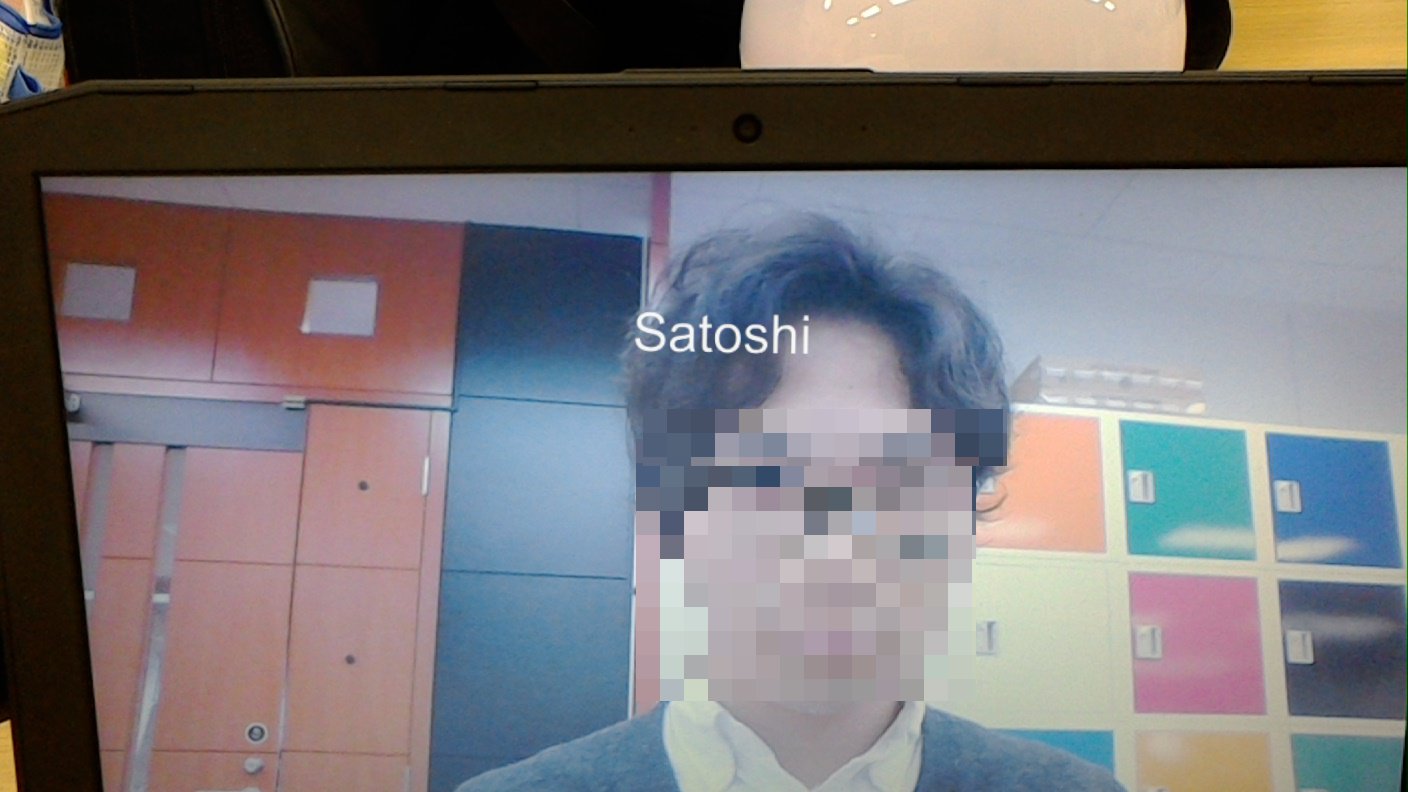
以上となります。お疲れ様でした。
