Michaelです。
「雑コラBOT」の作成の過程からAzure Functionsの設定方法を紹介する「雑コラBotを作ろう」の7回目です。
今回は、いよいよ「雑コラ」を作る仕組みを作成し、雑コラBotを完成させます。
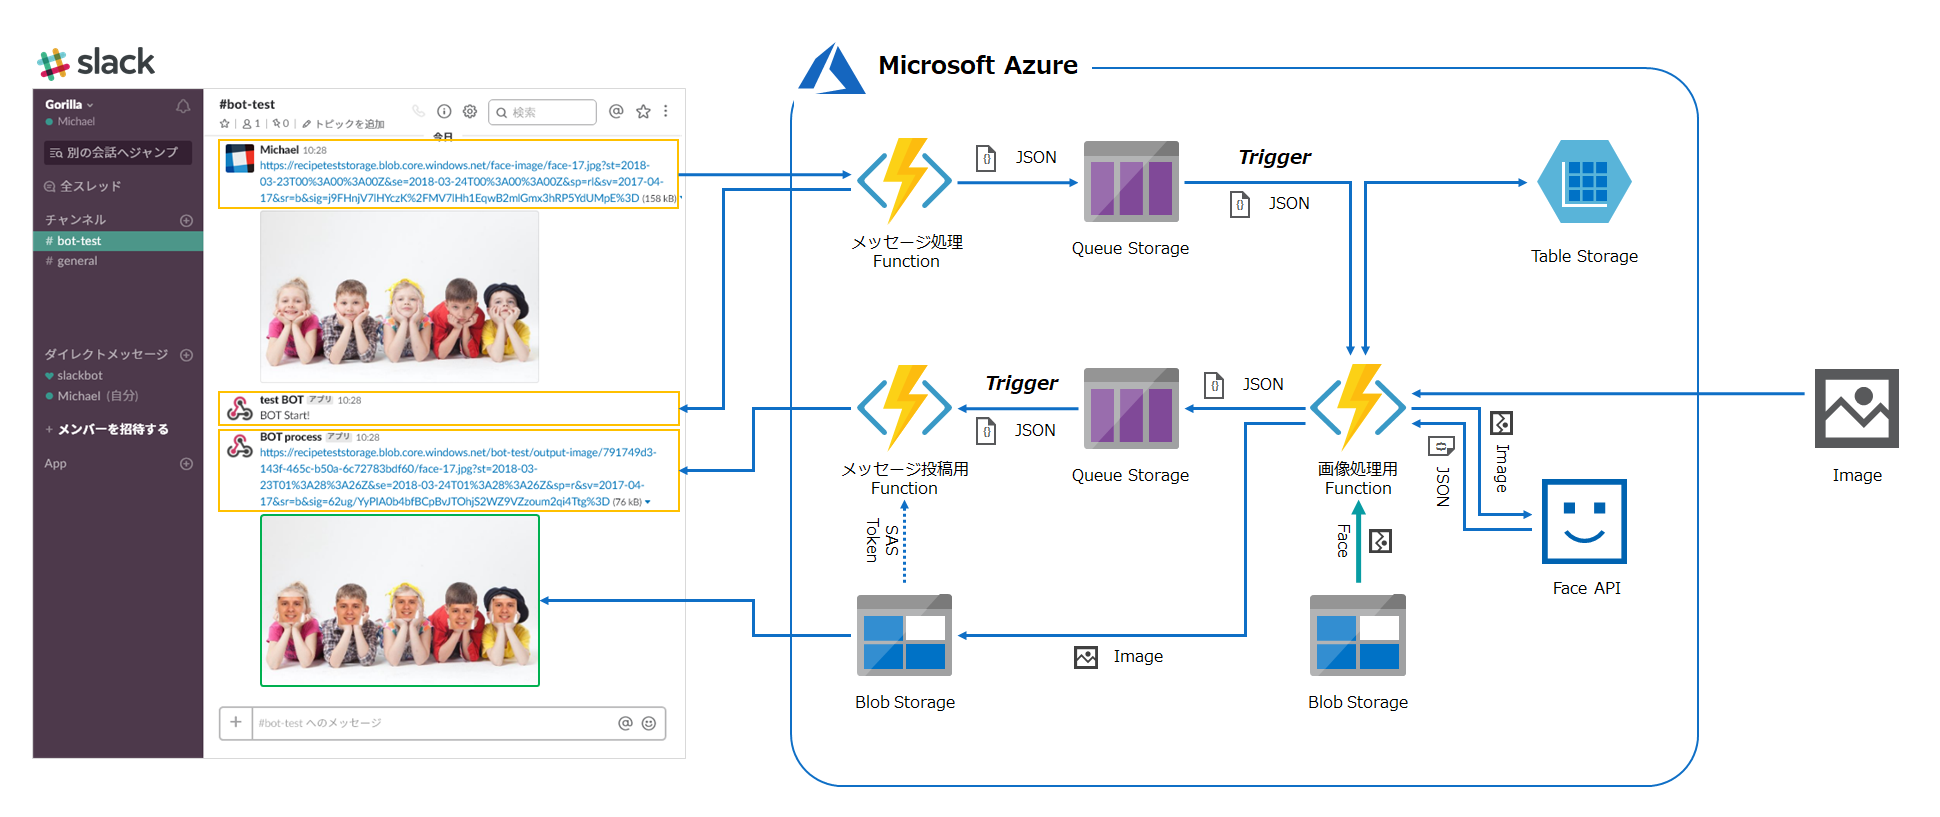
構成
画像処理用のPython関数に画像処理ライブラリを追加して、画像に顔を貼り付けられるようにします。
貼り付ける顔画像は、Blob Storageから取得します。
画像の準備
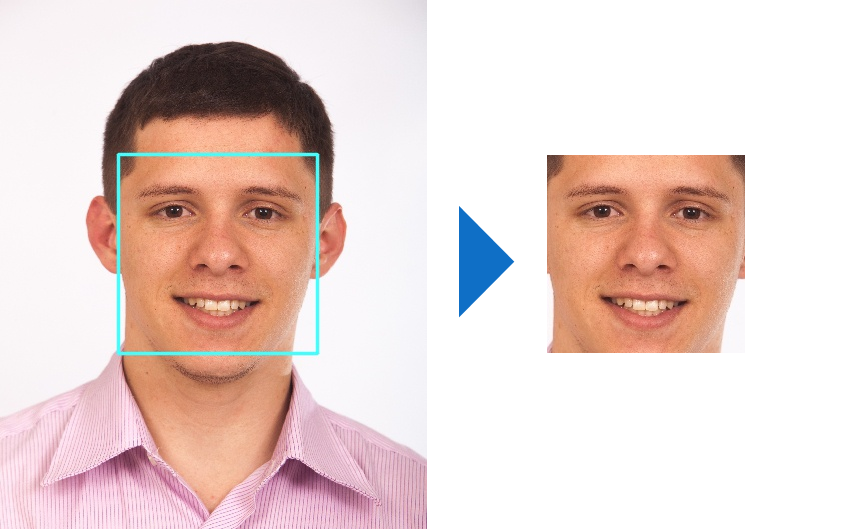
貼り付ける顔の画像を用意します。
画像は何でもいいですが、今回はFace API貼り付ける人物の顔をFace APIで検出して、顔の範囲を切り出したものを用意しました。
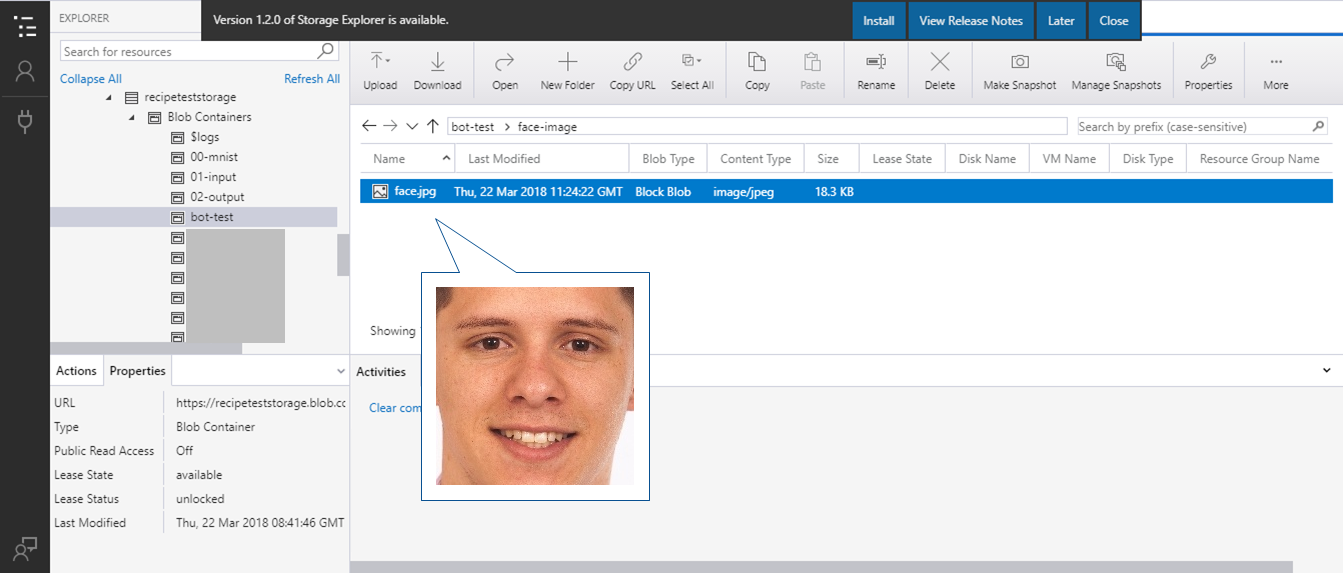
画像のファイルはBlob Storageの任意のパスにアップロードしておきます。
バインドの設定
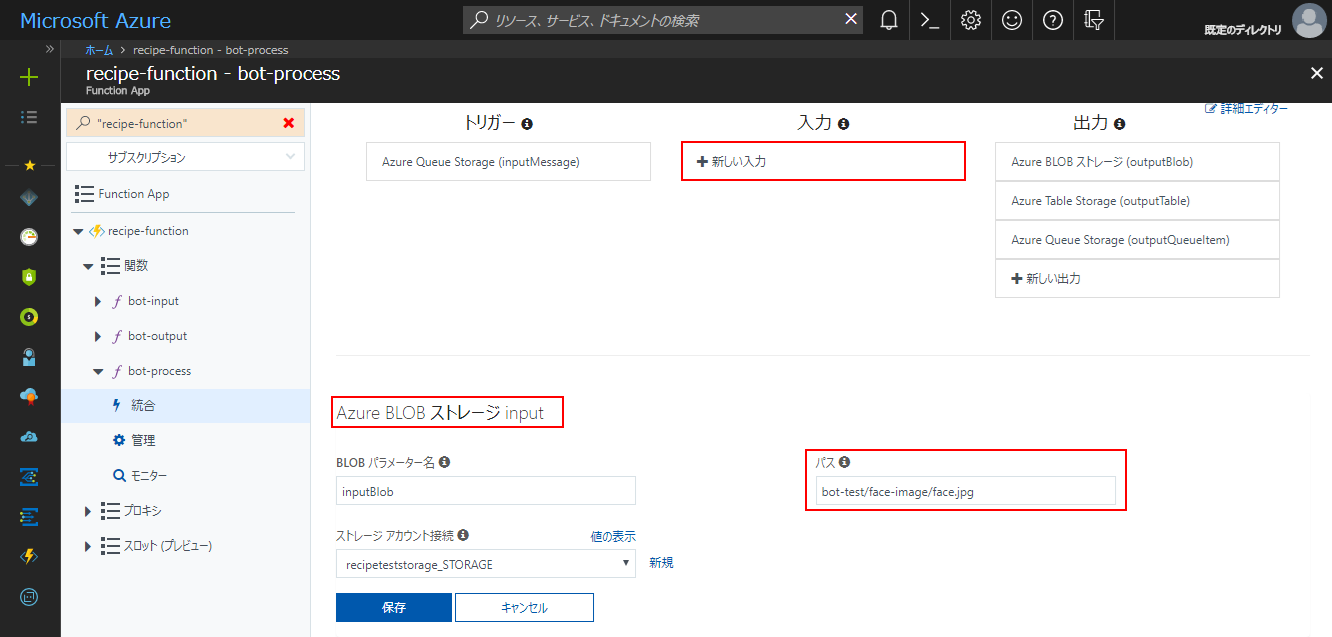
貼り付ける顔画像を取得するためのバインドを設定します。
画像処理用の関数の「統合」メニューで「+新しい入力」をクリックし、「Azure BLOB ストレージ」バインドを選択します。
「Azure BLOB ストレージ input」のパスには、先ほどの画像を保存したBlob Storageのパスを指定し、保存をクリックします。
ライブラリのインストール
PythonライブラリをAzure Functionsにインストールします。
今回は、Pythonの画像処理ライブラリ「Pillow」を使ってコラ画像を作成するため、KuduのCMDコンソールで下記のコマンドを入力し、「Pillow」をインストールします。
※ ライブラリのインストールに関してはこちらの記事 も参照ください。
|
1 |
D:\home\site\tools\python.exe -m pip install Pillow |
スクリプト
スクリプトは以下のように作成しました。
|
1 2 3 4 5 6 7 8 9 10 11 12 13 14 15 16 17 18 19 20 21 22 23 24 25 26 27 28 29 30 31 32 33 34 35 36 37 38 39 40 41 42 43 44 45 46 47 48 49 50 51 52 53 54 55 56 57 58 59 60 61 62 63 64 65 66 67 68 69 70 71 72 73 74 75 76 77 78 79 80 81 82 83 84 85 86 87 88 89 90 91 92 93 94 95 96 97 98 99 100 101 102 103 104 105 106 107 108 109 110 111 112 113 114 115 116 117 118 119 120 121 122 123 124 125 126 127 128 129 130 131 132 133 134 135 136 137 138 139 140 141 142 143 144 145 146 147 148 149 150 151 152 153 154 155 156 157 158 159 160 161 162 163 164 165 166 167 168 169 170 171 172 173 174 175 176 177 178 179 180 181 |
# coding: utf-8 # 1. ライブラリの読み込み import os, json import imghdr import urllib.parse import urllib.request import hashlib import io from PIL import Image # バインド設定の読み込み with open(os.path.dirname(__file__) + "/function.json", "r") as f: bindings = json.load(f) bindings = {bind["name"]: bind for bind in bindings["bindings"]} # Face APIキー情報 face_api_key = "{API Key}" face_api_endpoint = "https://japaneast.api.cognitive.microsoft.com/face/v1.0" # Face APIへのリクエスト def detect_face_from_data(api_key, body, endpoint_or_location="japaneast", returnFaceId=True, returnFaceLandmarks=False, returnFaceAttributes=[]): # URL生成 params = urllib.parse.urlencode({ "returnFaceId": returnFaceId, "returnFaceLandmarks": returnFaceLandmarks, }) if returnFaceAttributes != []: params["returnFaceAttributes"] = ",".join(returnFaceAttributes) if "http" in endpoint_or_location: url = "{}/detect?{}".format(endpoint_or_location, params) else: url = "https://{}.api.cognitive.microsoft.com/face/v1.0/detect?{}".format(endpoint_or_location, params) # リクエストヘッダ headers = { "Ocp-Apim-Subscription-Key": api_key, "Content-Type": "application/octet-stream" } # HTTPリクエスト req = urllib.request.Request(url, data=body, headers=headers) try: with urllib.request.urlopen(req) as res: res_json = json.loads(res.read()) except urllib.error.HTTPError as err: print(err.code) print(err.read()) res_json = [] except urllib.error.URLError as err: print(err.reason) res_json = [] return res_json print("Function Start. ID:" + os.environ["INVOCATIONID"]) def handler(): # メッセージ読み込み with open(os.environ["inputMessage"], "r") as f: input_msg = json.load(f) # コンテンツのダウンロード print("Downloading input image") dl_url = input_msg["img_url"] req = urllib.request.Request(dl_url) with urllib.request.urlopen(req) as res: img_bytes = res.read() # 実行履歴の取得 output_path = bindings["outputBlob"]["path"].format(blob_path=input_msg["blob_path"]).split("/") container = output_path[0] blob_path = "/".join(output_path[1:]) img_name = output_path[-1] img_md5 = hashlib.md5(img_bytes).hexdigest() # 画像フォーマット判定 print("Checking input image format") img_format = imghdr.what(None, h=img_bytes) if img_format in ["jpeg", "png", "bmp", "gif"]: # 顔を検出 print("Detecting Faces") detected_faces = detect_face_from_data(face_api_key, img_bytes, endpoint_or_location=face_api_endpoint) if len(detected_faces): result_message = "%s face(s) datected." % len(detected_faces) else: result_message = "No faces detected." print(result_message) # 2. 画像データをPillowの形式に変換 img_pil = Image.open(io.BytesIO(img_bytes)) img_raw_face = Image.open(os.environ["inputBlob"]) for face_info in detected_faces: # 3. 検出した顔の位置・サイズ情報を取得 face_rect = face_info["faceRectangle"] # 4. 顔画像のリサイズ paste_face = img_raw_face.copy() paste_face.thumbnail((face_rect["width"], face_rect["height"]), Image.ANTIALIAS) # 5. 顔画像の貼り付け img_pil.paste(paste_face, (face_rect["left"], face_rect["top"])) # 6. 画像の出力 img_pil.save(os.environ["outputBlob"], img_format.upper(), quality=100) #with open(os.environ["outputBlob"], "wb") as fw: # 置き換え #fw.write(img_bytes) # 出力メッセージの設定 result = { "status": "ok", #"message": "Image is uplaoded.", "message": result_message, "container": container, "blob_path": blob_path, "filename": img_name, "content_md5": img_md5, "input": input_msg } else: # 出力メッセージの設定 result = { "status": "error", "filename": img_name, "content_md5": img_md5, "input": input_msg, } if img_format is None: result["message"] = "Input file is not image." else: result["message"] = "Unsupported image format." # キューメッセージの出力 print("Output Queue Message") with open(os.environ["outputQueueItem"], "w") as fw: json.dump(result, fw) # 実行履歴の書き込み print("Insert Log to Table") insert_entity = {key: val for key, val in result.items()} insert_entity.update({ "PartitionKey": "results", "RowKey": os.environ["INVOCATIONID"] }) with open(os.environ["outputTable"], "w") as fw: json.dump(insert_entity, fw) return if __name__ == "__main__": handler() |
スクリプトの説明
- ライブラリの読み込み
必要なライブラリを読み込みます。
画像処理用の「Pillow」とBytes型で保持している画像データをPillowで読み込めるように「io」を追加しています。 - 画像データをPillowの形式に変換
Bytes型の画像データをPillowで読み込みます。
ここで、顔画像も同時に読み込んでおきます。 - 検出した顔の位置・サイズ情報を取得
Face APIで顔を検出した顔のサイズを取得します。
検出結果の「faceRectangle」キーから、顔の左上端の座標と顔の幅・高さのピクセル数が取得できます。 - 顔画像のリサイズ
貼り付ける顔画像を貼り付け先の顔のサイズにリサイズします。 - 顔の貼り付け
リサイズした顔画像を貼り付けます。 - 画像の出力
Pillowで加工した画像データを保存します。
Pillowから画像の保存ができるため、画像出力のスクリプトを置き換えています。
実行結果
Slackのチャンネルに画像のURLを投稿するとコラ画像が返ってきます
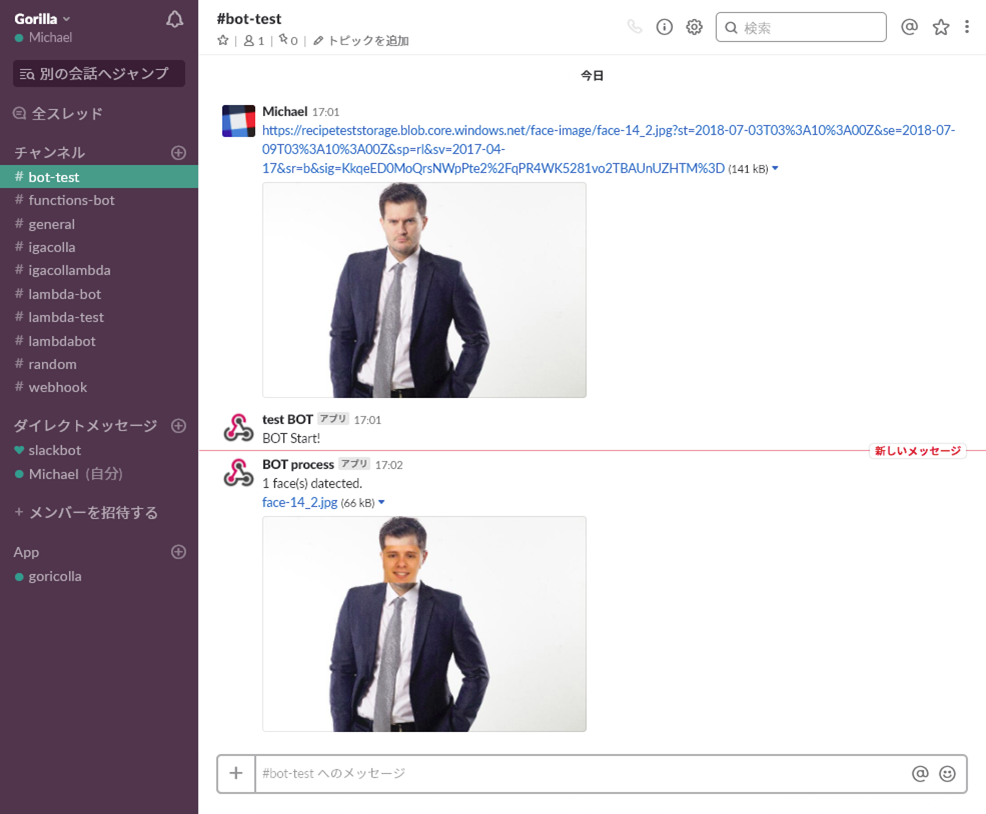
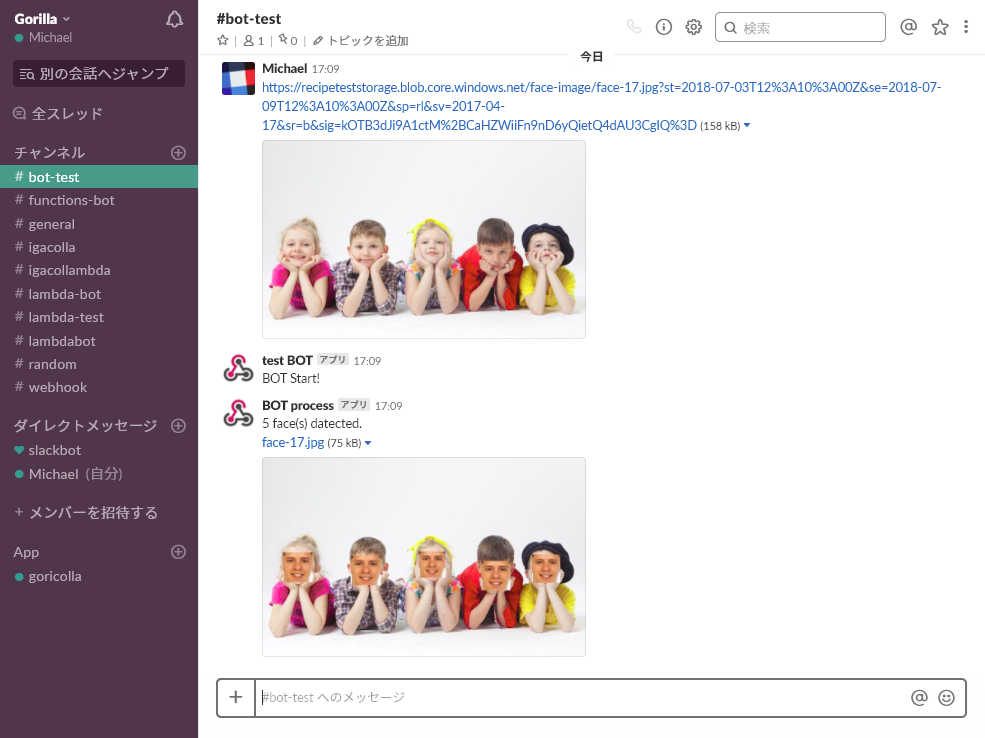
同様に画像を5人の子供の写真に変更しても、雑コラされた
まとめ
「雑コラBot」の紹介含め8回にわたった「雑コラBotを作ろう」は、今回の雑コラBot完成でようやく最終回となりました。このBotを使えば、たくさんのコラ画像を効率的に作成でき、業務最適化に役立てられます。
「雑コラ」なんてしないという方も、これまでに紹介した設定はAzure Functionsを使用する上での基本的なものであるため、Azure Functionsを使う場合にはぜひ参考にしてみてください。
ちなみに完成した「雑コラBot」は、記事作成の過程でパフォーマンス最適化を行ったことで、最初に紹介した雑コラBotと比較してレスポンス時間が1/3~1/2程度まで短縮されました。
次回は、Azure Functionsのパフォーマンス最適化について検証していきます。
